To avoid these ads, REGISTER NOW!

Vise soft jaws

vintage nut

Well-known member
Joined
Mar 17, 2015
Messages
1,272
Location
west coast of canada
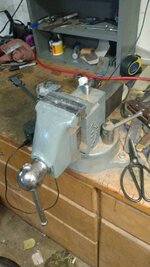
The main vise out of my collection I actually use is a rock island 851 dual swivel. I've always been a fan of sheet lead soft jaws, as my usual work (custom knives, and gun repairs) really can't get chewed up. The only problem with the lead jaws is they don't hold round object that will be subjected to a fair bit of torque very well. The last time I used copper jaws was making a set in grade 9 metal shop, and they fell off constantly. I patterned these off my usual lead covers I make for every vise I own.
df2e1ce13bd9c4d18672b8c16ef7a483.jpg

Anyways, enough of the background, time for building something.

First up the raw material, a sheet of 0.064" copper
bf51bfd276ac1414a85dd50f67d61771.jpg
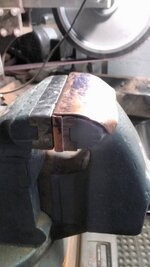
Next the layout. I actually forgot to take pictures of this, so here it is after cutting out on the bandsaw.
9ecab6d7bbee774c7082f6483c3a1a42.jpg
Now for some dimensions. Obviously these vary with your vise. In general you want 1/4" sticking out past each side of the jaws, and a long enough piece over the top to fold over as you'll see.
My rock island's jaws are 3.5"x1.125', so I started by laying that out. Add in the side folding material, and I cut them 4" wide. For this vise I need about 1.75" to fold the top how I like it.
9a9a6a49be1492610fae0635e11f5d16.jpg 29cf4c11cf55c7e03a4f1c6da92a0396.jpg

Sent from my MotoG3 using Tapatalk
 

Attachments

  • df2e1ce13bd9c4d18672b8c16ef7a483.jpg
    df2e1ce13bd9c4d18672b8c16ef7a483.jpg
    72.2 KB · Views: 0
  • 29cf4c11cf55c7e03a4f1c6da92a0396.jpg
    29cf4c11cf55c7e03a4f1c6da92a0396.jpg
    82.5 KB · Views: 0
  • 9a9a6a49be1492610fae0635e11f5d16.jpg
    9a9a6a49be1492610fae0635e11f5d16.jpg
    67.6 KB · Views: 0
  • 9ecab6d7bbee774c7082f6483c3a1a42.jpg
    9ecab6d7bbee774c7082f6483c3a1a42.jpg
    81.2 KB · Views: 0
  • bf51bfd276ac1414a85dd50f67d61771.jpg
    bf51bfd276ac1414a85dd50f67d61771.jpg
    74.8 KB · Views: 0
To avoid these ads, REGISTER NOW!
OP
V

vintage nut

Well-known member
Joined
Mar 17, 2015
Messages
1,272
Location
west coast of canada
Now the bandsaw doesn't leave the best looking edges, so I debur everything on a scotchbright belt. The contact wheel isn't necessary, slack belt or platten will work fine. I was just doing hollow grinds yesterday and didn't change it out
9cb10db2522af91f22cb02e2ebb2b875.jpg 1b9fa708cd2d3b5b1d836b15e25a776e.jpg
b26cbf690eb5d88e4d96dc958ebcd1f0.jpg
Camera didn't want to focus on the edges again, but it smoothed them out nicely.

Sent from my MotoG3 using Tapatalk
 

Attachments

  • b26cbf690eb5d88e4d96dc958ebcd1f0.jpg
    b26cbf690eb5d88e4d96dc958ebcd1f0.jpg
    47.1 KB · Views: 0
  • 1b9fa708cd2d3b5b1d836b15e25a776e.jpg
    1b9fa708cd2d3b5b1d836b15e25a776e.jpg
    84.4 KB · Views: 0
  • 9cb10db2522af91f22cb02e2ebb2b875.jpg
    9cb10db2522af91f22cb02e2ebb2b875.jpg
    45.6 KB · Views: 0
OP
V

vintage nut

Well-known member
Joined
Mar 17, 2015
Messages
1,272
Location
west coast of canada
Now for some shaping. I used a tinner's hammer, and the round face of an auto body hammer. 82c7e98bdfec8b2aa37158d22972da46.jpg
Keeping the faces well polished will avoid a lot of unnecessary marks on your project
c52e201bd440d599ae350ab820d7650a.jpg
Start by lining up the blank in the vise it's for. Your layout lines should be right on the edges of the jaws
b2efff2448f11b761daf7cbe4bfaf828.jpg
I like to start by folding the sides down. I used the tinner's hammer for this. The key to this style of jaws is getting everything fit nice and tight. They will snap on and stay in place if you get it right. af7d4ca9e0dc20100b5048cb4993e00d.jpg
Next comes the top. I used a combination of both hammers for this. The cross pein on the tinner's hammer was used to bend the corners down, and the body hammer was used to smooth everything out
04ff88f97f1f13f1a5618ec9edef9cca.jpg
ec3c71d95d77a523bd4ee14bfdd15574.jpg

Sent from my MotoG3 using Tapatalk
 

Attachments

  • 82c7e98bdfec8b2aa37158d22972da46.jpg
    82c7e98bdfec8b2aa37158d22972da46.jpg
    68.8 KB · Views: 0
  • c52e201bd440d599ae350ab820d7650a.jpg
    c52e201bd440d599ae350ab820d7650a.jpg
    59.5 KB · Views: 0
  • b2efff2448f11b761daf7cbe4bfaf828.jpg
    b2efff2448f11b761daf7cbe4bfaf828.jpg
    66.2 KB · Views: 0
  • af7d4ca9e0dc20100b5048cb4993e00d.jpg
    af7d4ca9e0dc20100b5048cb4993e00d.jpg
    60.9 KB · Views: 0
  • 04ff88f97f1f13f1a5618ec9edef9cca.jpg
    04ff88f97f1f13f1a5618ec9edef9cca.jpg
    52.5 KB · Views: 0
  • ec3c71d95d77a523bd4ee14bfdd15574.jpg
    ec3c71d95d77a523bd4ee14bfdd15574.jpg
    49.9 KB · Views: 0

General Geoff

Well-known member
Joined
Jan 12, 2013
Messages
3,873
Location
Allentown, Pennsylvania
Good work, they look a lot more well-planned than the ones I made out of some copper pipe. :)

20160925091101-8022b8f9-me.jpg
 
OP
V

vintage nut

Well-known member
Joined
Mar 17, 2015
Messages
1,272
Location
west coast of canada
Here's the set of jaws after shaping. They are ready to use, but could look better
b184c14a53e6d8e146ebee28864e3eda.jpg
12" hard spiral sewn wheel makes quick work of it. You can move a lot more metal than expected on a large buffer. Put enough weight into it and the metal starts flowing on a microscopic level. Amazing what you can make disappear. If I was starting my shop over, I'd want a buffer with at least 2hp and 18" wheels
bc7d8eb1441d3824b099125ddd63e3fd.jpg
And done!
Look a lot nicer than my lead jaws, but probably won't stay that way for long
0f3dc29255708c99e1963f9bf04dc26b.jpg0cbde786b0f8a951d33fcc7f43b56615.jpg

Sent from my MotoG3 using Tapatalk
 

Attachments

  • b184c14a53e6d8e146ebee28864e3eda.jpg
    b184c14a53e6d8e146ebee28864e3eda.jpg
    59.7 KB · Views: 0
  • bc7d8eb1441d3824b099125ddd63e3fd.jpg
    bc7d8eb1441d3824b099125ddd63e3fd.jpg
    72.7 KB · Views: 0
  • 0f3dc29255708c99e1963f9bf04dc26b.jpg
    0f3dc29255708c99e1963f9bf04dc26b.jpg
    74.9 KB · Views: 0
  • 0cbde786b0f8a951d33fcc7f43b56615.jpg
    0cbde786b0f8a951d33fcc7f43b56615.jpg
    69.7 KB · Views: 0
To avoid these ads, REGISTER NOW!
OP
V

vintage nut

Well-known member
Joined
Mar 17, 2015
Messages
1,272
Location
west coast of canada
Good work, they look a lot more well-planned than the ones I made out of some copper pipe. :)

20160925091101-8022b8f9-me.jpg
Nice to see someone else spelling the name the way I do haha
And nothing wrong with those!
It took me a fair bit of experimenting with different things to settle on this design. Pretty much anything will work though.
Yours look similar to the ones I made in highschool. Fit on a 4" record I no longer use. Unfortunately they were designed more as a project to teach people how to use a sheetmetal brake, rather than as good soft jaws... Fell off everytime you opened the vise.
Seems every shop has its own style soft jaws. Pretty much anything will work, just depends what you're used to.
My dad usually uses aluminum angle, or plywood. Regional thing too. North America copper seems common. Lead is more common in Europe.

Sent from my MotoG3 using Tapatalk
 

Keel

Banned
Joined
Jun 12, 2015
Messages
1,917
Location
LaLaLand
Nice..
I made mine out of 1/4" alum, drilled the back side and added/glued in a few magnets so they don't fall out.. magnets line up with vice jaw counter sunk screws
I will be making my own soon that will be 1/2 thick.. with my home foundry and cat food cans.. Gotta make dealing with the wife's cat worth it.. :lol:

Will drill these also to add magnets to the back..

I may even try to make copper ones out of scrap copper pipe.
If it wasn't so deadly to do, I'd melt some lead roof flashing and make a set of those also.. but breathing in that is bad juju. and I'd not trust my respirator mask for that.. If I could borrow a fresh air system like autobody guys use and a full suit then ya, but it's really not worth the risk.
 
Last edited:
OP
V

vintage nut

Well-known member
Joined
Mar 17, 2015
Messages
1,272
Location
west coast of canada
Aluminum works good. My dad's favorite soft jaws are aluminum angle with some of the sticky back fridge magnet stuff on the underside of the top.

As for lead, don't worry about it at all. Between bullet casting and making hammers for the shop, I've done a lot of it. The problem is the myths surrounding it. Lead doesn't put off vapors until it's boiling, which is at about 2000 degrees. Not only would the average camp stove or plumbers furnace have no chance of doing that, your pot would be glowing white before the lead started putting anything off.
Basically heat it until the lead melts and then pour. If you keep heating it the surface will start turning purple. It's not dangerous, but it's a sign you can back off on the heat.

The things to worry about with lead are dust, battery lead, and oxides. If the lead is white or yellow, you want to put some gloves on. Metallic lead won't absorb through your skin, the oxides will. However it still doesn't hurt to wear gloves, to avoid contamination of other things.

The basic rules to do it safely are no smoking (dust can get in your cigarette/cigar and vaporize), wash your hands before touching your face or eating, and don't do things that create dust. Files and hacksaws are fine. Belt sander should be avoided.

I did a thread at least a year or two ago on lead hammer casting. I've since updated my process, and am actually making a new mold as we speak. I'll be doing a new thread in the next week or two.

Don't fear lead, just don't be stupid with it.

Although if you have sheet lead, you may as well make a set of the sort of lead jaw covers I usually use. Love them for work on finished surfaces

Sent from my MotoG3 using Tapatalk
 

T45

Well-known member
Joined
Nov 20, 2014
Messages
3,252
nice thread OP, appreciate taking the time to show all of your work...
 
To avoid these ads, REGISTER NOW!
Top Bottom