To avoid these ads, REGISTER NOW!

Vises refurbished

obj

Active member
Joined
Nov 10, 2014
Messages
34
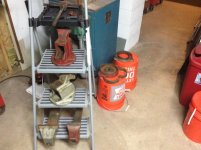
Hello folks, Thought I would toss up a few (or many) pictures of some vises got off of Craigslist last year. It was great, lady was less then 1/2 hour away from house and went to look at just one, buy said what the hell and bought all three.

Paid about $100 bucks for all of them, didn't think that was a bad deal.

**This might turn out to be a long *** post..might do multiple so spread out a bit...so if you want to scroll just to the pics...thats the meat and potatoes anyway.**

The 3 vises are:

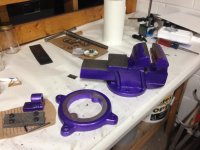
*ONE* -small 4" vise, no markings, this one is already completed...didn't think to take many pics of the restore on that. Cleaned up this little guy first, wanted my GF to have her own little vise lol. SO when you see the Purple Shimmer Metallic...you know now ;)

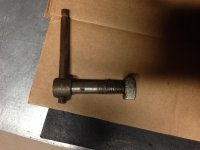
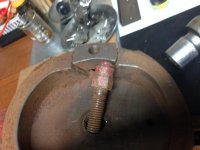
Everything went smooth, only problems were the jaw screws. Ended up chewing up the philips head, tried screw extractors...no go, just chewed up more.

Lucky in the end was able to gently hammer a square drive bit in and came out slow and easy.

Also went to 5 different hardware stores to find new jaw screws.
I am not sure if these screws were made in house, but could not match it.
The closest I got and went with were some black metric screws that needed the threads sanded lightly and to fit well.

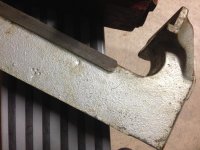
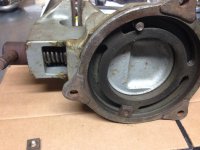
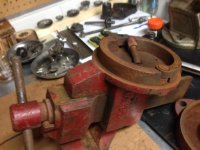
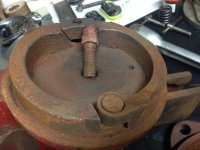
Did the body and slide in the sandblaster, the chromed (or what is left of) parts soaked in some vinegar for a few days.

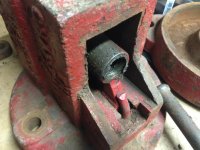
Red primer, white coat, then Purple Shimmer Metallic and stamped in my girls nickname I have for her lol
 

Attachments

  • IMG_5558.jpg
    IMG_5558.jpg
    137.5 KB · Views: 122
  • Photo Mar 28, 06 17 50.jpg
    Photo Mar 28, 06 17 50.jpg
    146.2 KB · Views: 133
Last edited:
To avoid these ads, REGISTER NOW!
OP
O

obj

Active member
Joined
Nov 10, 2014
Messages
34
NEXT UP...The 2 Works-In-Progress

*TWO*-large 6" vise, only markings are "150" on both sides and on the slide (or dynamic jaw/slide...ooohhh) is a slash with 3 dots above it (see pics below)

Came apart nice and easy, main screw guide (?) molded into body unlike other two that are separate parts. My fathers birthday is coming up and decided as a more special gift to refurbish this one and give it to him. He already has a vise, but has another nice beefy bench welded-up-himself bench...it looks so barren on top...it needs a vise......

Plan on blasting the body and slide in the sand cabinet. Have the main screw/handle, along with jaws/some other parts cooking in 5g bucket with some electrolysis going on.

Only issue with this is the paint I have (want to use up,not buy more).
Plan on spraying bare metal with Rustoleum Red Primer (red oxide?), then use some Duplicolor Acrylic Lacquer..nicest one I think he would like, it is a light metallic blue. The thing is I think I have to let the sh*t dry for a solid week before throwing on the coats of lacquer...from some research think it is doable.

On a side note: My father is from Canada, and we also have a special brand of humor between us..decreed name to be painted on vise will be updated in the future.....
 

Attachments

  • pops02.jpg
    pops02.jpg
    145.6 KB · Views: 54
  • pops07.jpg
    pops07.jpg
    143.5 KB · Views: 58
  • pops10.jpg
    pops10.jpg
    142.5 KB · Views: 71
  • pops05.jpg
    pops05.jpg
    142.9 KB · Views: 54
  • pops01.jpg
    pops01.jpg
    140.2 KB · Views: 56
OP
O

obj

Active member
Joined
Nov 10, 2014
Messages
34
And lastly...

*THREE*-large 4" vise, markings..all over it..Chas. Parker...CT, no.974, Parker on part above main screw handle, and I think "88" on the body, under jaws when jaws were removed.

This baby is mine ;) Came apart easily up until jaw removal. Tons of 3-in-1 oil, PB blaster, blocks of wood, scraps of leather and some very gentle torch heat...and was able to free them. Had to knock out the pins before attempting to remove the jaws. Pins were actually rolled up pieces of metal ribbon/sheet metal...not sure if this how it came.

It was handy that I have some tools from my father, who used to work on big rigs.
3/4" drive ratchet and a 1 3/16" socket in 3/4", not a problem.

The wrench handle is broken, but going to leave it like that so it doesn't forget its roots and also gives it some character...who am i kidding, I need a replacement wrench asap.

One thing I was surprised not to see on the Charles Parker no.974 was a spring for the main screw. The others had a spring and a cotter pin holding it in place. I am pretty sure it didn't come with one. The main screw shafts on the others had a hole for the cotter pin to slide into,not on this one.

With the paint, will probably do some red primer and go with some basic red..although black is nice.

Same as previous, going to toss this in the sand cab, some parts in electrolysis now. I decided to go the sand blasting route with all the bodies and slides for a few reasons:

- Some parts tons of grease on it..damn near impossible (well maybe If I had a parts washer or something) to get ALL the grease off. Electrolysis and vinegar do not work through grease/oil/etc.

-Electrolysis will not remove paint that is good (sometimes) so in this case I wanted to strip it...zapping it will be a waste of time

-If anything sandblasting will clean up rough spots on the casting a bit..only thing if some grease is left around and not blown off in the nooks and crannies...sand impregnated grease, lovely.

So enough talk from me. If you folks actually read all this ****, you have more patience then I do lol. Hope you guys found this of interest, I will post some follow up picks of the last two vises all cleaned up and in a couple of weeks of the finished products. Now for the rest of the pics:
 

Attachments

  • chas07.jpg
    chas07.jpg
    140.9 KB · Views: 50
  • chas06.jpg
    chas06.jpg
    142.8 KB · Views: 51
  • chas05.jpg
    chas05.jpg
    141.1 KB · Views: 54
  • chas04.jpg
    chas04.jpg
    134.8 KB · Views: 59
  • chas03.jpg
    chas03.jpg
    140.3 KB · Views: 55
  • chas02.jpg
    chas02.jpg
    141.2 KB · Views: 59
  • chas01.jpg
    chas01.jpg
    141.9 KB · Views: 76
Last edited:
OP
O

obj

Active member
Joined
Nov 10, 2014
Messages
34
...and more pics
 

Attachments

  • all05.jpg
    all05.jpg
    144.4 KB · Views: 41
  • all04.jpg
    all04.jpg
    144.9 KB · Views: 48
  • all03.jpg
    all03.jpg
    149.1 KB · Views: 42
  • all02.jpg
    all02.jpg
    142.6 KB · Views: 43
  • all01.jpg
    all01.jpg
    143.7 KB · Views: 41
  • chas09.jpg
    chas09.jpg
    141.4 KB · Views: 51
  • chas08.jpg
    chas08.jpg
    141.9 KB · Views: 44
OP
O

obj

Active member
Joined
Nov 10, 2014
Messages
34
and the last
 

Attachments

  • all06.jpg
    all06.jpg
    142.1 KB · Views: 34
  • all07.jpg
    all07.jpg
    142.7 KB · Views: 28
  • all08.jpg
    all08.jpg
    138.2 KB · Views: 29
To avoid these ads, REGISTER NOW!

Sawdustmaker

Well-known member
Joined
Jan 15, 2017
Messages
928
Location
Placentia, Orange Co., California
Good find on the vises. I have a 4" I need to restore. I don't have a blast cabinet, but think one of my neighbors does. I've notice some guys on the forum use glass beads instead of sand on a vise.
As far as grease and oil go. I've had good luck using 409 or Dawn dish soap, hot water and a stiff brush. Also with the products called Oil Eater (Amazon) and another called Krud Kutter (Home Depot).
Good luck on the rebuild. Looking forward to pics.
 

Mark in Indiana

Well-known member
Joined
Aug 11, 2010
Messages
3,057
Location
Southern Indiana
obj:
Great find on your vises. Also, looks like you have a good handle on your restorations.

Your first vise is likely a Chinese made vise.

Your second vise is a Bison 1250-150. Manufactured by Bison-Bial, a top shelf, Polish manufacture of work holding accessories for machine tools and vises.
http://www.bison-bial.com/vises/bench-vises
Likely, you can find the word POLAND stamped on handle end of the spindle. Also, there should be a date stamp on top of one of the jaws.
Great gift for your Dad!

On your third vise, you should be able to get a "vise wrench" to replace your broken one from KM Scott, a GJ member who makes vise parts, or I often see them on e-bay.

As far as removing the grease, I have a small parts tank filled with Kerosene for soaking. Removing the paint, I spray down the painted parts with EZ OFF, keep the sprayed down for 8 - 10 hours, wipe off the excess, then clean up with a braided wire wheel. There may be better ways, but that's what works for me.

BTW: I'm a huge fan of Chas. Parker and Bison vises. :thumbup:

Happy Trails
 
OP
O

obj

Active member
Joined
Nov 10, 2014
Messages
34
Thank you Mark in Indiana for the info on the vises.Also thank you Kevin54 and asked mod to move this post here...most certainly a better location ;) Thank you other folks for posting to this post (that sounded strange)

Thought I would post some more pics of the vises stripped and painted.

My dads vise came out pretty good I think. I really like the blue color..again my dads from Newfoundland, Canada so take note of the name I painted on: )

Got lazy and decided to leave the Chas. Parker stripped. Ironically, I think it took about as much time to hit it with a real soft wire wheel as painting would have.
Put a nice coat of paste wax on it..hopefully that will keep the rust at bay. Main screw and moving parts got a heavy coat of synthetic grease (think it shown in one of the pics)

And thats it..time for some pics.
 

Attachments

  • Photo Apr 12, 19 58 10.jpg
    Photo Apr 12, 19 58 10.jpg
    138.7 KB · Views: 30
  • Photo Apr 09, 10 28 55.jpg
    Photo Apr 09, 10 28 55.jpg
    136.4 KB · Views: 50
  • Photo Apr 09, 10 28 42.jpg
    Photo Apr 09, 10 28 42.jpg
    143.5 KB · Views: 30
  • Photo Apr 03, 18 20 15.jpg
    Photo Apr 03, 18 20 15.jpg
    142.9 KB · Views: 23
  • Photo Apr 03, 14 55 47.jpg
    Photo Apr 03, 14 55 47.jpg
    143.1 KB · Views: 20
  • Photo Apr 03, 14 45 28.jpg
    Photo Apr 03, 14 45 28.jpg
    144.7 KB · Views: 22
  • Photo Apr 03, 14 44 57.jpg
    Photo Apr 03, 14 44 57.jpg
    142.5 KB · Views: 22
OP
O

obj

Active member
Joined
Nov 10, 2014
Messages
34
and the rest
 

Attachments

  • Photo Apr 14, 05 15 22.jpg
    Photo Apr 14, 05 15 22.jpg
    138.8 KB · Views: 24
  • Photo Apr 14, 05 15 28.jpg
    Photo Apr 14, 05 15 28.jpg
    140.5 KB · Views: 28
  • Photo Apr 14, 05 15 37.jpg
    Photo Apr 14, 05 15 37.jpg
    143.6 KB · Views: 25
  • Photo Apr 14, 05 15 52.jpg
    Photo Apr 14, 05 15 52.jpg
    143.6 KB · Views: 35
  • Photo Apr 14, 05 16 25.jpg
    Photo Apr 14, 05 16 25.jpg
    143.6 KB · Views: 36
  • Photo Apr 14, 05 19 13.jpg
    Photo Apr 14, 05 19 13.jpg
    141.9 KB · Views: 36
To avoid these ads, REGISTER NOW!
Top Bottom