To avoid these ads, REGISTER NOW!

Visible Pump Restoration

Private Lugnutz

Well-known member
Joined
Mar 30, 2012
Messages
30,543
Location
The Authentic Jersey Shore
Are you restoring it to its original condition? Or are you restoring it to the condition it may have been in when your in-laws used it on the farm? The sign (added post-war, maybe as late as the 70's?) is a cool touch, demonstrating the pump's long history, but it's not original, and you've already replaced the un-original Sinclair DINO globe, so getting rid of the LEAD WARNING sign would be consistent. But I can see you keeping it. You could always split the diff: put the sign on a chain or something that does not mar the pump itself.
 
To avoid these ads, REGISTER NOW!
OP
T

turbowoodworker

Well-known member
Joined
Mar 18, 2012
Messages
3,532
Location
Apex NC
Well, Lugz, this isn't a numbers matching split window. I always try to be true but some hoops are better left unjumped. For instance, the Standard pumps were all red or mostly red. I already decided to go with something different, mostly white with red and blue accents (blue bonnet and base, red striping along waist and vertical seams).

So I'm already bending the rules, but I like the result. I just wasn't sure about the "lead" signage. Since I have it, I will probably place it on the back side.

Thanks for your opinion and feedback.

BTW, Lugz, I really value your input on all the vintage tool threads. Thanks.

Rick
 
OP
T

turbowoodworker

Well-known member
Joined
Mar 18, 2012
Messages
3,532
Location
Apex NC
One other example of bending the rules. I am using stainless hardware to cut down on long term rust stains on white paint. It is a little difficult finding slot drive fasteners in stainless, but they are obtainable. I cringe when I see Phillips screws on a project like this, or pop rivets holding on the placards. Just call me weird. Sometimes I bend the rules, some are wholeheartedly ignored. Others are deal breakers.

:beer:
 

thehorse13

Well-known member
Joined
Mar 15, 2015
Messages
3,477
Location
Jefferson County, WV
I'm liking the results so far. You're learning the ropes the same way that many of us have. Dropped into a situation and then figure out how to get things done. You know the old saying, you learn 10 times more when you do something wrong than when you do it right.

Anyhow, keep the pictures coming. This is the kind of thread that makes this place worthwhile to me. :)

A quick note on sandblasting services. 200 bucks is worth it. A bag of material is 50 bucks alone and if you tried to get those tins done by hand, you'd spend a hell of a lot of time and money on materials.
 
OP
T

turbowoodworker

Well-known member
Joined
Mar 18, 2012
Messages
3,532
Location
Apex NC
Horse, thanks for the comments. This was my first experience with sand or media blasting so I had no reference point but I recognize the time and sweat it saved me...priceless. Plus they get it all whereas I would have had difficulty getting nooks and crannies.

Putting on a clear coat today then more assembly. Gonna be plenty warm for paint today in NC for a change.

Don, thanks for stopping by. Do you notice any project similarities with the work you put into your Ferris wheel seat?
 
OP
T

turbowoodworker

Well-known member
Joined
Mar 18, 2012
Messages
3,532
Location
Apex NC
So I've been working on paint and reassembly. The original and probably period correct color for this pump would have been all red. I wanted something a little different so I went with the later pattern for Standard Oil of red, white and blue.
 

Attachments

  • IMG_1878.jpg
    IMG_1878.jpg
    118.9 KB · Views: 46
  • IMG_1925.jpg
    IMG_1925.jpg
    134.9 KB · Views: 57
OP
T

turbowoodworker

Well-known member
Joined
Mar 18, 2012
Messages
3,532
Location
Apex NC
I started the assembly of the pump to the base, base to the supporting plumbing and the cylinder base.
I threaded some 5/16" brass rod for the supports to replace the rotten iron ones.
Mocking up the top to ascertain conduit length and electrical. Back side of pump skin is in place now.
 

Attachments

  • IMG_1940.jpg
    IMG_1940.jpg
    76.9 KB · Views: 78
  • IMG_1941.jpg
    IMG_1941.jpg
    107 KB · Views: 78
  • IMG_1943.jpg
    IMG_1943.jpg
    66.1 KB · Views: 73
  • IMG_1939.jpg
    IMG_1939.jpg
    84.7 KB · Views: 84
OP
T

turbowoodworker

Well-known member
Joined
Mar 18, 2012
Messages
3,532
Location
Apex NC
Working on the two original brass placards. They appear in previous posts but represent the 1) ownership by SO of NJ, and 2) the NC licensure plaque.

The placards are very thin, just between the thickness of foils and a tin can lid, and they are beat up and cracked. Help me out here. How would you preserve these with the intent of placing them back on the pump?

My thought was to use a slightly thicker sheet of brass and solder the placard to a suitable sized and shaped "backing" that would then support the rather fragile piece. Any suggestions?
 

Attachments

  • IMG_1945.jpg
    IMG_1945.jpg
    124.3 KB · Views: 48
  • IMG_1948.jpg
    IMG_1948.jpg
    113.3 KB · Views: 40
  • IMG_0235.jpg
    IMG_0235.jpg
    132.6 KB · Views: 36
  • IMG_0233.jpg
    IMG_0233.jpg
    156.7 KB · Views: 46

Private Lugnutz

Well-known member
Joined
Mar 30, 2012
Messages
30,543
Location
The Authentic Jersey Shore
I like the backing idea, turbo. If the pieces are that brittle, I'd be tempted to just use a few spots of an epoxy. If you solder it to the backing, you have to use a very low temperature tin and silver bearing solder and keep the heat concentrated only on the spots you are spot soldering.

As for cleaning, there are probably all kinds of products to choose from now but I still use Brass-o. It's not super aggressive, so you could put it on thin and wipe it off with just a rag, in layers, if you're looking to preserve some of the patina. Or you could put it on thick, let it sit, and rub it with 0000 steel wool and then wipe it off with a rag if you want to get down to bright and shiny.
 
OP
T

turbowoodworker

Well-known member
Joined
Mar 18, 2012
Messages
3,532
Location
Apex NC
Updates:

I tried my hand at soldering the thin brass placards to a brass backer. Did not work as I could not get the solder to tin with the brass. Wrong flux? Wrong temperature? Not sure but rather than experimenting and risk damaging the irreplaceable placards, I went with the GJ suggestion of JB weld. Turned out much better. Even the loose remnant was affixed and mounted well to the pump.

Before and after mating to brass backer:
 

Attachments

  • IMG_1947.jpg
    IMG_1947.jpg
    110.9 KB · Views: 35
  • IMG_1969.jpg
    IMG_1969.jpg
    133.1 KB · Views: 42
  • IMG_1972.jpg
    IMG_1972.jpg
    73 KB · Views: 52
OP
T

turbowoodworker

Well-known member
Joined
Mar 18, 2012
Messages
3,532
Location
Apex NC
Most of the electrical is done except the light fixtures up top. I dropped in a box and switch that will be accessible from the front door

I also got vinyl decals for the gallon indicators. This is obviously not period correct on a few levels, not to mention the markers would be in constant contact with fuel. Not so good for vinyl!

I had not mentioned my decision on location. The wife said "No" to the dining room and "definitely no" to the bedroom. As good as it has come together, I decided to place it inside my shop and avoid vandals, theft and weather that might come about by placing it outside.
 

Attachments

  • IMG_1965.jpg
    IMG_1965.jpg
    60.3 KB · Views: 48
  • IMG_1966.jpg
    IMG_1966.jpg
    77.7 KB · Views: 53

thehorse13

Well-known member
Joined
Mar 15, 2015
Messages
3,477
Location
Jefferson County, WV
Indoors is the way to go with items like your pump. They've become too valuable to leave outdoors and before too long word would get out that an easy target is in your yard.

Great job. I'd be proud to have your pump living in my shop.
 
OP
T

turbowoodworker

Well-known member
Joined
Mar 18, 2012
Messages
3,532
Location
Apex NC
Thanks for the kind words, Horse.
More to come as I finish electric and move it. Still have to buy the globe...expensive!
 

tym

Well-known member
Joined
Mar 5, 2016
Messages
2,430
Location
MA
Updates:

I tried my hand at soldering the thin brass placards to a brass backer. Did not work as I could not get the solder to tin with the brass. Wrong flux? Wrong temperature? Not sure but rather than experimenting and risk damaging the irreplaceable placards, I went with the GJ suggestion of JB weld. Turned out much better. Even the loose remnant was affixed and mounted well to the pump.

Before and after mating to brass backer:
Was the placard much larger than what you were trying to solder it to? If so, the placard can act as a heat sink, keeping the work below the temperature needed for the solder to melt for a long time. I've had this issue many times when soldering electronics--the solution is more heat or more time, neither of which I'd want to do to an irreplaceable part.

So kudos on your solution!
 
OP
T

turbowoodworker

Well-known member
Joined
Mar 18, 2012
Messages
3,532
Location
Apex NC
Tym,

I suspect you are correct on the heat sink factor being the problem. The backing is thicker brass and was only slightly larger (later trimmed even to edge). I just did not have the patience, but more importantly the worry of injuring the placard was forefront in my mind.

Thanks all for watching. I am waiting til next paycheck to get the hose, nozzle and globe. Then I can assemble in place and will post finished pictures.

Rick:beer:
 
OP
T

turbowoodworker

Well-known member
Joined
Mar 18, 2012
Messages
3,532
Location
Apex NC
Mock up of the electrical done. I was able to clean and rewire the original porcelien fixtures.
 

Attachments

  • IMG_1985.jpg
    IMG_1985.jpg
    64.4 KB · Views: 48
To avoid these ads, REGISTER NOW!
OP
T

turbowoodworker

Well-known member
Joined
Mar 18, 2012
Messages
3,532
Location
Apex NC
Found a place for the pump in the corner of my shop.

I took one last picture of the glass cylinder in case I broke it on the install. I wanted to be able to look back and see it in its original state. Sure would have been difficult to replace. The repops are all acrylic.

But it all turned out OK.
 

Attachments

  • IMG_1999.jpg
    IMG_1999.jpg
    89.3 KB · Views: 69
  • IMG_1998.jpg
    IMG_1998.jpg
    80.9 KB · Views: 71
  • IMG_1997.jpg
    IMG_1997.jpg
    90.8 KB · Views: 83

tym

Well-known member
Joined
Mar 5, 2016
Messages
2,430
Location
MA
That looks like a perfect (and safe!) spot for it.
 
OP
T

turbowoodworker

Well-known member
Joined
Mar 18, 2012
Messages
3,532
Location
Apex NC
I had to overcome a bit of a dilemma. The install of the gallon markers was interesting. In this first picture, you can see that the ends of the aluminum rods sit in tapered holes in the cast bottom plate while the tops sit in Al hollow screws that are adjustable. The screws are in the steel plate on top that actually rests on the glass cylinder. The placement of these rods are quite simple with no glass in place.
 

Attachments

  • IMG_1967.jpg
    IMG_1967.jpg
    82.7 KB · Views: 56
  • IMG_1972.jpg
    IMG_1972.jpg
    73 KB · Views: 51
OP
T

turbowoodworker

Well-known member
Joined
Mar 18, 2012
Messages
3,532
Location
Apex NC
With the glass cylinder in place, my solution was to silicone the rods into the hollow Al screws, then flip the top plate over and dangle the rods near the bottom plate holes. I then slipped a thin posterboard material with a notch cut in it beneath the glass. Next task was to maneuver the rod to its final resting place. It only took me a couple of frustrating hours! I'm betting the guy in the G&B factory installing them in 1928ish had a better trick.

Now I'm waiting on the globe and ring mount to arrive.
 

Attachments

  • IMG_2000.jpg
    IMG_2000.jpg
    67.5 KB · Views: 49
OP
T

turbowoodworker

Well-known member
Joined
Mar 18, 2012
Messages
3,532
Location
Apex NC
Thanks for stopping in Tym. As I mentioned before I was struggling with location but as it got nearer the end, it was looking so good that I decided not to risk the UPS guy backing into it outside.
 
OP
T

turbowoodworker

Well-known member
Joined
Mar 18, 2012
Messages
3,532
Location
Apex NC
Seeing the light at the end of the tunnel. Got the globe and ring and started prep and paint. Opted for bare metal so I could match the paint rather than guess and hope it was close.
 

Attachments

  • IMG_2122.jpg
    IMG_2122.jpg
    152.2 KB · Views: 34
  • IMG_2125.jpg
    IMG_2125.jpg
    128 KB · Views: 34
  • IMG_2127.jpg
    IMG_2127.jpg
    154.2 KB · Views: 31
  • IMG_2128.jpg
    IMG_2128.jpg
    142.8 KB · Views: 29

don long

Well-known member
Joined
Mar 31, 2012
Messages
8,845
Location
southern california
Turbo
I've enjoyed your project very much.
I just bought a Frye (may west pump) and it needs the same restoration that you are doing. Now I can go back through your thread for tips and techniques.

I agree with your decision to go metal on the globe housing

Don
 
OP
T

turbowoodworker

Well-known member
Joined
Mar 18, 2012
Messages
3,532
Location
Apex NC
Don, when the time comes for parts, I can endorse GasPumpHeaven.com as a good source. They have been prompt and helpful.
I have never seen the May West pump in the wild. In pictures, they appear to be cast iron bodies, instead of sheet metal like my G&B. Is that right?
 
OP
T

turbowoodworker

Well-known member
Joined
Mar 18, 2012
Messages
3,532
Location
Apex NC
More progress on the globe.completed striping and once cured, will coat with clear and install.
 

Attachments

  • IMG_2148.jpg
    IMG_2148.jpg
    85.4 KB · Views: 29
  • IMG_2146.jpg
    IMG_2146.jpg
    87.7 KB · Views: 28
  • IMG_2149.jpg
    IMG_2149.jpg
    67 KB · Views: 30
OP
T

turbowoodworker

Well-known member
Joined
Mar 18, 2012
Messages
3,532
Location
Apex NC
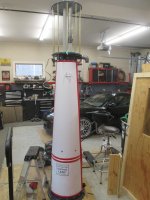
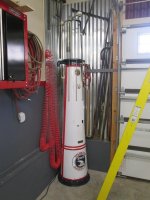
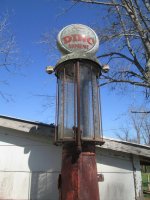
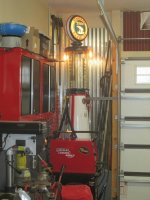
This completes my restoration project of the late '20's Gilbert and Barker visible pump.

This project has been one of the most satisfying that I have done in a very long time. I fancy myself as a pretty good woodworker, but this pump took me to techniques I had either never done before or had not done in a long time.

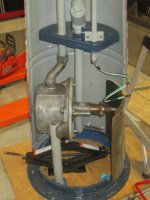
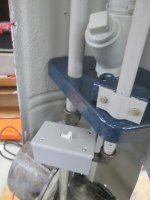
I am not an accomplished TIG welder but I got to have some fun with my Lincoln 175 Square Wave. I've really never done body work but I now know I don't want to quit my day job for it. Reworking the electrical was fun but only as complicated as rewiring an old lamp. The most interesting part was trying to diagnose and fix the frozen pump. This was done with the help of a few over on Oldgas.com, and with applying some brain power and elbow grease...the stuff GJ members are known for. Without manuals, schematics or prior knowledge, this part proved to be quite frustrating, and therefore all the more satisfying in the end.

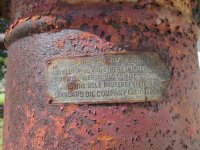
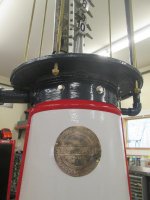
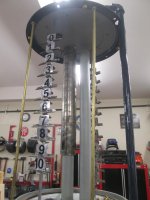
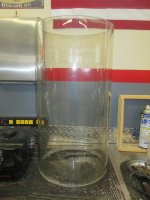
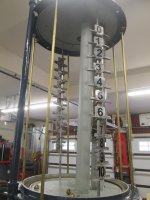
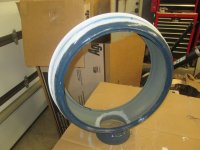
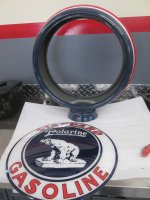
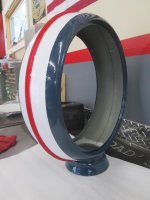
I am proud of the results and my efforts. I am also so happy to have the opportunity and privilege to save a part of American automobile history from the rust bucket. As the before and after photos show, I started with a rust pile but the difficult to obtain parts (glass cylinder,etc.) were there.

Thanks to all who have lent their opinions and advice here on GJ. It is always appreciated.

I hope you have enjoyed this build project as I have and if you ever get the chance to save an old artifact, give it a try. The results might just surprise you.

Rick:beer:
 

Attachments

  • IMG_0239.jpg
    IMG_0239.jpg
    140 KB · Views: 71
  • IMG_0242.jpg
    IMG_0242.jpg
    108.6 KB · Views: 68
  • IMG_2153.jpg
    IMG_2153.jpg
    96.7 KB · Views: 75
  • IMG_2158.jpg
    IMG_2158.jpg
    91.2 KB · Views: 66
  • IMG_2159.jpg
    IMG_2159.jpg
    91.4 KB · Views: 68
OP
T

turbowoodworker

Well-known member
Joined
Mar 18, 2012
Messages
3,532
Location
Apex NC
One last photo. I think the pump lends class to the wife's 996, don't you?

:lol_hitti
 

Attachments

  • IMG_2160.jpg
    IMG_2160.jpg
    150.1 KB · Views: 66
OP
T

turbowoodworker

Well-known member
Joined
Mar 18, 2012
Messages
3,532
Location
Apex NC
I was almost remiss in thanking the good folks at GasPumpHeaven for their assistance and fine replacement parts.
 

vette-kid

Well-known member
Joined
Jul 21, 2008
Messages
3,636
Location
Navarre, FL
Beautiful! Outstanding job. Is everything functional? I think u would have been tempted to leave out the inner workings, I'm impressed that you restored it to that level.

Sent from my Moto Z (2) using Tapatalk
 
To avoid these ads, REGISTER NOW!
Top Bottom