To avoid these ads, REGISTER NOW!

Volunteer shop

Blazinzuk

Well-known member
Joined
Mar 13, 2016
Messages
637
Location
Afton Wy
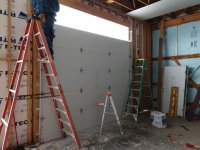
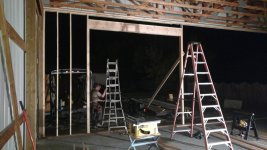
I call it the volunteer shop for one simple reason. I have had alot of good folks come and help me in this thing.

I'm nearly done now but thought a few might find it interesting.

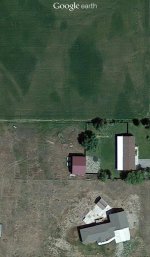
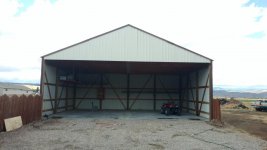
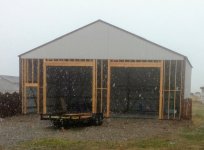
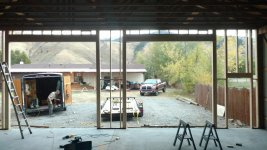
We bought this house in 2015 it has several key features for me. Actually 2. Had a decent sized garage and a 3 sided pole barn 30 ft deep 40 ft wide.

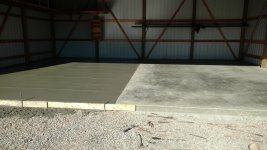
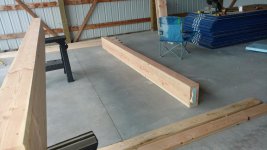
I knew it would be a bit before I could get to finishing the shop. But started making plans
 

Attachments

  • 20150216_093052.jpg
    20150216_093052.jpg
    146.6 KB · Views: 241
  • 1424152828214.jpg
    1424152828214.jpg
    99.1 KB · Views: 283
To avoid these ads, REGISTER NOW!
OP
B

Blazinzuk

Well-known member
Joined
Mar 13, 2016
Messages
637
Location
Afton Wy
Well first order of business was concrete.

I have a friend here who used to do concrete. Which in all reality allowed me to do it. He helped me with all of it. Including borrowing a plate compactor and a power trowel

Now there is one thing I would have really liked to do and that was insulation under the concrete. But it just wasn't in the cards.

The nice thing is the previous owners had put down about 3" of nice crushed rock. I had previously killed all the vegetation the year before. The rock had been there for several years but we still compacted.

Then came the day to pour. Concrete is 5.5" thick 4000 psi, with rebar.

Got the whole thing done for just over 3k. I did pay my buddy but in all reality this pour would have cost me more than double that.
 

Attachments

  • IMG_20160914_123254552.jpg
    IMG_20160914_123254552.jpg
    126.8 KB · Views: 275
  • IMG_20160901_143324897.jpg
    IMG_20160901_143324897.jpg
    134.9 KB · Views: 270
  • IMG_20160902_094057351.jpg
    IMG_20160902_094057351.jpg
    149.1 KB · Views: 246
  • IMG_20160901_080732927.jpg
    IMG_20160901_080732927.jpg
    146.3 KB · Views: 252
  • IMG_20160901_083924727.jpg
    IMG_20160901_083924727.jpg
    152.5 KB · Views: 266
  • IMG_20160830_184946161.jpg
    IMG_20160830_184946161.jpg
    148.5 KB · Views: 260
  • IMG_20160830_145522726.jpg
    IMG_20160830_145522726.jpg
    157 KB · Views: 333
OP
B

Blazinzuk

Well-known member
Joined
Mar 13, 2016
Messages
637
Location
Afton Wy
Building the front wall.

We built our own headers for the garage door. 2x12 with a 2x6 on top and bottom, with a peice of 1" foam board stuck in there. 2x8 for the man door. Even though the front wall is not load bearing

Everything else was pretty straight forward
 

Attachments

  • IMG_20161003_124656074.jpg
    IMG_20161003_124656074.jpg
    140 KB · Views: 224
  • IMG_20160918_191835285.jpg
    IMG_20160918_191835285.jpg
    152.9 KB · Views: 204
  • IMG_20160917_192008825.jpg
    IMG_20160917_192008825.jpg
    127 KB · Views: 203
  • IMG_20160917_210148914.jpg
    IMG_20160917_210148914.jpg
    146.8 KB · Views: 187
  • IMG_20160917_192025963.jpg
    IMG_20160917_192025963.jpg
    116.5 KB · Views: 196

Deezler

Well-known member
Joined
Nov 1, 2011
Messages
240
Location
Southeast MI
Great start! Look forward to seeing more. That's a lot of concrete (with rebar!) for $3k, your buddy must have almost lost money on it.
 
OP
B

Blazinzuk

Well-known member
Joined
Mar 13, 2016
Messages
637
Location
Afton Wy
He basically made about 700 bucks off it. Most of the local estimates I got were 7k to 10k.

Yah probably the single biggest savings. Hopefully he will be building a shop next spring I'll be there alot.

Would have never meant the guy if it weren't for our kids. They went to preschool together and have been best buddies ever since!
 
OP
B

Blazinzuk

Well-known member
Joined
Mar 13, 2016
Messages
637
Location
Afton Wy
Oh it also helps he gets the concrete at a small discount. He poured alot of concrete in this valley.
 
OP
B

Blazinzuk

Well-known member
Joined
Mar 13, 2016
Messages
637
Location
Afton Wy
Next up was running electric out there. Now this was a huge pain. Mainly because I have a 12 ft concrete patio right where my power comes in.

I still drilled/ hammered my way through part of the patio. I didn't want the conduit sticking up on the outside edge of this.

Now concrete must have been cheap to free when they poured this patio, and prep work must have been a fortune, it was about 4" thick in one side of the hole and about 9" thick on the other. It was only a 4.5 hole. Took me 2 days to go through it all enough to get the conduit up through the hole.

Also I plan to enlarge my post right there with some 1x6 or 1x8 to fully enclose the conduit that sticks up.
 

Attachments

  • IMG_20170505_173456949.jpg
    IMG_20170505_173456949.jpg
    147.9 KB · Views: 215
  • IMG_20170505_194831847.jpg
    IMG_20170505_194831847.jpg
    150.3 KB · Views: 221
  • IMG_20170506_154713812.jpg
    IMG_20170506_154713812.jpg
    147.1 KB · Views: 206
OP
B

Blazinzuk

Well-known member
Joined
Mar 13, 2016
Messages
637
Location
Afton Wy
At this point I had been overthinking insulation. It gets fairly cold here. I also planned on heating all the time in winter.

I really wanted spray foam for it's air sealing capability. But even using a friend's equipment for free I still would have been 2500 for 1.5". In addition to the fact I've never sprayed it so he recommended I buy more than just what was needed.

So instead of spray foam went the budget route. I'm not gonna call it the cheap route because well it wasn't. But it was less than half of spray foam.

I bought 1" thick foam board and put in up in-between the girts. I then sprayed great stuff foam to seal the joints.

I feel this is a viable solution to spray foam. But I did learn some stuff. Give yourself the width if the tip of the can of foam your using. Putting some space in there allows you to spray right into the joint, instead if on top of the joint. That width needs to be between all the sheets. I did not do that and just to make sure I got the walls sure sealed I went back and double or triple foamed all the joints.

My plan was to just use that for the air sealing properties and let fiberglass Batts be my main insulation.

The foam board really worked out pretty well.
 

Attachments

  • IMG_20161008_140753121.jpg
    IMG_20161008_140753121.jpg
    145.6 KB · Views: 164
  • IMG_20161012_171248415.jpg
    IMG_20161012_171248415.jpg
    123.3 KB · Views: 149
  • IMG_20161005_181258803.jpg
    IMG_20161005_181258803.jpg
    113.7 KB · Views: 152
OP
B

Blazinzuk

Well-known member
Joined
Mar 13, 2016
Messages
637
Location
Afton Wy
For information sake I used a table saw to cut the big peices and just a utility knife to score the small ones then snap it off.

Be careful with the table saw. Kickback on this stuff can be brutal. A light touch is the key
 

jblnut

ALLIANCE MEMBER
Joined
Jan 17, 2015
Messages
6,990
Location
In the Middle of MN
Shop looks great !! What do you plan to do inside it once it's finished ??

Having friends and family help will ultimately get you a shop that will have some meaning behind it and I'm guessing they will keep helping long into the future. Finishing the shop out, using your space for their projects, drinking your beer, playing cards and the like. I love helping people with stuff because it's an awesome way to build connections.

It's not what you know, it's who you know after all :thumbup:
 
OP
B

Blazinzuk

Well-known member
Joined
Mar 13, 2016
Messages
637
Location
Afton Wy
Thanks guys.

I do some fab work on the side. I also build off road stuff. Alot of my own stuff. But it will be a fab/mechanical shop.

Got a brand new utility truck I am building a rack for very soon. Shop isn't done but it's done enough to be able to do it in the shop. Just means an extra bit of cleanup when I finish taping and paint the walls
 
OP
B

Blazinzuk

Well-known member
Joined
Mar 13, 2016
Messages
637
Location
Afton Wy
So at this point budget constraints once again forced a halt on major construction.

I had done so much work on the side and back walls I didn't want to leave the front wall out. The rest of the shop is all tin and the front will be covered with tin too but I wanted to put some sort of foam board up to air seal it as much as I could.

I had a bunk of OSB. So I bought some 1/2" thick foam board and broke into my bunk of OSB and got to work.

Didn't take too many pics of this process. Once again there were volunteers to help. This time my Dad.

Nothing special here just boards
 

Attachments

  • IMG_20171023_143744608.jpg
    IMG_20171023_143744608.jpg
    152.5 KB · Views: 143
OP
B

Blazinzuk

Well-known member
Joined
Mar 13, 2016
Messages
637
Location
Afton Wy
To this point I felt I had been making pretty good progress within my budget constraints.

It was almost a year from when we poured concrete till I started putting up the sheeting on the front wall. Also on the ground you can see my garage doors.

The garage doors I bought from my neighbor, he sells and installs garage doors. But he also runs a dairy. I have helped him several times to replace panels in large doors and he volunteered to help me put up my doors.
 
To avoid these ads, REGISTER NOW!
OP
B

Blazinzuk

Well-known member
Joined
Mar 13, 2016
Messages
637
Location
Afton Wy
To put garage doors up required me to put sheetrock up. At least where the garage doors go. Well I needed to do this to get the shop mostly weather sealed.

It had already been through one winter with just plastic stapled up on the outside wall.

So we put up sheetrock where it was needed. Would have loved to have done the whole thing at this time, but not happening.
 

Attachments

  • IMG_20171028_190046937.jpg
    IMG_20171028_190046937.jpg
    147.2 KB · Views: 121
  • IMG_20171216_133332477.jpg
    IMG_20171216_133332477.jpg
    138.1 KB · Views: 112
OP
B

Blazinzuk

Well-known member
Joined
Mar 13, 2016
Messages
637
Location
Afton Wy
Winter had held off quite nicely to this point.

I didn't get the garage doors up until December. Still only one is functional. But my need for 2 doors is less than my need to go around the second set of rails on the ceiling.

So the garage just kind if sat there looking very sad till spring time

In this time frame I made a deal for a used waste oil heater. Which is nice. I plan on this being heated all winter.
 

Attachments

  • IMG_20171221_164632013_HDR.jpg
    IMG_20171221_164632013_HDR.jpg
    88 KB · Views: 117
  • IMG_20171212_150449445.jpg
    IMG_20171212_150449445.jpg
    139.8 KB · Views: 122
OP
B

Blazinzuk

Well-known member
Joined
Mar 13, 2016
Messages
637
Location
Afton Wy
So at this point your very nearly caught up to date.

I finished getting power to the shop late April of this year.

I already had wire that I had gotten from a guy buried in the ground but I had to run it from where I stubbed it in to my panel. Took some minor stretching of the conduit but it all worked out. Plan in a couple years is to redo my breaker box. It's a disaster right now.

Got materials for putting up studs in my shop!
 

Attachments

  • IMG_20180610_133708008.jpg
    IMG_20180610_133708008.jpg
    146.7 KB · Views: 115
  • IMG_20180427_180715772_HDR.jpg
    IMG_20180427_180715772_HDR.jpg
    152.8 KB · Views: 114
OP
B

Blazinzuk

Well-known member
Joined
Mar 13, 2016
Messages
637
Location
Afton Wy
I had made the decision to do 2x4 studs on 16" centers, use R19 fiberglass Batts, use OSB the first 8 ft up and 1/2" sheetrock above that. 5/8 sheetrock on the ceiling.

I needed to finish all my wiring. Get all the studs up. Insulate and sheet the walls.

It finally started to feel like I was very much on my way to having an honest to goodness shop!
 
OP
B

Blazinzuk

Well-known member
Joined
Mar 13, 2016
Messages
637
Location
Afton Wy
Started framing everything.

View media item 83921
Had a couple issues. I don't think this building was ever meant to be finished. In addition to the fact that I am a newb on all this stuff. I forgot we poured a slight slope to the garage floor. It made framing a bit tricky. Since these are not support walls, but rather a wall to hang insulation and sheeting from, we built it a touch short and used shims to get it tight.


View media item 83922
 
OP
B

Blazinzuk

Well-known member
Joined
Mar 13, 2016
Messages
637
Location
Afton Wy
I decided to prepare for the future a bit. I hope to add on the the back of the shop eventually. A mini workshop away from the main area. So I framed can opening to said future addition.

View media item 83925
I also put blocking up. 8 ft up and blocked the studs to the bottom girt. I had alot of 4-6" long pieces if 2x4. Blocking 8 ft up and blocking to the girt stiffened the wall dramatically.


View media item 83926
View media item 83932
You can also see the blocking I did for a bench. I hope to use the 8 ft tall blocking as a cabinet block also.
 

sbosecker

Well-known member
Joined
Sep 25, 2012
Messages
3,539
Location
Peachtree City, GA
...Now concrete must have been cheap to free when they poured this patio, and prep work must have been a fortune, it was about 4" thick in one side of the hole and about 9" thick on the other...


Blazinzuk,

Cheap is one possibility... Another is "Bleep Happens"...

About 25 years ago an acquaintance of mine was building a house and somehow he wound up with a portion of his basement floor that was 40-inches thick instead of 4" of concrete.

When he told me this story all I could think of was somebody (like you) dealing with this monstrosity in 50 years or so and wondering WTF?

Best regards,

Scott
 
OP
B

Blazinzuk

Well-known member
Joined
Mar 13, 2016
Messages
637
Location
Afton Wy
Blazinzuk,

Cheap is one possibility... Another is "Bleep Happens"...

About 25 years ago an acquaintance of mine was building a house and somehow he wound up with a portion of his basement floor that was 40-inches thick instead of 4" of concrete.

When he told me this story all I could think of was somebody (like you) dealing with this monstrosity in 50 years or so and wondering WTF?

Best regards,

Scott

Lol yes stuff happens but 40" holeee ****
 
OP
B

Blazinzuk

Well-known member
Joined
Mar 13, 2016
Messages
637
Location
Afton Wy
Had all the walls framed up ready to rock. So I gotta insulation. But first the ceiling!

https://www.garagejournal.com/forum/picture.php?albumid=6411&pictureid=84142

Had 2 friends up on a Saturday. Got the whole thing done in one long day.

Insulation next

View media item 84139
Once again it's the volunteer shop. Here was my work crew for a couple days

View media item 84140
My cousin in the mud and tape duty. My buddy and his daughter on insulation and my daughter who was actually helping my cousin with taping and mudding.

Got the bottom 8 ft of insulation done and started sheeting it. That was a bit if a challenge. Somewhere along the lines I had forgotten we sloped the floor a bit. We started in the low end. Not a real big deal, but made us think for a second

View media item 84142
 
OP
B

Blazinzuk

Well-known member
Joined
Mar 13, 2016
Messages
637
Location
Afton Wy
Oh a couple of random electrical pics.

View media item 84136
I ran most of the wiring behind the 2x4s as there was plenty of room and it was fairly protected.

But it was starting to get crowded so ran a bunch in holes through the 2x4s.

Also likely went overboard on the cable clamps
View media item 84138
I did that pretty much everywhere. Had my neighbor whose an electrician come and check me. There is no electric inspection needed on outbuildings here.

He said I was good. Had me separate a couple wires a bit more but that's all
 
OP
B

Blazinzuk

Well-known member
Joined
Mar 13, 2016
Messages
637
Location
Afton Wy
Now about the time I got to this point I got a call from our local power company. I build utility racks for their trucks. They had 2 for me here pretty quick. Plus, we had planned on camping for a couple days, so this is pretty much where the shop was. Not done but a workable shop.

Well truck got here yesterday. Moved all the construction stuff to one side cleaned out a side and started in a bench.

Stuff I still need to do.

Lights. I have about half of them. But I'd really like to see if I can get by till I can run the second coat of mud on the ceiling and paint it.

I need to tape and mud the walls. Caulk in-between the OSB joints, and paint the walls.

I have some vinyl baseboard to put down.

Get second door functional.

Insulate the attic.

Will take me about 2 to 3 weeks to get both trucks done, so won't be much updating other than minor stuff. But then a big push will happen to finish it up.
 
OP
B

Blazinzuk

Well-known member
Joined
Mar 13, 2016
Messages
637
Location
Afton Wy
I built this bench. It was out of stuff I have. The plan is to use it for now and then have some 14 gauge steel bent to go over it.

Nice start for the bench
View media item 84160
Just wanted it 8 ft long so I built this top.

View media item 84161
I also managed to put the leg on the wrong side. Why well left and right is hard sometimes!

2 layers of 1/2" OSB for the top.

Still need to do some stuff to it but basically done for what I need now.

View media item 84164
 
OP
B

Blazinzuk

Well-known member
Joined
Mar 13, 2016
Messages
637
Location
Afton Wy
Not alot of progress lately.

Just an observation. Needing to use your shop before it's completely done us no fun. Still trying to keep a minimum of stuff in there so when the current job is done I can finish the taping and get to painting asap.

But having a great time actually having room!
 
To avoid these ads, REGISTER NOW!
Top Bottom