To avoid these ads, REGISTER NOW!

Walker 93632 release valves

wxm

Well-known member
Joined
Dec 15, 2008
Messages
901
Location
NJ
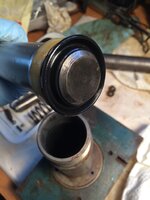
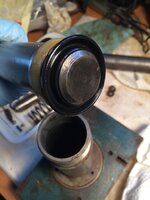
Following the 93632 rebuild thread. I fabricated a spanner from a 1-1/2" impact socket. It took a while, finally got the ram out.
2e9521d3220b3e10e8b853598a1aaf9e.jpg

It turned out the old u-cup was in pieces and left the plastic plated stuck inside. It was a pain to get that out.
e00c0cd14e37c190bf21c123353cb5b8.jpg

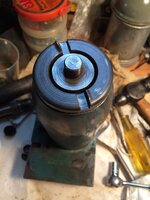
Now the question related to the release valves. Those two holes look all covered. Tried the punch in the center, it felt solid. Is it possible that some models have no valves behind those plates?
0d21ca8472897946a37406d28cf4ff3c.jpg
 

Attachments

  • 2e9521d3220b3e10e8b853598a1aaf9e.jpg
    2e9521d3220b3e10e8b853598a1aaf9e.jpg
    238.4 KB · Views: 0
  • e00c0cd14e37c190bf21c123353cb5b8.jpg
    e00c0cd14e37c190bf21c123353cb5b8.jpg
    212.9 KB · Views: 0
  • 0d21ca8472897946a37406d28cf4ff3c.jpg
    0d21ca8472897946a37406d28cf4ff3c.jpg
    237.1 KB · Views: 0
To avoid these ads, REGISTER NOW!

Hiball

Well-known member
Joined
Apr 30, 2009
Messages
14,033
Location
Missery
I have a special little chisel I use to remove the plugs, Definitely not solid but possible the center has been beat down to the point it's touching the valve plug head. I would try working at a angle with your punch (assuming your using that starter punch in the picture) taking care not to get into the block. If your worried about damaging the inside of the sealing edge with the punch, a small drill bit should do the trick, all you need is a small hole in the freeze plug and you can easily pry it out.
 
Last edited:

6PTsocket

Well-known member
Joined
Mar 12, 2014
Messages
4,593
I am finishing a rebuild that started a long time ago. The top lip is pretty chewed up on the outside. The slot is now wider than stock. I replaced the seals and it is back together but I am not sure it is tight enough to make that dry fit seal. I hear the torque spec is pretty high. I also stripped two of the locking thread shoulder mounting bolts. The originals are 5/8 locking thread with a 3/4 shoulder. I just retapped the hole for 3/4 fine thread. Later jacks had no shoulder bolt. What is that allen head screw at the bottom of one of the mounting holes?

Sent from my SM-G900V using Tapatalk
 
OP
W

wxm

Well-known member
Joined
Dec 15, 2008
Messages
901
Location
NJ
Thanks hiball. Got both caps off. Kind of messed both up, will probably have to make two later on.

Now come to the next two challenges:
(1) one valve with a bigger nut was so tight. I was using the hand impact driver, broke the bit. It was still not moving... Shall I take a chance and move on?
(2) on the other side, the "screw" easily came out, then the spring, safety cap thinny and a small ball. I vaguely remember the other thread also mentioned a bigger ball on top of the spring, but mine doesn't have it. Shall I put one in anyway, since there is a bigger one coming from the rebuild kit?

Thanks in advance for any advice.
 

Hiball

Well-known member
Joined
Apr 30, 2009
Messages
14,033
Location
Missery
Thanks hiball. Got both caps off. Kind of messed both up, will probably have to make two later on.

Now come to the next two challenges:
(1) one valve with a bigger nut was so tight. I was using the hand impact driver, broke the bit. It was still not moving... Shall I take a chance and move on?
(2) on the other side, the "screw" easily came out, then the spring, safety cap thinny and a small ball. I vaguely remember the other thread also mentioned a bigger ball on top of the spring, but mine doesn't have it. Shall I put one in anyway, since there is a bigger one coming from the rebuild kit?

Thanks in advance for any advice.

The one that came apart is the overload, Since you mentioned the Ucup being deteriorated, I would definitely pursue taking the working valve apart. If you have a fairly good sized blunt punch, position the hydraulic unit on a solid base and smack the top of the valve using the punch and a hammer. It will swell the threads and hopefully allow you to loosen it with the hand impact. The rebuild kit should have New freeze plugs, if not they are 5/8 concave and can be found at most parts houses. The working valve will consist of a large weight, Big ball, small weight and then a small ball.
 
OP
W

wxm

Well-known member
Joined
Dec 15, 2008
Messages
901
Location
NJ
Thanks again hiball. As always you knowledge and advise are deeply appreciated.

I finally got the stubborn valve screw off. Before putting everything back, can someone confirm that the order in the picture for both valves.


095f5740428f4b1e8dc910b3956363c6.jpg

By the way, all parts except for the copper gasket are in good shape. Shall I reuse them or replace with those from the rebuild kit (e.g. balls)
 

Attachments

  • 095f5740428f4b1e8dc910b3956363c6.jpg
    095f5740428f4b1e8dc910b3956363c6.jpg
    234.8 KB · Views: 0

Hiball

Well-known member
Joined
Apr 30, 2009
Messages
14,033
Location
Missery
Looks good to me, I would definitely use the New balls, make sure when reassembling the overload that the little ball is centered in the seat prior dropping the cap/spring on top of them. I also use a dab of bearing grease inside the cap to make sure the spring stays positioned when reinstalling.
 
To avoid these ads, REGISTER NOW!
OP
W

wxm

Well-known member
Joined
Dec 15, 2008
Messages
901
Location
NJ
Just to report back. Put all together today. It worked very well. Lift up a corner of my car, and left there for 20 minutes, no dripping. Thanks GJ, especially hiball for the advises.

c0e325fdb10bd143c77dd17856793997.jpg18bacc8f9c43b5836a7d92869f0a5b02.jpg
4cde93da1994770af3f1ff35431e5887.jpg
712d730eef90e5f984f05dba5c6fd2c2.jpg
c312393350e79f7cfcc3e74a3b422713.jpg
 

Attachments

  • c312393350e79f7cfcc3e74a3b422713.jpg
    c312393350e79f7cfcc3e74a3b422713.jpg
    313.4 KB · Views: 0
  • 712d730eef90e5f984f05dba5c6fd2c2.jpg
    712d730eef90e5f984f05dba5c6fd2c2.jpg
    270.8 KB · Views: 0
  • 4cde93da1994770af3f1ff35431e5887.jpg
    4cde93da1994770af3f1ff35431e5887.jpg
    209.4 KB · Views: 0
  • 18bacc8f9c43b5836a7d92869f0a5b02.jpg
    18bacc8f9c43b5836a7d92869f0a5b02.jpg
    226.1 KB · Views: 0
  • c0e325fdb10bd143c77dd17856793997.jpg
    c0e325fdb10bd143c77dd17856793997.jpg
    177.3 KB · Views: 0
OP
W

wxm

Well-known member
Joined
Dec 15, 2008
Messages
901
Location
NJ
Hmmm, I might have over thought about this - how do you install the concave freeze plug. I meant which direction does it go in?
 
Last edited:

Hiball

Well-known member
Joined
Apr 30, 2009
Messages
14,033
Location
Missery
High side Up.. then when square in the hole the edges rest on that little shelf, when you seat the plug by flattening it (middle). It creates pressure on the edges, thus sealing the hole, Don't get rough with it, If you go too far it will have the opposite effect and reduce edge pressure.
 
OP
W

wxm

Well-known member
Joined
Dec 15, 2008
Messages
901
Location
NJ
Tried the jack first time since the rebuild. The pump seems to stuck at the compressed position. I could not think of anything would do this. Anyone had the similar experience!
 

Hiball

Well-known member
Joined
Apr 30, 2009
Messages
14,033
Location
Missery
Tried the jack first time since the rebuild. The pump seems to stuck at the compressed position. I could not think of anything would do this. Anyone had the similar experience!

If there is any dents in the caging, they could be getting hung up on each other. Outside of that is internal issues, overtightened Vees causing too much wall pressure, damage in the grooves from removing/installing the splined cross pin.
 
OP
W

wxm

Well-known member
Joined
Dec 15, 2008
Messages
901
Location
NJ
If there is any dents in the caging, they could be getting hung up on each other. Outside of that is internal issues, overtightened Vees causing too much wall pressure, damage in the grooves from removing/installing the splined cross pin.


Hiball, I think you nailed it. I must have over-tighten the nuts on those bees at end of the pump piston. Just took it out and loosen it a bit. It seems to work fine now. Will do more the testing later on...

Thanks again as always.
 
Last edited:
To avoid these ads, REGISTER NOW!
Top Bottom