To avoid these ads, REGISTER NOW!

Walker Floor Jack Score

WarDamnEagle

Well-known member
Joined
Mar 13, 2009
Messages
208
Location
Auburn
I've spent quite a bit of time on here recently researching jacks. It all started when I wanted to work on my wife's car and the Blackhawk 8T bottle jack that my father gave me years ago wouldn't work........and was leaking. I used another jack (and stands), threw the Blackhawk in the trash and after finishing the car work went to Harbor Freight (yes bad; I know) and bought a new 8T whatever bottle jack.

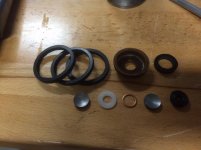
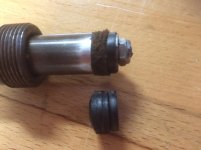
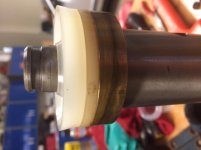
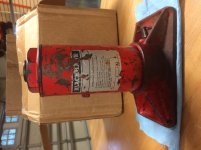
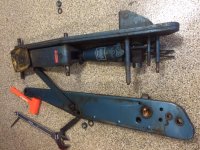
When I took the HF sourced jack out of the box for close inspection I quickly realized that I didn't really like anything about it; wimpy everything. I then went online and did some Garage Journal research on jacks. That research led to a trip out to the street in pouring rain to fish my jack out of the garbage. I haven't PM'd Hiball yet but if he doesn't read this thread I will be sending him a PM to source a rebuild kit........as soon as I figure out the model (see pic; information welcome). Again, it's 8Ton and probably circa 1970 or so.

I also decided that it was time to buy a floor jack. I settled on a Milwaukee Hydraulics 2T but then balked on the price and wait list. I then thought well I'll just buy a reconditioned one and of course quickly figured out that everyone else has had the same idea....none to be found.

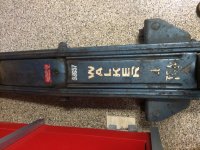
This epiphany led to a craigslist search for older jacks to rebuild which, based on past experience, I assumed would take months if not years. Well after a grand total of one week I found a local ad for a 4T, long frame Walker...........for the grand total of $150. Owner bought it new in 1978 and had no further use for it. Much larger jack than I wanted but what's not to like?

Owner wasn't sure it still worked as he hadn't used it in years but it jacked up the rear (from the bumper hitch) of a 2010 Tacoma with no issues. Guess for now I'll just concentrate on rebuilding the Blackhawk.

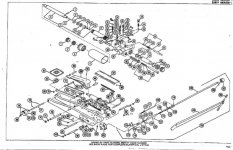
Garage Journal is a great site by the way. I've already downloaded the manual on the Walker 93657.
 

Attachments

  • Blackhawk.jpg
    Blackhawk.jpg
    114.5 KB · Views: 159
  • Walker Jack1.jpg
    Walker Jack1.jpg
    147.4 KB · Views: 238
  • Walker Jack2.jpg
    Walker Jack2.jpg
    149.6 KB · Views: 202
To avoid these ads, REGISTER NOW!

Steevo

Well-known member
Joined
Aug 18, 2009
Messages
8,738
Location
43.49600, -112.04300
Glad you were able to rescue your Blackhawk from the trash.
It is very much worth rebuilding.

I have the same Walker jack you just bought. I got mine from an auction for almost nothing, and got the rebuild kit from a GJ "Secret Santa" gift last Christmas, so my investment is extremely low.

I do not have the tin cover that you have over the jack section, and am always on the lookout for one.

Enjoy your vintage jacks and never trash them. Nothing made today can ever replace them.
 

EDGAR

Well-known member
Joined
Aug 21, 2010
Messages
437
37 years old seals...:scared: You should seriously consider replacing those seals before using the jack again, more importantly, the mail seal that does the lifting. If you use it like that, it is like playing Russian roulette, you never know when you are going to lose.

I mean, you would not use 37 years old tires, or 37 years old radiator hoses, or 37 years old fan belts, so on and so forth, so why risk a sudden failure and have the vehicle come crashing down? Main seals made of urethane tend to harden overtime and become brittle and more so if the jack was not used for some years. Using the jack maintains the seal pliable for a longer time, still, not for 37 years. You could literally be at the brink of disaster.

I have two of those 4 ton jacks and both had their u-cups in pieces. One is an older Walker which I have not repaired yet because it is missing a plastic cup (broken) that goes were the u-cup goes and supposedly is no longer available new, (someone else picture below of missing part) and the other was a newer Lincoln. I am considering replacing the broken plastic cup with a steel bushing sometime in the future.

Similar goes for other, older jacks using leather piston cup seals. These can last a long time but can break at the inside edge were the side and the bottom of the seal meet when these are older.

So with old seals it can be: here today, gone tomorrow.

For general consumption:

As I stated in another thread; the idea is to find a vintage jack, with the mind set on replacing the seals ASAP, whether the jack works or not. Don' t go with the idea of finding an old jack that works and then use it as found, with the old seals. This could be a regrettable mistake.

Reseal and have peace of mind.
 

Attachments

  • WALKER 93657  SHOWING MISSING PART THAT WAS BROKEN.jpg
    WALKER 93657 SHOWING MISSING PART THAT WAS BROKEN.jpg
    134.4 KB · Views: 94
Last edited:
OP
W

WarDamnEagle

Well-known member
Joined
Mar 13, 2009
Messages
208
Location
Auburn
That's good advice Edgar. I did intend to buy the seal kit for both and do the Blackhawk first. I don't have any need for the floor jack at the moment and if I did I would only use it to get something on stands until I can replace the seals.
 
OP
W

WarDamnEagle

Well-known member
Joined
Mar 13, 2009
Messages
208
Location
Auburn
Anyone know if these are the original hand grips? I tried searching for this jack but only found what looked like bare metal handles. The parts diagram shows a metal covering but it's hard to tell from a diagram whether or not these were OEM.
 

Attachments

  • Walker Jack handle.jpg
    Walker Jack handle.jpg
    101 KB · Views: 65

Richard Cranium

Well-known member
Joined
Apr 22, 2011
Messages
18,552
Location
central Washington
Yes they look like bike grips. Good luck with your rebuilds. Hiball is the man for the jacks. He also has a thread on here about jack repairs, It is worth the reading...Rich
 

Monkey Milk

Well-known member
Joined
Nov 18, 2012
Messages
450
Location
Hawaii
I have the same era blackhawk bottle jack but 12t, it's used in my press. We had a jack like that at work and I hated to use it. Big and bulky, but never failed us. Also had the same type of grips in white.
 

jreb10

Well-known member
Joined
Oct 18, 2014
Messages
329
Location
Westby, WI
Anyone know if these are the original hand grips? I tried searching for this jack but only found what looked like bare metal handles. The parts diagram shows a metal covering but it's hard to tell from a diagram whether or not these were OEM.

I've got that same model jack. My grips look just like yours. I think they are original. I would not try to remove them as they may have become brittle with age.
 

EDGAR

Well-known member
Joined
Aug 21, 2010
Messages
437
The 93657 came with bicycle type grips and still comes with those grips.
 

Attachments

  • HEIN WERNER 93657.JPG
    HEIN WERNER 93657.JPG
    92.1 KB · Views: 71
OP
W

WarDamnEagle

Well-known member
Joined
Mar 13, 2009
Messages
208
Location
Auburn
Thanks. Mine are in good shape but have both been turned in different directions. I will put a heat gun on them and see if I can twist them into the correct orientation. If they won't budge then I'll probably just leave them for now. Maybe buy some fancy white ones at some point!
 
OP
W

WarDamnEagle

Well-known member
Joined
Mar 13, 2009
Messages
208
Location
Auburn
So I bought new seal kits for both from Hydraulic Parts Supply (thanks to Hiball and Steve). I thought I would practice on the 8 ton Blackhawk. Just finished it up this morning and it appears to be working well. The pic shows it just before I reassembled.

Those parts in the photo were left over from the kit. I think I can rationalize all of them. My Blackhawk does not have packing on the tank nut; it has an O-ring so the two large packings are not needed.

Starting from the left on the other three parts, the first packing I think is the pump packing if you have a packing nut at the top of the pump cylinder. My jack doesn't have one. There is instead a small packing that goes inside the pump cylinder near the top which was included in the kit.

The next small disk I think might go under the pump cup but I reused the small metal washer that was on my jack. If it doesn't go in place of that washer then I don't know where it would go (at least on my jack).

It also doesn't have packing around the release valve (again, O-ring) and I think the fat little doughnut packing on the far right probably would go there.

Next up is the Walker 4 Ton.
 

Attachments

  • Blackhawk extra seals.jpg
    Blackhawk extra seals.jpg
    127.6 KB · Views: 46
Last edited:
OP
W

WarDamnEagle

Well-known member
Joined
Mar 13, 2009
Messages
208
Location
Auburn
So I took the Walker apart today. I degreased it and now need to get the tank nut off. Thought I would get that removed and replace the main cup and seals before doing the pump seals. Probably have to take it back to one of our shops to get it off.

Quick question, one of the casters doesn't spin on the ball bearings very smoothly. It doesn't look like there is any lubrication in there at all (see photo). Left to my own devices I would put some synthetic, moly fortified grease in there but thought I would ask the experts.
 

Attachments

  • Walker Jack3.jpg
    Walker Jack3.jpg
    154.3 KB · Views: 57
  • Walker Jack caster.jpg
    Walker Jack caster.jpg
    116.5 KB · Views: 48

Hiball

Well-known member
Joined
Apr 30, 2009
Messages
14,027
Location
Missery
So I took the Walker apart today. I degreased it and now need to get the tank nut off. Thought I would get that removed and replace the main cup and seals before doing the pump seals. Probably have to take it back to one of our shops to get it off.

Quick question, one of the casters doesn't spin on the ball bearings very smoothly. It doesn't look like there is any lubrication in there at all (see photo). Left to my own devices I would put some synthetic, moly fortified grease in there but thought I would ask the experts.

I wouldn't attempt to replace any seals till you have completely disassembled the hydraulic unit/valves etc, otherwise any attempt to flush any particles will meet resistance. In regards to the bearing lube, anything other than your standard tub of bearing grease will completely eat the Jack up (looks around) :p On a serious Note.. Anything is better than nothing, don't sweat the small stuff and try and keep it under 100Mph and everything should be O.K.
 
OP
W

WarDamnEagle

Well-known member
Joined
Mar 13, 2009
Messages
208
Location
Auburn
Thanks; will do and probably would have. I certainly learned from the first one that you need everything apart to get all the dregs out.
 
OP
W

WarDamnEagle

Well-known member
Joined
Mar 13, 2009
Messages
208
Location
Auburn
OK so the Walker isn't starting off quite as well as the Blackhawk. I got the tank nut off and removed the ram. What came out, aside from a few additional small plastic bits is shown in the photo and none of it came out attached to the ram. Therefore I have no idea exactly how and what goes back in or is replaced or in what order.

So starting from what goes on first, there should be the following according to the parts diagram:

1 Washer (Assume this is the brass colored, metal washer, front right in the photo)
3 Heel plates (No idea....nothing in the kit fits over the smaller diameter part of ram tight other than the cup)
1 U Cup (in kit but not sure which direction it goes on the ram)

What is the plastic washer in the photo (front left)? Is that the "3 Heel Plates"? Maybe what is left of the U-Cup?

Also there is a groove in the end of the smaller diameter part of the ram. The plastic U Cup fits tight on this part of the ram but does nothing go in the groove to hold everything on? Is it just the tight fit of the U-Cup?

I also don't know if I should try to replace the ram screen, 1/4" OD bearing, and ram screen washer. I don't see a screen in the parts kit so I assume not although there is a 1/4" bearing in the kit. They are identified in the Walker manual as being included in their replacement kit; thus my question. If they are to be replaced, even if you reuse the screen, there isn't any obvious way to remove the washer to get to the parts.

Perhaps Hiball will wade in here and help me out. :)
 

Attachments

  • Walker Ram Parts.jpg
    Walker Ram Parts.jpg
    110.2 KB · Views: 38
Last edited:
To avoid these ads, REGISTER NOW!

Hiball

Well-known member
Joined
Apr 30, 2009
Messages
14,027
Location
Missery
Install the brass washer first, then The white Heel plate, then the Ucup mates to the heel plate flat side down, curved side outward. The white crumbled up piece in the picture was what used to secure the Ucup, it wasn't a very good design and when the Ucup deteriorates it falls off and normally gets smashed. I normally use a quality zip tie as a replacement, during normal operation the Ucup can't come off, but if someone would grab the lift arm and lift, it's possible for the Ucup to come off without pressure to keep it secured. I wouldn't mess with the ram screen or ball, everything is secured by a staked washer and there is only so much material to go back. The black particules are what is left of the Ucup, the rest is probably in the bottom of the cylinder bore and in the valve system.
 
OP
W

WarDamnEagle

Well-known member
Joined
Mar 13, 2009
Messages
208
Location
Auburn
Thanks so much....and on a Friday night! So there is only one heel plate and not 3?

I will try a zip tie. It looks like you could use a snap ring (retaining ring) in the groove to keep the U Cup from coming off?
 
Last edited:

Hiball

Well-known member
Joined
Apr 30, 2009
Messages
14,027
Location
Missery
Thanks so much....and on a Friday night! So there is only one heel plate and not 3?

I will try a zip tie. It looks like you could use a snap ring (retaining ring) in the groove to keep the U Cup from coming off?

They changed from 3 to 1 over the years, and maybe back again IRC. The stack height remained the same though and they where interchangeable. I never liked to use a snap ring, because the groove is so big, lots of options, just pick one that works for you.
 
OP
W

WarDamnEagle

Well-known member
Joined
Mar 13, 2009
Messages
208
Location
Auburn
Well I finished taking the hydraulic unit apart this morning on the Walker. It wasn't nearly as grimy as the Blackhawk. For others tackling this job, those valve screws are not easy to break loose. I had to use large straight blade sockets with an impact wrench on two of them. One broke with a cheater bar.

I was very careful to label and lay everything out as I took the jack apart but unfortunately I did run into an issue or two during reassembly. The first question has to do with a part that fell out as I was cleaning the jack. It is the bullet shaped piece in the first photo. I have it shown with the Release Stem because I think that piece is the Release Valve (part #212227). If so there is suppose to be a Plastic Spring (part #233917) between the Release Valve and the Release Stem. So, is that the Release Valve and do I need a Release Spring?

Second photo shows how the parts came off the Pressure Pump: 3 U-Cups, 1 Back-up Washer (I think that's it; part #232968), 1 metal washer, and 1 locking nut. The parts diagram says that the Back-up Washer goes on first followed by 1 U-Cup. It doesn't mention the metal washer or nut. So I used the Back-Up Washer from the kit with the convex side toward the pump followed by 3 U-Cups from the kit (maybe 3 pieces make 1 U-Cup??) then the metal washer and nut. The next photo shows the assembly. Is this correct or do I need to rearrange?

No photo but the Tank Nut calls for a Ram Quad Ring (part #221764) which goes in a groove inside the Tank Nut. Two seals came out of my Tank Nut. I used the largest seal in the kit but it doesn't completely fill the width of the groove. I tried to put one of the leftover seals in the top left of the last photo but couldn't get it in with the Ram Quad Ring. It does look like two of the three leftover seals in the photo would work without the Ram Quad Ring. So any issue there? Do I need to try to force one of those three leftover seals in the groove?

Lastly the last photo shows all the leftover parts except for some ball bearings. Anything there that I should probably have used?

Thanks!!!!!!!!!!
 

Attachments

  • Walker Jack parts 4.jpg
    Walker Jack parts 4.jpg
    111.3 KB · Views: 34
  • Walker Jack parts 3.jpg
    Walker Jack parts 3.jpg
    107.7 KB · Views: 32
  • Walker Jack parts 1.jpg
    Walker Jack parts 1.jpg
    115 KB · Views: 35
  • Walker Jack parts 2.jpg
    Walker Jack parts 2.jpg
    127.3 KB · Views: 36

Hiball

Well-known member
Joined
Apr 30, 2009
Messages
14,027
Location
Missery
1. The spring between the release stem and the cone isn't a spring in the sense of your typical spring, if you look at the end of the release stem you will see a white piece in the end. The job of this "spring" is essentially there to reduce friction between the 2 parts.

2. Yeah you definitely have stuff out of whack on the "current" component installation, and it looks like those "Vees" are wrecked. It almost looks like you tried to install them in the bore or have the nut completely cranked down, which will can ruin them, not only need to be in the proper order, they need to be soaked in hydraulic oil prior to installation, Also remember to install the compression nut/packing prior to the seals, otherwise you can't get them over the seals. Probably going to have to replace those Vees, the order is correct on the Pick.

3. Should have been a thin backup in the kit that will mate to the quad ring, it needs to be installed beveled side towards the quad ring and above the pressure side. If you didn't get one in the kit, you can reuse the old one in a pinch.

4. Extra parts, looks like packing for the Tank on older series, Yours uses quad ring, Freeze plug for overload, copper crush for older vent series, leather piston for High speed, assuming yours uses quad ring, power pump ucup, yours uses leather Vees, white washer for Newer vent.
 
OP
W

WarDamnEagle

Well-known member
Joined
Mar 13, 2009
Messages
208
Location
Auburn
2. Yeah you definitely have stuff out of whack on the "current" component installation, and it looks like those "Vees" are wrecked. It almost looks like you tried to install them in the bore or have the nut completely cranked down, which will can ruin them, not only need to be in the proper order, they need to be soaked in hydraulic oil prior to installation, Also remember to install the compression nut/packing prior to the seals, otherwise you can't get them over the seals. Probably going to have to replace those Vees, the order is correct on the Pick.

3. Should have been a thin backup in the kit that will mate to the quad ring, it needs to be installed beveled side towards the quad ring and above the pressure side. If you didn't get one in the kit, you can reuse the old one in a pinch.

So the parts diagram is incorrect? I did soak them in hydraulic fluid, installed them and then removed them as I had forgotten to run the pump stem through the packing nut. So you think I need to get new Vees (I assume 3 Vees make 1 U-Cup??); if so I will give you guys a call on Monday.

I will look for a thin backup in the kit. One of the two that were in my tank nut was trashed. Not sure which one it was but will look.

Thanks.
 

Hiball

Well-known member
Joined
Apr 30, 2009
Messages
14,027
Location
Missery
So the parts diagram is incorrect? I did soak them in hydraulic fluid, installed them and then removed them as I had forgotten to run the pump stem through the packing nut. So you think I need to get new Vees (I assume 3 Vees make 1 U-Cup??); if so I will give you guys a call on Monday.

I will look for a thin backup in the kit. One of the two that were in my tank nut was trashed. Not sure which one it was but will look.

Thanks.

I believe you might be looking at the wrong diagram (series?) or diagram area, Vees never make a Ucup, 2 completely different types of seals. The Vees look trashed to me, make some better pictures of them disassembled.

Oh.. I'm not affiliated with HPS, outside of dealing with them for over 20 years.
 
Last edited:
OP
W

WarDamnEagle

Well-known member
Joined
Mar 13, 2009
Messages
208
Location
Auburn
Thanks. I have two diagrams and they are consistent. One is for new HW93657 and the other is an old Walker parts diagram for the model 93657. Perhaps neither is correct for my ~1978 Walker 93657. I will take it apart tomorrow and inspect.

Again; thanks.
 

Hiball

Well-known member
Joined
Apr 30, 2009
Messages
14,027
Location
Missery
Thanks. I have two diagrams and they are consistent. One is for new HW93657 and the other is an old Walker parts diagram for the model 93657. Perhaps neither is correct for my ~1978 Walker 93657. I will take it apart tomorrow and inspect.

Again; thanks.

New HW models use a Ucup on the Power piston, older ones still use the Vee's including your series.
 
OP
W

WarDamnEagle

Well-known member
Joined
Mar 13, 2009
Messages
208
Location
Auburn
Well I rearranged the Vee's and did a test fit. You still have to tap the assembly into the cylinder but you can pull it out by hand.........well with two hands and a drift punch crosswise through the hole in the end.

I took a photo of the result with the old parts adjacent. I'm in no hurry to put it back together so if there is any question at all I will just get 3 new Vee's ordered.

I also tried to measure the remaining gap in the groove in the Tank Nut. There is about 3/32" left next to the Ram Quad Ring. The 3 remaining seals that were left in the kit are all twice that thick. I will phone the hydraulic supply tomorrow and ask about the additional seal.

The second photo shows the Ram as assembled. It had to have come like that from the factory but would have included the plastic cap that disintegrated. Again, the diagram that I'm using says there are 3 Heel Plates but I assume this one is just thicker.

For posterity sake I posted photos of the Model Plate and the Serial Number plate. The factory diagrams that I have are of a J model and apparently mine is a K model. The J model diagram and the new HW93657 owner's manual diagram match perfectly. Maybe K came before J or they changed some of the seals and then changed them back? Couldn't find anything online diagram wise for a K model.
 

Attachments

  • Walker Jack parts 5.jpg
    Walker Jack parts 5.jpg
    104.1 KB · Views: 35
  • Walker Jack parts 7.jpg
    Walker Jack parts 7.jpg
    86.3 KB · Views: 31
  • Walker Jack Model plate.jpg
    Walker Jack Model plate.jpg
    129.6 KB · Views: 26
  • Walker Jack serial number.jpg
    Walker Jack serial number.jpg
    144.5 KB · Views: 24

Hiball

Well-known member
Joined
Apr 30, 2009
Messages
14,027
Location
Missery
Well I rearranged the Vee's and did a test fit. You still have to tap the assembly into the cylinder but you can pull it out by hand.........well with two hands and a drift punch crosswise through the hole in the end.

I took a photo of the result with the old parts adjacent. I'm in no hurry to put it back together so if there is any question at all I will just get 3 new Vee's ordered.

I also tried to measure the remaining gap in the groove in the Tank Nut. There is about 3/32" left next to the Ram Quad Ring. The 3 remaining seals that were left in the kit are all twice that thick. I will phone the hydraulic supply tomorrow and ask about the additional seal.

The second photo shows the Ram as assembled. It had to have come like that from the factory but would have included the plastic cap that disintegrated. Again, the diagram that I'm using says there are 3 Heel Plates but I assume this one is just thicker.

For posterity sake I posted photos of the Model Plate and the Serial Number plate. The factory diagrams that I have are of a J model and apparently mine is a K model. The J model diagram and the new HW93657 owner's manual diagram match perfectly. Maybe K came before J or they changed some of the seals and then changed them back? Couldn't find anything online diagram wise for a K model.

1. The Vees are trashed, it will never seal. There is a fine line in regards to "How" much compression you put on the Vees prior to installation. If you tighten them down too much, you expand the lip outwards and it can be damaged upon installation. Just for Clarity.. Look at the seals that came off versus what you have now. It's easy to tell the difference between the pump Pistons in regards to which ones utilize Ucups versus Vees. The Vee Pistons utilize a concave backing that accept the natural shape of the Vees, versus a flat base for the ucup to mate too, not to mention the Ucup version utilizes a button to secure the Ucup, versus a threaded stem.

2. Yeah there isn't a backup in the pictures, the 3 packing rings are for the leather Ram series, won't fit nor work as a backup.

3. The Ram? The distance appears correct, along with the offset. As I mentioned earlier they have changed from 1 to 3 heel plates over the years.

The K was actually a early 93657, I know it doesn't make since but the 93657 was initially sold under Walker as a update from the J134. I scoured some of the online Walker 93657 manuals and it appears some of them are a cobbled up version with a lot of Mixing and matching of series.
 
Last edited:
OP
W

WarDamnEagle

Well-known member
Joined
Mar 13, 2009
Messages
208
Location
Auburn
Thanks. Never too old to learn! Easy enough to get new ones at this point.

Your quick advice again is very much appreciated!
 
OP
W

WarDamnEagle

Well-known member
Joined
Mar 13, 2009
Messages
208
Location
Auburn
Well I ordered 3 new V packings today for the Pressure Pump and thanks to the kinds folks at Hydraulic Parts Supply I managed to get an actual parts diagram and description list for a Walker 96357 K Series. I have attached them here for posterity.

In addition I learned that the tank nut seal I was trying to use, the Ram Quad Ring, is not for my jack. I am supposed to use 2 of the leftover seals (no explanation as to why there were 3 in the kit) as I have a Gland Nut on my Tank Nut. Apparently I need to separate the two and install the Tank Nut first. Then install the two seals and the Gland Nut.

I also discussed the missing plastic cap on the ram, called a U-Cup Retainer, and verified that it was no longer available. They are sending me two additional back up washers as possible spacers. They also suggested a retaining ring but I will decide that later when I see how the spacing is working out. I think two more will be too much as it will throw the top of the U-Cup into the groove and clearly you want the U-Cup to stay tight on the shaft. I'm actually thinking maybe a Zip tie on the shaft under the groove with a retaining ring in the groove. We'll see.

Edit: Unfortunately the Parts Diagram is just a bit too large in it's current PDF format. I have included the Parts Description and will edit again and include the Parts Diagram when I get the size reduced.
 

Attachments

  • Walker 93657 K series parts description 2.pdf
    111 KB · Views: 13
  • Walker 93657 K series parts description 1.pdf
    127.5 KB · Views: 17
  • Walker 93657 K series parts diagram.jpg
    Walker 93657 K series parts diagram.jpg
    77.5 KB · Views: 25
Last edited:

Hiball

Well-known member
Joined
Apr 30, 2009
Messages
14,027
Location
Missery
Well I ordered 3 new V packings today for the Pressure Pump and thanks to the kinds folks at Hydraulic Parts Supply I managed to get an actual parts diagram and description list for a Walker 96357 K Series. I have attached them here for posterity.

In addition I learned that the tank nut seal I was trying to use, the Ram Quad Ring, is not for my jack. I am supposed to use 2 of the leftover seals (no explanation as to why there were 3 in the kit) as I have a Gland Nut on my Tank Nut. Apparently I need to separate the two and install the Tank Nut first. Then install the two seals and the Gland Nut.

I also discussed the missing plastic cap on the ram, called a U-Cup Retainer, and verified that it was no longer available. They are sending me two additional back up washers as possible spacers. They also suggested a retaining ring but I will decide that later when I see how the spacing is working out. I think two more will be too much as it will throw the top of the U-Cup into the groove and clearly you want the U-Cup to stay tight on the shaft. I'm actually thinking maybe a Zip tie on the shaft under the groove with a retaining ring in the groove. We'll see.

Edit: Unfortunately the Parts Diagram is just a bit too large in it's current PDF format. I have included the Parts Description and will edit again and include the Parts Diagram when I get the size reduced.

Does your Tank nut has the inner spanner nut on the outside of the tank nut? I thought you said it had a inner groove? Which would be for the quad ring.

Here is a online link to what appears you are trying to post.
 
Last edited:
OP
W

WarDamnEagle

Well-known member
Joined
Mar 13, 2009
Messages
208
Location
Auburn
Does your Tank nut has the inner spanner nut on the outside of the tank nut? I thought you said it had a inner groove? Which would be for the quad ring.

I did say it had a groove but only because I didn't know what I was looking at. It has a packing gland nut which I suppose is a spanner nut screwed into the top of the tank nut. The two do not meet internally so when you look inside it looks like a groove. I didn't appreciate that they were two pieces. I've attached a photo showing the "groove" with the Quad Ring installed. My mistake.
 

Attachments

  • Walker Jack parts 6.jpg
    Walker Jack parts 6.jpg
    94.4 KB · Views: 20

Hiball

Well-known member
Joined
Apr 30, 2009
Messages
14,027
Location
Missery
I did say it had a groove but only because I didn't know what I was looking at. It has a packing gland nut which I suppose is a spanner nut screwed into the top of the tank nut. The two do not meet internally so when you look inside it looks like a groove. I didn't appreciate that they were two pieces. I've attached a photo showing the "groove" with the Quad Ring installed. My mistake.

Ok.. Np, I always use all 3 pieces of packing, the inner spanner nut will be a bit proud, but all 3 will fit.

Note... Do not over tighten the inner gland nut, it will not only wear the seals faster, it will cause the quick lift not to operate.
 
OP
W

WarDamnEagle

Well-known member
Joined
Mar 13, 2009
Messages
208
Location
Auburn
Ok.. Np, I always use all 3 pieces of packing, the inner spanner nut will be a bit proud, but all 3 will fit.

Note... Do not over tighten the inner gland nut, it will not only wear the seals faster, it will cause the quick lift not to operate.

There were two seals that I removed. One was intact and just identical to the ones that go back. The other one was destroyed but looked like it was the same material. I'm wondering myself if maybe I should use the quad ring and one of the other seals instead of two of the "correct" seals? Maybe the quad ring doesn't work so well without the backer seal with the beveled edge?

Probably doesn't matter as little use as this jack will ever see. :lol:
 

Hiball

Well-known member
Joined
Apr 30, 2009
Messages
14,027
Location
Missery
There were two seals that I removed. One was intact and just identical to the ones that go back. The other one was destroyed but looked like it was the same material. I'm wondering myself if maybe I should use the quad ring and one of the other seals instead of two of the "correct" seals? Maybe the quad ring doesn't work so well without the backer seal with the beveled edge?

Probably doesn't matter as little use as this jack will ever see. :lol:

Use the packing.. In theory if your cylinder bore is good/New Ucup you shouldn't have much oil on top of the piston head, mostly some startup leakage and over extension pressurized oil.
 
OP
W

WarDamnEagle

Well-known member
Joined
Mar 13, 2009
Messages
208
Location
Auburn
I have two of those 4 ton jacks and both had their u-cups in pieces. One is an older Walker which I have not repaired yet because it is missing a plastic cup (broken) that goes were the u-cup goes and supposedly is no longer available new, (someone else picture below of missing part) and the other was a newer Lincoln. I am considering replacing the broken plastic cup with a steel bushing sometime in the future.

Well I have been pondering different solutions to the missing plastic cap. I tried various zip ties and a self gripping snap ring but all of them failed the pull off test. In other words, if I put the ram assembly in they would pull off when I attempted to pull the assembly back out.

I finally bought some heavy duty 7/8" snap rings from McMaster Carr and had a machine shop groove the shaft to spec for the ring. The ring is just above the U-Cup and it will not pull off - period.

Hopefully I can now get the jack put back together.
 

Attachments

  • Walker Jack parts 8.jpg
    Walker Jack parts 8.jpg
    75.9 KB · Views: 22
  • Walker Jack parts 9.jpg
    Walker Jack parts 9.jpg
    108 KB · Views: 28
OP
W

WarDamnEagle

Well-known member
Joined
Mar 13, 2009
Messages
208
Location
Auburn
Got it all put back together this morning before the football games started. Seems to work very well. Thanks again to Hiball and everyone else for the advice. I learned a lot.
 

Attachments

  • Walker Jack Finished.jpg
    Walker Jack Finished.jpg
    150.3 KB · Views: 25
To avoid these ads, REGISTER NOW!
Top Bottom