ToolEnthusiasts
Member
Thought I would share my 1 1/2 year restoration project journey. I purchased two machines at a house in Hayward, California from a retired contractor. I initially went to see just an old crusty drill press which turned out to be a craftsman mohawk style from 1941 or 42 (a different story which I'll go into later on another post) and sitting next to it was another machine I had never seen in my life. I asked him what it was and he said " it's a jointer" (picture below). At this point I had to ask, What is a jointer?" I think he felt sorry for me and proceeded to tell me what it was and how it could be helpful in my quest to build furniture and guitars. So, I purchased both crusty, rusty and not working machines for $20 each. I lifted them up and threw them in the back of my car and drove them home with the hopes of being able to restore them rather quickly. The quick part was not to happen, but I did get both restored and this post is focused on the Walker Turner Jointer.
To be blunt, I had no idea what a jointer was nor how to use it at the time but it now now sat in my garage taking up space. I took plenty of time getting to know what I actually acquired online with plenty of YouTube videos, forums and history lessons on the company. I was convinced that this would be one of the machines to be included as the centerpieces for my tiny little garage shop to come. Little by little, I was getting sucked into this vortex of vintage tools ... and loving it!
As I was quite unfamiliar with the machines and a novice, the jointer set in my garage for nearly a year before I dated to touch it. It continued to be rusty, dusty and now, in MY way. But I had hopes that it would be a shiny, gleaming and actually functional device.
When my brother came over and asked me what it was and how you use it, I gave him all the details I had learned about it's history and such. I was now an expert I thought! I decided right after he left, I needed to get this project started and so the next day, I started to disassemble the jointer.
I would have posted on a regular basis, but I really was worried that I wouldn't be able to complete my project and so I didn't post as I was going along. I don't know about most of you, but I like to work late at night when I can relax with uninterrupted time. Also, I work during the day so the project took a long time, (although quite enjoyable).
As I started taking it apart, I had to do a lot of research on the jointer, the parts and how it was supposed to work. I wasn't sure if it was complete or if I was missing items and I'd learned that I was missing a few pieces. Or should I say all of the swing away guard blade assembly. (If anyone has a lead on the blade cover with the swing away arm let me know)
I discovered how to take off the fence and the two tables and the blade cylinder and then I had parts all over the garage floor. I was worried and was furiously trying to take photos and bag parts with labels. It can get quite overwhelming really quickly and I had a lot of respect for people that were able to do nice restoration jobs. Not being a slouch myself, I watched plenty of videos and read plenty of posts in the forms to pull out nuggets and treasures of advice and guidance.
I took a long time for another reason as well, I was extremely cautious and worried that I may make a mistake that I couldn't fix. Little by little I took every part and cleaned it. Wired-wheeled it! Sandblasted, and used an amazing amount of Emery cloth and green Scotch-Brite pads! There was a lot of rust and a lot of paint splattered over the entire machine. However, I was encouraged as I wanted to bring this back to life.
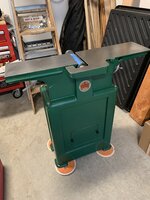
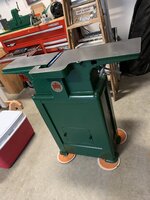
Below are some of the first photos I took of the jointer shortly after I got it home in April of 2020.
I will post more photos as I think it could be helpful for other people that want to do a p restoration project similar to this one and use it as a reference for other people that have a 6-in Walker. Turner jointer from I believe around 1950.
I don't think I could have gotten this or my other projects done without the encouragement I found here on Garage Journal!


To be blunt, I had no idea what a jointer was nor how to use it at the time but it now now sat in my garage taking up space. I took plenty of time getting to know what I actually acquired online with plenty of YouTube videos, forums and history lessons on the company. I was convinced that this would be one of the machines to be included as the centerpieces for my tiny little garage shop to come. Little by little, I was getting sucked into this vortex of vintage tools ... and loving it!
As I was quite unfamiliar with the machines and a novice, the jointer set in my garage for nearly a year before I dated to touch it. It continued to be rusty, dusty and now, in MY way. But I had hopes that it would be a shiny, gleaming and actually functional device.
When my brother came over and asked me what it was and how you use it, I gave him all the details I had learned about it's history and such. I was now an expert I thought! I decided right after he left, I needed to get this project started and so the next day, I started to disassemble the jointer.
I would have posted on a regular basis, but I really was worried that I wouldn't be able to complete my project and so I didn't post as I was going along. I don't know about most of you, but I like to work late at night when I can relax with uninterrupted time. Also, I work during the day so the project took a long time, (although quite enjoyable).
As I started taking it apart, I had to do a lot of research on the jointer, the parts and how it was supposed to work. I wasn't sure if it was complete or if I was missing items and I'd learned that I was missing a few pieces. Or should I say all of the swing away guard blade assembly. (If anyone has a lead on the blade cover with the swing away arm let me know)
I discovered how to take off the fence and the two tables and the blade cylinder and then I had parts all over the garage floor. I was worried and was furiously trying to take photos and bag parts with labels. It can get quite overwhelming really quickly and I had a lot of respect for people that were able to do nice restoration jobs. Not being a slouch myself, I watched plenty of videos and read plenty of posts in the forms to pull out nuggets and treasures of advice and guidance.
I took a long time for another reason as well, I was extremely cautious and worried that I may make a mistake that I couldn't fix. Little by little I took every part and cleaned it. Wired-wheeled it! Sandblasted, and used an amazing amount of Emery cloth and green Scotch-Brite pads! There was a lot of rust and a lot of paint splattered over the entire machine. However, I was encouraged as I wanted to bring this back to life.
Below are some of the first photos I took of the jointer shortly after I got it home in April of 2020.
I will post more photos as I think it could be helpful for other people that want to do a p restoration project similar to this one and use it as a reference for other people that have a 6-in Walker. Turner jointer from I believe around 1950.
I don't think I could have gotten this or my other projects done without the encouragement I found here on Garage Journal!
Attachments


Last edited: