Medeek
Well-known member
Started to put the Wall Plugin together in earnest today. A lot of competing interests so I'm still not sure on the date of first release yet, but at least I'm putting something together now.

For the Imperial Version the First and Second Menu Items (Ext. Wall Type) are currently:
First Menu:
1.) Wall Mode: Line, Polyline
2.) Wall Type: Exterior, Interior
3.) Wall Justification: Front, Center, Back
4.) Wall Height (in.): 97
5.) Wall Header Height (in.): 80
6.) Stud Size: 2x2, 2x4, 2x6, 2x8, 2x10, 2x12
7.) Stud Spacing (in.): 12,16,19.2,24,32,48
8.) Stud Direction: Left, Right
9.) Corner Offset (in.): 0
10.) Top Plate: 1,2,3
11.) Top Plate Thickness (in.): 1.5
12.) Bottom Plate: 1,2,3
13.) Bottom Plate Thickness (in.): 1.5
14.) Adv. Wall Options: YES,NO
Second Menu (Adv. Wall Options):
1.) Wall Sheathing: YES,NO
2.) Sheathing Thickness: 3/8,7/16,15/32,1/2,19/32,5/8,23/32,3/4
3.) Wall Cladding: YES,NO
4.) Cladding Thickness: 3/8,7/16,15/32,1/2,19/32,5/8,23/32,3/4
5.) Wall Gypsum: YES,NO
6.) Gypsum Thickness: 1/4,3/8,1/2,5/8
I will start with the (single wall) line mode first and then progress to the polyline once I have the basic system working. Then the addition of doors and windows and advanced options which will automatically insert doors and windows into the openings.
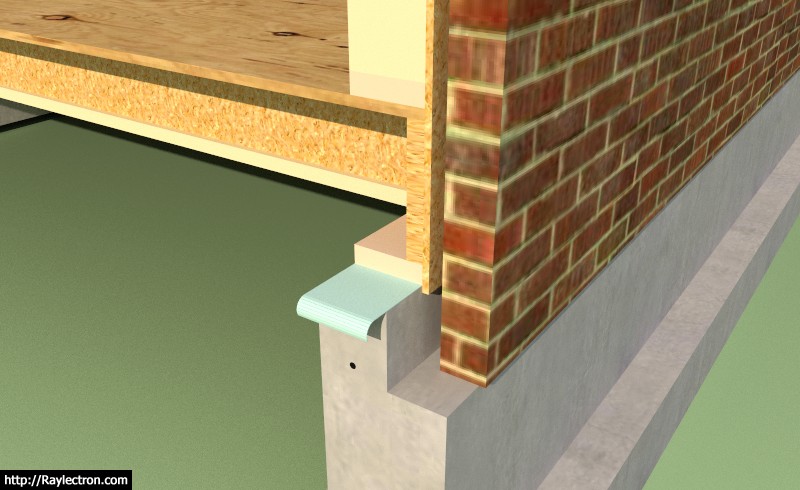
I've been thinking about brick facade and I'm not entirely sure how I'm going to incorporate this into the plugin yet. Typical air gap is 1":
A 5.5" thick stud wall with 1/2" sheathing and a 1" air gap with 3.5" thick brick fits on a 10" stemwall with a 1/2" overhang of the brick. Does anyone have any wall details/sections that they would like to see implemented in the plugin?
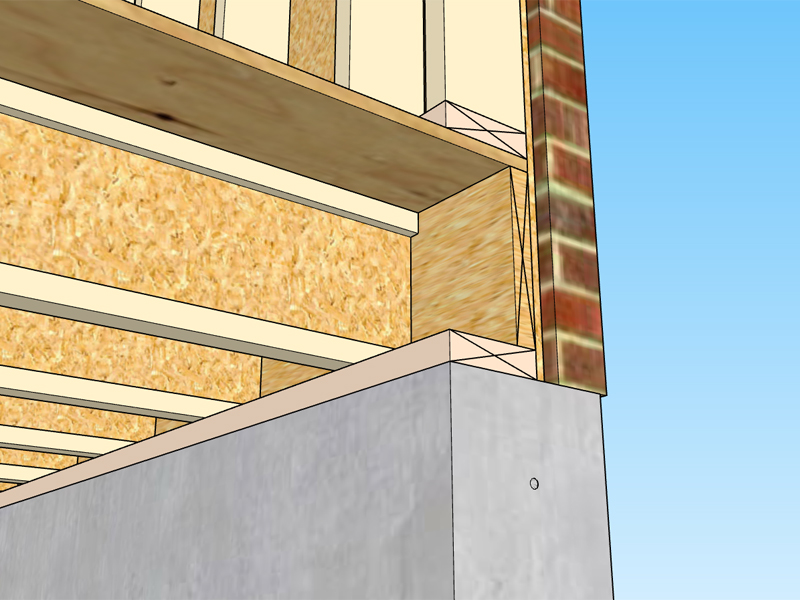
Here is the same wall but with a 4" x 6" brick ledge:
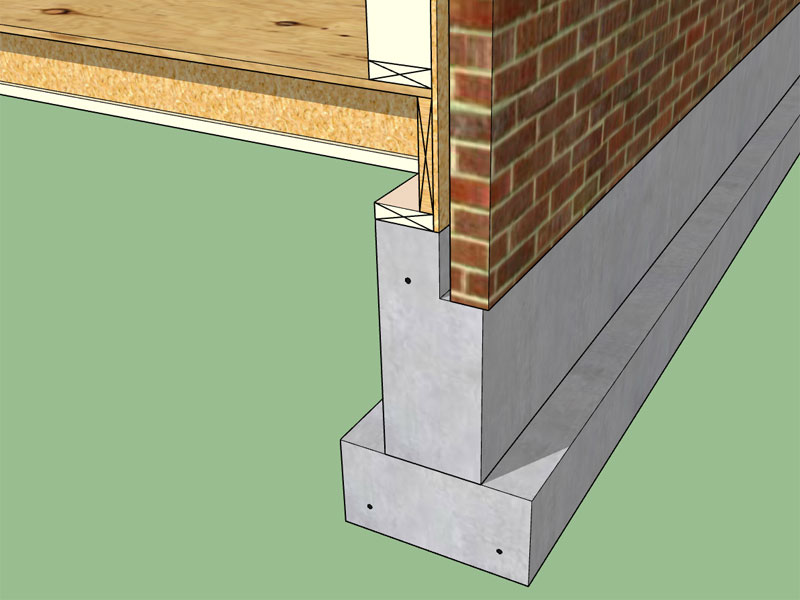
Notice the APA detail the brick ledge does not project below the structural sheathing, this probably makes more sense since you probably don't want the **** end of the sheathing sitting against the concrete and absorbing moisture, even though there usually will be a foam strip between the sill plate and the concrete.
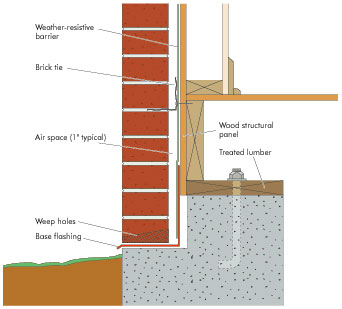
I've also seen details where the sheathing laps down over the brick ledge about a 1/2", this probably makes sense in helping to keep the bugs out but then it puts the sheathing into more direct contact with the concrete. More discussion on this subject is warranted. I've never actually had to provide a wall detail for brick since most of the construction locally is with hardi-plank siding so my experience with brick is theoretical at best.
For the Imperial Version the First and Second Menu Items (Ext. Wall Type) are currently:
First Menu:
1.) Wall Mode: Line, Polyline
2.) Wall Type: Exterior, Interior
3.) Wall Justification: Front, Center, Back
4.) Wall Height (in.): 97
5.) Wall Header Height (in.): 80
6.) Stud Size: 2x2, 2x4, 2x6, 2x8, 2x10, 2x12
7.) Stud Spacing (in.): 12,16,19.2,24,32,48
8.) Stud Direction: Left, Right
9.) Corner Offset (in.): 0
10.) Top Plate: 1,2,3
11.) Top Plate Thickness (in.): 1.5
12.) Bottom Plate: 1,2,3
13.) Bottom Plate Thickness (in.): 1.5
14.) Adv. Wall Options: YES,NO
Second Menu (Adv. Wall Options):
1.) Wall Sheathing: YES,NO
2.) Sheathing Thickness: 3/8,7/16,15/32,1/2,19/32,5/8,23/32,3/4
3.) Wall Cladding: YES,NO
4.) Cladding Thickness: 3/8,7/16,15/32,1/2,19/32,5/8,23/32,3/4
5.) Wall Gypsum: YES,NO
6.) Gypsum Thickness: 1/4,3/8,1/2,5/8
I will start with the (single wall) line mode first and then progress to the polyline once I have the basic system working. Then the addition of doors and windows and advanced options which will automatically insert doors and windows into the openings.
I've been thinking about brick facade and I'm not entirely sure how I'm going to incorporate this into the plugin yet. Typical air gap is 1":
A 5.5" thick stud wall with 1/2" sheathing and a 1" air gap with 3.5" thick brick fits on a 10" stemwall with a 1/2" overhang of the brick. Does anyone have any wall details/sections that they would like to see implemented in the plugin?
Here is the same wall but with a 4" x 6" brick ledge:
Notice the APA detail the brick ledge does not project below the structural sheathing, this probably makes more sense since you probably don't want the **** end of the sheathing sitting against the concrete and absorbing moisture, even though there usually will be a foam strip between the sill plate and the concrete.
I've also seen details where the sheathing laps down over the brick ledge about a 1/2", this probably makes sense in helping to keep the bugs out but then it puts the sheathing into more direct contact with the concrete. More discussion on this subject is warranted. I've never actually had to provide a wall detail for brick since most of the construction locally is with hardi-plank siding so my experience with brick is theoretical at best.