To avoid these ads, REGISTER NOW!

Wall flashing on reroof

billconner

Well-known member
Joined
Jul 20, 2021
Messages
6,971
Location
Thousand Islands NYS
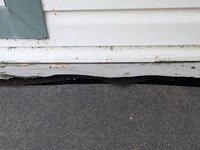
Another challegene on my porch addition, after I have decided to reroof existing. Picture shows existing wall flashing. I suspect this was not nailed through on original roof but on reroof they nailed through it. It's very well sealed - caulked - to that bottom piece of vinyl.

My best idea at the moment is to score/cut it just above nail holes - leaving 2 to 2 1/2". Then to install new wall flashing with a short - maybe 1 1/2" - vertical leg, slipped in behind existing. Then roof cement or maybe a butyl tape to seal the oll down to new.

Other ideas? This is not visible from exterior - 3 in 12 roof at top of a long sloped lot. Visible from master bedroom window if you look hard. And it's over an open porch, so not as critical as over an interior space.
 

Attachments

  • PXL_20250830_124452271_copy_1020x768.jpg
    PXL_20250830_124452271_copy_1020x768.jpg
    255 KB · Views: 31
To avoid these ads, REGISTER NOW!

PCustoms

Well-known member
Joined
Jul 23, 2011
Messages
23,416
Location
VT
Can't really tell what I'm looking at, but I'd personally never run vinyl starter strip of J channel that close to the roof. We have snow up here...
 

PCustoms

Well-known member
Joined
Jul 23, 2011
Messages
23,416
Location
VT
You're looking down. Starter strip is only an inch above the roof. Put there in 1994.
Yeah I'd cut out at least a half strip of siding.

You get get some good flashing in there, re-nail the j-teim/trim ship higher up and clean all that up in one go.

Is that window trim just nailed on top of siding, or is there j-trim?
 

BillK

Well-known member
Joined
Aug 24, 2006
Messages
9,360
Location
Beautiful Southern Maryland
Can you just slide the new roofing under the existing flashing ?? It is very hard to visualize this from this picture. Can you post another one from a few feet further back ?
 

PackagingSea

Member
Joined
Apr 5, 2021
Messages
19
Location
USA
Back in the day we’d just bend a custom piece with a longer kick-out, slip it up behind, and call it good. No need to tear off half the wall if it’s not over living space.
 
OP
B

billconner

Well-known member
Joined
Jul 20, 2021
Messages
6,971
Location
Thousand Islands NYS
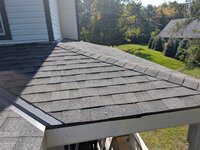
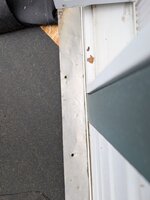
2 photos - straight on and straight down.

Window trim is vinyl with a J built in.
 

Attachments

  • PXL_20250830_194315516_copy_768x1020.jpg
    PXL_20250830_194315516_copy_768x1020.jpg
    197.6 KB · Views: 32

HankDallins

New member
Joined
Sep 5, 2025
Messages
1
Another challegene on my porch addition, after I have decided to reroof existing. Picture shows existing wall flashing. I suspect this was not nailed through on original roof but on reroof they nailed through it. It's very well sealed - caulked - to that bottom piece of vinyl.

My best idea at the moment is to score/cut it just above nail holes - leaving 2 to 2 1/2". Then to install new wall flashing with a short - maybe 1 1/2" - vertical leg, slipped in behind existing. Then roof cement or maybe a butyl tape to seal the oll down to new.

Other ideas? This is not visible from exterior - 3 in 12 roof at top of a long sloped lot. Visible from master bedroom window if you look hard. And it's over an open porch, so not as critical as over an interior space.
I think your idea to install new flashing slipped behind and then reseal should be fine... As long as you make sure it's sealed properly and then you shingle over top, you should be watertight! I've recently found TitanPatch sealant tape on Amazon and it's honestly one of the best butyl/sealant tapes I've come across in years.

I've used it to patch holes on the canvas material on my popup campers and it feels like it's going to hold for a long time. I've also used it for a few odd jobs around the house and it just feels like a really solid repair tape. I think it could work great for helping you seal your new flashing because it's not just waterproof, it's also UV resistant and designed to work in extreme cold or heat. So it shouldn't degrade even after years of baking in the sun on your roof!
 

alwaysFlOoReD

Well-known member
Joined
Sep 24, 2013
Messages
2,408
Location
Airdrie, Alberta, Canada
Run your shingles under the old flashing. Squirt some caulk , not silicone, between the shingle and flashing at the old holes. Press down so you see caulk squeeze up from old hole. Put new nails a few inches away from old.
 
OP
B

billconner

Well-known member
Joined
Jul 20, 2021
Messages
6,971
Location
Thousand Islands NYS
@HankDallins I'm sure I want shingles under, not over, flashing.

@alwaysFlOoReD No added flashing? Not too crazy about new nails through it. Was hoping added flashing and roof cement would be enough. Agree that added flashing.may not be necessary.

Wonder if a strip of the titanpatch would make it look better. Appearance was the reason for trimming the nail hole filled existing flashing and adding new under and behind.
 
OP
B

billconner

Well-known member
Joined
Jul 20, 2021
Messages
6,971
Location
Thousand Islands NYS
Just finished tear off. Wondering if I can slip ice and water shield in (on entire roof - 3:12) so it turns up wall a little under existing aluminum. Then just shingles up to wall under flashing, and a thick layer of asphalt roof sealant under flashing like alwaysF10oReD suggested. Just hoping I can get flashing to stay flat on roofing.
 

alwaysFlOoReD

Well-known member
Joined
Sep 24, 2013
Messages
2,408
Location
Airdrie, Alberta, Canada
@HankDallins I'm sure I want shingles under, not over, flashing.

@alwaysFlOoReD No added flashing? Not too crazy about new nails through it. Was hoping added flashing and roof cement would be enough. Agree that added flashing.may not be necessary.

Wonder if a strip of the titanpatch would make it look better. Appearance was the reason for trimming the nail hole filled existing flashing and adding new under and behind.
You could put a piece over the existing flashing just for esthetic reasons.
 
To avoid these ads, REGISTER NOW!

Bert_

Well-known member
Joined
Dec 24, 2016
Messages
9,775
Location
NW Iowa
I've used steel roofing screws in this situation before. They have a rubber washer so you have a good chance it won't leak
 

gba2331

Well-known member
Joined
Sep 22, 2021
Messages
781
I'm sure I want shingles under, not over, flashing.
I think the idea is the flashing is under one shingle but on top of the next / lower shingle. Otherwise wind could drive rain under the flashing that is on top of the shingle.
 

alwaysFlOoReD

Well-known member
Joined
Sep 24, 2013
Messages
2,408
Location
Airdrie, Alberta, Canada
The one pic I see is at a wall where one long continuous flashing is used, not a slope where step flashing would be used. So in this case the flashing goes on top of the shingle. Step flashing is where the upper shingle would cover the lower step flashing.
You need to remember...
Water runs downhill.
 
OP
B

billconner

Well-known member
Joined
Jul 20, 2021
Messages
6,971
Location
Thousand Islands NYS
The one pic I see is at a wall where one long continuous flashing is used, not a slope where step flashing would be used. So in this case the flashing goes on top of the shingle. Step flashing is where the upper shingle would cover the lower step flashing.
You need to remember...
Water runs downhill.
Indeed. The step flashing is no problem, in good condition. It's the "headwall" that's been nailed through which just seems wrong. I've about decided I can live with its appearance - since only visible from bedroom windows with head pressed against glass.

I'm struggling with the suggestion of last row of tabs on top and nails exposed. I liked the idea of embedding the flashing in asphalt roof cement, but will it stay down?

I discovered at previous 1904 house with cedar shakes and "tin" flashing, they covered headwall flashing at dormer with a wood clapboard. Granted it was under a deep eave (prairie style house) but still took a beating. Wondered if a cement or aluminum clap would last, but still fastening. A metal tab bent around **** of clap?
 

Burt Shaver

Well-known member
Joined
Dec 7, 2023
Messages
1,272
Location
Iroquois, Ontario Canada
Indeed. The step flashing is no problem, in good condition. It's the "headwall" that's been nailed through which just seems wrong. I've about decided I can live with its appearance - since only visible from bedroom windows with head pressed against glass.

I'm struggling with the suggestion of last row of tabs on top and nails exposed. I liked the idea of embedding the flashing in asphalt roof cement, but will it stay down?

I discovered at previous 1904 house with cedar shakes and "tin" flashing, they covered headwall flashing at dormer with a wood clapboard. Granted it was under a deep eave (prairie style house) but still took a beating. Wondered if a cement or aluminum clap would last, but still fastening. A metal tab bent around **** of clap?
I will say this, I can’t tell from the pictures what you are trying to do but anytime a nail head is exposed I always put ice and water shield beneath the materials. It’s self sealing
 
OP
B

billconner

Well-known member
Joined
Jul 20, 2021
Messages
6,971
Location
Thousand Islands NYS
New pictures. I don't trust the ice and water shield to last as long as the shingles, and would never leave a roofing nail head exposed. As happened here they rust and corrode before the shingles fail. Becoming comfortable with the ice and water shield - I couldn't slip it up the wall - two layers of shingles, and flashing with a layer of roof cement. I think the Titanpatch tape just wouldn't look good in 15 years.

Now have to recollect how to do valleys with W valley flashing. Have a few videos to watch.
 

Attachments

  • PXL_20250911_130050322_copy_1020x768.jpg
    PXL_20250911_130050322_copy_1020x768.jpg
    274.4 KB · Views: 22
  • PXL_20250911_130023792_copy_1020x768.jpg
    PXL_20250911_130023792_copy_1020x768.jpg
    214.6 KB · Views: 19
  • PXL_20250911_130010312_copy_1020x768.jpg
    PXL_20250911_130010312_copy_1020x768.jpg
    312.5 KB · Views: 17

jkuro

Well-known member
Joined
Apr 28, 2009
Messages
552
Step flashing doesn't look right.
 

Attachments

  • Screenshot_20250911_123553_Google.jpg
    Screenshot_20250911_123553_Google.jpg
    519.4 KB · Views: 26
OP
B

billconner

Well-known member
Joined
Jul 20, 2021
Messages
6,971
Location
Thousand Islands NYS
Step flashing doesn't look right.
I think it will look like the diagram once the shingles are installed. That is just the ice and water shield. There is about2" of overlap piece to piece. I don't know if its one piece - usually what I have done - or two piece. I'm not disturbing existing siding, which does make this a little hard.

There area couple of down spouts from higher roof gutters that drain on this rood and as I would expect, some additions degradation of the existing - now torn off - roof. Mushy shingles. I'm going to hire some one to do new gutters on porch an will see if they can propose some fixes - extending down spouts to gutter or whatever. A lot of steps and set backs make it tricky. The highest step flashing was one spot.

I was surprised how solid the flashing is after 30 years.
 
OP
B

billconner

Well-known member
Joined
Jul 20, 2021
Messages
6,971
Location
Thousand Islands NYS
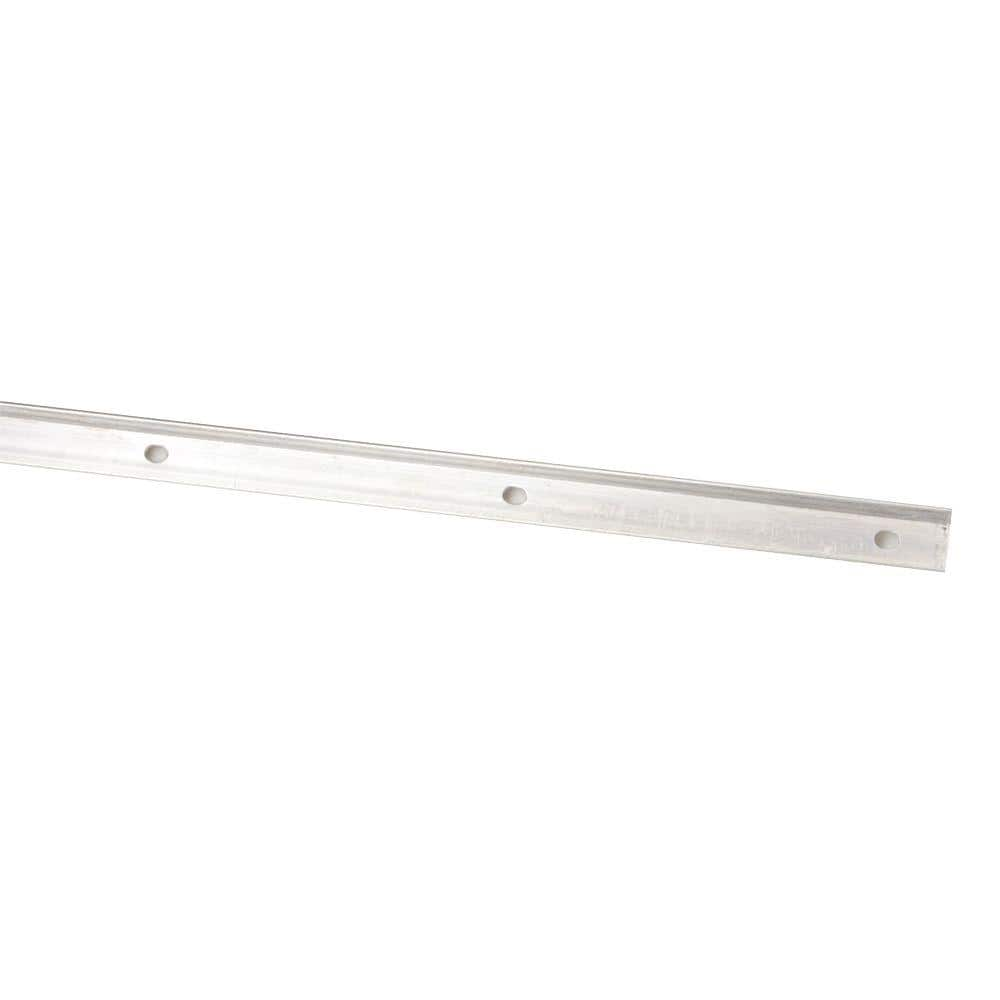
Almost done. Just some hips and ridge left to do tomorrow, and finish the wall flashing. Was thinking about termination bar, with caulk under and screws with gaskets like for metal roofs. Thought about just aluminum bar stock.


Also considered a strip of cement siding but I think it would hold too much water above it.
 

Burt Shaver

Well-known member
Joined
Dec 7, 2023
Messages
1,272
Location
Iroquois, Ontario Canada
don't trust the ice and water shield to last as long as the shingles, and would never leave a roofing nail head exposed
Ice and water is always under the shingles so it lasts forever. When your doing counter flashings, or vents there’s no choice sometimes but to leave a screw head or nail head exposed, sure you dab some roof cement on it, but it’s still considered an exposed fastener
 
OP
B

billconner

Well-known member
Joined
Jul 20, 2021
Messages
6,971
Location
Thousand Islands NYS
Ice and water is always under the shingles so it lasts forever.
I'm not worried about it lasting, but about its ability to seal water tight around fasteners for 20 years in a climate with below zero winters.

Finished. Some photos including my scaffold which I was able to move in about 15 minutes. Was a great help.
 

Attachments

  • PXL_20250928_155728096_copy_768x1020.jpg
    PXL_20250928_155728096_copy_768x1020.jpg
    355.8 KB · Views: 14
  • PXL_20250928_154914682_copy_1020x768.jpg
    PXL_20250928_154914682_copy_1020x768.jpg
    309.4 KB · Views: 11
  • PXL_20250928_154900367_copy_1020x768.jpg
    PXL_20250928_154900367_copy_1020x768.jpg
    320.4 KB · Views: 18

Burt Shaver

Well-known member
Joined
Dec 7, 2023
Messages
1,272
Location
Iroquois, Ontario Canada
I'm not worried about it lasting, but about its ability to seal water tight around fasteners for 20 years in a climate with below zero winters.

Finished. Some photos including my scaffold which I was able to move in about 15 minutes. Was a great help.
Looks good, well whether it lasts or not, there’s no other options. All I’m saying is where the flashing is on the wall, the bottom part of that flashing is screwed with metal roofing screws through the shingles, same as the lower portion of a roof vent or stink pipe flange. So again, anywhere there is an exposed fastener you should have ice and water beneath the shingles and the ice and water overlapping the synthetic. Probably never get a drop of water anyways, but if the washer on the screw happened to fail and some water made its way down the shank of the screw there should be ice and water there so the moisture wicks away beneath the shingles
 
OP
B

billconner

Well-known member
Joined
Jul 20, 2021
Messages
6,971
Location
Thousand Islands NYS
I feel pretty good about it. Only a very few nails that go from weather did through sheathing, mostly close to leeward side wall, through flashing and shingles and ice and water with blob of roof cement under each penetration of shingles and flashing, a dab on nail head, and a squirt under each existing nail hole in flashing. Still looking at idea of a termination bar to cover ragged existing flashing and "clamp" it down.
 
To avoid these ads, REGISTER NOW!
Top Bottom