To avoid these ads, REGISTER NOW!

Water line through foundation

ururk

Well-known member
Joined
Jan 9, 2010
Messages
739
Location
Southeast MI
Heh, I couldn't find a plumbing forum on this site so decided might as well post here :D

I am running a water line out to my barn workshop - in fact the line was run about two weeks ago via directional boring (1" IPS, NPS poly). It's now time to dig pits on either end to run the pipe into the house and barn.

At the barn I already stubbed out a 3" PVC pipe with long sweep for the water line - that should be "easy" to feed the 1" line through.

At the house I need to core drill a hole through 10" of concrete.

Would appreciate some advice on the following:

1) What product should I use in the 3" pipe to seal the inner space down at the barn?

2) What product/technique should I use to seal the core drilled hole in the foundation?

#2 is causing me a lot of problems in particular. I'd like to use a link seal - but do I put a seal on either end of the pipe? Can I just bore a 3" hole and not sleeve it with the link seals? Do I coat the core with an epoxy product? Are sleeves even required in a cored hole? If I use a link seal, do I still seal the outer foundation wall with some sort of tar-like product? Can you even use a link seal with a poly line?

I could do it all traditional-like - core, sleeve, fill space between 1" pipe and 1.5" sleeve with silicone or other appropriate caulk, and roofing tar the outside. But our well pipe has a water leak around it, as have the other pipe penetrations in the past, so I'd like to avoid the "traditional" way.

Thanks!
 
To avoid these ads, REGISTER NOW!

510ebl

Well-known member
Joined
Jan 20, 2015
Messages
518
Location
Southern New Jersey
I am not a plumber, but when running water service through my basement wall I used a fernco pipe sleeve seal inside and outside the wall to seal the 1” line to the sleeve. No leaks. I don’t recall what I used to seal the sleeve to the concrete though. I may have used spray foam on the inside.

https://www.fernco.com/products/flexible-couplings/pipe-sleeve-seals
 
Last edited:

stokefire7

Well-known member
Joined
Oct 5, 2011
Messages
616

larry4406

Well-known member
Joined
Jan 27, 2006
Messages
19,558
Location
Northern Virginia
I did the same thing last year. Still need to tie the water lines in to the basement plumbing....

I ran 1" black poly. One line for yard hydrants (some question potability due subsurface drain), and another potable line for a hopeful detached garage with living space.

From outside, dig down to where you want to core thru the wall. Core from the outside and core at a slight upward angle, say 15 degrees. Your core bit is chosen based on the pipe sleeve you intend to insert and the pipe you intend to run. I used 1.5" PVC for the sleeve for my 1" black poly.

After the wall is cored, measure and cut PVC sleeves. I ran long on the interior by about 1" and on the outside by about 2-3 inches. Blow the hole clear with compressed air then use hydraulic cement to pack the annulus fully from both the inside and the outside and feather the patch into the wall sides.

After the hydraulic cement has cured, tar the hydraulic cement and the wall to match the waterproofing. Dig down to the house perimeter drainage system. Add gravel up to the level of your wall penetrations. This will provide a short circuit to the draintile vs the groundwater challenging your penetration.

Use Fernco couplings to seal the sleeve to the poly. I could not find the proper size to match the black poly OD so I used a short section of vinyl hose from the Orange Big Box store to a make up the difference. After the Fernco's are in place, add more gravel over and above the penetration, add filter fabric, then bury.

On the interior, place hose clamps into position, heat the brass barb with a torch, press barb into poly, tighten clamps, then connect interior water line to barb.

No leaks.
 

Attachments

  • Foundation Cored.jpg
    Foundation Cored.jpg
    169 KB · Views: 174
  • PVC sleeves.jpg
    PVC sleeves.jpg
    123.9 KB · Views: 175
  • PVC sleeves outside.jpg
    PVC sleeves outside.jpg
    163.6 KB · Views: 173
  • Foundation Tarred.jpg
    Foundation Tarred.jpg
    148.8 KB · Views: 175
  • Water Lines Stubbed Into House.jpg
    Water Lines Stubbed Into House.jpg
    91.2 KB · Views: 187
  • Fernco's in place.jpg
    Fernco's in place.jpg
    148.5 KB · Views: 192
Last edited:

nadogail

Well-known member
Joined
Jan 23, 2009
Messages
32,041
Location
Coronado, CA
How about running the water line through the wall above the 10" thick foundation?

I think that would be easier than trying to get through a thick foundation wall.
 
OP
U

ururk

Well-known member
Joined
Jan 9, 2010
Messages
739
Location
Southeast MI
How about running the water line through the wall above the 10" thick foundation?

I think that would be easier than trying to get through a thick foundation wall.
I want water year-round, and it freezes here (Southeast Michigan).
 
OP
U

ururk

Well-known member
Joined
Jan 9, 2010
Messages
739
Location
Southeast MI
I did the same thing last year. Still need to tie the water lines in to the basement plumbing....

I ran 1" black poly. One line for yard hydrants (some question potability due subsurface drain), and another potable line for a hopeful detached garage with living space.

From outside, dig down to where you want to core thru the wall. Core from the outside and core at a slight upward angle, say 15 degrees. Your core bit is chosen based on the pipe sleeve you intend to insert and the pipe you intend to run. I used 1.5" PVC for the sleeve for my 1" black poly.

After the wall is cored, measure and cut PVC sleeves. I ran long on the interior by about 1" and on the outside by about 2-3 inches. Blow the hole clear with compressed air then use hydraulic cement to pack the annulus fully from both the inside and the outside and feather the patch into the wall sides.

After the hydraulic cement has cured, tar the hydraulic cement and the wall to match the waterproofing. Dig down to the house perimeter drainage system. Add gravel up to the level of your wall penetrations. This will provide a short circuit to the draintile vs the groundwater challenging your penetration.

Use Fernco couplings to seal the sleeve to the poly. I could not find the proper size to match the black poly OD so I used a short section of vinyl hose from the Orange Big Box store to a make up the difference. After the Fernco's are in place, add more gravel over and above the penetration, add filter fabric, then bury.

On the interior, place hose clamps into position, heat the brass barb with a torch, press barb into poly, tighten clamps, then connect interior water line to barb.

No leaks.
Thanks! And with excellent pictures too! I like the slight upward angle idea too. Knowing myself I would have run it perpendicular to the wall.

I was planning on adding some gravel, but I'd have to dig another 20-30 inches to get to the footing drain. Might not be too bad, I'll give it a shot.

Just two questions:

1) What size core drill did you use for the PVC? I'm assuming it was slightly larger?

2) Did you fill the space between the sleeve and pipe?
 

larry4406

Well-known member
Joined
Jan 27, 2006
Messages
19,558
Location
Northern Virginia
Thanks! And with excellent pictures too! I like the slight upward angle idea too. Knowing myself I would have run it perpendicular to the wall.

I was planning on adding some gravel, but I'd have to dig another 20-30 inches to get to the footing drain. Might not be too bad, I'll give it a shot.

Just two questions:

1) What size core drill did you use for the PVC? I'm assuming it was slightly larger?

2) Did you fill the space between the sleeve and pipe?

Yes the core bit was about 1/8" larger than the PVC sleeve. I wasn't too picky as it was the bit my brother had and also forced the decision to use 1.5" PVC.

The core bit I used has a removable pilot bit once the core starts to bore the hole. The concrete "plug" bottoms out in the core bit just like when using a wood hole saw, so a cold chisel and hammer was needed to periodically bust the plug and keep drilling. My foundation wall is 8". PVC sleeves slid nicely through holes.

I did not fill the space between the sleeve ID and poly OD although I see no harm in doing it.

Glad I could share the pictures and they are helpful. Because of this forum, I take lots of pictures of my projects, most never to be seen again.

In my case, I only had to dig about another 12" to get to the drain tile (my piping penetrates the foundation below the frost line so it was a no brainer). My thoughts are if you are within 20-30 inches of your drain tile, I would go for it as it is simple insurance to not have to come back.

On my new house constructions where we have hung sewers, I locally extend the gravel up to and above the wall penetration and cover with filter fabric as I don't want to deal with a foundation leak.
 
OP
U

ururk

Well-known member
Joined
Jan 9, 2010
Messages
739
Location
Southeast MI
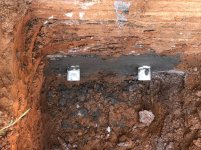
I reached 54":

media


media


Really struggling on whether I'll go another 32 inches or so. The ground - clay - is really heavy, and I'm amazed I made it this far with the pit and trench.
 
OP
U

ururk

Well-known member
Joined
Jan 9, 2010
Messages
739
Location
Southeast MI
I decided to dig down to the drain tile - turns out this isn't going to happen. There's a huge lump of concrete directly below my pit. I dug to both sides of the lump and there's more concrete, almost as if they used this spot to dump their leftover concrete from the pour. I'm not going to tie it in - I'm really not concerned, as I'm using a link seal on the inside, and will sleeve it at the back with a fernco and hydraulic cement. A bit overkill, but that's just me.
 

larry4406

Well-known member
Joined
Jan 27, 2006
Messages
19,558
Location
Northern Virginia
I decided to dig down to the drain tile - turns out this isn't going to happen. There's a huge lump of concrete directly below my pit. I dug to both sides of the lump and there's more concrete, almost as if they used this spot to dump their leftover concrete from the pour. I'm not going to tie it in - I'm really not concerned, as I'm using a link seal on the inside, and will sleeve it at the back with a fernco and hydraulic cement. A bit overkill, but that's just me.

Well you tried. At least add gravel from that lower level up to your sealed penetration, geotech fabric, then dirt. Will create a diversion for any groundwater.

Those link seals are pretty cool if you are using what I am thinking of.
 
OP
U

ururk

Well-known member
Joined
Jan 9, 2010
Messages
739
Location
Southeast MI
Well you tried. At least add gravel from that lower level up to your sealed penetration, geotech fabric, then dirt. Will create a diversion for any groundwater.

Those link seals are pretty cool if you are using what I am thinking of.
I’ll post pics - it’s fairly inexpensive compared to the rest of this project, just had to order it.

Oh, and the fernco couplers - couldn’t find them locally so had to order as well. Ferguson carries them, but it would have been up to two weeks, and their price was the same as ordering+shipping.
 

Retroman

Well-known member
Joined
Jan 21, 2018
Messages
1,364
Location
Mojave Desert
You typically have to core a 3" bigger hole than the pipe for a linkseal. The ones I have cored for have all been in precast vaults, lift stations etc but always precast concrete. Been a while but it seems if I remember right they flush out on each side of the vault wall. Probably better options for your application. I am in the desert they maybe more widely used in wetter parts of the country. In 30+ years of core drilling probably drilled for less than 50 of them.
 
To avoid these ads, REGISTER NOW!
OP
U

ururk

Well-known member
Joined
Jan 9, 2010
Messages
739
Location
Southeast MI
You typically have to core a 3" bigger hole than the pipe for a linkseal. The ones I have cored for have all been in precast vaults, lift stations etc but always precast concrete. Been a while but it seems if I remember right they flush out on each side of the vault wall. Probably better options for your application. I am in the desert they maybe more widely used in wetter parts of the country. In 30+ years of core drilling probably drilled for less than 50 of them.
For a 1” pipe their spec calls for four LS-300-S links - $24 plus shipping. I asked about installing two and the rep told me I only needed one on the inside. They actually work on smaller cores as well but the pipe size has to be smaller.
 

larry4406

Well-known member
Joined
Jan 27, 2006
Messages
19,558
Location
Northern Virginia
The link seals I bought for a sewer inlet to my basement from a detached garage at former house, the sized the links and number of links based on the hole core size and pipe that went in. They had a chart showing various hole/pipe combos and different sized links.
 
OP
U

ururk

Well-known member
Joined
Jan 9, 2010
Messages
739
Location
Southeast MI
How deep is your frost line,how deep is the bottom of footing under that wall?
Frost line - 48”. I’m going down 54”.

I have no idea how deep the bottom of the footing is. The builders of the house were... well let’s just say they had issues. Wall height is 96”, so I presume I have about 30” to get to the drain tile, maybe a little more.
 

johnnyradiant

Well-known member
Joined
Mar 27, 2017
Messages
833
Location
Vancouver, BC
Frost line - 48”. I’m going down 54”.

I have no idea how deep the bottom of the footing is. The builders of the house were... well let’s just say they had issues. Wall height is 96”, so I presume I have about 30” to get to the drain tile, maybe a little more.

If they had 'issues' your more might only be 1/4"
 
OP
U

ururk

Well-known member
Joined
Jan 9, 2010
Messages
739
Location
Southeast MI
If they had 'issues' your more might only be 1/4"
I have my doubts there is a drain tile on this side! I poked down with a soil probe next to the concrete lump - a few inches down and felt gravel. But it didn’t sound like a pipe, sounded more like I had hit more concrete. I dug some more, filled it with water... water was still there several hours later.
 
OP
U

ururk

Well-known member
Joined
Jan 9, 2010
Messages
739
Location
Southeast MI
If they had 'issues' your more might only be 1/4"
Thanks for your comment! Seriously.

I checked the hole today - still filled with water... and an idea hit me - try vacuuming it out. So with some additional water and the shop vac I was able to get to the top of the footer. No pipe in sight, but this time the water level wouldn't rise above a certain height! I'd fill it and it would settle about 1" from the top of the footing.

If you click the photo you can see the large lump of concrete (shovel is resting on top of) and the top of the footing (small black patch).

media


I'm not too sure the footer drain is clear - but it did drain away the majority of the water I shot down there.
 
OP
U

ururk

Well-known member
Joined
Jan 9, 2010
Messages
739
Location
Southeast MI
And one correction. I did a bit of research on this last night, our frost line is actually 42", which would mean I only needed to go to 48". However, the builder who did my footings told me to go to 54", hence I went to 54".
 
OP
U

ururk

Well-known member
Joined
Jan 9, 2010
Messages
739
Location
Southeast MI
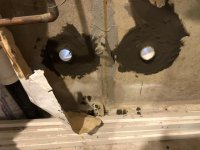
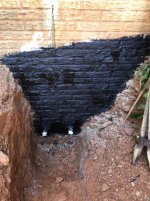
Drilled through the wall yesterday! Only took an hour to drill a 3" hole through 10" of concrete, no steel rod encountered:

media


media


media


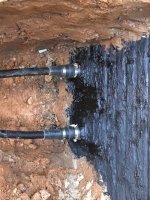
I used a link seal on the inside, and the traditional sealing method on the other. I'm letting the hydraulic cement cure 24 hours, will coat it with roofing tar tonight and install filter fabric/stone as well. My fernco coupler isn't in the picture, but it is on the pipe.
 
Last edited:
OP
U

ururk

Well-known member
Joined
Jan 9, 2010
Messages
739
Location
Southeast MI
Just coated it with that foundation coating - I knew the stuff was going to be gross, but yuck. That's all I have to say about the process!
 
OP
U

ururk

Well-known member
Joined
Jan 9, 2010
Messages
739
Location
Southeast MI
I still have to dig the pit by my barn :D Currently it's about 95 with 90% humidity :O so I'm going to hold off on that dig for a bit.
 
OP
U

ururk

Well-known member
Joined
Jan 9, 2010
Messages
739
Location
Southeast MI
This was at least 3 weeks ago, pit at the barn...

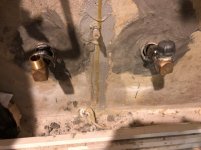
Gas and water go their separate ways:

media


Final connection:

media


I don't think the date on Instagram matches when I finished digging this pit. Essentially, I had placed a 3" Schedule 80 PVC pipe in the floor and through the foundation when the foundation was poured. I had to do some horizontal digging to find it - I was very very fortunate and located it exactly where I was digging:

media


Attached a 45 degree sweep to it, then two Fernco's. Since I couldn't locate a 3"->3/4" PVC fernco, I had to step it down to 2" first. I was able to pull+push the waterline up through the 3" pipe and at the moment I have a long piece of pipe in the barn, just need to figure out how close to the floor to cut it and how to terminate it.
 
To avoid these ads, REGISTER NOW!
Top Bottom