

You are using an out of date browser. It may not display this or other websites correctly.
You should upgrade or use an alternative browser.
You should upgrade or use an alternative browser.
Weather WTF
- Thread starter 600SL
- Start date

Iamkar33m
Well-known member
Wow, that's the epitome of Murphy's Law right there. =/
Wow, that's the epitome of Murphy's Law right there. =/
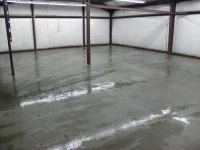
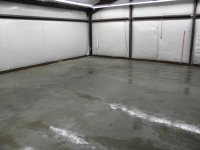
I couldn't get it on one page but its like that for the next ten days. But it did not rain today. I will just have to do hourly checks before each step. I did one last round of patching today. Will do final power wash tomorrow vacuum on Wednesday and possibly start priming on Thursday.
Farmall450
Well-known member
We lost probably a week of "heavy" work due to rain here...more to come.

Same thing happened to me. For ten 10 days straight, either the humidity was 90+% or it was raining. I ended up having to "scuff" the areas I patched. I finished laying my floor last week and it is worth waiting for! Im going to post my own thread soon.


Screwed once again. Went to put gown the second coat and found one of the pails was short the Part B hardener.
I sent an Email to Armorpoxy asking them to overnight a gallon of hardener but I don't know if they will get it until Monday. But there answering machine does state that they do answer E-mails off hours and on weekends so I wait.
I'm just glad I opened all three pails before I started to lay down the paint. That would have really sucked if I started with the first pail opened the second or third and found no hardener.
NitroShark
Well-known member
don't you have a 24 hour max window between coats? Your product data sheets should show you what is required.
don't you have a 24 hour max window between coats? Your product data sheets should show you what is required.
No but I always try to do them one day at a time I think its a good idea. Nothing in the data sheet on this from Armorpoxy. They did get back to me and said they wont be able to ship until Monday.
benwah
Well-known member
don't you have a 24 hour max window between coats? Your product data sheets should show you what is required.
No but I always try to do them one day at a time I think its a good idea. Nothing in the data sheet on this from Armorpoxy. They did get back to me and said they wont be able to ship until Monday.
According to their product data sheet, this product does require scarification before applying another coat after 12 hours of curing @ 70 degrees.
6) RECOAT OR TOPCOATING: If you opt to recoat or topcoat this product, you must first be sure that the coating has tacked off before recoating. However, all previous coats should be deglossed to insure a trouble free bond prior to application of recoats or topcoats. Colder temperatures will require more cure time for the product before recoating or topcoating can commence. Before recoating or topcoating, check for epoxy blushes (a whitish, greasy film or deglossing). If a blush is present, it can be removed by any standard detergent cleaner prior to topcoating or recoating. Many epoxy coatings and urethanes as well as multiple coats of this product are compatible for use as a topcoat.
This is not uncommon with 100% solids epoxies. They cure extremely hard and require scarification or "deglossing" before another coat is applied if outside the re-coat window. Since your prime coat has been curing for a few days, I would most definitely give it a light sanding and a solvent wipe (denatured alcohol) before applying your 2nd coat. Something like this works pretty well with some 80-100 grit sandpaper if you cannot mechanically abrade.
I've attached the product data sheet.
Attachments
Last edited:
According to their product data sheet, this product does require scarification before applying another coat after 12 hours of curing @ 70 degrees.
6) RECOAT OR TOPCOATING: If you opt to recoat or topcoat this product, you must first be sure that the coating has tacked off before recoating. However, all previous coats should be deglossed to insure a trouble free bond prior to application of recoats or topcoats. Colder temperatures will require more cure time for the product before recoating or topcoating can commence. Before recoating or topcoating, check for epoxy blushes (a whitish, greasy film or deglossing). If a blush is present, it can be removed by any standard detergent cleaner prior to topcoating or recoating. Many epoxy coatings and urethanes as well as multiple coats of this product are compatible for use as a topcoat.
This is not uncommon with 100% solids epoxies. They cure extremely hard and require scarification or "deglossing" before another coat is applied if outside the re-coat window. Since your prime coat has been curing for a few days, I would most definitely give it a light sanding and a solvent wipe (denatured alcohol) before applying your 2nd coat. Something like this works pretty well with some 80-100 grit sandpaper if you cannot mechanically abrade.
I've attached the product data sheet.
All I see is recoat or topcoat 8-12 hour. To me that's when its ready for recoat not 8 hour minimum and 12 hr maximum. I did ask them about this and they said no problems.
benwah
Well-known member
I realize they don't have a maximum re-coat window listed on their data sheet, it's just common practice to scarify after 24 hours with the epoxies I work with.
Hey if they say you're good, then cool!
Hey if they say you're good, then cool!
I realize they don't have a maximum re-coat window listed on their data sheet, it's just common practice to scarify after 24 hours with the epoxies I work with.
Hey if they say you're good, then cool!
Well its on we will find out in a year or two. The one good thing is it is guaranteed for life and I do have the e-mail I sent them where I highlighted that as a concern. Sorry no pictures.
Tomorrow morning I will put down the last top coat.
A couple of lessons learned:
1) Open up your barrels before you start.
2) Everyone who is using the spiked shoes should try them on and make sure you know how to put them on and physically can put them on.
3) Spiked shoes are slippery and you could fall on your paint.
4) Using the squeegee requires a certain skill, if you **** at it just use the roller. In my case my helper was very good with it so he became the squeegee man and I believe it does make for a better job.
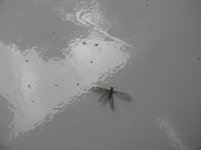
5) Bugs especially moths ****.
6) Do not step on your tarps with spiked shoes or they will not be tarps any more.
7) Do not step on electrical cords with spiked shoes use a cordless drill.
8) Wear at least a dust mask. I got very sick last week and I do believe that was the reason. The disposable dust mask I wore today helped a lot.
The Morning After
Bugs up the ****
I came in this morning and there were bugs everywhere stuck into the paint. I did not have that problem with the primmer coat or at least not half as bad. I believe this may have been because for the primer coat I was not using spikes so when I got to the door I could only reach for the main breaker which shut off all lights including the outside lights which of course are right over all the door. Last night I shut only the interior lights and left the outside lights on. I believe this attracted the bugs.
I happen to be fortunate that the top coat for the Armorpoxy ultra system is a colored coat just like the base. If it were clear I would be well screwed now. So I get another shot at it. I will be starting earlier today so hopefully the bug activity will be less than the night bug activity and I will turn off the outside lights.
So lesson learned #9, Turn of outside lights.
Attachments


Done
Bugs cleaned up well with some of the more fossilized creatures still embedded. Did the top coat which seamed to hide all evidence. Hopefully this time of day is less of a problem for the bugs. also the topcoat seams to be much more toxic. Anything that crawls under the doors today will probably not make it past 6 inches.
And to Benwah's point the top coat does specifically say it has to be applied within 24 hrs or deglazed. No such instructions on the middle coat. That might be because the first coat has a mat finish nothing to deglaze whereas the second coat is like a mirror. Hopefully all will be well and this wont turn out like my outside concrete.
Attachments


benwah
Well-known member
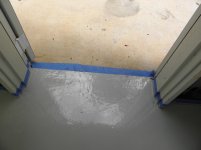
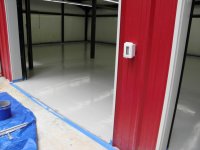
Awesome! Really dig the solid light gray!
Awesome! Really dig the solid light gray!
Thanks
I just did a 3 hour check up. So far there is one bug on it's back kicking its legs and two leaves that made there way under the door. The wind is staring to kick up here so I don't think much more is going to be flying around. The floor is also hard enough that not much more will stick to it.
your fun has just begun, those light colors are so hard to keep clean. They clean ez enough, but you spend a lot of time doing it. It looks nice.
It is my preferred color for a working shop. I had the same color in my old shop. I found the secret to getting it clean is pressure wash and vacuum up water while dirt is in suspension to get it out.
I currently work at Honda Aircraft where we have white epoxy floors and we wear white uniforms. The Honda theory is that if dirt gets on your close or floor there is a process problem that needs to be addressed. They are not winning this battle in the receiving area where the floor is getting black from forklift traffic. But all in all I believe the theory is valid. If you can manufacture products without getting the floor or yourself dirty then the product you deliver will most likely not be dirty. From what I understand this is the way all Honda facilities are.
I'm just about to apply primer today and then the epoxy tomorrow. I'm also worried about bugs getting everywhere!!
I'm not sure if I have the answer but the first evening prime with lights out worked fine, we were also done buy about 7:30PM with plenty of daylight left. Next coat was stated at 7:30 PM for cooler weather and finished at about 9:30 in the dark with outdoor lights on. It was a bad combination. The topcoat was stated at 11:00 AM this morning and worked out very well.
But I remember the Rustoleum guy doing my floor years ago in the day time in CT battling bugs the whole time. So your mileage may vary but I am convinced that outdoor lighting is a no no especially when painting at night.
