To avoid these ads, REGISTER NOW!

Weld/Fab Table Top Stand-Off?

Joined
May 15, 2013
Messages
14
I am working on a small weld/fab table design for my garage. While I would love a nice fixturing table with precision holes and all the matching clamps, but my projects are 1-offs, usually related to automotive racing or general home use, so I cannot justify a proper fixturing table, nor is it necessary.

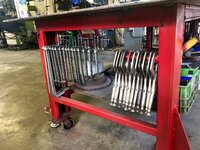
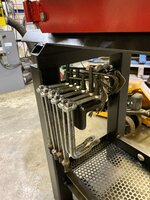
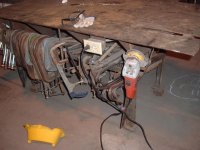
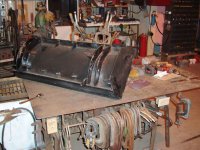
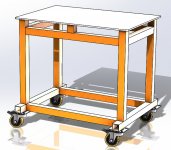
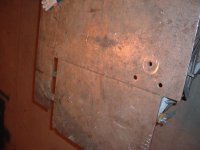
That said, I have a 24"x36"x3/8" table top and I was planning to space it off from main table frame at 6 points. One this will allow me to fine tune and shim the table top for flatness (as the plate has a slight bow to it). Two I can build the frame to 24" x 36" since i don't need overhang which will promote table stability. Finally with the top spaced off I can use large throat C-Clamps, F-Clamps and pliers at pretty much any point around the parameter of the table top.

So my question is how far to stand the table top off? The larger the stand-off the more real estate I lose under the table, but I want to make sure I have enough space to accommodate all your typical welding/fixturing clamps and pliers. Maybe squeeze my arm under the table if I were to punch some holes in the top later on. What would be a recommended stand-off? 3"?
 

Attachments

  • weldtable.jpg
    weldtable.jpg
    101.2 KB · Views: 73
Last edited:
To avoid these ads, REGISTER NOW!

sberry

Banned
Joined
Jun 18, 2005
Messages
35,747
Location
Brethren, Michigan
I need to get a drawing program. I am in on this thread because I lime your accurate assessment of your needs. I have built a lot of benches over the years, used tube legs as it was a customer wish but personally would get the top, a stick of 3/16 x 2 angle and a piece of 1 1/2 1/8 for shelves. Make some overhang for clamps, get it reasonable flat, tack it to the top
Weld legs on, stiffen it the long way, wouldn't bother at 24 the other way. To tell the truth it's awfully small. I don't like huge, too much to walk around and S you said, can rig up for 1 off and can drill a hole if you can't figure out something better. This type of bench works well with common clamps. There is nothing wrong with the other stuff but a guy can't use them elsewhere or on equipment. Half a dozen 11r, couple smaller ones and some screw clamps. My bench does welding but I use it for everything but big greasy, don't WANT holes.
Most of the time I ran in to more sophisticated waz when owners drug something home from a sale, got a bud has a platter he wouldn't mind selling now as he found out it was a better idea than a use. He went back to what he used for the last 20 years.
I was in a nuke, benches were plate on heavy sawhorses. My tops, really the whole things are kind of junk but they work so well its not worth fixing and no one notices but me. I would be inclines to upside this if you could. I fussed with sizes of fab tables, have used them big, my preferred is 42x 50 or 60 depending, not huge. My neighbor a real pro has a simple 18x18 inch he manages with, his more a garage, mine a shop.
 

sberry

Banned
Joined
Jun 18, 2005
Messages
35,747
Location
Brethren, Michigan
Thousands of projects on this and never consider how flat it is.
 

Attachments

  • bench connect 1.JPG
    bench connect 1.JPG
    33.5 KB · Views: 78
  • bench connect.JPG
    bench connect.JPG
    30.1 KB · Views: 78
  • bench welder 4.jpg
    bench welder 4.jpg
    148.8 KB · Views: 96
  • benches holes.jpg
    benches holes.jpg
    138.8 KB · Views: 71
  • benches holez.jpg
    benches holez.jpg
    150.1 KB · Views: 64
OP
B
Joined
May 15, 2013
Messages
14
Unfortunately I do not have the real estate for anything larger and I already have my 24" x 36" top. Currently, it has about a 1/4" bow across the 36" width that drives me absolutely batty. I am not looking for inspection table flatness, but I need to be able to lay my work pieces on it without it rocking around.

Understand that the purpose of floating/spacing the top off the table frame is so i can get clamps on the table top at any position around its parameter, even large throat clamps. If I were to simply create a traditional 2" or 3" overhang with the top, my frame would be narrower than its height which concerns with from a stability standpoint, particularly if working material that extends off the edge of the table that would create a moment arm.

I currently am not fully decided on the table frame material and will definitely evaluate angle iron. I actually need additional angle iron anyway to repair the legs on my blast cabinet, so that would be a win-win.
 

sberry

Banned
Joined
Jun 18, 2005
Messages
35,747
Location
Brethren, Michigan
You can take the bow out when you build it, on a plate that small might heat it straighter or even run over it to bend it a little too. 1/4 is a bit much on a plate that small for sure.
 

sberry

Banned
Joined
Jun 18, 2005
Messages
35,747
Location
Brethren, Michigan
I have tacked legs square on the plate and pulled them plumb and square. I am not sure I can sprain this and a little doesn't apply to one off but I built about 200 2 ft wide, some 2x2, 2x3, 2x4 and 2x5. I chopped them on a shear in a combination of cuts. I made a jig for the leg/ends, was sort of an H with a top,, like a block A, built them upside down and had a sequence of steps, clamp up with 4 clamps, had gang cut all the stuff.
 
Last edited:

tarbellb

Well-known member
Joined
Apr 17, 2011
Messages
5,733
Location
Oregon
Grab the largest clamp you plan on using, measure the height needed between table top and frame at the deepest point of throat you want.

Or just measure how much height you need to reach under the table to locate clamps.

Don't over think it, pick one and go.
 

sberry

Banned
Joined
Jun 18, 2005
Messages
35,747
Location
Brethren, Michigan
I think it's worth some thoght,, different than over complication. The thought/design can eliminate it rather than add to it. I recently did a remodel of a job I have done before. The new design removed more than it added. Especially in the main essential design part. Move rather than add too.
 
To avoid these ads, REGISTER NOW!

matt_i

Well-known member
Joined
Mar 14, 2008
Messages
10,720
Location
SE Michigan
I'm curious how you are going to shim out the curve...are you using flathead screws to pull down at the 4 corners and flex it over shim stacks on the center posts on the sides?

The other thing you could do is design the storage system for your clamps before getting started. At least the basics of it...I wouldn't want to model a C-clamp either !! :)

The front lower crossmember is a conundrum for me, the first bench I built I made it like that. Planned to add a full complement of drawers which never materialized. Ever since I've either omitted or cut out (on a bench I got already welded) that front lower crossmember so I could either roll stuff underneath or could sit at the table and have a place for my lower legs to go. Possibly a thought if you're tig welding.

I think the thought about trying the biggest, deepest C-clamp is best. Those seem to have the most curvature going below the pad. Bar clamps are usually pretty compact in the fixed head with exception of the Jorgensen I-bar clamps.
 

lis2323

Well-known member
Joined
Dec 25, 2016
Messages
3,234
Here's a few pics of my welding clamp storage

3e7e2643f8341bc9138294d4d03368eb.jpg


680388aac138ba0fe35187bf60249bd2.jpg
03ead9a126d8315416982f3a1c211cbd.jpg

a156369d024646bf9925d0e515d4ec5e.jpg


Sent from my iPhone using Tapatalk26e745c45288d20469d32bbd5ced783a.jpg

Sorry the photos are out of order. The bottom photo shows the table in photo ONE without the clamps.
 

Attachments

  • 3e7e2643f8341bc9138294d4d03368eb.jpg
    3e7e2643f8341bc9138294d4d03368eb.jpg
    902.5 KB · Views: 5
  • 680388aac138ba0fe35187bf60249bd2.jpg
    680388aac138ba0fe35187bf60249bd2.jpg
    777.1 KB · Views: 5
  • 03ead9a126d8315416982f3a1c211cbd.jpg
    03ead9a126d8315416982f3a1c211cbd.jpg
    848.8 KB · Views: 4
  • a156369d024646bf9925d0e515d4ec5e.jpg
    a156369d024646bf9925d0e515d4ec5e.jpg
    842.6 KB · Views: 3
  • 26e745c45288d20469d32bbd5ced783a.jpg
    26e745c45288d20469d32bbd5ced783a.jpg
    144.8 KB · Views: 6
Last edited:

sberry

Banned
Joined
Jun 18, 2005
Messages
35,747
Location
Brethren, Michigan
Good clamp collection. If I was a bit younger might invest in a couple bigger of those Bessy type, they are really deep. If someone doesnt know what to give the gearhead for Christmas I suggest an 11R,, what if he has one,,, I say, he has 6, 7 is better,,, ha
 

Attachments

  • bench welder 3.jpg
    bench welder 3.jpg
    149.6 KB · Views: 44
  • bench grinder.jpg
    bench grinder.jpg
    147.4 KB · Views: 42
  • clamp plow bench.jpg
    clamp plow bench.jpg
    154.8 KB · Views: 40
  • bench welder 4.jpg
    bench welder 4.jpg
    148.8 KB · Views: 38

lis2323

Well-known member
Joined
Dec 25, 2016
Messages
3,234
Good clamp collection. If I was a bit younger might invest in a couple bigger of those Bessy type, they are really deep.

I LUCKED OUT on those Besseys. A welder was doing a career change and had them listed cheap. No brainer. I just paid him what he was asking.


Sent from my iPhone using Tapatalk
 

sberry

Banned
Joined
Jun 18, 2005
Messages
35,747
Location
Brethren, Michigan
I agree, the price is right takes a lot of pain out of it. That is a point I somewhat try to make a bit here about speculation. If a guy needs something to do work he should buy it as soon as he can, some items are worth waiting a little for. You can wait forever too,,, there is some middle ground.
If a guy is doing any real work will get some viable use especially out of the general ones. I got a bud who is used to somewhat slightly different environment and tends to try to get a bit custom for stuff we get with more universal tools. Some of it I used to use, do other ways but have worked a lot of flow bugs out or tailored it a bit so the tools are more generic so to speak and its kind of difficult to put in to words.
I had a bit of a run in on a welder forum when it was suggested upon opening the box the guy find a mini mill and tailor the mig tip just so. I try to splain that we not helping the insecure to start with by letting him think it wasnt great out of the box and while running different test coupons was a hobby to him the guy bought this machine cause he had something he wanted to do.
I am a function guy first, I can do form but I kind of get bored with it. Its why I suggest some trial and error the cheap way before committing to something a guy finds hard to re do or cost a lot. Both mistakes I have made. The more of those I scrape by now the clearer some hindsite is with it and now I am starting to look for the easier way first at least with shop/process.
I really didnt get a hoist cause I want to work on cars, I got it to promote easier maintenance, easier means its more likely to get done. same reason I am such a fan of economical,,, if its cheaper or affordable the less likely a guy is to hesitate about something he should do. Its hard to miss hitting a mark with a 30$ decent grinder,,, he does without if it cost 150 or more. Spending and investing is a good efficient way to solve problems. Like a lot of guys here say,,,, I can buy the tool etc and makes it even better if its 25 dollars a set vs 25 a piece.
To me that kind of math isnt a compromise its a bonus. Clearing the cost in the first event vs making the first payment allows for opportunity to search for more.
 
Last edited:

sberry

Banned
Joined
Jun 18, 2005
Messages
35,747
Location
Brethren, Michigan
To tell the truth I think this guy is wasting effort on this whole thing and would take a frame from a BBQ cart and mount that dinky plate on it vs fukkin with a bunch of tubing, cut weld grind and have it done for free in a couple hrs of dicking around, use some of the bends for hangers.
You can finish as nice as you want but would look just a bit for something close to ready made and clamp it on. Some of this has since been refined and refinish a little and cant tell what it was.
Some was simple proto and need and had intended to upgrade but it worked so well I said fukkit and have since refined some features that doing anything else simply cost more, I cant make it any better.
 

Attachments

  • tool cart b.jpg
    tool cart b.jpg
    151 KB · Views: 43
  • tools turnstyle.jpg
    tools turnstyle.jpg
    112.2 KB · Views: 36
  • cabnit rolling.JPG
    cabnit rolling.JPG
    54.2 KB · Views: 36
  • cabnit base.JPG
    cabnit base.JPG
    45 KB · Views: 35
  • cabnit frame.JPG
    cabnit frame.JPG
    32.2 KB · Views: 35
Last edited:

tarmy

Well-known member
Joined
May 28, 2014
Messages
4,646
Location
Nor Cal
I made this years ago...served me very well...the blue table is for various oversized projects. Both tables are exactly the same height as well for long work.

A7DD8D6A-E285-4570-B5BF-587E9B0244D7.jpg

B21AFCDB-1BD1-4777-B23D-939F4C8A9C64.jpg

5BD8CE6B-EB6D-49C5-9F18-ADEDD72135DE.jpg

C9C488CC-7BED-4990-8E70-57A592535B43.jpg

A5380048-AC1A-4AB8-A19C-9806045A4045.jpg
 
OP
B
Joined
May 15, 2013
Messages
14
I overthink everything, that is my job. :) I enjoy designing, and I want to design a solution that will give me a lifetime of use. Something that is solid, flexible and adaptable. And it also gives me an opportunity to further practice welding.

That said, I picked up some Bremen 11R locking clamps this weekend. Also measured up some some other clamps including HF's C-Clamps as well as their F-Clamps. 2.5" would be an absolute minimum, but I will likely run 3"-3.5" to fit my arm under the table top.

TARMY, i like what you have done there with the square tubing, leaving the ends open for retractable material supports is brilliant, along with the typical receiver for accessories. The thought and planning should give you a lifetime of use.

MATT_I, I can "flatten" the 3/8" table top by clamping it to my bench countertops in the middle. My original plan was to drill and countersink 6 holes in the top and use flat head screws to cinch the top to the stand-off posts. But I am considering welding some long hex head bolts to the bottom of the plate to act as the stand-off and I could adjust the individual height of each stand-off, similar to the fixturing plates shown in TARMY's pictures above.
 
To avoid these ads, REGISTER NOW!
Top Bottom