To avoid these ads, REGISTER NOW!

Weld Table Build Thread

Lyaec350

Well-known member
Joined
Nov 17, 2007
Messages
583
Location
somewhere...
As promised, here are pictures of my weld table as it went together. I used (roughly) the plans on the Miller website (http://www.millerwelds.com/interests/projects/pdf/weld-table.pdf) but I modified them a bit so that the overhang was 3" on all sides, and I used a stainless steel hotel buffet pan as the catch tray for the plasma because that way I can put an inch of water in the bottom and it won't rust. Also, the miller plans don't include the vise mounts. If you have any questions about the pictures let me know...

Cutting the foot plates:

IMG_1004.jpg


Top material (5'x7'x3/8")

IMG_1030.jpg


All pieces cut and ready to assemble.

IMG_1034.jpg


Laying out the bottom frame. Used jackstands to keep everything level and a big framing square to keep it square.

IMG_1035.jpg


Keeping it all in plane with the foot pads.

IMG_1036.jpg


IMG_1039.jpg


Bottom frame complete.

IMG_1041.jpg


IMG_1043.jpg


Start of the top.

IMG_1046.jpg


Half inch hole for the vise hitch pin.

IMG_1047.jpg


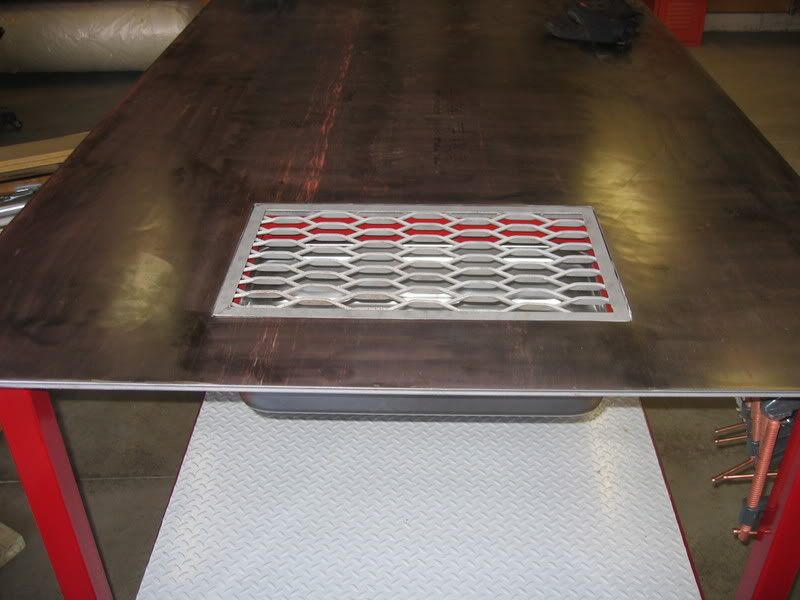
Frame for the plasma grate.

IMG_1049.jpg


Top done.

IMG_1052.jpg


First leg.

IMG_1057.jpg


Welds on top ground down.

IMG_1058.jpg


Another leg.

IMG_1059.jpg


All 4.

IMG_1060.jpg


Top on.

IMG_1061.jpg


Close up of nut for hitch pin.

IMG_1063.jpg


Catch pan slide in frame.

IMG_1074.jpg


Pan in place.

IMG_1073.jpg


Wheels and leveling feet on.

IMG_1077.jpg


Bottom shelf in (4'x6'x3/16" tread plate).

IMG_1080.jpg


Painted and ready to go.

IMG_1110.jpg


Cutting the top.

IMG_1124.jpg


Grate close up.

IMG_1150.jpg


Big vise close up.

IMG_1146.jpg


Both vises.

IMG_1147.jpg


Nice little box for pens/rulers/tapes/consumables.

IMG_1236.jpg


Already covered in junk.

IMG_1212.jpg


My helper.

IMG_1044.jpg
 
Last edited:
To avoid these ads, REGISTER NOW!

6768rogues

Banned
Joined
Nov 28, 2007
Messages
4,524
Location
Western NY
You did a very nice job on the welding table. It is obviously well thought out and executed. I have a welding table that is similar, but not as nice as yours, that I acquired from someone who was moving out of state and parting with his tools. I bought his welder and torches, and he threw in the table. Once again, nice job.
 

Lloydthumper

Well-known member
Joined
Jun 3, 2007
Messages
268
I'm planning on building a similar frame for mine I was given a 3/4"x4'x10' magnetic stainless steel plate from where I work I figuare that will make a pretty good welding table top. I will have to find a more economical set of stands to build it though I can't afford that many jack stands LOL. It looks good nice job.
 

JohnK007

Well-known member
Joined
Sep 13, 2007
Messages
807
Location
Downers Grove, IL
Outstanding job!!! I especially like the way you have the vises mounted. I'm going to have to remember this thread and copy your plan when it's time to build my table. I really like it!
 

Mr.N

Well-known member
Joined
Jul 13, 2005
Messages
2,221
Location
Mpls, MN
How do you store the vice?

Just flip it upside down? (This would be cool with some pipe weld on the end of the vice square stock)
Or did you make another area to hold the vice?
 

Uncle Buck

Banned
Joined
Mar 7, 2005
Messages
9,120
Location
Kansas
Well done, great job, I would love to have one just like it! BTW, What is the little pan covered with expanded steel that hangs from the top for?
 
OP
L

Lyaec350

Well-known member
Joined
Nov 17, 2007
Messages
583
Location
somewhere...
How do you store the vice?

Just flip it upside down? (This would be cool with some pipe weld on the end of the vice square stock)
Or did you make another area to hold the vice?

If I need to put long things on the table I just throw the vises underneath... they just slide out and I screw the little T bolt back in to store it. Haven't actually needed to take them off, if they're in the way I just stick them on the other side...

The catch pan is filled with an inch or so of water and that way when plasma cutting the dust generated is much less, works well. Next time I'd get the 6" deep pan instead of the 4" (might still do that).
 

Steve in Mi

Well-known member
Joined
Mar 13, 2007
Messages
1,042
Location
Mid Michigan
Great build and step by step, thanks!

How did you fasten the top down?

Good use of the leveling stands but if they are Magnesium (my Reese stands are Mag) don't let them get started or it will be one hot, bright meltdown.

CAUTION: To the poster that mentioned using Stainless plate for a top. The coefficient of thermal expansion is considerably greater for the SS than non stainless steel framing so it will be best to let it float some or extended heat buildup could cause it to buckle or break something - lots of force is developed by a difference in thermal expansion. [example; bimetallic strips]
 
OP
L

Lyaec350

Well-known member
Joined
Nov 17, 2007
Messages
583
Location
somewhere...
How did you fasten the top down?


The top is floating. I just tacked some 2 or 3 3" pieces of 1"x1"x1/8" angle to each side of the bottom of the top plate. I spaced them ~1/16" from the frame in order to minimize bowing if it expands too much while keeping it from sliding off if you try to push the table around by the top. Hasn't moved at all so far.

I'm actually thinking about building 2 tubing handles that slide in the vise mounts to roll the table around with. 800 lbs has a lot of inertia.

The jackstands are made of pure chinesium (I assume Al as they have that crappy Al corroded look and were purchased dirt cheap @ Menards about 10 years ago).
 

milkovich

Well-known member
Joined
Oct 15, 2007
Messages
677
Location
Akron Ohio
How do you like that Jet (I assume by the paintjob) band saw?

I have a green one from harbor freight and it *****. If I hear that *PING* of the blade jumping one more time I'm going to return it to HF... through their front window.

Very nice table by the way! :drool:
 
OP
L

Lyaec350

Well-known member
Joined
Nov 17, 2007
Messages
583
Location
somewhere...
I really like the Jet, has paid for itself in saved time esp compared to the crappy cuts you get w/ a chop saw. It sounds like your blade is jumping because the tension is too high, the blade count is too low, or the blade itself is just plain worn out. They're only $9, just go get a new one. I go through a blade every couple months or so (obviously depends on thickness, etc).
 
To avoid these ads, REGISTER NOW!

raffaelli

Well-known member
Joined
Dec 18, 2007
Messages
202
I am preparing to build a table. I was thinking of getting a chop saw. Seems like a band saw is preferred?
 

Steve in Mi

Well-known member
Joined
Mar 13, 2007
Messages
1,042
Location
Mid Michigan
The top is floating. I just tacked some 2 or 3 3" pieces of 1"x1"x1/8" angle to each side of the bottom of the top plate. I spaced them ~1/16" from the frame in order to minimize bowing if it expands too much while keeping it from sliding off if you try to push the table around by the top. Hasn't moved at all so far.

I'm actually thinking about building 2 tubing handles that slide in the vise mounts to roll the table around with. 800 lbs has a lot of inertia.

The jackstands are made of pure chinesium (I assume Al as they have that crappy Al corroded look and were purchased dirt cheap @ Menards about 10 years ago).

Excellent on the top mounting.

You may already know that Magnesium can take on that oxidized look similar to aluminum but you can easily test/check them to be sure. Scrape some particles from an inside edge or the bottom where it won't show. Introduce just those few particles to open flame. If it's Mg they will burn brightly (white hot) until they are totally consumed. It is like lighting a sparkler (Mg powder on a wire) for the 4th of July. If they are aluminum - nothing will happen unless you hold the flame to them long enough to actually melt the material.

It may not be any big deal at all but I think a stand made of Mg would start to burn fairly easily and once started would develop enough heat to do considerable damage to concrete and the sprawling cement spread any fire. Water will not put out a magnesium fire - in fact it will cause a further reaction. That is why Mg flares are used under water for a light source. Special precautions are used with regard to magnesium handling (especially fabrication techniques) and fire fighting. Magnesium is lighter than aluminum and cost more - probably not something China is sending us. You being a welder probably know all this but maybe it will be of benefit to someone not so familiar with Mg.

http://www.encyclopedia.com/doc/1E1-magnesiu.html
 
OP
L

Lyaec350

Well-known member
Joined
Nov 17, 2007
Messages
583
Location
somewhere...
I am preparing to build a table. I was thinking of getting a chop saw. Seems like a band saw is preferred?

Yes, cleaner, faster, easier, safer cuts at only a little over ~2 times the price... cannot be beat. No sparks, no heat, no dust, less mess. Don't even consider the chop saw, you will be very unhappy.

You may already know that Magnesium can take on that oxidized look similar to aluminum but you can easily test/check them to be sure. Scrape some particles from an inside edge or the bottom where it won't show. Introduce just those few particles to open flame. If it's Mg they will burn brightly (white hot) until they are totally consumed. It is like lighting a sparkler (Mg powder on a wire) for the 4th of July. If they are aluminum - nothing will happen unless you hold the flame to them long enough to actually melt the material.

It may not be any big deal at all but I think a stand made of Mg would start to burn fairly easily and once started would develop enough heat to do considerable damage to concrete and the sprawling cement spread any fire. Water will not put out a magnesium fire - in fact it will cause a further reaction. That is why Mg flares are used under water for a light source. Special precautions are used with regard to magnesium handling (especially fabrication techniques) and fire fighting. Magnesium is lighter than aluminum and cost more - probably not something China is sending us. You being a welder probably know all this but maybe it will be of benefit to someone not so familiar with Mg.

Actually, I hadn't even thought of them being Mg cause they're so cheap but I'll go out and flame test them this evening when I'm sweating some copper ;) Thanks for the tip.
 

jhn9840

Well-known member
Joined
Mar 11, 2007
Messages
1,189
Location
Northern Panhandle of WV
Incorperating the grate and vises into the table along the leveling feet make this a very nice table. Fantastic job putting it all together.

jhn9840
John
 

doslocos

Member
Joined
Jan 7, 2008
Messages
12
Location
Southwest Colorado
Very nice table, I was going to build something similar until I went to the metal yard and priced steel !!!! :shocking: 15% to as much as 30% increase in price depending on what your were purchasing. They wanted $650 for a sheet of 3/8" 4'x8' and I really wanted 1/2. How much did your material cost for you build? thanks
 
OP
L

Lyaec350

Well-known member
Joined
Nov 17, 2007
Messages
583
Location
somewhere...
Very nice table, I was going to build something similar until I went to the metal yard and priced steel !!!! :shocking: 15% to as much as 30% increase in price depending on what your were purchasing. They wanted $650 for a sheet of 3/8" 4'x8' and I really wanted 1/2. How much did your material cost for you build? thanks

$200 for all the steel, another $100 for casters, hardware, pan, etc.

I'm lucky enough to have a HUGE steel plant close by that has a whole warehouse full of scrap. Just about any thickness sheet/plate in normal and diamond plate for $0.15/lb. Most are sheets that were 5x10' but got cut down to 5x8' or 5x9' or 5x7' so they're sold as scrap. Everything is kept on racks indoors so it's not rusty and you can look pieces over to make sure they're not creased or dented.
 

roycemek

Member
Joined
May 29, 2007
Messages
8
Nice table. I'm looking to build something very simmilar. After looking at yours I'm inspired.

One question on the construction. I noticed for the top and bottom corners you butted the tubing rather than mitered. I'm new to all this, but how do you close out the open ends of the square tubing. Is it hard to do while keeping it all flush? Do you have any close up pics of the corners and or tips on how you closed them up.

Thanks,
Royce M
 
OP
L

Lyaec350

Well-known member
Joined
Nov 17, 2007
Messages
583
Location
somewhere...
Nice table. I'm looking to build something very simmilar. After looking at yours I'm inspired.

One question on the construction. I noticed for the top and bottom corners you butted the tubing rather than mitered. I'm new to all this, but how do you close out the open ends of the square tubing. Is it hard to do while keeping it all flush? Do you have any close up pics of the corners and or tips on how you closed them up.

Thanks,
Royce M

I don't have any newer pictures but I'll try to explain with ones I've got.

Generally with square tube, I **** all the joints as it is difficult to get a perfect 45* miter and if you're off it creates a gap, especially with big tubing. If strength matters yu can cope the joints, but the only thing I ever really miter is round tube.

What I did was make the bottom frame totally enclosed (keep stuff from getting inside it), while leaving the 4 corners of the top frame open (for mounting attachments).

To create a square with all the corners closed in, you just make the two legs that would have open ends a bit shorter (I used 2"x2"x1/8" box, so each was shorted by 1/8" on each end = 1/4" total) and weld a piece of 2"x1/8" bar stock cut to 2" on each end, then grind the weld down and contour the edges to match the tube edges with a flap disc on a grinder.

This isn't the best picture, but you can see that the left tube has been capped with a piece of plate and ground down to fit up at 90* doing this on all 4 corners will result in a fully enclosed square frame.

IMG_1036.jpg


Here you can see all the individual pieces used to build the frame. The leftmost tubes are capped and finished with the grinding disc (originally 1/4" shorter + 2 pieces of 1/8" plate = same overall length as top pieces) and the right long tubes have the holes drilled for the vise mounts and the ends left open.

IMG_1034.jpg


Hope this helps.
 
Last edited:

Dragster Racer

Well-known member
Joined
Feb 9, 2008
Messages
1,891
Location
Morrison, IL
I like my chop saw. It's fast. It's also filthy, and showers sparks everywhere. Band saws are more accurate, and cleaner, but pricier.
 

roycemek

Member
Joined
May 29, 2007
Messages
8
Thanks for the explaination. I totally missed the capped ends when I first looked at the pics.
 

dragginbalz

Well-known member
Joined
Sep 19, 2005
Messages
197
Location
Illinois
That table looks awesome! Great job.
Another option is to cut one tube longer and then cut away the material so that it the one tube forms it's own cap. Like this:
tubing.jpg


Just another option.

t
 

StanBo

Well-known member
Joined
Jun 25, 2005
Messages
149
Location
New Jersey
Fantastic build! I like how you have the vises off of the tabletop. I plan on building a table for my garage and was going to drill my top to install my vice. I think I am going to follow your lead and build a spot for them off of the top.

:beer:
 

e-tek

Well-known member
Joined
Dec 19, 2007
Messages
10,690
Location
Saskatoon, SK
Here-here: The vice off the front is a GREAT idea - and it's given me another! This would work even for a wooden bench. You wouldn't have to drill through the top, you could remove thevice easily if needed (you could use a similar system and mount the female tube to the bench I guess). I'm gonna retrofit mine like this! thanks!!
 
To avoid these ads, REGISTER NOW!
Top Bottom