Sparkfarmer
Well-known member
Hey guys,
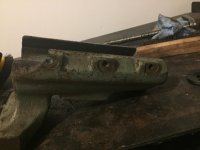
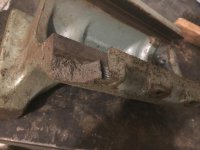
I am restoring an FPU Bison Bial vice. A small corner piece of the vice where the screw that tensions the gib goes is broken. I am planning to add beads of weld to build it up and give that screw some more strength (after welding I will re-drill then tap the hole). The pictures are attached.
I havent welded ductile Iron before so I could use any advice or suggestions I can get. From the research I have done this is my plan:
1. clean up the break with a grinder.
2. heat up the piece to around 500c in the oven
3. use a torch to heat the piece to over 600
4. fill in the screw groove with weld (I have a lb of nickel 55)
5. weld across the length of the break checking the temp after each bead and letting the piece stay between 600 and 700
6. use the torch to keep the piece evenly heated
7. when done cover the part in sand to cool slowly
If anyone has any advice it would be appreciated. Especially as to what order and configuration they would lay the beads and how to avoid making too much of a mess of the adjacent bearing surface.
note: I don't have the piece that broke off.
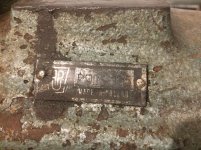
One last thing: anyone know any way to clean up one of these metal plates and make it look good? (see first picture)
Thanks!
I am restoring an FPU Bison Bial vice. A small corner piece of the vice where the screw that tensions the gib goes is broken. I am planning to add beads of weld to build it up and give that screw some more strength (after welding I will re-drill then tap the hole). The pictures are attached.
I havent welded ductile Iron before so I could use any advice or suggestions I can get. From the research I have done this is my plan:
1. clean up the break with a grinder.
2. heat up the piece to around 500c in the oven
3. use a torch to heat the piece to over 600
4. fill in the screw groove with weld (I have a lb of nickel 55)
5. weld across the length of the break checking the temp after each bead and letting the piece stay between 600 and 700
6. use the torch to keep the piece evenly heated
7. when done cover the part in sand to cool slowly
If anyone has any advice it would be appreciated. Especially as to what order and configuration they would lay the beads and how to avoid making too much of a mess of the adjacent bearing surface.
note: I don't have the piece that broke off.
One last thing: anyone know any way to clean up one of these metal plates and make it look good? (see first picture)
Thanks!