
CGT80
Well-known member
I have posted some of these photos in other threads and I also post on the welding web forum. Others wanted to see the photos, so I thought I would actually start my own thread, instead of filling up other people's threads with my photos.
My first welder was a Miller 135. It came with a cart and the only modification was that I added a rectangle made out of steel square tube, to the right of the welder. It had some flat stock hooks and a square tube mig gun holder. The combo got a bunch of work done for me and it was OK with the 80 cf bottle. Wait............my memory just came back..........also, I added larger HF rubber tires (the cheese grade kind that don't hold air) and larger solid casters in the front. After I bought and used the 211, I sold the cart and welder to my buddy.
This welder needed to be up where it was easy to use the controls and I wanted a shelf to protect the top of the machine. The old machine acted as a shelf, but my junk was always falling off. The new machine has a 15' mig gun and a spool gun. I also have three 80 cf bottles and normally just use the two for steel and aluminum, with a tri mix I picked up for some stainless work, after my tig torch melted.
It took months of kicking around ideas and looking at these forums to decide what I wanted. The build was drawn out since I would measure and mock up items and the think on it for a few days or a week. The filing cabinet was one of the first set in stone decisions. While I was doing a job with the old cart (too small for the length and width of the new machine by an inch or so) I found the filing cabinet on amazon. It was just the right depth, width, and height for the size cart I wanted.
This cart doesn't take up much more floor space, but it is taller than the old combo. The vertical space was wasted before, so no loss in garage space in a single car garage.
Originally, I was going to use angle to keep items from falling off the top and to keep the welder on the filing cabinet. It then occurred to me to just notch the top and place it under the tube. I drew the top in CAD and ran it off with the CNC plasma table, in one of the other garages. The tube was a better looking option for the welder base, too.


The cord wraps are what I came up with after looking at pics on here. The tube was a remnant from Industrial Metal Supply, in Socal, my main source for any metal. The other parts were rems I had and I drew the parts in CAD and ran them on the CNC. A green, fine, 5" finishing pad on my 5" Milwaukee vs angle grinder was good for finishing them. The insides have tack welds that I did with the TIG.
The ground hog clamps work great and I have them on the MIG and TIG. The cool magnetic grounds just don't stick well to aluminum work
That is a 15' gun and 25' of #4 ground cable.

A smaller version for a clear shield, helmet, and ear muffs. The center is smaller aluminum tube that I cut in half.

The helmet rests on the steel tube next to the welder and not the pretty Miller Blue paint. I prefer to have nice looking tools when possible.


It is harder to read the regulator and I have to give it the old reach around to turn on the gas, but miller put the stupid power switch on the back anyways. The 135 and 252 have them on the front. What a backwards move, along with using the 10/100 numbering system on the wire and voltage vs. actual numbers and digital readouts on the bigger machines. The 211 is small time pro territory, as well as hobby territory and it would be nice to pick up the 252 after this one, and know what settings I run. Autoset? When I bought it, I didn't care about the feature. It works great for most welding and is the lazy way to adjust the machine. Others may not like it, but I like the auto transmissions in my trucks too. Manual is great when you just want to have fun (my dune buggy is a vw 4 speed) or you need to dial in a weld, but I'm only a little CDO and am not that much of a control freak. It is easy enough to dial it in manually, if I have the urge.

The horizontal plates are CNC plasma cut. The vertical plates are laser cut
No, not at home. They are remnants from the fab table I purchased. I asked the company to throw in a bunch of rems since it was shipped on a pallet any way. They were just the right size and looked good enough.

The chain is left over from the gate open I installed on the gate to the back driveway. The cheese grade chain on the other miller cart was not skookum enough.


That welding table mentioned above, came in handy for building the frame for this cart. That is the back of the filing cabinet. The table adjusts from something like 28" to 44" tall. There is acme thread inside the legs and I use a 7/16 socket through the 5/8" holes in the table to turn the top of the acme thread.

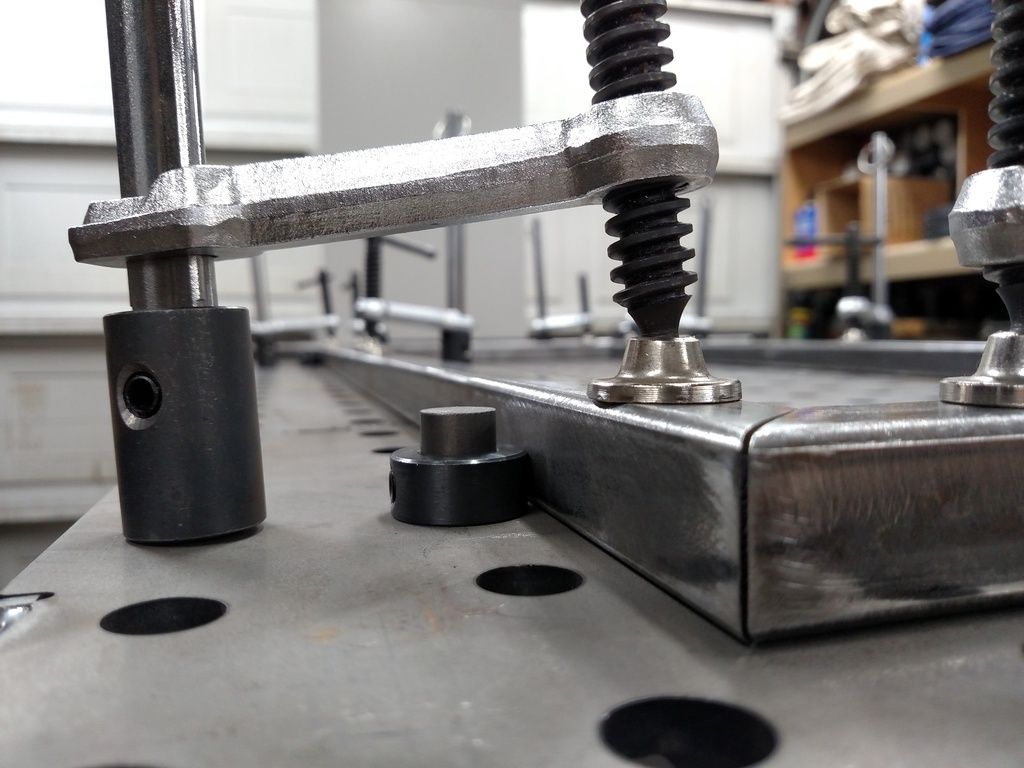
The stops are just 5/8" ground steel rod and collar stops from McMasterCarr. I was too cheap to buy stronghand stops. The clamps were 13 bucks each, on sale, so I bought 10 of them.
My first welder was a Miller 135. It came with a cart and the only modification was that I added a rectangle made out of steel square tube, to the right of the welder. It had some flat stock hooks and a square tube mig gun holder. The combo got a bunch of work done for me and it was OK with the 80 cf bottle. Wait............my memory just came back..........also, I added larger HF rubber tires (the cheese grade kind that don't hold air) and larger solid casters in the front. After I bought and used the 211, I sold the cart and welder to my buddy.
This welder needed to be up where it was easy to use the controls and I wanted a shelf to protect the top of the machine. The old machine acted as a shelf, but my junk was always falling off. The new machine has a 15' mig gun and a spool gun. I also have three 80 cf bottles and normally just use the two for steel and aluminum, with a tri mix I picked up for some stainless work, after my tig torch melted.
It took months of kicking around ideas and looking at these forums to decide what I wanted. The build was drawn out since I would measure and mock up items and the think on it for a few days or a week. The filing cabinet was one of the first set in stone decisions. While I was doing a job with the old cart (too small for the length and width of the new machine by an inch or so) I found the filing cabinet on amazon. It was just the right depth, width, and height for the size cart I wanted.
This cart doesn't take up much more floor space, but it is taller than the old combo. The vertical space was wasted before, so no loss in garage space in a single car garage.
Originally, I was going to use angle to keep items from falling off the top and to keep the welder on the filing cabinet. It then occurred to me to just notch the top and place it under the tube. I drew the top in CAD and ran it off with the CNC plasma table, in one of the other garages. The tube was a better looking option for the welder base, too.
The cord wraps are what I came up with after looking at pics on here. The tube was a remnant from Industrial Metal Supply, in Socal, my main source for any metal. The other parts were rems I had and I drew the parts in CAD and ran them on the CNC. A green, fine, 5" finishing pad on my 5" Milwaukee vs angle grinder was good for finishing them. The insides have tack welds that I did with the TIG.
The ground hog clamps work great and I have them on the MIG and TIG. The cool magnetic grounds just don't stick well to aluminum work
That is a 15' gun and 25' of #4 ground cable.
A smaller version for a clear shield, helmet, and ear muffs. The center is smaller aluminum tube that I cut in half.
The helmet rests on the steel tube next to the welder and not the pretty Miller Blue paint. I prefer to have nice looking tools when possible.
It is harder to read the regulator and I have to give it the old reach around to turn on the gas, but miller put the stupid power switch on the back anyways. The 135 and 252 have them on the front. What a backwards move, along with using the 10/100 numbering system on the wire and voltage vs. actual numbers and digital readouts on the bigger machines. The 211 is small time pro territory, as well as hobby territory and it would be nice to pick up the 252 after this one, and know what settings I run. Autoset?
When I bought it, I didn't care about the feature. It works great for most welding and is the lazy way to adjust the machine. Others may not like it, but I like the auto transmissions in my trucks too. Manual is great when you just want to have fun (my dune buggy is a vw 4 speed) or you need to dial in a weld, but I'm only a little CDO and am not that much of a control freak. It is easy enough to dial it in manually, if I have the urge.
The horizontal plates are CNC plasma cut. The vertical plates are laser cut
No, not at home. They are remnants from the fab table I purchased. I asked the company to throw in a bunch of rems since it was shipped on a pallet any way. They were just the right size and looked good enough.
The chain is left over from the gate open I installed on the gate to the back driveway. The cheese grade chain on the other miller cart was not skookum enough.
That welding table mentioned above, came in handy for building the frame for this cart. That is the back of the filing cabinet. The table adjusts from something like 28" to 44" tall. There is acme thread inside the legs and I use a 7/16 socket through the 5/8" holes in the table to turn the top of the acme thread.
The stops are just 5/8" ground steel rod and collar stops from McMasterCarr. I was too cheap to buy stronghand stops. The clamps were 13 bucks each, on sale, so I bought 10 of them.