To avoid these ads, REGISTER NOW!

Welding help

Toolhorder

Well-known member
Joined
Nov 9, 2009
Messages
5,711
Location
Montana
Just got a Miller 211 and my first project is a pedestal grinder stand. I got some 4x4 square tubing and a couple plates one is 7x12 1/2" plate. I got a huge diesel truck rotor for the base. My question is can I mig weld straight to the rotor flange without a problem? Someone mentioned its cast but the flange is just machined flat. I'm talking the part the wheel mounts to
Also I can't weld in 220 mode only 110 right now so I'm worried about penetration. Don't want it breaking and falling on a car or bike or kid in my garage someday
 
To avoid these ads, REGISTER NOW!

zkling

Well-known member
Joined
Jan 23, 2007
Messages
16,939
Can you? Yes, for this application it really won't be that big of a worry. It would be better to bolt it together though. The weld will be brittle on the drum side, right outside the welded area. But seeing as how it is a grinder stand that probably won't get beat on to much, a good weld would be just fine. :beer:
 
Last edited:

trackwelder

Well-known member
Joined
Jun 22, 2005
Messages
2,608
Location
n.y
Can you preheat the weld area with a oxy fuel torch? If you could it will help with penetration.
 

Zeke

Well-known member
Joined
Aug 13, 2009
Messages
17,176
Location
Long Beach CA, the sewer by the sea.
I doubt you will get much penetration at all on the 1/2" top plate. Try some flux core or hook up to some CO2 gas. Better yet, take the parts to a place where you have 240v.
Jody on Welding Tips and Tricks just did this steel to CI with aluminum bronze. But, he was using a TIG torch.
 
OP
T

Toolhorder

Well-known member
Joined
Nov 9, 2009
Messages
5,711
Location
Montana
Here is the drum I plan to use for the base,
vo7nky.jpg
 

Jswain

Well-known member
Joined
Apr 26, 2013
Messages
2,457
Location
Calgary, AB
Tack the plate on then flip the drum upside down and weld on the plate through the holes. Keep welding until the weld flows over the hole and make a circular pass overtop of that. Then you don't have to worry about the mild steel-cast cracking as the weld will also sandwich the drum...plus it should be plenty hot by then to get enough penetration into the plate for this application, and also gives you more practise then bolting it down.
 
OP
T

Toolhorder

Well-known member
Joined
Nov 9, 2009
Messages
5,711
Location
Montana
Tack the plate on then flip the drum upside down and weld on the plate through the holes. Keep welding until the weld flows over the hole and make a circular pass overtop of that. Then you don't have to worry about the mild steel-cast cracking as the weld will also sandwich the drum...plus it should be plenty hot by then to get enough penetration into the plate for this application, and also gives you more practise then bolting it down.

That's an excellent idea! Basically you are saying fill up the lugnut holes from the backside with mig wire?
 

fnieto

Well-known member
Joined
Aug 27, 2013
Messages
1,401
Location
Tucson,Arizona
Bolt the base. Your machine will not handle the thick Drum base. You will at some point roll your pedestal for some reason or another. You really don't want to have it fall on a family member at some point in time. If you look close, the vice to the right of the photo is mounted to a fire truck drum (bolted). I own several millers that could handle the heat, but I chose to bolt it. It's the the only way (my opinion) to make it "bomb proof". This set up weighs around 200-240 lbs. and I can roll it around on the edge of the drum to suit my needs. The flange is only one extra step in the grand scheme of things.
Good luck.
 

Attachments

  • IMG_0034.jpg
    IMG_0034.jpg
    140.2 KB · Views: 60
To avoid these ads, REGISTER NOW!

great white tj

Well-known member
Joined
Apr 12, 2009
Messages
545
Location
Ocala Fl.
I have a vise stand,a sander stand, a grinder stand and a drill press all on brake drums and all welded with a 110volt Hobart 140 ro my MM211 be for I got 220 to my shop. Weld it up and make something.......
 

Attachments

  • brake drum on wheels.jpg
    brake drum on wheels.jpg
    32.6 KB · Views: 58
  • sander stand.JPG
    sander stand.JPG
    133.7 KB · Views: 66
  • vise stand.jpg
    vise stand.jpg
    42.6 KB · Views: 65
  • P1010044.jpg
    P1010044.jpg
    47.3 KB · Views: 61

great white tj

Well-known member
Joined
Apr 12, 2009
Messages
545
Location
Ocala Fl.
Use that MM211 on 110 until you get 220, do not use the auto set on 110. it will not weld very good on auto set on 110. have fun.
 

Attachments

  • View #1.jpg
    View #1.jpg
    44.5 KB · Views: 52
  • View #5.JPG
    View #5.JPG
    146.4 KB · Views: 39
  • View #4.jpg
    View #4.jpg
    33.9 KB · Views: 47
  • View #3.jpg
    View #3.jpg
    42.9 KB · Views: 53
OP
T

Toolhorder

Well-known member
Joined
Nov 9, 2009
Messages
5,711
Location
Montana
Well I was going to try welding through the back and filling the bolt holes but I can't get the welder hooked up. I got a 25ft. extension cable from the welding shop yesterday and went to connect it up to the dryer plug but it's not the same. I see you can "make" something to adapt it but I don't want to burn the house down.
 

sberry

Banned
Joined
Jun 18, 2005
Messages
35,747
Location
Brethren, Michigan
I like to blow some holes in the plate, could lighten it if they were off 4 corners of the tube and bolt it. Maybe you change your mind or come up with another scheme.
I only got one vise and I like a little bench space around it to sit the tools one is using, some of these stand alone deals, they are nice too. As my mechanic but says, bolted to the floor is good too.

Nice shop pics above.
 
Last edited:

zkling

Well-known member
Joined
Jan 23, 2007
Messages
16,939
Well I was going to try welding through the back and filling the bolt holes but I can't get the welder hooked up. I got a 25ft. extension cable from the welding shop yesterday and went to connect it up to the dryer plug but it's not the same. I see you can "make" something to adapt it but I don't want to burn the house down.

You will be fine. Although I'd probably return the one to the weld shop and build your own. The common welder plug is a NEMA 6-50, which looks like a supersized 120v 3 prong/ grounded outlet. The common dryer plug is a 10-30 IIRC, 3 prongs, but the two lines are not parallel. Both 240v rated plugs just one 30 and one 50 amp.
 

MoonRise

Well-known member
Joined
Nov 5, 2010
Messages
4,028
Location
NJ
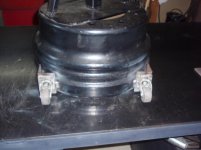
Bolt to the rotor, don't weld there. That way you will have no worries about a cracked weld or incomplete fusion/penetration or any other weld-related 'issues'.

And with currently only 120V power to run the welder? Forget about welding to the 1/2" thick plate. Especially with GMAW (aka MIG). Even running straight CO2 shielding gas, on 120V input power you will never get enough output power in short-circuit transfer mode to adequately weld to some 1/2" thick plate (1500F preheat notwithstanding). On 'maximum', the machine can only ouput ~130 amps using 120V input power. And that amperage is what you would use for some ~1/8" plate (rule of thumb : use 1 amp welding current per each 0.001" thickness of the work piece). Nowhere near enough output power to weld some 1/2" thick plate.

RTFM or look at the parameter chart inside the wire-compartment door. Using 120V input power, maximum workpiece thickness is listed as 3/16" thick steel. Using 240V input power, maximum workpiece thickness is listed as 3/8" thick steel.

Unlike SMAW (aka stick), you can not just try and run multiple passes to weld a thicker workpiece when using wire-feed machines. Sometimes, you just run out of output power to adequately melt a thick workpiece. The wire will (almost :D ) always melt, but without enough total ouput power you might not melt any/enough of the workpiece to get anything other than a weld bead that is just piled on top of the workpiece. Classic cold lap, aka inadequate fusion, aka inadequate penetration.

And if using Lincoln Innershield NR-211-MP FCAW wire, note that the wire itself is only rated for use on workpiece thicknesses 5/16" or less (with wire sizes 0.045" or smaller, all you would be running on that class machine anyway).

Doesn't matter how many passes you use or how 'big' a machine you have, Lincoln flat-out says do NOT use NR-211-MP on workpieces thicker than 5/16" if using 0.035 or 0.045 wire. (if using 0.068" or larger NR-211-MP wire, the workpiece thickness limitation is 1/2" max).

The MM211 is a nice machine and all, but it is NOT a machine with enough ouput power to weld 1/2" thick plate. And no way does it have enough ouput power to weld 1/2" thick plate when using 120V input power. Nope, nada, nichts, nyet, nope.

IMNSHO.

Bolt to the rotor, if using the 1/2" thick bottom plate then use a stick welder to weld the 4x4 vertical post to the 1/2" thick baseplate (get the puddle going on the 1/2" thick plate and then 'wash' it onto the thinner-walled 4x4 post, standard thick-to-thin procedure) and bolt the baseplate to the rotor.
 

Ben Buck

Well-known member
Joined
Dec 30, 2010
Messages
7,256
Location
S. W. Ohio
Here's mine. 1/4 plate bolted to the rim, corners were cut with a 4/1-2 grinder, with cut off wheels.

The post welded on the top plate and to base plate.
 

Attachments

  • GEDC2027.jpg
    GEDC2027.jpg
    146.9 KB · Views: 29
OP
T

Toolhorder

Well-known member
Joined
Nov 9, 2009
Messages
5,711
Location
Montana
Actually it's 1/4 plate on the bottom and 1/8 plate on the top where the grinder will mount. I took it all to work (welder/materials) and I bought a Dewalt Chop Saw because the 4x4 square tubing is too long for my liking (I want the grinder waist high) but the chop saw didn't like the 1/4 plate much so I torched it to size. Still need to grind and dress it up a bit before welding to the rotor. I'm planning on flipping the rotor over, welding through the bolt holes like someone mentioned here. I might run a couple beads on the outside of the plate on top too.

I'm really happy with the welder so far. I've been really busy at the shop and have had no time to even connect my gas bottle to the machine. My team leader came over with a broken hood latch off a truck that someone on my team was working on. He was finished with the repairs but when he tried to close the hood the latch broke. Of course we didn't have a new one in stock but he had the broken piece still. The part that broke off the latch was the part that the cable end goes through (like a ball at the end of the steel cable and it fits into a spot on the end of the arm)
Anyway the part was really small and a little bit of a challenge because if you weld it too hot or long it would go through and penetrate the bottom metal behind it and the latch won't move anymore. (I'm welding the middle piece of metal in a 3 piece metal sandwich that's held together with a rivet so the middle piece moves)
Anyway I ran a couple small tack welds to it and then a couple second solid weld and it worked perfectly. I actually tried the auto set feature and measured the piece I wanted to weld. Fantastic machine! Saved the day for my team and the truck's latch was better than new. I'm thinking of welding a small cage or enclosure for my welder and leaving it at my work now.
 
To avoid these ads, REGISTER NOW!
Top Bottom