when you hammer the welds flat, do you need to do it after each spot weld when they are hot or wait until your done? i'm getting ready to patch my front fenders on my 66 stang and this thread has been an AWESOME help.
I posted the following in another thread as a response to a question, but I think it may help to answer some of the welding/shrinking/planishing questions.....
Here is a thread I did on welding and shrinking, this may give some insight......
For all the progress pictures, how-to's, etc, sometimes the small details get lost in the shuffle. I thought I'd start a thread just to get people thinking about the effects of welding and perhaps how to read a panel to see if we need to shrink or stretch the metal.
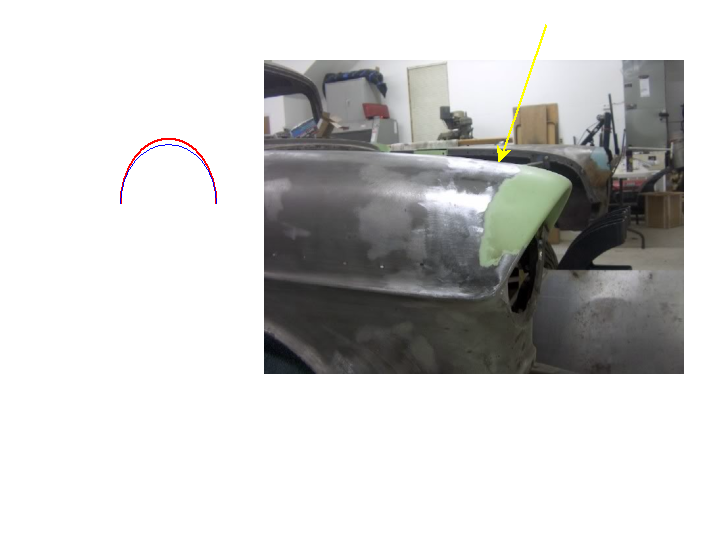
Using a headlight eyebrow picture as a sample, looking at a cross section of the patch panel we have a long arc that stretches from the outside of the fender to the inside. Once we weld along this seam, eventually going from one end to the other, the heat from welding will have a tendency to shrink the area in the HAZ (heat affected zone). In most cases, any shrinkage from the welding will tend to be more prominant within the center section of the panel, especially one with a low crown. In effect, the original arc shape (red) as the heat from welding attempts to shrink the area, will cause the arc to shorten in length. As the ends are somewhat locked in place, the result will be a smaller arc (blue) and even though the welds have been dressed, this can be seen as a slight dip (yellow arrow).
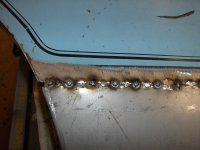
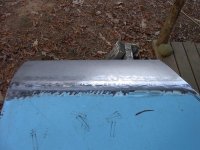
To correct this flaw, short of increasing the stock prices of bondo, some stretching of the HAZ thoughout the weld is in order. Some 80 grit on a long board sander, and a cross hatch pattern across the area will quickly show the high spots (become bright and shiny) and the low spots (sander didn't touch them) Match the contour underneath as closely as possible to an appropriate dolly, and with a low crown hammer (the flat one), use the on-dolly technique (you should hear a ping when you strike) to stretch the area. (this should only be done after the welds are dressed and the panel somewhat flat) Worked slowly and methodically, checking your progress with the sander. If you have an area you got too happy with the hammer and it now shows too high, use off dolly (dolly on low spot underneath, hammer strikes the high spot on top....gently- no ping sound) to bring it back down again. Repeat as neccessary until you are happy with the results. The recent fender repair I did to remove a crease shows what can be accomplished using this method. Where this used to have a good amount a filler as a repair, we should be able to straighten much of it out where high build will address the imperfections:


Once we have the dolly selected, in this case we use some off dolly with a ******* to bring down the high spots. (A ******* has much more surface area, and thus has less chance of leaving marks as a hammer.....plus can span a narrow valley to off-dolly the two sides at once) Unlike welding, a glancing blow as I have here in this sample
does stretch the metal, so some shrinking is in order.
Once the high spots are brought down and the panel countour looks close, some on-dolly in the low areas will bring them up a bit more.
Much better:
For flatter panels such as quarters, I think some may be under the misconception that because a panel used to be flat, and now that the metal has moved away from its flatness, well obviously the metal has stretched.
NOT! There are very few, if any cases where a welding exercise will result in the
permanent stretching of metal. Sure the metal will stretch while exposed to the heat from welding, but as the area cools, the molecular structure re-aligns and becomes tighter, closer than they were previously- resulting in shrinking.
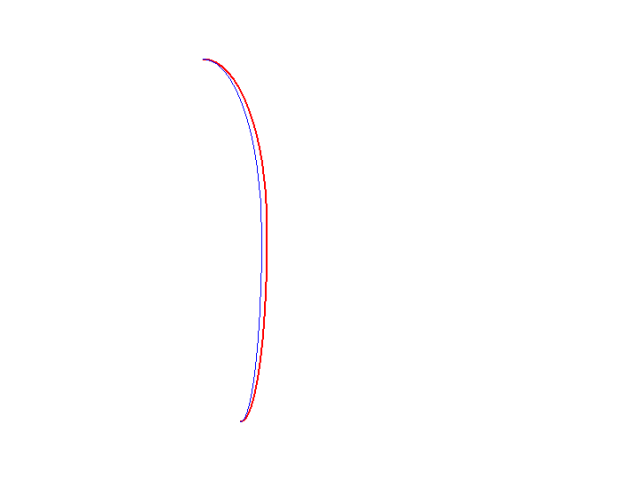
Looking at the cross-section of the quarter, the same principle applies as the eyebrow patch above. Where this is a lower crown panel, and the heat often wreaks more havoc on the center of the panel, in many cases it will shrink, lose some of the crown, (become more flat), and possibly start to oil can as the metal loses its shape. In the picture below, again the red arc would represent the original shape, and the blue shows what occurs as the weld shrinks the surround area; the arc loses some of its length and pulls the adjoining metal into a valley.
To correct this, the hammer and dolly principles as explained above are used. Use caution, no matter what type of panel you are working on, to not get trapped with "tunnel vision" and only focus on the immediate weld area. We should always keep an eye on the surrounding area as well, and check your progress with some long metal strips/rulers laid across the area to help see where the shape needs to move. On a quarter, I like to lay a long ruler across the seam to read the dip, and then also drag it along the panel parallel with the seam, to see any change in the crown from the unshrunk area and into the welded area. Hopefully this will give a better understanding to what happens when welding so we can use more metalworking and less filler.

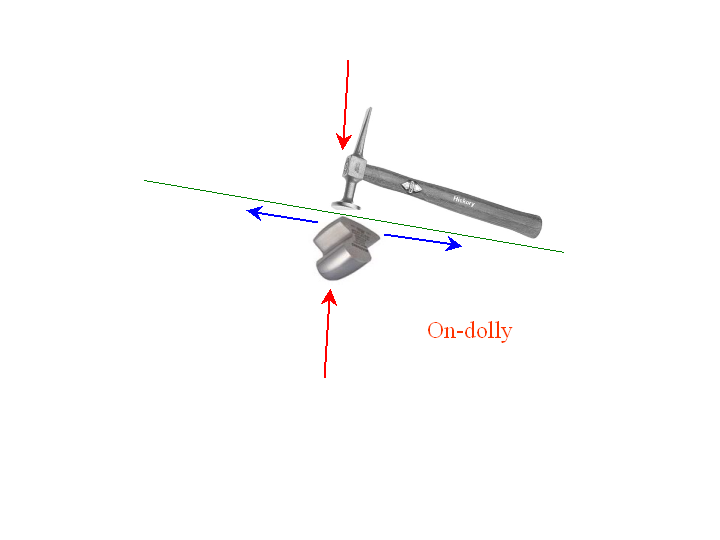
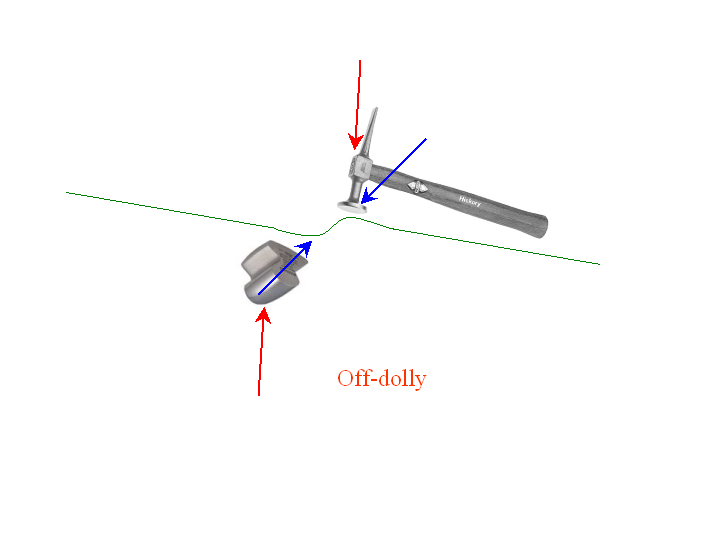
Remember, on-dolly, metal pinging sound = stretching. Off-dolly, NO pinging sound and light taps = shrinking
Just to clarify a couple points, I had some questions about the above initial post....
Hi Robert,
As a student of these skills I need a little help.
I have never thought of “off dolly” work as a shrinking operation. I thought it was only used to raise or lower the surface of the metal. I understand that on dolly operations stretch the metal by thinning and spreading it out whereas shrinking requires the gathering and compression of the metal into an heated area.
Secondly, are you saying that to counteract the inherent shrinking produced by the welding operation that the weld metal should be planished (on dolly) but also the parent metal adjacent to the weld metal?
To explain what is occurring, when using On-dolly, hammer and dolly directly lined up with each other on opposite sides of our green metal, and when you strike the hammer you will hear a ping as the force travels through to the dolly. (red arrows) The secondary action is that this forces the metal outward (blue arrows), in essence stretching the metal.
Now after someone backed into your fender (obviously stretching the metal) we have a ripple to remove. Using the off dolly technique, each tool on the high part of their side of the panel, striking the panel with the hammer will force the metal bulge of that side downward (red arrow) as does the dolly on its side of the panel. The secondary action in this case is to force the metal back into itself (blue arrows), as well as raising/lowering the metal as you suggest. By no means will you see the amount of shrinking that takes place when you introduce heat, such as with the torch or shrinking disc. But it shrinks, just the same.
As far as planishing the metal, where ever you see discoloration from the heat (the HAZ), you have experienced shrinking. Simply planishing the weld will help, but to truly fix the effects from the heat, the HAZ outside the weld will need planishing as well.
.

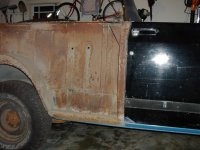
 . Can you straighten the flange out and if so what would be the best way? I have some duck bill pliers?