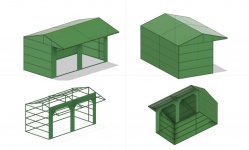
To avoid these ads, REGISTER NOW!

Welding Project: Loafing Shed

eriksalo

Well-known member
Joined
Nov 29, 2007
Messages
184
Location
Colorado
Horse Loafing Shed:

I wanted a new loafing shed for my horses this winter. I looked around at what I could buy in Colorado and didn't find anything I liked so I decided to build one.

It cost me about $1,200 for the 2x2" square tubing steel and $1,500 for the steel sheeting and trim. Maybe $3,000 total.

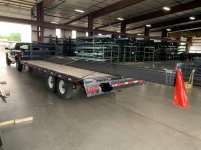
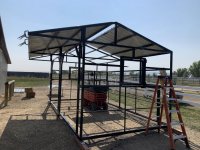
I built the frame in my barn and then removed it to install the sheet metal and finish it up.

Here's a build sequence:
 

Attachments

  • Finished.jpg
    Finished.jpg
    163.9 KB · Views: 130
To avoid these ads, REGISTER NOW!
OP
E

eriksalo

Well-known member
Joined
Nov 29, 2007
Messages
184
Location
Colorado
Partly for style, partly for the enjoyment of a new project, I decided to build my own and promptly fired up the CAD program and designed a shelter we liked:
 

Attachments

  • CAD.jpg
    CAD.jpg
    82.6 KB · Views: 64
OP
E

eriksalo

Well-known member
Joined
Nov 29, 2007
Messages
184
Location
Colorado
I made up a bill of material, hooked of the flatbed and headed to the steel yard.
Here’s my load of 1200+ lbs of 2”x2” 14 gage square tubing. The “sticks” are 24 feet long.
 

Attachments

  • Steel.jpg
    Steel.jpg
    141.2 KB · Views: 117
OP
E

eriksalo

Well-known member
Joined
Nov 29, 2007
Messages
184
Location
Colorado
Here’s the “tin” as it’s called which is made from 36” wide 26 gage steel sheeting plus all of the trim.
I designed the system on CAD and ordered all of the pieces custom cut to fit.
Flatiron steel also made me some custom shaped pieces for me to trim around the openings.
This is ~700 lbs of steel.
 

Attachments

  • Sheet.jpg
    Sheet.jpg
    109.2 KB · Views: 82
OP
E

eriksalo

Well-known member
Joined
Nov 29, 2007
Messages
184
Location
Colorado
With my metal in hand, I set to work. I decided to build the frame inside of the barn. It is a lot easier to MIG weld inside and it would be out of the weather.
The key to any project like this is the FIRST PIECE. I spent a bunch of time getting the foundational rectangle square and level. The structure is 10 feet deep by 20 feet wide.
 

Attachments

  • Frame.jpg
    Frame.jpg
    149.9 KB · Views: 73
OP
E

eriksalo

Well-known member
Joined
Nov 29, 2007
Messages
184
Location
Colorado
Once I got the base set, I put in the uprights and built the roof.
The peak of the roof is 10 feet high and the lowest point inside is 8 feet high. The overhand is 4 feet.
If you are noticing the structure looks larger than the aisle, you would be right! It will not come out of the barn like this…
 

Attachments

  • Frame 2.jpg
    Frame 2.jpg
    151.7 KB · Views: 96
OP
E

eriksalo

Well-known member
Joined
Nov 29, 2007
Messages
184
Location
Colorado
Once I had the main frame done, I filled it in with the horizonal pieces for the siding, made two windows and created a way to put in ¾” OSB boards all around from the ground to 4 feet up to protect from the horses feet and also to make a smooth surface for them to lay against.
I also made mounts for three gates. One for each opening and one for the middle so the structuer can serve as a two horse pen if needed.
It’s REALLY strong….
 

Attachments

  • Frame 3.jpg
    Frame 3.jpg
    130.4 KB · Views: 65
Last edited:
OP
E

eriksalo

Well-known member
Joined
Nov 29, 2007
Messages
184
Location
Colorado
I built the structure to have one inch of vertical clearance coming out of the barn. To make it small enough to clear the width, I added two bolted together risers and then cut the overhang section so it could be detached and I could get it out of the barn.
I had been telling everyone I was 80% sure it would clear the door!
 

Attachments

  • Frame 4.jpg
    Frame 4.jpg
    142.5 KB · Views: 76
OP
E

eriksalo

Well-known member
Joined
Nov 29, 2007
Messages
184
Location
Colorado
Once I got it out and re-installed the overhang (which I dropped and bent and had to fix and reinstall). I ground down all the welds that still needed it and painted the whole frame black with enamel.
You don’t have to be a good welder if you are a good grinder…. The whole project was more work than I though. I always take my time. Speed not being the point at all.
 

Attachments

  • Painted Frame.jpg
    Painted Frame.jpg
    146.7 KB · Views: 72
OP
E

eriksalo

Well-known member
Joined
Nov 29, 2007
Messages
184
Location
Colorado
With the frame done, I installed the roof and the sides
 

Attachments

  • Roof.jpg
    Roof.jpg
    147.7 KB · Views: 61
  • Sides.jpg
    Sides.jpg
    126.1 KB · Views: 67
Last edited:
OP
E

eriksalo

Well-known member
Joined
Nov 29, 2007
Messages
184
Location
Colorado
And the trim.

Not the removeable “ski’s” I built under the corners. These allowed me to easily drag it around with tractor.
 

Attachments

  • Outisde.jpg
    Outisde.jpg
    150.5 KB · Views: 70
OP
E

eriksalo

Well-known member
Joined
Nov 29, 2007
Messages
184
Location
Colorado
And finally, the wood panels on the sides.
Nearly done.
 

Attachments

  • Inside.jpg
    Inside.jpg
    145.9 KB · Views: 75
To avoid these ads, REGISTER NOW!
OP
E

eriksalo

Well-known member
Joined
Nov 29, 2007
Messages
184
Location
Colorado
It’s darn heavy (about a ton) but I didn’t want to take any chances of it blowing over or moving so I set a 5’ long chain into the earth at each corner with concrete.
I drilled holes one foot wide by 3 feet deep and poured 160 lbs of concrete into each. It is not going anywhere.
 

Attachments

  • Footings.jpg
    Footings.jpg
    84.7 KB · Views: 59
OP
E

eriksalo

Well-known member
Joined
Nov 29, 2007
Messages
184
Location
Colorado
It was more work than I thought. That’s a theme in my project planning. I underestimate by about half and to make it worse, I work to achieve whatever quality I desire. That bar increases with time and age. My bad esitmating skills are probably why I start so many projects. My dad instilled in me that finishing things that you start is a virtue few possess but all shoud aspire to achieve. “There are a lot of good starters but few good finishers.” So, one more thing finished and off to the next project. The horses shelterd for the Colorado winter.
 

Attachments

  • Finished.jpg
    Finished.jpg
    163.9 KB · Views: 61

RTBS

Active member
Joined
Jan 3, 2015
Messages
36
Location
UT
Awesome project thanks for sharing the step by step process. Looks nicely done. I fall under the same regime of always taking a lot longer than I expect doing quality work and become more that way the older I get. I'm working on a couple of loafing sheds myself. Good idea with the windows, guessing you wanted those to be able to open in warm weather.

Sent from my SM-G975U using Tapatalk
 

Ign

Well-known member
Joined
Jul 7, 2006
Messages
12,769
Location
Butte Peak ND
It was more work than I thought. That’s a theme in my project planning. I underestimate by about half and to make it worse, I work to achieve whatever quality I desire. That bar increases with time and age. My bad esitmating skills are probably why I start so many projects. My dad instilled in me that finishing things that you start is a virtue few possess but all shoud aspire to achieve. “There are a lot of good starters but few good finishers.” So, one more thing finished and off to the next project. The horses shelterd for the Colorado winter.

This is absolutely me. I think it's a self-defense mechanism -- if my brain allowed me to understand how much work any given project ACTUALLY was, I'd never start it.
 

bimmer1980

Well-known member
Joined
Feb 5, 2009
Messages
2,104
Location
York, PA
Nicely done!

A little more time during the project to get it right is better than more time later trying to fix issues.....
 
OP
E

eriksalo

Well-known member
Joined
Nov 29, 2007
Messages
184
Location
Colorado
Very nice build log. You did all that yesterday ;)

The project took me ~4 full weekends spread out over a couple of months. I didn't have many mis-steps but took my time.

All the joints are fully welded and ground.

I only made a couple of mistakes. The first was a faulty strap dropped the detached "overhang" piece and bent it. I had to repair the piece.

The other issue was that I originally made the windows to open in. My wife wanted them to open out so I had to change them.

Otherwise the project went smoothly with no mistakes or other re-work.

The building is square and straight to better than half an inch across the 20 foot length. It's very rigid as well.
 

matt_i

Well-known member
Joined
Mar 14, 2008
Messages
10,725
Location
SE Michigan
Good job, I was worried it was going to get stuck inside the barn when I saw the overhangs installed :D

Great planning and execution! :thumbup: thanks for sharing and we look forward to your next project...

....if you put a tail on that Goose it could probably haul the tractor :)
 
OP
E

eriksalo

Well-known member
Joined
Nov 29, 2007
Messages
184
Location
Colorado
Good job, I was worried it was going to get stuck inside the barn when I saw the overhangs installed :D

Great planning and execution! :thumbup: thanks for sharing and we look forward to your next project...

....if you put a tail on that Goose it could probably haul the tractor :)

I was telling everyone that I was 80% sure it would make it out of the barn!
 
To avoid these ads, REGISTER NOW!
Top Bottom