To avoid these ads, REGISTER NOW!

Welding Table and Vise Stand

mike13u

Well-known member
Joined
Mar 1, 2008
Messages
616
Location
S.Florida
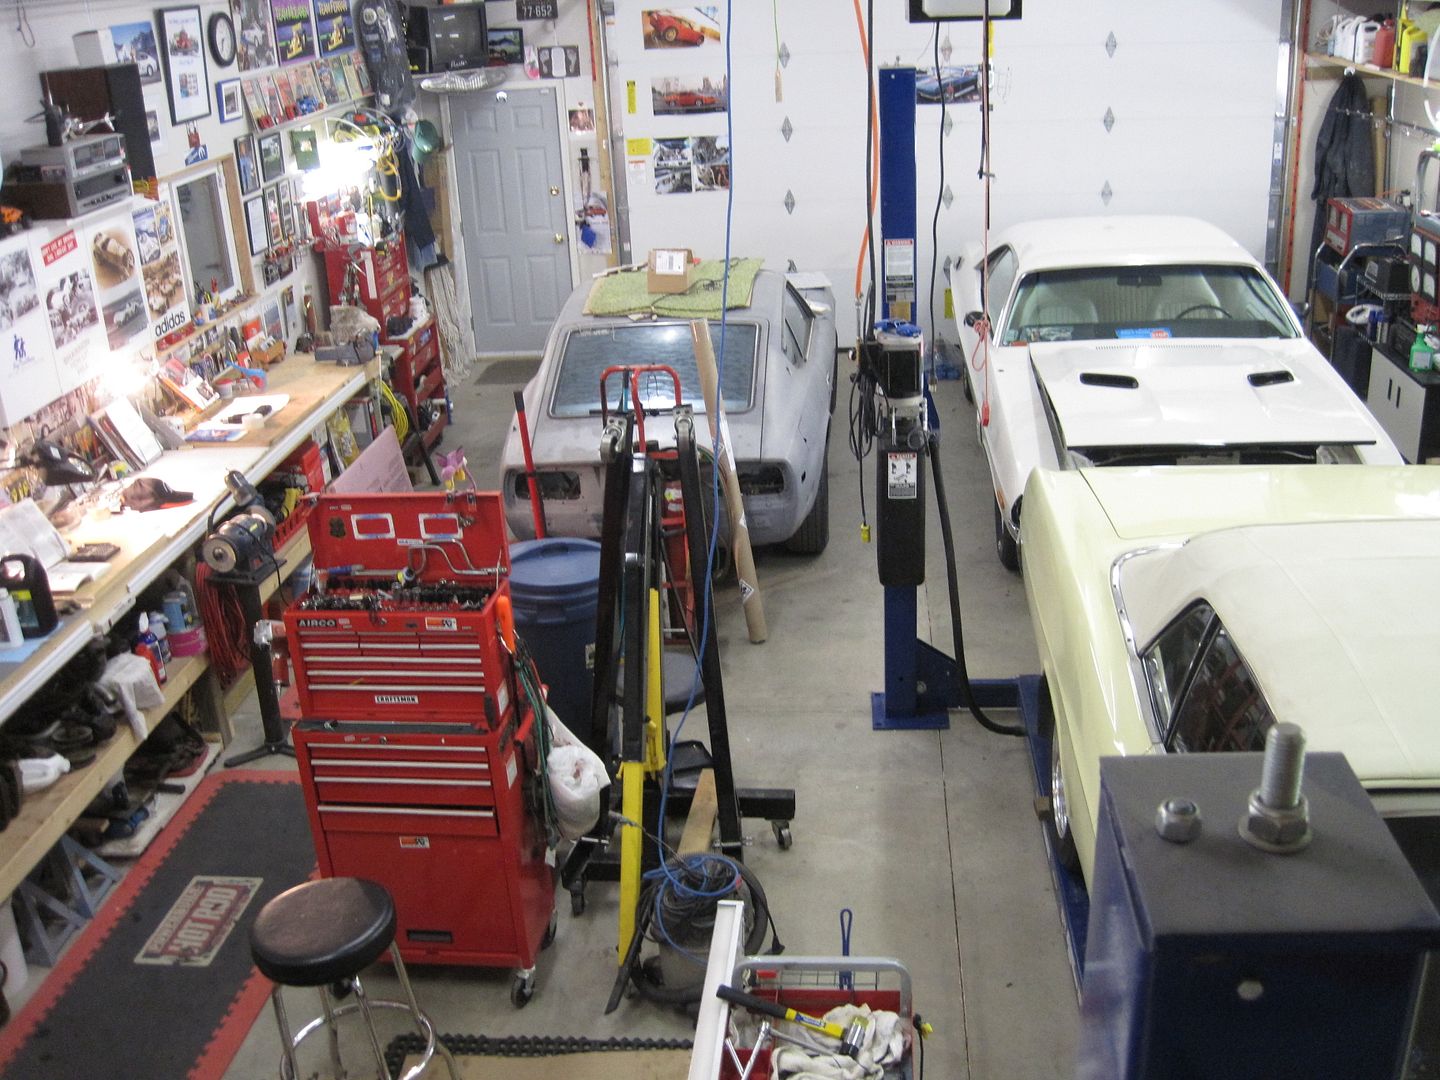
Hello Gentlemen. I have been lurking for a while but since I have been in the process of moving I really havent had much to contribute. My new garage is nowhere near being complete, but I did make a few things that will make working in the garage a bit easier.
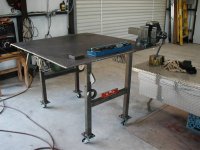
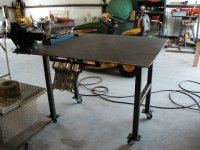
below are pics of a stand I made to hold my vise and tubing bender. Also, some shots of my new welding table. The table is a bit overkill in terms of strength/weight but I wanted to utilize a t-slot top that I had available and the stand needed to be heavy duty as the t-slot top is super heavy.
See next link.
 
Last edited:
To avoid these ads, REGISTER NOW!

AFR6

Member
Joined
Dec 11, 2009
Messages
5
I like what you have it looks like it will work very well. nice work.
 

Motofixxer

Well-known member
Joined
Oct 10, 2009
Messages
681
What is that T-slot top from? Looks kinda useful, but I have never seen anything like that out of steel.
 

evintho

Well-known member
Joined
Apr 6, 2006
Messages
1,358
Location
Santa Rosa, CA.
Very nice work! I have a question. Do you still get a good ground, for welding, using the plastic/neoprene tire casters? I assume rubber tire casters wouldn't work.
 

35mastr

Well-known member
Joined
Dec 6, 2007
Messages
2,534
Location
Norcal
Cool projects. I really like the bench. That top looks to be from some Giant Mill.

Got any more??
 

AFR6

Member
Joined
Dec 11, 2009
Messages
5
Very nice work! I have a question. Do you still get a good ground, for welding, using the plastic/neoprene tire casters? I assume rubber tire casters wouldn't work.

the casters shouldn't affect the ground if he uses a clamp style ground for his welding as he would just attach it to the table.
 
OP
M

mike13u

Well-known member
Joined
Mar 1, 2008
Messages
616
Location
S.Florida
Thanks for the kind words.

These T-slot tables can be found from machine and manufacturing shops. Search t-slot table on e-bay and you will find them. I picked-up three of these (each was 2' by 3') for around $250 a while back. Freight costs for the pallet was $100 though as each plate is around 200lbs. A 58-piece clampling set will allow you to clamp any kind of work to the table and can be found from Enco for around $30-$60

No problem with the casters. Just set welding clamp to work or any steel surface on your weldiing table and you are good to go.
 

dagoat_1

Well-known member
Joined
Dec 18, 2007
Messages
449
Location
ON, Canada
Very nice indeed.
I love the idea of the t-top table for clamping and will be keeping an eye out for something like this.
 

Bigger Hammer

Well-known member
Joined
Jun 26, 2007
Messages
173
The table is a bit overkill


When you are talking about welding tables the above statement is not possible. That is one sweet little table top. Where did you come across the t-slot top?

nevermind, i should have kept reading before posting
 

AZAV8

Well-known member
Joined
Apr 3, 2006
Messages
56
Location
Mesa, AZ
Hey! You stole my idea of using receiver tube for the floor stand. Oops, sorry, I should have typed, that great minds think alike. I'm building a similar floor stand to hold my vise, grinder, bandsaw stand, and anything else, I can slide in and out of the tube steel. I attached mine to a concrete-filled 16 inch Ford truck wheel. That way I can move it outside and leave the grinding dust and dirt outside instead of having to clean it up inside the shop. My garage space is limited so I refrain from attaching anything permanently to the floor. Good work!!!

Phil
 

JakeD

Well-known member
Joined
Sep 29, 2008
Messages
153
Location
Houston, TX
Howdy. I was wondering if you could give some specifics about how the stand base is attached to the concrete floor. Drop in threaded anchors, expansion bolts? Thanks,
 
OP
M

mike13u

Well-known member
Joined
Mar 1, 2008
Messages
616
Location
S.Florida
Yes they are Ramset /Red Head drop-in anchors. Use hammer drill and drill out your hole with masonery bit. I like to use a drill stop to gauge the hole depth. Tape around your drill bit will also work as a guide but can become hard to see once concrete dust starts flying. Whatever you decide to use the depth of the whole is important. So, make sure you use something. Once the hole is drilled out, I try and get the dust out the best I can and then drop the anchor in. Once anchor is in, you tap it with a punch and it sets into the concrete.

Red Head sells a lot of good anchor products. I like these for the floor stand because I can move the stand whenever I want (unscrew 4 bolts) and my garage floor is flush and without seems or threaded studs sticking up.

As with any/most typical garages, space is always limited so you want to be able to move it. But, i wont go with anything other than bolted to the deck for a vise stand. It will move when you really start to bang on something...and you will always be banging on something.
 

JakeD

Well-known member
Joined
Sep 29, 2008
Messages
153
Location
Houston, TX
Yeah I've been thinking about using those drop-in anchors for a similar deal, grinder and tube bender stands. But I've been hesitant to drill until I'm sure how I want to do it. Maybe also I'd countersink the top of the floor so that you could put a bolt back in after you remove the stand, and it would be flush and stuff wouldn't fall in. Anyway, I just wanted to find out what you did and how you liked it. Sounds like you did what I was thinking about and it worked well. Thanks for the install tips!
 

larryv

Well-known member
Joined
May 1, 2005
Messages
456
Location
Ca.
Howdy. I was wondering if you could give some specifics about how the stand base is attached to the concrete floor. Drop in threaded anchors, expansion bolts? Thanks,
The Vise stand would work great for me. How was it made? Thanks
 

caper

Well-known member
Joined
Feb 12, 2006
Messages
3,185
Location
cape breton
Yeah I've been thinking about using those drop-in anchors for a similar deal, grinder and tube bender stands. But I've been hesitant to drill until I'm sure how I want to do it. Maybe also I'd countersink the top of the floor so that you could put a bolt back in after you remove the stand, and it would be flush and stuff wouldn't fall in. Anyway, I just wanted to find out what you did and how you liked it. Sounds like you did what I was thinking about and it worked well. Thanks for the install tips!

You could just thread an Allen head set screw in the hole when not in use.It would sit flush without having to countersink.
 
OP
M

mike13u

Well-known member
Joined
Mar 1, 2008
Messages
616
Location
S.Florida
Great idea. Socket head cap screw (allen) will work best when the stand isnt in. Again, the depth in which you set the threaded inserts into the concrete is important for uniformity, aesthetics, and so you dont need various sized bolts. Doing it over, I would thread the socket head screw into the insert, measure the total length of the insert w/ set screw inserted, and make the depth of the hole to that measurement .

LarryV, The vise stand is made with 2.5" square tube with .125" wall thickness. The top insert is a $9 trailer hitch from HF. You need to grind the weld seem inside the square tube for the trailer hitch to fit into it. The hitch pin was around $4 at HF. The top plate and bottom base are .25" steel plate.
 
Last edited:
To avoid these ads, REGISTER NOW!

JakeD

Well-known member
Joined
Sep 29, 2008
Messages
153
Location
Houston, TX
You could just thread an Allen head set screw in the hole when not in use.It would sit flush without having to countersink.

Like this, yeah?
0553004-11.jpg


I had to look that up on Enco, I've never used those before. But it's a great idea. Thanks!
:thumbup:
 

Moremph

Member
Joined
Nov 9, 2006
Messages
6
Does that 2.5 pipe move at all or is it pretty stout, I built a similar stand using 3/8 plate on the top and bottom and a piece of 1/4 wall 6 pipe as the stand, It is pretty sturdy but it still flexs/shakes more then i was thinking it would?.

Travis
 
OP
M

mike13u

Well-known member
Joined
Mar 1, 2008
Messages
616
Location
S.Florida
Moremph - Mine does not move at all. There was a slight bit of play between the two tubes at the top. For this, I threaded a small hole at the top of the outside tube and used a thumb screw like this thumb screw.jpg to screw through the outside tube and just press into the other tube inside. That eliminated the small bit of play between the two tubes.
 

bimmer1980

Well-known member
Joined
Feb 5, 2009
Messages
2,104
Location
York, PA
Good looking welding table! it's your post on it that made me just "have to have" the antique printer's steel top! :bounce: good stuff.
 
OP
M

mike13u

Well-known member
Joined
Mar 1, 2008
Messages
616
Location
S.Florida
Thanks man. That cast table top you have is awesome. Take your time and have fun cleaning it up, planning the base, and putting it all together. If you think about it, if something so well made and useful is laid out properly there is a good chance it will be a worktable for the next 100+ years. Maybe not yours, but you can create something that could be usefull for your lifetime and the lifetime of whomever it belongs to after you. Make sure you post some pics of how it comes out. Good luck.
 

Brad54

Well-known member
Joined
Jun 13, 2006
Messages
4,646
I found a 3x5 foot x 1/2-inch steel plate at the scrap yard that I snagged for cheap as the basis of my welding table. I kept my eyes open for years to find a chunk that thick, and was pretty damn proud of myself for finding it.

It now pales in comparison, so thanks. (is there a raspberry smiley?)

-Brad
 

Tony T.

Member
Joined
Jan 30, 2010
Messages
8
Location
North Texas
Very nice looking weld table you got there Mike, I scored a couple 1/2 inch plates here a while back to make mine. It is a handy piece of equipment to have around the shop for welding and other projects.

Also on a side note you guys planning to anchor into concrete be aware of what kind of re-enforcement material was used when poured. Re-bar should'nt be a problem but my slab has the cable in it and has been streched to so many ??? psi, I would be sick to drill down and pop one of those cables in half. :wtf: Probably you would miss hitting a cable it not to deep but you never know on some of them.
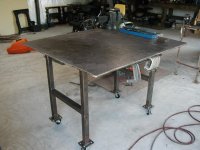
Tony
 

Attachments

  • JD & Weld Table Pics 005.jpg
    JD & Weld Table Pics 005.jpg
    60.7 KB · Views: 208
  • JD & Weld Table Pics 007.jpg
    JD & Weld Table Pics 007.jpg
    63.9 KB · Views: 201
  • JD & Weld Table Pics 008.jpg
    JD & Weld Table Pics 008.jpg
    66.1 KB · Views: 198

akdiesel

Well-known member
Joined
Aug 8, 2008
Messages
2,617
Location
Wasilla, AK
Tony,
Nice table but not sure if you are aware of some issues. The large vice on the corner of your table has no lower support to stop any mechanical leverage that may be applied when wrenching on somthing or putting somthing large/heavy in the vice.
The wheels look like they may be around 150-200# rated capacity each. It looks like the table and extras might weigh in around 300# or more, so you may not have alot of room for additional weight on your table.
 

Tony T.

Member
Joined
Jan 30, 2010
Messages
8
Location
North Texas
Tony,
Nice table but not sure if you are aware of some issues. The large vice on the corner of your table has no lower support to stop any mechanical leverage that may be applied when wrenching on somthing or putting somthing large/heavy in the vice.
The wheels look like they may be around 150-200# rated capacity each. It looks like the table and extras might weigh in around 300# or more, so you may not have alot of room for additional weight on your table.
The locking wheel casters are rated at 250# each as far as the vice/table goes I'm not to worried about what it can handle with what I'm using it far, define what you mean as large/heavy and maybe I can give you a better answer. :)

Tony
 

akdiesel

Well-known member
Joined
Aug 8, 2008
Messages
2,617
Location
Wasilla, AK
Large/heavy meaning the same thing. I have put upwards of 400# on my table table like lift gates axles, etc not to mention hammering to straighten things out. With the vise not drirectly under the frame support and that far out the plate steel could start to bend down from hammering or heavy use.
I have the tendancy to over engineer things for not damaging things and safety for future planning.
Just somthing to think about.
 

Tony T.

Member
Joined
Jan 30, 2010
Messages
8
Location
North Texas
Large/heavy meaning the same thing. I have put upwards of 400# on my table table like lift gates axles, etc not to mention hammering to straighten things out. With the vise not drirectly under the frame support and that far out the plate steel could start to bend down from hammering or heavy use.
I have the tendancy to over engineer things for not damaging things and safety for future planning.
Just somthing to think about.
Pictures can be deceiving at times and I think that's happened in this case. That is not just a set of legs welded to the bottom of the 1/2 inch plate your looking at, that is a 2x2x3/16 frame with 3/16 outer frame supports welded at each corner that are recessed back a bit.

Really in that pic I'm not completely finshed with the table, I'm planning to add a bottom shelf using 2x2 3/16 cross bracing, some angle, and expanded metal, but have run out of material for the time being, hopefully it will be completed in the near future, thanks for the concern though. :thumbup:

Tony
 
Last edited:

akdiesel

Well-known member
Joined
Aug 8, 2008
Messages
2,617
Location
Wasilla, AK
No problem, just would hate to hear someone with their toes cut off from their table falling over on them.
When I had to move my table I had to get additional help to lift it after a failed attempt and a few near-ruptured internal body parts. These things are heavy and at the hight when tipping over can pick up speed.
 

Wayne02

Member
Joined
Aug 4, 2005
Messages
13
Location
WA
Very nice table, mike. Those t-slots will likely be very handy. I like that concept better then the old acorn table with peg holes, at least for most home shop type uses.

I made my welding table and tried to incorporate storage and use of as many items as possible so it would all be contained in one area. Having the table on wheels has turned out to be very handy as I can move the table near the work when needed.

Used receiver tube for mounting the various attachments - bender, brake, cutting table, shear etc. This is all relatively light duty stuff used mostly for thinner materials but it works for most of my miscellaneous home shop needs. If I need to horse around larger/thicker pieces of material it gets done outside.

61133300_bWS9e-M.jpg


61133347_RdWyU-M.jpg


61133314_W4RW8-M.jpg


61133333_wGrNX-M.jpg
 
OP
M

mike13u

Well-known member
Joined
Mar 1, 2008
Messages
616
Location
S.Florida
Awesome! Real nice work Wayne. That is a very nice and well thought out table. My space is somewhat limited so i cant have that large a table so I am putting my tubing bender on the vice stand above. If I get a notcher/shear I'll use same stand. But, i really like your cutting table add-on for plasma and since i havent added any paint to my table legs and base (a must in the s.florida tropics) , I think I will make one of those for mine as well.
Thanks for shareing man.
 

e-tek

Well-known member
Joined
Dec 19, 2007
Messages
10,690
Location
Saskatoon, SK
First off - I want to thank Mike - and encourage others - for the great and detailed explanations when asked a Q. So often answers are vague or they may assume everyone knows what is goin on. I wanted to do "something" with anchors but haven't - until I read your expanation. Now I feel I can do it - right!

Both tables (Mike and Wayne) are awesome. Mine is a combination teardown/shaping/welding table - but after seeing these I'll be hunting for a full sized plate to cover the entire top:
IMG_1007.jpg


I think I'll have to use a combo of floor-mount and bench-mount receivers to make best use of my space. You can see my grinder stand here, but it's not held down by anything. Cheers!
SHOP003.jpg
 
Last edited:

Blackend

Well-known member
Joined
Oct 21, 2009
Messages
53
Location
Round Rock, Texas
Like this, yeah?
0553004-11.jpg


I had to look that up on Enco, I've never used those before. But it's a great idea. Thanks!
:thumbup:

my threaded inserts are not exactly flush with floor so i am going to use these:
socket head.jpg


Question for you guys - I'm wondering if using these allen head bolts (like the ones JakeD mentioned) with some drop in anchors to mount my bender in the garage would work for mounting the bender and not just filling the holes when not in use. If the anchor is 2 1/4" long, and I was to buy 2 1/4" long allen head bolts so it was flush with the floor when all the way in - could I just back out the studs and put a nut on top to secure the bender when I wanted to use it? Shouldn't that be secure enough assuming I hold the allen wrench while tightening the nut? Figure even with a nut on top and the width of the stand, there will still be 1 1/2" worth of stud in the anchor. Then I'd not have to get 2 sets of bolts to keep up with when I wanted to ruin a perfectly straight piece of tubing...

Thoughts or is anybody doing this now?
 
To avoid these ads, REGISTER NOW!
Top Bottom