To avoid these ads, REGISTER NOW!

Welding table evolution

TXNinAZ

Well-known member
Joined
Oct 9, 2011
Messages
507
Location
Phoenix, AZ
I finally bought a welder about 2 years ago after wanting to learn my whole adult life. I went with an import TIG machine to get started with- most challenging, but would allow me to learn how to weld aluminum, thin steel is easier, and of course it doubles as a decent stick machine. The next trouble was a surface to weld on. I didn't want to spend big on a table as there was no guarantee I'd learn to use the machine, so I bought a Harbor Freight table to start.

The other option was a homemade table that someone else made, but those are usually not great. Like this one. If this is your build, I apologize if I hurt your feelings, that's not my intention. But I can't imagine a worse way to build a table [emoji23]

ec897b9f8fd470dee8d6c86a0c311c5b.jpg

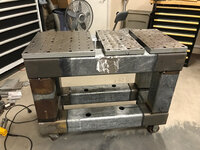
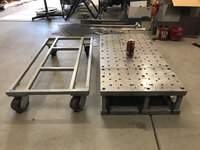
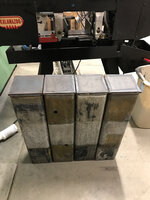
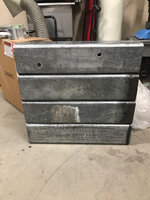
After figuring out how to TIG with some minimal level of skill, I decided it was time to get a real table. I scour Craigslist daily for various things, so I started looking for table materials. I found a machine shop closing its doors that was selling some fixturing blocks they used on their boring jig that could be disassembled and allow me to use the tops for a tabletop.

6211d46e484eff7c509a24d15feb79f9.jpg

8b348ece383a10cc1c074722b318b79f.jpg

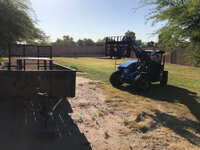
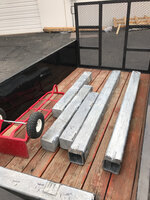
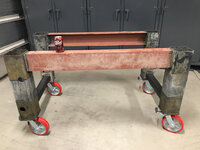
I've got a good friend whose company is building a data center here in Phoenix and mentioned they had some extra steel I could have. I jumped on the offer and took home some good sized pieces of 6" hollow structural steel. Ultra super overkill, but free is free.

aab400bba959b7efc366f460eb2deda5.jpg

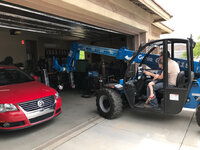
I needed to get them cut, but didn't yet have my bandsaw, so off to Metals supermarkets to pay their shop rate getting cuts.

5edff5a26d0df1e30e853f7d33e19297.jpg

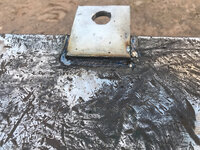
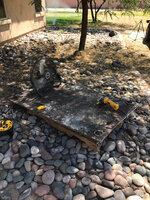
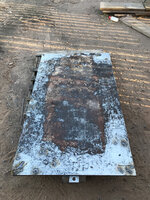
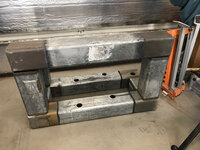
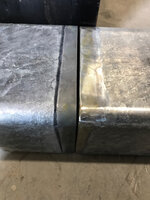
Next was getting rid of the zinc. Welding galvanized steel is bad news for those unaware- the fumes from vaporizing the zinc will give you flu like symptoms for a day or two and in rare circumstances it can kill you. I started with a respirator and grinding disc, but that was slow as Christmas. Chemistry is usually the answer and HCl does the trick to strip hot dipped galvanization in a matter of minutes. It's not cheap, but a gallon from Home Depot got me started to see how well it would work.

6158c1135b6196889b212312081ac1e0.jpg

b8a7bde4df90bcf9d42c2ad006ea13b8.jpg

About 20 minutes of grinding vs 5 minutes of sitting it in the muriatic acid and working on something else while it chooches. Time for a couple more gallons.

686673d2cd432d7d3ba2da0c0f3c861d.jpg

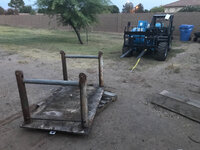
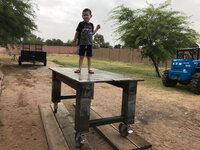
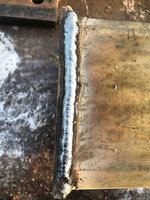
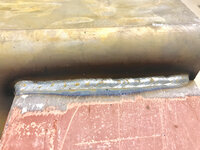
Time to stack and weld. The dimensions of the frame would allow full length for the fixture plates on top and a 2" gap between them for clamping.

b2536be56f5a7129bb4c760c3bcd4056.jpg

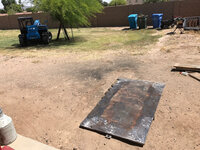
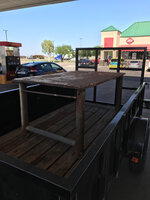
About this point I realized I was not going to like the end result of my idea. It was not going to work out, but I went ahead and finished so I'd have something to use since the HF table was such junk.

1a21e2d832b6fb95b39851fc138ad935.jpg
 

Attachments

  • 1a21e2d832b6fb95b39851fc138ad935.jpg
    1a21e2d832b6fb95b39851fc138ad935.jpg
    750.3 KB · Views: 1
  • b2536be56f5a7129bb4c760c3bcd4056.jpg
    b2536be56f5a7129bb4c760c3bcd4056.jpg
    729.3 KB · Views: 1
  • 686673d2cd432d7d3ba2da0c0f3c861d.jpg
    686673d2cd432d7d3ba2da0c0f3c861d.jpg
    801.1 KB · Views: 0
  • b8a7bde4df90bcf9d42c2ad006ea13b8.jpg
    b8a7bde4df90bcf9d42c2ad006ea13b8.jpg
    688.7 KB · Views: 0
  • 6158c1135b6196889b212312081ac1e0.jpg
    6158c1135b6196889b212312081ac1e0.jpg
    700.6 KB · Views: 0
  • 5edff5a26d0df1e30e853f7d33e19297.jpg
    5edff5a26d0df1e30e853f7d33e19297.jpg
    891.2 KB · Views: 0
  • aab400bba959b7efc366f460eb2deda5.jpg
    aab400bba959b7efc366f460eb2deda5.jpg
    883.7 KB · Views: 0
  • 8b348ece383a10cc1c074722b318b79f.jpg
    8b348ece383a10cc1c074722b318b79f.jpg
    699 KB · Views: 0
  • 6211d46e484eff7c509a24d15feb79f9.jpg
    6211d46e484eff7c509a24d15feb79f9.jpg
    661.5 KB · Views: 0
  • ec897b9f8fd470dee8d6c86a0c311c5b.jpg
    ec897b9f8fd470dee8d6c86a0c311c5b.jpg
    438.2 KB · Views: 0
To avoid these ads, REGISTER NOW!
OP
T

TXNinAZ

Well-known member
Joined
Oct 9, 2011
Messages
507
Location
Phoenix, AZ
I kept looking on Craigslist after finishing the 'thing' and finally found something pretty nice, though small.

8ccfe7c93b60139fee20a098c89358d3.jpg

1-1/2" thick top, clever trailer jack system to move it around, and not terribly expensive. The problem I saw immediately was the small size (24x29").

I have a tool storage problem and can't seem to settle on my Lista, Vidmar, Snap On cabinets, and now tables. I found another good candidate on Craigslist two weeks ago.

e58000bd5cad6f773b444249ce98ecb0.jpg

Seller's forklift got it in my trailer.

5a06d3434e7363646bc9b8c62e92ea05.jpg

It's a great size for my shop: 1" thick top, and 67x39". Not too wide, not too long, and super duty. The legs are awful and the top was gouged up from lazy workers not being careful with the cutting torch. But fixable problems and it was cheap. A new plate these dimensions would be well over $500.

Time to fix the 19 holes drilled through in random places and replace the missing 2-1/2"x2" corner area.

33f1b9d06f31b5b2a03234fd096b4c81.jpg

As I strip off the paint and crud, I find the surface to be worse than I realized. If I just can't stand it, I got a quote for a sheet of 1/4" steel that I can layer on top and weld to the 1" plate. Then all the apprentice marks will be my fault.

Time to repurpose the materials from the 'thing.' Forgot to mention the enormous weight of the finished product- 760 lbs. I don't have a cutting torch or plasma cutter, so grinding discs it is.

bcaff773eb1cc027862f77722b03f931.jpg

Now I needed them cut to length. I wanted the working height at 36" since I'm not a fabricator and usually have a TIG pedal needed when welding so nothing too high. I ordered 8" casters from Amazon with a 1200 lbs each rating that would be 9-1/2" total height, so I needed each leg 25-1/2" long to make my 36" finished height.

I got my old Kalamazoo band saw a while ago from an estate sale, which fortunately has the capacity for my 6" HSS.

1d2abe7cf600460d60d593d00da44888.jpg

It was slow going as the blade got dull, but it chugged right along. Until the last cut, the blade finally gave up.

5001544e812768c0b45521309b1a274a.jpg

All done within 1/16" of each other.

8da8213af49fe9167246293dc336e9d4.jpg

Now time to get some plates welded onto the bottom of the legs to mount the casters on.

f6fb5a4516aa33591ca6cab043f4f751.jpg

I still have a long way to go, but I really love stick welding. This is Lincoln 1/8" 7018.

f2f6bb1c3722ba8f1c118b4db14b7b07.jpg

With the 3/8" plates welded on, time to drill and tap the mounting holes. I could have more easily drilled them before they were welded on, but I was concerned about them changing shape too much from the heat input of welding. Wasn't too big of a deal, just some setup involved to get the full leg in the drill press. Note the reassembled fixture block. Very handy way to mount the mill vise in position on the drill press base.

3f11288b71b6c1a563cc3e9524a955bd.jpg

No broken drill or taps in the 16 holes so that was nice.
 

Attachments

  • 8ccfe7c93b60139fee20a098c89358d3.jpg
    8ccfe7c93b60139fee20a098c89358d3.jpg
    733.3 KB · Views: 0
  • e58000bd5cad6f773b444249ce98ecb0.jpg
    e58000bd5cad6f773b444249ce98ecb0.jpg
    179.6 KB · Views: 0
  • 5a06d3434e7363646bc9b8c62e92ea05.jpg
    5a06d3434e7363646bc9b8c62e92ea05.jpg
    681.1 KB · Views: 0
  • 33f1b9d06f31b5b2a03234fd096b4c81.jpg
    33f1b9d06f31b5b2a03234fd096b4c81.jpg
    886.3 KB · Views: 0
  • 3f11288b71b6c1a563cc3e9524a955bd.jpg
    3f11288b71b6c1a563cc3e9524a955bd.jpg
    759.8 KB · Views: 0
  • f2f6bb1c3722ba8f1c118b4db14b7b07.jpg
    f2f6bb1c3722ba8f1c118b4db14b7b07.jpg
    667.6 KB · Views: 0
  • f6fb5a4516aa33591ca6cab043f4f751.jpg
    f6fb5a4516aa33591ca6cab043f4f751.jpg
    861 KB · Views: 0
  • 8da8213af49fe9167246293dc336e9d4.jpg
    8da8213af49fe9167246293dc336e9d4.jpg
    668.5 KB · Views: 0
  • 5001544e812768c0b45521309b1a274a.jpg
    5001544e812768c0b45521309b1a274a.jpg
    678.4 KB · Views: 0
  • 1d2abe7cf600460d60d593d00da44888.jpg
    1d2abe7cf600460d60d593d00da44888.jpg
    806.3 KB · Views: 0
  • bcaff773eb1cc027862f77722b03f931.jpg
    bcaff773eb1cc027862f77722b03f931.jpg
    731.3 KB · Views: 0
Last edited:
OP
T

TXNinAZ

Well-known member
Joined
Oct 9, 2011
Messages
507
Location
Phoenix, AZ
My hole patterns were not perfect, but close enough that a little deburring ball cutter made one hole on each caster more oval and allowed a nice fit up.

Now that the legs are done, time to get the frame built. From my same buddy I got some 6" channel iron in 8' lengths. With the bandsaw down and new blade on backorder, I wanted to minimize cutting by hand. Since I wanted an overhang for clamping anyway, the channel could be cut just once and I'd have two 48" lengths for the long sides. That would give me about 3" overhang on each end, which should be fine on 1" plate. I gave cutting a try with my sawzall using the Milwaukee Torch blades and was thoroughly impressed.

2c3935ec6a7791804b98739e15e39f32.jpg

A bit of grinder cleanup and my side pieces were good to go. I went back to Metal Supermarket to get the lower support tubes and got 3x3" 1/4 wall tubing which should be way strong enough. Time to lay everything out and pull out the new MIG welder.

c36d78ad4dd4596751cc28f54ab8060e.jpg

And now the base is done!!!

86594c852c6ed639abf62ace9e647f8b.jpg

I weighed the individual pieces so I would know what my final project weighed:

Casters: 9 lbs each
Leg sections: 54 lbs each
Channel sections: 64.5 lbs each
3" tubing: 16.7 lbs each

Total weight of base: 414 lbs, give or take.

The big 8" casters are great- my 4 year old boy has no problem pushing it around the garage. Once the top is on I'm sure that won't be the case, but I'm very happy with the design. And the structure is rigid enough that one wheel up in the air over a low spot will free spin.

The rental company brings a forklift by tomorrow morning so I can get the table out of the trailer and flip it over to cut the old legs off. Then get it mounted on the new base.
 

Attachments

  • 86594c852c6ed639abf62ace9e647f8b.jpg
    86594c852c6ed639abf62ace9e647f8b.jpg
    661.3 KB · Views: 0
  • c36d78ad4dd4596751cc28f54ab8060e.jpg
    c36d78ad4dd4596751cc28f54ab8060e.jpg
    878.7 KB · Views: 0
  • 2c3935ec6a7791804b98739e15e39f32.jpg
    2c3935ec6a7791804b98739e15e39f32.jpg
    895 KB · Views: 0
Last edited:

matt_i

Well-known member
Joined
Mar 14, 2008
Messages
10,722
Location
SE Michigan
Looking good, time for a big vise :) I've had good luck with the "varipitch" sawblades, mostly they are Starrett from McMaster Carr but Lenox is also a very good brand.

Also it would be nice to have a torch setup, for heating but you could take the legs off the steel plate quite rapidly also with the gas axe.
 
OP
T

TXNinAZ

Well-known member
Joined
Oct 9, 2011
Messages
507
Location
Phoenix, AZ
Looking good, time for a big vise :) I've had good luck with the "varipitch" sawblades, mostly they are Starrett from McMaster Carr but Lenox is also a very good brand.

Also it would be nice to have a torch setup, for heating but you could take the legs off the steel plate quite rapidly also with the gas axe.

I had a good experience with the Starrett that was on there. Bought another one just like it. For a backup I may try something different.

A big blue wrench is definitely in the plans. There's a million on Craigslist so I'm just waiting for the right price and setup. Fortunately the old legs are just pipe, so it shouldn't take too long to cut them off with a wheel. Definitely easier with a Victor though.
 
OP
T

TXNinAZ

Well-known member
Joined
Oct 9, 2011
Messages
507
Location
Phoenix, AZ
Things are getting serious this weekend!

8c6c12ea55f7165b2e6d72cba5681aa8.jpg
 

Attachments

  • 8c6c12ea55f7165b2e6d72cba5681aa8.jpg
    8c6c12ea55f7165b2e6d72cba5681aa8.jpg
    862.8 KB · Views: 0

86turbodsl

Well-known member
Joined
Jul 1, 2005
Messages
6,554
Location
Michigan
Holy **** dude, what are you parking on that table? 65' Buicks? Giant tractors? Talk about overkill... :eyecrazy:

And i say this with a grain of salt. :)
 

James E

Well-known member
Joined
Jun 21, 2010
Messages
16,507
Location
Raleigh, NC
Jeezus. In two thousand years, all remnants of our civilization will have returned to the dirt, but that welding table will still be sitting there.
 

rslaback

Well-known member
Joined
Jul 24, 2010
Messages
4,061
Location
Westcentral Wisconsin
Since you already made a new stand for it, I would suggest flipping the table top. It looks like you'd have some grinding in each of the corners where the legs were but I imagine the rest of the surface is probably in a lot better condition than the top.
 
OP
T

TXNinAZ

Well-known member
Joined
Oct 9, 2011
Messages
507
Location
Phoenix, AZ
Since you already made a new stand for it, I would suggest flipping the table top. It looks like you'd have some grinding in each of the corners where the legs were but I imagine the rest of the surface is probably in a lot better condition than the top.

That will definitely be evaluated. The underside does have a couple of questionable slag/leftover brackets under it, so I'm unsure if it has already been flipped at some point in its life. If the underside is nicer, I will definitely use it for the top.
 
OP
T

TXNinAZ

Well-known member
Joined
Oct 9, 2011
Messages
507
Location
Phoenix, AZ
Holy **** dude, what are you parking on that table? 65' Buicks? Giant tractors? Talk about overkill... :eyecrazy:

And i say this with a grain of salt. :)

Jeezus. In two thousand years, all remnants of our civilization will have returned to the dirt, but that welding table will still be sitting there.

i want that table so bad.

Thanks guys, I'm happy with how things are going so far. As long as I can figure out how to manipulate the forklift without killing anything, I should be pounding away by Monday!
 
To avoid these ads, REGISTER NOW!

matt_i

Well-known member
Joined
Mar 14, 2008
Messages
10,722
Location
SE Michigan
I would drag out some 2x4s for spacers/cribbing, so you don't get to a situation where the top is flat on the ground and have to go excavating.

To flip the top I would drill/punch a square piece of steel, weld the tab to the leg up near the underside of the bench. Now you can install an anchor shackle and attach a sling or a chain, carefully raise up from that point and the tabletop will go vertical. Allow one corner to touch down and then manipulate the steering slightly to get the rollover going the direction you want. I always place a heavy C-clamp on the parallel part of the forks (not the tapered section ideally) and tighten it as tight as I can get it to keep the sling/chain from sliding down the length.

Keep people and pets a safe distance back. They don't stand a chance...
 
OP
T

TXNinAZ

Well-known member
Joined
Oct 9, 2011
Messages
507
Location
Phoenix, AZ
I would drag out some 2x4s for spacers/cribbing, so you don't get to a situation where the top is flat on the ground and have to go excavating.

To flip the top I would drill/punch a square piece of steel, weld the tab to the leg up near the underside of the bench. Now you can install an anchor shackle and attach a sling or a chain, carefully raise up from that point and the tabletop will go vertical. Allow one corner to touch down and then manipulate the steering slightly to get the rollover going the direction you want. I always place a heavy C-clamp on the parallel part of the forks (not the tapered section ideally) and tighten it as tight as I can get it to keep the sling/chain from sliding down the length.

Keep people and pets a safe distance back. They don't stand a chance...


Thanks Matt that helps me visualize it. I planned on setting it down on a pallet to help get it maneuvered while it's upside down. I've got some 3" angle I can use for the anchor point on the table, and actually have a lifting eye on the bottom of the fork frame provided by the rental company. Should help keep things as safe as possible.
 
OP
T

TXNinAZ

Well-known member
Joined
Oct 9, 2011
Messages
507
Location
Phoenix, AZ
Sadly the weather wasn't great today. 108 degrees on May 5th was a new record. Got started at about 5 to avoid some sweating. Got a tab welded on:

3092a76616733614b064c0e26c046a1a.jpg

Used a strap with hooks on it- wrapped around the lower part of the fork frame, and hooked onto my tab.

55587ada16a2664eb7edb8f09c10baac.jpg

After some wrangling, got it upright.

5b5713bac093825b7a5caff8a4ba8bb9.jpg

And some more maneuvering got it to lay down safely without dropping it.

58a65906cc8eb6cf6a82b488e60e5911.jpg


There is some kind of plaster material stuck to the bottom, but once removed, the table is in pretty good shape. There are some boogers on there where apparently someone was trying to practice overhead stick welding. Between those random blobs and a few bracket remains, I've got some work to do but I think this side will turn out better than the other side.
 

Attachments

  • 3092a76616733614b064c0e26c046a1a.jpg
    3092a76616733614b064c0e26c046a1a.jpg
    962.5 KB · Views: 0
  • 55587ada16a2664eb7edb8f09c10baac.jpg
    55587ada16a2664eb7edb8f09c10baac.jpg
    741 KB · Views: 0
  • 5b5713bac093825b7a5caff8a4ba8bb9.jpg
    5b5713bac093825b7a5caff8a4ba8bb9.jpg
    703.9 KB · Views: 0
  • 58a65906cc8eb6cf6a82b488e60e5911.jpg
    58a65906cc8eb6cf6a82b488e60e5911.jpg
    755.7 KB · Views: 0

RobSmith

Banned
Joined
Feb 5, 2009
Messages
562
Location
NSW Australia
Not too sure of your plans ... but that heavy duty frame sitting on those four tiny axles won't be too solid. I hope you are going to put decent feet (to lift the wheels off the ground) on your set up.
Turn the table top over and use that surface ... you only need to clean up the leg welds.
 

BoilermakerFan

Well-known member
Joined
Apr 17, 2006
Messages
2,188
Location
Indianapolis, Indiana
And now the base is done!!!

86594c852c6ed639abf62ace9e647f8b.jpg

I weighed the individual pieces so I would know what my final project weighed:

Casters: 9 lbs each
Leg sections: 54 lbs each
Channel sections: 64.5 lbs each
3" tubing: 16.7 lbs each

Total weight of base: 414 lbs, give or take.

The big 8" casters are great- my 4 year old boy has no problem pushing it around the garage. Once the top is on I'm sure that won't be the case, but I'm very happy with the design. And the structure is rigid enough that one wheel up in the air over a low spot will free spin.

The rental company brings a forklift by tomorrow morning so I can get the table out of the trailer and flip it over to cut the old legs off. Then get it mounted on the new base.

Man that is sweet looking! Nice fabricating!
 

Attachments

  • 86594c852c6ed639abf62ace9e647f8b.jpg
    86594c852c6ed639abf62ace9e647f8b.jpg
    107 KB · Views: 0
OP
T

TXNinAZ

Well-known member
Joined
Oct 9, 2011
Messages
507
Location
Phoenix, AZ
Thanks guys! More progress today. Only 96 degrees so not as bad as yesterday.

I 49bd26fe7e9ce84be418cff4c46e6527.jpg

After about 4-1/2 hours of grinding and we're there. Just need to weld up the holes on the underside and flip it onto the base. I will be using the original topside for my topside. The under side wasn't any better and I had already patched up the top so we'll run with it.

4f02706e8a61be6abf3b28863b0e7ca7.jpg
 

Attachments

  • 4f02706e8a61be6abf3b28863b0e7ca7.jpg
    4f02706e8a61be6abf3b28863b0e7ca7.jpg
    925.6 KB · Views: 0
  • 49bd26fe7e9ce84be418cff4c46e6527.jpg
    49bd26fe7e9ce84be418cff4c46e6527.jpg
    1 MB · Views: 0
OP
T

TXNinAZ

Well-known member
Joined
Oct 9, 2011
Messages
507
Location
Phoenix, AZ
Got the underside holes all filled.

784aa4271d40c7a109d02f75fa4cc204.jpg

Made a new friend.

22ff0e005120a558da05cc83c2a2f79d.jpg

Brought the base around to the side yard so that any mishaps would fall over dirt rather than crack the driveway. Then the waltz with a 735 lb piece of sail. Went pretty well considering I'd never driven a forklift before Friday. (The better half took this from inside through the bug screen thus the weird photo)

08035070d87db495ebda9df537dc99d6.jpg

Success!!

200f4acfe77a39359844bc3b6f9bff76.jpg

Ground off the lifting tab, welded a few stitches along the sides and moved it to garage.

1e3ffcad6ddba7995dfcc518671d4319.jpg

Overall a pretty nice upgrade. Thanks for following along.

0706a0953990e6268d545302dc402659.jpg
 

Attachments

  • 784aa4271d40c7a109d02f75fa4cc204.jpg
    784aa4271d40c7a109d02f75fa4cc204.jpg
    1.1 MB · Views: 0
  • 08035070d87db495ebda9df537dc99d6.jpg
    08035070d87db495ebda9df537dc99d6.jpg
    1 MB · Views: 0
  • 22ff0e005120a558da05cc83c2a2f79d.jpg
    22ff0e005120a558da05cc83c2a2f79d.jpg
    633.5 KB · Views: 0
  • 200f4acfe77a39359844bc3b6f9bff76.jpg
    200f4acfe77a39359844bc3b6f9bff76.jpg
    867.3 KB · Views: 0
  • 1e3ffcad6ddba7995dfcc518671d4319.jpg
    1e3ffcad6ddba7995dfcc518671d4319.jpg
    719.9 KB · Views: 0
  • 0706a0953990e6268d545302dc402659.jpg
    0706a0953990e6268d545302dc402659.jpg
    670.1 KB · Views: 1
Last edited:

Plastikosmd

Well-known member
Joined
Nov 17, 2016
Messages
1,254
Nice table, I like the newer version. I went with noncaster table as I now have the space. With 2 large vises and the ability to crank and bend stuff with without movement is very handy. I think your table will serve you well
 

Mgnu

Well-known member
Joined
Jun 5, 2013
Messages
425
Location
Valley of the Sun, AZ
TXN looks great! Can you please post a link to those casters on Amazon? I think I have found them, but not certain. How do you like them?

I'm near Stetson Valley, what area in the Valley are you in?

Loving this weather! (Before the blast furnace comes back on)
 

Plastikosmd

Well-known member
Joined
Nov 17, 2016
Messages
1,254
Also, on one table I made I used heavy steel casters to prevent stray current grounding issues as I tend to lean on the bench at times. Probably overthinking it but I tend to do that
 
OP
T

TXNinAZ

Well-known member
Joined
Oct 9, 2011
Messages
507
Location
Phoenix, AZ
TXN looks great! Can you please post a link to those casters on Amazon? I think I have found them, but not certain. How do you like them?

I'm near Stetson Valley, what area in the Valley are you in?

Loving this weather! (Before the blast furnace comes back on)


I'm just about due south of you in Laveen (67th Ave and Baseline). So far the casters are great- even with the top added, the table rolls easily and applying one brake keeps the whole thing solid.

E.R. Wagner Plate Caster, Swivel with Total-Lock Brake, Polyurethane on Aluminum Wheel, Roller Bearing, 1200 lbs Capacity, 8" Wheel Dia, 2" Wheel Widt https://www.amazon.com/dp/B003E7E9Q2/?tag=atomicindus08-20
 
OP
T

TXNinAZ

Well-known member
Joined
Oct 9, 2011
Messages
507
Location
Phoenix, AZ
Nice table, I like the newer version. I went with noncaster table as I now have the space. With 2 large vises and the ability to crank and bend stuff with without movement is very handy. I think your table will serve you well


Some day I'll have enough room to have a table like this that I can center in the shop and level it perfectly. But for now I need the flexibility. Thanks!
 
To avoid these ads, REGISTER NOW!
Top Bottom