To avoid these ads, REGISTER NOW!

Welding Table Modifications

Provincial

Well-known member
Joined
Sep 21, 2011
Messages
6,874
Location
Near Salem, OR
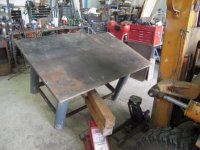
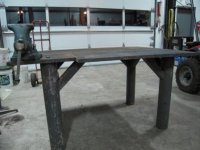
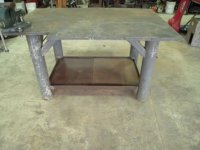
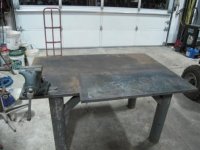
I recently purchased a steel welding table and 6" Wilton Tradesman vise. It is very heavy duty, with a 1" top and legs that are 4.8" diameter with 9/16" wall thickness. With the vise, it weighs about 1,000 pounds.

It started out being 60-1/2" by 42-1/2", but someone cut out a section to clear the handle of a very large vise prior to the Wilton. It must have been a huge vise, since the handle was very long, and there is a 5/8" NC tapped hole where one mounting point isn't covered by the Wilton.

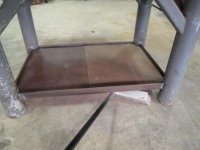
I like my things to be mobile, so I modified the table by adding a shelf about 4" above the floor. I used 2x2x 1/4 angle iron for support, and 3/4" plywood for the deck. I split the deck in half and used 2x 1/4 flat bar to support the joint. I covered the deck with thin sheet steel salvaged from old uninsulated stove pads. I used chimney caulk to seal the edges so sparks can't get to the plywood to start a fire.

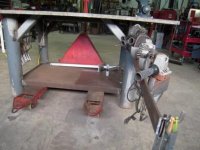
The angle iron allows me to use my pallet jack or forklift to move the table around. The shelf is high enough that I can sweep under it with a push broom.

I welded some rebar between the legs on the short sides to hang clamps and vise grips from.
 

Attachments

  • Weld Table 1.jpg
    Weld Table 1.jpg
    31.7 KB · Views: 74
  • Weld Table 7.jpg
    Weld Table 7.jpg
    30.7 KB · Views: 56
  • Weld Table 6.jpg
    Weld Table 6.jpg
    33.5 KB · Views: 64
  • Weld Table 5.jpg
    Weld Table 5.jpg
    36.5 KB · Views: 57
  • Weld Table 4.jpg
    Weld Table 4.jpg
    30.2 KB · Views: 60
  • Weld Table 3.jpg
    Weld Table 3.jpg
    30.6 KB · Views: 62
  • Weld Table 2.jpg
    Weld Table 2.jpg
    31.1 KB · Views: 62
To avoid these ads, REGISTER NOW!
OP
P

Provincial

Well-known member
Joined
Sep 21, 2011
Messages
6,874
Location
Near Salem, OR
Here are more photos of the first phase.

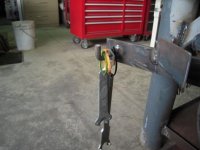
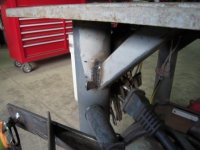
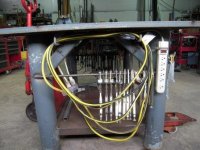
I added some hooks made from cut-off J-bolt anchors for concrete stem walls. These keep my cords under control when I keep my grinders plugged in, or when I wind up the extension cord that supplies power to the table. I also mounted two power strips to the table, and used 1-1/2" square tube welded under the top to protect the pigtail leads where they run to the extension cord feed point.

I keep several 4-1/2" grinders handy with different wheels/brushes, so I built a rack from 1/4 x 2 flat bar and a weld-on hinge under one long side. I made a catch to support the free end and hold it closed. Another cut-off J-bolt made a combination handle and hang-up for grinder spanners. I welded 1/8 x 2 flat bar at a 45 degree angle for the grinders to hang from. The side handles extend under the table out of the way, and it conserves space. I can lift the free end and swing the rack out of the way to access the lower shelf from that side. The racks are one inch above the top edge of the main bar.

I bought some grey paint for the table, but have been too busy using it! Perhaps next winter.
 

Attachments

  • Weld Table 13.jpg
    Weld Table 13.jpg
    30.1 KB · Views: 65
  • Weld Table 12.jpg
    Weld Table 12.jpg
    31 KB · Views: 55
  • Weld Table 11.jpg
    Weld Table 11.jpg
    36.3 KB · Views: 1,669
  • Weld Table 10.jpg
    Weld Table 10.jpg
    36.1 KB · Views: 57
  • Weld Table 9.jpg
    Weld Table 9.jpg
    27.9 KB · Views: 45
  • Weld Table 8.jpg
    Weld Table 8.jpg
    28.9 KB · Views: 45
OP
P

Provincial

Well-known member
Joined
Sep 21, 2011
Messages
6,874
Location
Near Salem, OR
The last couple of photos of the table.

I'm thinking of drilling and tapping some 1/2" NC holes in the top so I can use my clamping set from my milling machine when I need to hold down parts I'm welding. I already could have used them a few times. I bought the table in mid-February. I paid $400.00 for it, including the vise. :beer:
 

Attachments

  • Weld Table 14.jpg
    Weld Table 14.jpg
    33.9 KB · Views: 57
  • Weld Table 15.jpg
    Weld Table 15.jpg
    43.5 KB · Views: 53
To avoid these ads, REGISTER NOW!

AJ.

Well-known member
Joined
Jan 30, 2016
Messages
238
Location
South Australia
The last couple of photos of the table.

I'm thinking of drilling and tapping some 1/2" NC holes in the top so I can use my clamping set from my milling machine when I need to hold down parts I'm welding. I already could have used them a few times. I bought the table in mid-February. I paid $400.00 for it, including the vise. :beer:

Nice bench :)

Great minds think alike I reckon, your bench and mine have a lot of similarities. Mine is larger 2400 x 1200 (8' x 4') but a bit lighter in construction with a 1/2" top and lighter square tube frame, But I have my grinders and clamps just like yours. I also set mine up to be shifted around the shed with my pallet jack :)

I also drilled a pattern of holes at 120mm centres to from a grid, and tapped then 1/2"NC and use my mill clamps to hold stuff down. That works really well. I also have my holes numbered and jigs made for some things I make on a regular basis, I just screw the jigs in the correct holes and I am set up to make my project.

Cheers Andrew
 
To avoid these ads, REGISTER NOW!
Top Bottom