To avoid these ads, REGISTER NOW!

Welding Table with Pneumatic Casters

Manrigdude

Member
Joined
Nov 6, 2014
Messages
6
Location
South Puget Sound, Washington
Hello there. I’ve been a lurker for over a year and have “stolen” or adapted many project and design ideas from other members along the way. I never really felt like I had much new to contribute, until now, maybe….

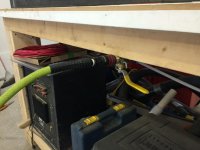
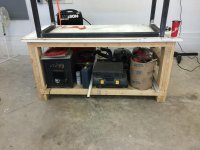
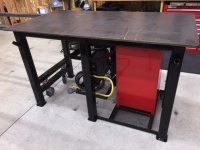
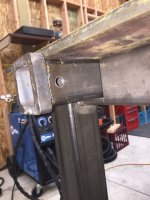
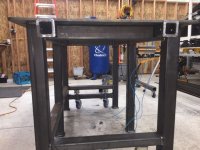
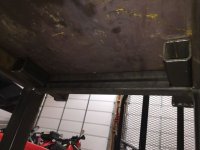
I just finished my welding table. The table is 36 x 66 with ½” plate top. It has six 3X3 legs, shelves for clamps / grinders, torch holders, built-in toolbox, receivers for vices, and a slide-out table extension, and removable plasma grate. None of this is particularly new or innovative. Like I said, I have gratefully “borrowed” most of these features from other members.

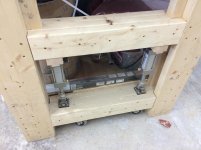
What is unique, I think, is the pneumatic cylinder system that lifts the table onto the casters for easy movement. I have seen floor jacks, scissor jacks, and bottle jacks used on other member’s tables but not pneumatic cylinders. Since I have compressed air readily available, I thought I might as well use it! I wanted to be able to move the table easily so I could roll it over so that the plasma grate extends outside the shop door for plasma cutting. This helps ventilation and lets the slag go onto the gravel driveway instead of onto my concrete floor.

Check out this short YouTube video of the table in action:


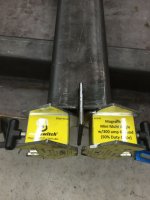
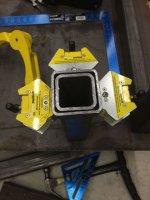
These are several manufacturers of these cylinders. I used Bimba Flat series cylinders. There are MANY different variants and you “just” have to select the piston size, throw length, and mounting option that fits your application. I used 2” diameter piston (since that would provide enough lifting force to lift my table and 1” throw (since I just needed enough lift to get the table feet off the ground). The model number I used was F0-311.

The 2” diameter piston model can lift 3.1 times whatever air pressure you apply to it. This table weighs approximately 900 lb. There are 4 cylinders to split the weight so they each need to lift approx. 225lb. So, in theory, it should take about 225 / 3.1 = 73 lb of air pressure to lift the table. In reality, it takes about 90 lb to lift my table probably due to friction losses. These will take up to 200 psi max (I believe) so, if I used my full 175 psi tank pressure, my table could weigh up to 175 x 3.1 x 4 = 2,170 lb! That would be a serious welding table…..

I have attached a few photos of my table. This thing was literally the first thing I have ever welded so be gentle. I hope this helps someone else. Let me know if I can answer any questions.
 

Attachments

  • IMG_1991.jpg
    IMG_1991.jpg
    57 KB · Views: 473
  • IMG_1994.jpg
    IMG_1994.jpg
    52.9 KB · Views: 460
  • IMG_2002.jpg
    IMG_2002.jpg
    49.4 KB · Views: 502
  • IMG_2003.jpg
    IMG_2003.jpg
    50.2 KB · Views: 405
  • IMG_2006.jpg
    IMG_2006.jpg
    64.1 KB · Views: 494
  • IMG_2008.jpg
    IMG_2008.jpg
    63.6 KB · Views: 452
  • IMG_2010.jpg
    IMG_2010.jpg
    55.6 KB · Views: 435
To avoid these ads, REGISTER NOW!

tarbellb

Well-known member
Joined
Apr 17, 2011
Messages
5,742
Location
Oregon
A very nice table with some very cool features. Ive always thought the other lifting systems seemed a bit clumsy or time consuming, but not this one!

I have designed a extending table in draft only. Could you elaborate more on how you did yours? I really would like to figure out the best extension system that will be strong and perfectly flat.

Well done sir. Oh, where did you source your air cylinders?
 

kazlx

Well-known member
Joined
Oct 30, 2012
Messages
2,851
Location
Tustin, CA
Nice job. Out of all the efforts I have seen to blend a mobile and solid table, this is the best design I have seen. I like it. As heavy as my table is, is still moves if I wrench hard on something in the vise.
 

larry_g

Well-known member
Joined
Apr 28, 2007
Messages
16,874
Location
oregon
I would suggest that you remove the caps from the second port and replace it with a muffler, http://www.automationdirect.com/adc/Overview/Catalog/Pneumatic_Components/Pneumatic_Accessories/Exhaust_Silencers?gclid=CL-kiM2w4sUCFUxqfgodth8A0w&source=google&keyword=pneumatic%20muffler&type=search&s_kwcid=AL!3683!3!19963952903!b!!s!!pneumatic%20muffler&ef_id=VMFkaAAABTB@BFYF:20150527165017:s. This will allow free air flow through the port and keep contaminates out. If you find the table dropping with a bang then you could also install a flow control in the input line to give a fast rise and a slow drop. Flow control

lg
no neat sig line
 

aka Larry

Well-known member
Joined
May 2, 2012
Messages
8,026
Location
Eastern, NC
This thing was literally the first thing I have ever welded so be gentle.

A 900 lb welding table with pneumatic casters was your first welding project? Talk about ambitious!

Sure turned out nice man. Good work.

How about some pics of your welds? Cost to date if you don't mind sharing?
 

StevenMorgan

Well-known member
Joined
Oct 20, 2011
Messages
137
Location
Paris, KY
Where are you located and how much do you want for it?!

Or at least give the price of those cylinders, so I can try and copy this
 
To avoid these ads, REGISTER NOW!
OP
M

Manrigdude

Member
Joined
Nov 6, 2014
Messages
6
Location
South Puget Sound, Washington
Thanks for all the comments!

I got the cylinders off Ebay and paid about $25 each so $100 total for the set. There are LOTS of different cylinders on the Bay in many different configurations (throw lengths, internal vs. external thread on the piston, etc). Many of these would work if you just design the table around whatever you find. The trick is finding 4 that are identical so the table raises in unison and doesn't bind up. The cylinders add a bit of cost to the table but you do get to save some money on the casters so that offsets some of the cost. The casters are only under load during the few minutes while you are moving the table so lighter-duty casters are OK. Also, you don't need locking casters so that saves some money as well.

My cylinders are mounted to the "fixed" brace and then I just made a piston pusher foot by welding a hardened bolt to the center of a round piece of 1/4" plate. The bolt threads into the piston. The foot is not attached to the moving caster brace, it just pushes down on it (with a light coating of grease). This allows just a tiny bit of movement of the caster brace when the table is moving and doesn't put too much torque on the piston.

You need to secure the moving caster brace in some fashion so it can only move up/down and cant twist or move laterally. Otherwise, it will move out of place as the table is moved and/or put huge stress on the piston which it wouldn't like. I welded tabs to the ends of the moving brace and put slots in the legs so the brace can only move straight up/down. The tabs do allow the corners to go up at slightly different times (if that's what it wants to do) as shown in the video.

My brother is building a very similar table and using my cylinder concept. However, he used concentric pieces of 1" and 1 1/4" Sch 40 steel pipe to control the movement of the caster brace. His works good too but it can tend to bind up a little more if the corners try to raise up at different times. A little grease and he should be in good shape.

I included a pic of his pipe / sleeve design in progress if you prefer that method.
 

Attachments

  • IMG_1829.jpg
    IMG_1829.jpg
    18.3 KB · Views: 257
  • IMG_1787.jpg
    IMG_1787.jpg
    54.2 KB · Views: 274
  • IMG_1779.jpg
    IMG_1779.jpg
    46.2 KB · Views: 259
Last edited:
OP
M

Manrigdude

Member
Joined
Nov 6, 2014
Messages
6
Location
South Puget Sound, Washington
Here's more details on the slide-out extension for those interested:

The slide extension rails are 2x2" with 1/4" wall so they are reasonably heavy-duty and will take some weight/abuse. I welded on a piece of 3/4" thick plate to the ends of the rails so that the top of the slide plate matches the height of the top of the table (1/2" plate table top plus the 1/4" top wall of the receiver tube). The slides run the full length of the table underneath the top so about 5' of extension total. In use, downward pressure on the receiver tubes pushes up on the bottom of the 1/2" plate table top so they are well supported. I drilled holes in the far ends of the receiver tubes and just put a loose bolt/nut through the hole to keep the slides from coming completely out of the receivers and crashing to the floor causing me to soil myself.

The receiver channels for the slides were made from 2.5 x 2.5 with 1/4" wall. You can purchase "receiver extension" material but it is over-sized and seemed pretty sloppy with the 2x2 material. I didn't like that. You DO have to grind out the internal weld in the 2.5 material so that the 2x2 can slide in. I ground out the weld with a mini belt grinder. Since the receivers are only 12" long, you can grind the weld about 6" from each end (before welding them in). The rails fit with absolutely no slop which also means that you have to make sure the receivers are DEAD parallel or the slides will bind and not slide properly. I also welded 1/2" wide "hoops" of 3" material left over from the table legs around the edges of the 2.5" receiver tubes as additional bracing to keep the edges of the receivers from flaring under heavy weight.

The plasma grate material is 2 x 2 angle around the outside with 2 1/2" tall slats (so that they are level with the top of the 1/2" plate on the table). The 2x2 angle fully covers the extension rails so that plasma slag doesn't get stuck to the rails and keep them from being able to slide.

I may make another drop-in top to fit on the rails when not using the plasma grate. I think that would be nice when doing other projects (assembly work, woodworking, etc). I suppose 3/4" plywood with some 2x4 pieces underneath to fit down between the rails would work. Or maybe make a laminate top that drops in???

When not using the extension rails, the two receivers could be used to attach a vise. I also may build a base for my dry cut saw that would slide into the receivers.

The receivers are not yet welded in the attached pics but you get the idea of how they fit.
 

Attachments

  • IMG_1790.jpg
    IMG_1790.jpg
    56.4 KB · Views: 171
  • IMG_1777.jpg
    IMG_1777.jpg
    47.2 KB · Views: 174
  • IMG_1792.jpg
    IMG_1792.jpg
    61.7 KB · Views: 158
  • IMG_1794.jpg
    IMG_1794.jpg
    46 KB · Views: 144

NUTTSGT

Super Moderator
Staff member
Joined
Sep 14, 2009
Messages
50,891
Location
Northern Central Ohio
Nice table, especially the slide out extension.

This being the GJ, I'd offer a suggestionto possibly make the table better.

Add a tee and a couple of ball valves into the plumbing. Doing this would allow you to hook up the quick connect, then opening a valve to charge the air system instead of doing it as you couple the air hose. Once the system is charged up, shut the valve and you should be able to unhook the airline when you move the table, no need to drag the airling as you move the table.

The Tee and second ball valve would be nothing more than an air drain to dump the air out of the system. I think it might be easier on your cylinders to let off the pressure gradually rather than bam with the weight of the table coming into play also.

Just food for thought man and probably wouldn't cost more than $20 to add to the system. Either way, the table gets a :thumbup: from me.
 

NUTTSGT

Super Moderator
Staff member
Joined
Sep 14, 2009
Messages
50,891
Location
Northern Central Ohio
Hello there. I’ve been a lurker for over a year and have “stolen” or adapted many project and design ideas from other members along the way. I never really felt like I had much new to contribute, until now, maybe….

BTW, I'll also add, you've been here for 6 months, build this stuff of this caliber and only make 3 posts ? You Sir, need to be sharing more of that knowledge inside your skull.


:beer:
 

CalgaryJoe

Member
Joined
Dec 9, 2012
Messages
12
I did the same concept a while back out of wood for a general garage table - works great. Nice work with the welding table.
 

Attachments

  • IMG_0958.jpg
    IMG_0958.jpg
    135.5 KB · Views: 142
  • IMG_0959.jpg
    IMG_0959.jpg
    130.3 KB · Views: 100
  • IMG_0957.jpg
    IMG_0957.jpg
    134.3 KB · Views: 100
OP
M

Manrigdude

Member
Joined
Nov 6, 2014
Messages
6
Location
South Puget Sound, Washington
Thanks again for the comments and suggestions!

I originally installed a small regulator / gauge to be able to slowly increase the pressure for more control over the lift / lower. I was afraid the table would "slam" down when the air was unpugged. However, the travel is only 1" and the small diameter of the tubing acts as a bit of a "damper" on both the ascent and the descent since it restricts the airflow and lets it out slowly. The regulator didn't really make much difference and I removed it for simplicity. That said, the ball valve to be able to charge the system and then remove the hose would be a great idea. Thanks NUTTSGT! I'll probably add that.
 

NUTTSGT

Super Moderator
Staff member
Joined
Sep 14, 2009
Messages
50,891
Location
Northern Central Ohio
Thanks again for the comments and suggestions!

I originally installed a small regulator / gauge to be able to slowly increase the pressure for more control over the lift / lower. I was afraid the table would "slam" down when the air was unpugged. However, the travel is only 1" and the small diameter of the tubing acts as a bit of a "damper" on both the ascent and the descent since it restricts the airflow and lets it out slowly. The regulator didn't really make much difference and I removed it for simplicity. That said, the ball valve to be able to charge the system and then remove the hose would be a great idea. Thanks NUTTSGT! I'll probably add that.

Not a problem my freind, that's why we are all here. :beer:
 

McLean

Well-known member
Joined
Jul 24, 2013
Messages
218
Location
Seattle, WA
Very cool table! Retractable caster idea is great, but my favorite part is the retractable plasma grate/table extension. Keep up the good work!

Just curious, what type of work will you be doing on this bitchin' table?
 
OP
M

Manrigdude

Member
Joined
Nov 6, 2014
Messages
6
Location
South Puget Sound, Washington
Very cool table! Retractable caster idea is great, but my favorite part is the retractable plasma grate/table extension. Keep up the good work!

Just curious, what type of work will you be doing on this bitchin' table?

Glad you like the table extensions and plasma grate! I left an unpainted spot on the shelf where the plasma cutter sits so I just connect the plasma ground there and leave it connected. The plasma torch fits perfectly in the mig torch pipe holders too so that's pretty handy.

So far I've just been doing small welding / fabrication projects such as some wall-mounted kayak racks, a new tailgate for my trailer with built-in ramps, and some post brackets for an outdoor covered patio. I just wanted to learn to weld and, now that I have a welder, good projects seem to keep coming up. I'm starting to research designs for a driveway security gate. That will be my Winter project.
 
To avoid these ads, REGISTER NOW!
Top Bottom