Here's my saga for for future generations:
The garage is a new construction about 440 sq. ft. I started out by smoothing the edges of the expansion joint groove with a Kobalt rub brick from Lowes.
Swept the floor and blew it out with a leaf blower. The next step was filling in the expansion joint with a quarter inch backer rod, then Sikaflex SL. That stuff is pretty neat. It is a 20 ft groove that needed two 10 oz cartridges. The stuff levels out, but gives a slightly concave surface. I considered leveling off with Rustoleum epoxyshield, but I did not have the time.
Day 2 was acid etching. I used the solid powder that comes with the kit and also used hydrochloric acid. I wasn't sure if the acid was having any effect. Next came the neutralization with ammonia. I used a quart (I think) in two batches, spraying from the sprayer. Next washed with water. I thought ok, now to squeegee the water out... but guess what? I had bought an 18" squeegee from Lowes, but the darn thing had no threads to affix on the pole! I thought, ok, not a deal breaker. I will just use the sqeegee that comes with the Epoxy-coat kit. Well, that doesn't have threads either! Gaffled by both Lowes and Epoxy-coat! Last resort was the notched sqeegee. I used the back edge to push out water, as best I could. Then I used the leaf blower. Let dry overnight. I came back the next day to find all sorts of marks, mainly footprints on the floor. Also there was a dark gray residue on the floor. I used a wet sponge mop to clean in straight lines.
Day three was applying the primer. I used Elitecrete's VB-5 primer that is a 2-part epoxy that is diluted with water. I started out making the stuff in a 5-quart pail. Put half the stuff in a Wooster Big Ben paint pan lined with aluminum foil. I used an 18" roller and things were going swimmingly. After a while though, I saw that the primer in the pan was bubbling and looked like a delicious dessert pudding of some sort! I realized that it was gelling up, so I went to the balance of stuff in the pail and in a panic, I dumped it on the floor. Well, it had a giant glob of gel in it too, which promptly proceeded to stick to the floor! I quickly picked up what I could, made a second batch and finished the floor. With advice from Gene from Elitecrete, I sanded the lumpy stuff the next day to clean it up.
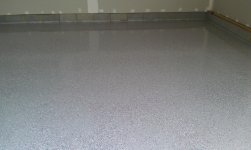
Day four was the real test. I put Part B in 4 5-quart pails (a hole was drilled at the edge of the lid to facilitate pouring) to make 4 batches. Started the first batch and dumped it on the floor in S-shaped patterns. Started the rolling. When I was satified with the neatness, I threw on the paint chips. Terracotta red, white and blue. Did one section at a time. Unfortunately, I had used up both my 1/4 in nap rollers on the primer, so I was using a 3/8 in nap. I was getting lifting of the epoxy on the last batch. Only happened on one end of the roller, so I was able to fix it. Also, the last batch seemed a lot stickier. It didn't help that it was 95 degrees this weekend in central Virginia...
In the end, I do have some thicker spots where I may not have rolled properly, but the paint chips make it not noticeable.
I drew on the experience of members here and advice of the pros. This is an excellent forum for learning. I hope my meager experience will aid others. I am going to try to post pictures if I am able.
The garage is a new construction about 440 sq. ft. I started out by smoothing the edges of the expansion joint groove with a Kobalt rub brick from Lowes.
Swept the floor and blew it out with a leaf blower. The next step was filling in the expansion joint with a quarter inch backer rod, then Sikaflex SL. That stuff is pretty neat. It is a 20 ft groove that needed two 10 oz cartridges. The stuff levels out, but gives a slightly concave surface. I considered leveling off with Rustoleum epoxyshield, but I did not have the time.
Day 2 was acid etching. I used the solid powder that comes with the kit and also used hydrochloric acid. I wasn't sure if the acid was having any effect. Next came the neutralization with ammonia. I used a quart (I think) in two batches, spraying from the sprayer. Next washed with water. I thought ok, now to squeegee the water out... but guess what? I had bought an 18" squeegee from Lowes, but the darn thing had no threads to affix on the pole! I thought, ok, not a deal breaker. I will just use the sqeegee that comes with the Epoxy-coat kit. Well, that doesn't have threads either! Gaffled by both Lowes and Epoxy-coat! Last resort was the notched sqeegee. I used the back edge to push out water, as best I could. Then I used the leaf blower. Let dry overnight. I came back the next day to find all sorts of marks, mainly footprints on the floor. Also there was a dark gray residue on the floor. I used a wet sponge mop to clean in straight lines.
Day three was applying the primer. I used Elitecrete's VB-5 primer that is a 2-part epoxy that is diluted with water. I started out making the stuff in a 5-quart pail. Put half the stuff in a Wooster Big Ben paint pan lined with aluminum foil. I used an 18" roller and things were going swimmingly. After a while though, I saw that the primer in the pan was bubbling and looked like a delicious dessert pudding of some sort! I realized that it was gelling up, so I went to the balance of stuff in the pail and in a panic, I dumped it on the floor. Well, it had a giant glob of gel in it too, which promptly proceeded to stick to the floor! I quickly picked up what I could, made a second batch and finished the floor. With advice from Gene from Elitecrete, I sanded the lumpy stuff the next day to clean it up.
Day four was the real test. I put Part B in 4 5-quart pails (a hole was drilled at the edge of the lid to facilitate pouring) to make 4 batches. Started the first batch and dumped it on the floor in S-shaped patterns. Started the rolling. When I was satified with the neatness, I threw on the paint chips. Terracotta red, white and blue. Did one section at a time. Unfortunately, I had used up both my 1/4 in nap rollers on the primer, so I was using a 3/8 in nap. I was getting lifting of the epoxy on the last batch. Only happened on one end of the roller, so I was able to fix it. Also, the last batch seemed a lot stickier. It didn't help that it was 95 degrees this weekend in central Virginia...
In the end, I do have some thicker spots where I may not have rolled properly, but the paint chips make it not noticeable.
I drew on the experience of members here and advice of the pros. This is an excellent forum for learning. I hope my meager experience will aid others. I am going to try to post pictures if I am able.