To avoid these ads, REGISTER NOW!

Wescraft boat Storage

american3.14guy

Active member
Joined
Nov 18, 2011
Messages
44
Location
Southwest Kansas
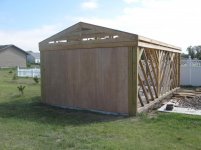
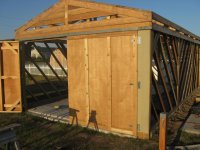
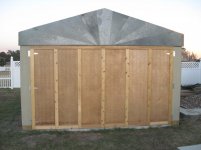
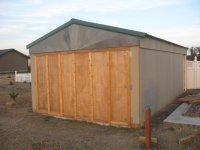
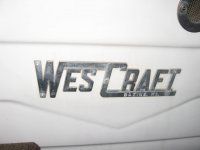
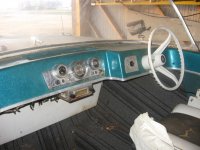
I have been following several threads here and have decided to begin my own. This summer we bought a boat, a 1965 Wescraft. The company was started by a friend of mine's grandfather on a small western Kansas dairy farm, about 10 miles from where I grew up. When production on the farm reached max capacity, they moved to a larger town nearby and continued production. Anyway, my plans this winter include restoring the boat, but I needed a shed first. As of now, the shed is finished, but I will share with you guys how I built it. My budget here was limited, so I stretched the dollar any way I could. The premise was simple. Get as much as I can for as little as I can. I teach during the school year and during the summer I drive mixer truck and hauled back nearly 4 yards of concrete from a job they ordered too much on. Hurriedly, I laid out a pad that was smaller than my shed, added fiber, and poured most of the floor.
My next step was to place the poles in the ground where they needed to be, and then form up the remainder of the floor and a small stem wall.
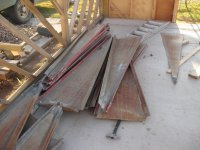
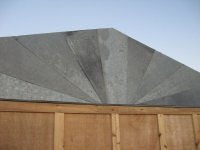
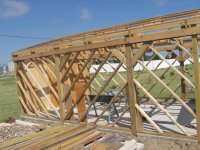
On top of the stem wall I power nailed treated 2x4s and added my studs on opposing 45 degree angles in each sections. I believe I was reading a thread on geo-barns when I saw this. I makes for a very strong structure. Also, in order to stretch a dollar, I bought the "cull bin" full from my local lumber yard. I chose lumber for the studs based on the direction of "crooked," either warp or crown crookedness. This is also what my rafters are made out of, as well as the 2x6 around the perimeter of the top of the posts. The use of structural screws and figuring how to use the crooked to my advantage helps straighten out crooked lumber.
 

Attachments

  • IMG_4691.jpg
    IMG_4691.jpg
    145.8 KB · Views: 55
To avoid these ads, REGISTER NOW!
OP
A

american3.14guy

Active member
Joined
Nov 18, 2011
Messages
44
Location
Southwest Kansas
Next, I wanted to build carriage doors. Since I wouldn't be opening the doors very many times a year, I didn't want to invest in a 7x12 foot rollup door. I constructed the door frames and screwed it into the opening, and then covered it in 3/8 rough cedar plywood. Once I had the hinges attached, I took the screws out of the frame and cut them apart. Not a bit of sag. I trimmed them out with rough cedar and made them overlap the gaps to be as weathertight as possible.
 

Attachments

  • IMG_4693.jpg
    IMG_4693.jpg
    143.2 KB · Views: 26
  • IMG_4719.jpg
    IMG_4719.jpg
    142 KB · Views: 25
OP
A

american3.14guy

Active member
Joined
Nov 18, 2011
Messages
44
Location
Southwest Kansas
On the end of the gables I wanted something a little different. I was browsing through BuickFarmer's post and was inspired by his sunrise pattern on his barn. Using roof pieces from an old round granary, I trimmed off the sides with a metal cutting blade in a circular saw until I had flat pie pieces. To moisture proof the upper part of the door opening, I used some of the pieces I had left over from the siding to create a flashing. Then I got creative and began working on the bottom two pieces and ending with one piece overlapping the top. These have great patina considering the granary was from the late 20's. In fact, they are the inside surfaces and have a nice dark galvanizing.
 

Attachments

  • IMG_4729.jpg
    IMG_4729.jpg
    138.9 KB · Views: 25
  • IMG_4723.jpg
    IMG_4723.jpg
    140.8 KB · Views: 20
  • IMG_4720.jpg
    IMG_4720.jpg
    139 KB · Views: 21
  • IMG_4718.jpg
    IMG_4718.jpg
    141.2 KB · Views: 21
To avoid these ads, REGISTER NOW!
OP
A

american3.14guy

Active member
Joined
Nov 18, 2011
Messages
44
Location
Southwest Kansas
On to siding. I wanted to use cement board siding and when I poured my stem wall, I made it so the siding covered the base plate plus an inch and a half of concrete. I cut them to size and nailed them on. To minimize blowout on the backside of the sheets of siding, I predrilled each hole. Time consuming, but worth it. To line up the studs, I placed a pencil mark on the top perimeter board and on the stem wall where the stud would extend to. I nailed each one up with a few nails around the perimeter and used a chalkline and pencil marks to mark where the studs should be underneath. I nailed by every groove on the panel.
I also included another shot of the gable end.
 

Attachments

  • IMG_4730.jpg
    IMG_4730.jpg
    140.7 KB · Views: 12
  • IMG_4789.jpg
    IMG_4789.jpg
    135 KB · Views: 18
OP
A

american3.14guy

Active member
Joined
Nov 18, 2011
Messages
44
Location
Southwest Kansas
From ends of the cfb panels that I cut off, I made sure that there was enough to cover the perimeter board that ties all of the posts together. First, though, I cut down a trim piece to cover the gaps at the top of the lower siding and it was covered by the upper siding. This created a step, I know, but that was OK by me.
 
OP
A

american3.14guy

Active member
Joined
Nov 18, 2011
Messages
44
Location
Southwest Kansas
Here are a few pics of the boat. It is a very sound, very complete survivor. I bought it from the original owner. They bought it new in 1965. It is 18 ft. long with the Buick odd-fire V6. I will try to get more pics later.
 

Attachments

  • IMG_4788.jpg
    IMG_4788.jpg
    133.7 KB · Views: 19
  • IMG_4791.jpg
    IMG_4791.jpg
    120.9 KB · Views: 16
  • IMG_4792.jpg
    IMG_4792.jpg
    140.9 KB · Views: 15
To avoid these ads, REGISTER NOW!
Top Bottom