
You are using an out of date browser. It may not display this or other websites correctly.
You should upgrade or use an alternative browser.
You should upgrade or use an alternative browser.
west of Philly - barn saving
- Thread starter rieferman
- Start date
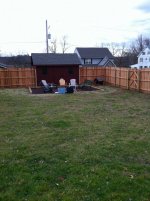
New fence is in! Just in time for Christmas (whew! this was our gift to each other!). We got an oddly mild temperature day a few days ago and had a fire pit in our newly very private back yard. It was really what we imagined.
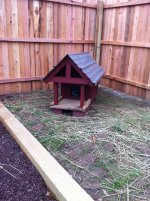
I also had the shed company include a gallon of the paint for the shed. Kitty's overkill house got 1 coat and he's moved into his new location.
I also built the ramp to the shed last week, so the mower is moved in. Today, I build the bunny run. Next weekend, wife gets shelving in her shed.
And my builds are progressing, here's a shot of the big two-story in Bucks county.
I also had the shed company include a gallon of the paint for the shed. Kitty's overkill house got 1 coat and he's moved into his new location.
I also built the ramp to the shed last week, so the mower is moved in. Today, I build the bunny run. Next weekend, wife gets shelving in her shed.
And my builds are progressing, here's a shot of the big two-story in Bucks county.
Attachments

Well, we've had unusually mild weather so far this year so I've taken the opportunity to get a jump on work planned for spring time.
In the barn, if I am to create my office, I needed to empty the shed-type stuff to...errr... a shed. Additionally, the wife needs a spot for her garden/pet area that I built for her recently. So we bought a shed (see previous posts).
Now, as you'd expect:
- I cannot just throw stuff into a shed willy nilly
- and
- I cannot spend any money on the solutions
SO...
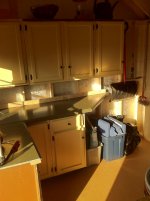
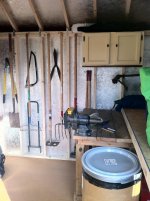
I took my old kitchen cabinets, some salvaged corian counter tops, scrap lumber, and whatever else I could find to create a nice efficient area. I can hold all pet supplies, gardening supplies, yard tools, commercial grade walk behind mower, wheel barrow etc.etc. etc. very easily in this 10x14 shed. And all of the interior solutions are free.
And yes, I DID drill holes in the handles of my yard tools years ago and it's never bothered me one bit. ;-)
In the barn, if I am to create my office, I needed to empty the shed-type stuff to...errr... a shed. Additionally, the wife needs a spot for her garden/pet area that I built for her recently. So we bought a shed (see previous posts).
Now, as you'd expect:
- I cannot just throw stuff into a shed willy nilly
- and
- I cannot spend any money on the solutions
SO...
I took my old kitchen cabinets, some salvaged corian counter tops, scrap lumber, and whatever else I could find to create a nice efficient area. I can hold all pet supplies, gardening supplies, yard tools, commercial grade walk behind mower, wheel barrow etc.etc. etc. very easily in this 10x14 shed. And all of the interior solutions are free.
And yes, I DID drill holes in the handles of my yard tools years ago and it's never bothered me one bit. ;-)
Attachments
ha ha, my bad!
Got the table up and running last night.
First, I used leftover nuts/bolts from installing my garage door to get the frame back together. It's in great shape!
There was a 2x4 used as a spreader/cross bar. Being the frugal nut that I am, I ripped it in half to create front and back rails for a shelf under the table.
I had a pine plank laying around from a craigs list lumber score awhile back, so I put that between the rails for the shelf.
I loved the character of the butcher block top, so I only sanded enough to take off anything that had texture or profile to it. Everything else is permanently preserved under a coat of poly (the water proof variety).
On the underside of the table I found "Welded Wood" logo, and looked them up on the web. I was happy to find they are based in Michigan and seem to be focused on quality, so I'm glad I'm supporting their product in a 2nd hand way. I have no idea what they'd normally cost, but I paid $75 for the entire setup.
http://www.mapleblock.com/
Left to do, I'm just going to add a 2x4 chunk under each leg to bring it up higher due to my height. And I will be adding a woodworker's vice. Otherwise, time to use it. Heavy as can be, solid as can be.
i had no idea they'd clean up that nice!
in Michigan these show up on craigslist all the time. 50 or so for one with a beat up top. i have 2 in fact...maybe i'll try to sand them down a bit.
i better keep my eyes open for a few more!!
theoldwizard1
Well-known member
Doesn't everybody ??!!!!And yes, I DID drill holes in the handles of my yard tools years ago and it's never bothered me one bit. ;-)
I guess I picked that one up from my Dad. The only problem was the year I went through 3 or 4 Craftsman shovels digging out posts set in concrete. The new one don't have holes in the handle.
Your place is getting better all the time. It surely doesn't look like it did when I first saw the link to your build.
A link that brought me here to this site that I have enjoyed, Thank you.
A link that brought me here to this site that I have enjoyed, Thank you.
Hey Guys, Haven't been here in awhile, so it was really cool to see your comments. I have got to get better about commenting in other builds too, because I know first hand that it keep motivations going!

This weekend, I got a chance finally to swing by the local sawmill for some lumber for my next aridondack chair. The first one has stood up nicely to weather and is almost exactly as comfortable as I want it to be (the next model will not have as much recline in the seat back) so I opted again to go with White Oak.
This time, he gave me a good deal on 10 footers including a few boards that were quarter sawn. He said most customers have him plane it, but I think that's part of the fun, so I bought rough lumber.
Got it home and marked it up so that the figured boards would be displayed in the chair arm rests and seat back. The most visible areas.
Got all the lumber milled and ready to be cut to final dimension/shape. Since I have a 6" jointer, this entails edge jointing so that I can rip to just under 6", then I face joint, then planer to desired thickness. This entire pile is 3/4" thick.
Filled an entire 35 gal drum with chips this day, and enjoyed every single minute of it.
This weekend, I got a chance finally to swing by the local sawmill for some lumber for my next aridondack chair. The first one has stood up nicely to weather and is almost exactly as comfortable as I want it to be (the next model will not have as much recline in the seat back) so I opted again to go with White Oak.
This time, he gave me a good deal on 10 footers including a few boards that were quarter sawn. He said most customers have him plane it, but I think that's part of the fun, so I bought rough lumber.
Got it home and marked it up so that the figured boards would be displayed in the chair arm rests and seat back. The most visible areas.
Got all the lumber milled and ready to be cut to final dimension/shape. Since I have a 6" jointer, this entails edge jointing so that I can rip to just under 6", then I face joint, then planer to desired thickness. This entire pile is 3/4" thick.
Filled an entire 35 gal drum with chips this day, and enjoyed every single minute of it.
Attachments
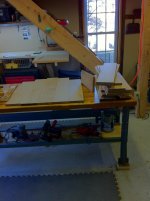
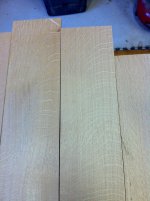
Well, woodworking gets easier the more you do it. The first chair was slow to build, the 2nd one is flying by.
Some efficiencies gained this time around include:
- I organized the cut list so that all width cuts of the same dimension, and length cuts of the same dimension, are grouped. More accurate and faster.
-Using double sided "turner's" tape to affix two boards together I cut pairs of pieces on the bandsaw all at once, and then used my sanding station to perfect them. 1/2 the cuts, and the pieces end up identical.
- I didn't have a router table last time, so all routing was done handheld. Which worked but was time consuming to clamp the pieces to hold them still. And, it was messy, spewing chips everywhere. This time, I connected my router table to the dust collection system and was SOOOO much faster, and ended up with less than a dustpan full of mess that escaped the suction.
Anyways, we're ready for sanding and assembly now. The most time consuming part of assembly is that I make my own plugs, countersink each hole, glue and screw the chair together, and then glue the plugs into each hole. Then, flush cut, final sand, weather-proof poly 2 coats with fine sanding between.
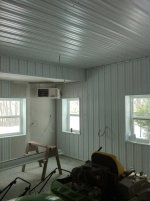
Also, inside one of my builds, the shop used fire rated sheetrock (living space above) topped with steel liner panels. So easy to clean, durable, bright, easy to see. Almost done in this pic
Some efficiencies gained this time around include:
- I organized the cut list so that all width cuts of the same dimension, and length cuts of the same dimension, are grouped. More accurate and faster.
-Using double sided "turner's" tape to affix two boards together I cut pairs of pieces on the bandsaw all at once, and then used my sanding station to perfect them. 1/2 the cuts, and the pieces end up identical.
- I didn't have a router table last time, so all routing was done handheld. Which worked but was time consuming to clamp the pieces to hold them still. And, it was messy, spewing chips everywhere. This time, I connected my router table to the dust collection system and was SOOOO much faster, and ended up with less than a dustpan full of mess that escaped the suction.
Anyways, we're ready for sanding and assembly now. The most time consuming part of assembly is that I make my own plugs, countersink each hole, glue and screw the chair together, and then glue the plugs into each hole. Then, flush cut, final sand, weather-proof poly 2 coats with fine sanding between.
Also, inside one of my builds, the shop used fire rated sheetrock (living space above) topped with steel liner panels. So easy to clean, durable, bright, easy to see. Almost done in this pic
Attachments

theoldwizard1
Well-known member
I'm not a wood worker, but I thought quarter sawn lumber was a thing of the past ! To get a 6" board the tree had to be 20+" diameter and extremely tall and straight.This time, he gave me a good deal on 10 footers including a few boards that were quarter sawn.
Curious, does your supplier buy raw logs ? Does he dry the lumber himself ? I have heard that slow drying (low heat) can take days (weeks ?)
For something different, you might want to try a tung oil or linseed oil finish. It takes time, but with multiple coats, will give you the longest last, weather resistant finish you can imagine.
Quarter sawn is still very popular, but it's more expensive because the sawmill process is more involved.
Because of the way it's cut, quarter sawn is a more stable board in terms of how it changes shape with changes in humidity. The end of a plain sawn will have C-shaped grain pattern, therefore the board can cup as the different sized C's absorb or shed humidity/temp changes. The end of a quarter sawn board will have parallel grain pattern nearly perpendicular to the face of the board. This allows the board to adjust and change in a more consistent and predictable way. A very good choice for certain parts of projects for that reason. Also, in some woods such as Oaks, you can see rays/flecks due to the nature of how the wood is sectioned, so quarter sawn is considered more beautiful in these cases.
Picture looking at a log from the end point of view. It's a circle. If you cut that circle into 4 pieces of pie, that's the first step in quarter sawing. Then, you cut boards from the outside edge towards the middle, giving you boards with the parallel grain. On the other hand, plain sawn is more like a baloney slicer process.
My local sawmill purchases logs and cuts them on his diesel powered saw. The blade is at least 6 feet across. It's a huge circular saw basically. He has a carriage that slides on rails to feed the logs to the blade. Other sawyers use enormous bandsaws. And I'm sure there are other methods I'm not aware of.
Depending on the situation, he kiln dries some lumber and air dries other lumber. I would assume that popular products (such as 4/4 Red Oak) are kiln dried normally for speed of getting product to the shelf. For woodworking purposes, the moisture content of the lumber is important, so this speed is also important for the sawyer's income stream. Other times, air drying is preferred, but I don't yet know enough to conjecture why.
I have used boiled linseed oil on a project before, and it's very nice to work with. What I like most is that it doesn't hide, it enhances, the natural beauty of the wood. Whereas dark stains and paints can overpower something that is already gorgeous, linseed oil doesn't have that problem. For this particular project, I'm just going with a UV-blocking spar varnish type of outdoor polyeurethane. The white oak shines without messing with it.
Thanks for stopping in! I love talking about this stuff
(edit: and to get a 6" quarter sawn board, the tree would need to be minimally 12" in diameter, quite common even today. But, the reason you pay more for thicker boards and for wider boards is because they require even thicker trees... which are less common today)
Because of the way it's cut, quarter sawn is a more stable board in terms of how it changes shape with changes in humidity. The end of a plain sawn will have C-shaped grain pattern, therefore the board can cup as the different sized C's absorb or shed humidity/temp changes. The end of a quarter sawn board will have parallel grain pattern nearly perpendicular to the face of the board. This allows the board to adjust and change in a more consistent and predictable way. A very good choice for certain parts of projects for that reason. Also, in some woods such as Oaks, you can see rays/flecks due to the nature of how the wood is sectioned, so quarter sawn is considered more beautiful in these cases.
Picture looking at a log from the end point of view. It's a circle. If you cut that circle into 4 pieces of pie, that's the first step in quarter sawing. Then, you cut boards from the outside edge towards the middle, giving you boards with the parallel grain. On the other hand, plain sawn is more like a baloney slicer process.
My local sawmill purchases logs and cuts them on his diesel powered saw. The blade is at least 6 feet across. It's a huge circular saw basically. He has a carriage that slides on rails to feed the logs to the blade. Other sawyers use enormous bandsaws. And I'm sure there are other methods I'm not aware of.
Depending on the situation, he kiln dries some lumber and air dries other lumber. I would assume that popular products (such as 4/4 Red Oak) are kiln dried normally for speed of getting product to the shelf. For woodworking purposes, the moisture content of the lumber is important, so this speed is also important for the sawyer's income stream. Other times, air drying is preferred, but I don't yet know enough to conjecture why.
I have used boiled linseed oil on a project before, and it's very nice to work with. What I like most is that it doesn't hide, it enhances, the natural beauty of the wood. Whereas dark stains and paints can overpower something that is already gorgeous, linseed oil doesn't have that problem. For this particular project, I'm just going with a UV-blocking spar varnish type of outdoor polyeurethane. The white oak shines without messing with it.
Thanks for stopping in! I love talking about this stuff
(edit: and to get a 6" quarter sawn board, the tree would need to be minimally 12" in diameter, quite common even today. But, the reason you pay more for thicker boards and for wider boards is because they require even thicker trees... which are less common today)
theoldwizard1
Well-known member
How much more ? 10% ? 25% ?Quarter sawn is still very popular, but it's more expensive because the sawmill process is more involved.
(edit: and to get a 6" quarter sawn board, the tree would need to be minimally 12" in diameter, quite common even today. [/QUOTE]
Check with the sawyer. I'll bet they are using 18" or larger logs for 6" quarter sawn boards. You loose the bark and sap wood which has to be 2-4" on each side of the slab.
(Grandpa was a lumberjack in upper MI !)
fergus
Well-known member
Bob, thanks for the lesson on quarter sawn lumber. I've never understood exactly what it was...other than a good quality for hardwood to possess.
I've always thought it would be super cool to actually fall and mill my own timber for a project. That's one of those "way out in the future" long range project ideas...
I've always thought it would be super cool to actually fall and mill my own timber for a project. That's one of those "way out in the future" long range project ideas...
theoldwizard1
Well-known member
I've always thought it would be super cool to actually fall and mill my own timber for a project. That's one of those "way out in the future" long range project ideas...
It is possible to cut hardwood on public land in certain parts of MI, with the correct permit. The problem is, falling the tree without damaging others around it and then getting it out of the woods.
I saw an article in the newspaper several years ago about a guy who was doing it the "old fashioned" way. He did cut the trees with a chain saw, but he did it in winter, because it was easier for his draft horse (less impact on the forest floor) to pull the logs on the snow, just like they did in the late 1800s before they invented the Michigan Logging Wheel.
Wizard, you're probably right, closer to 20" log to yield a 6" board on each quarter. Anyways, they're still widely available depending on the species of lumber and the area where you're buying. In terms of cost, I'd have to check on that, but I'd suspect in the 25% upcharge area for quarter sawn.
fergus, great to hear from you! How's it been going? You can rent portable mills to bring to the tree, or even hire someone that does that work. Most mills don't want you to bring in trees for fear that there's hidden metal inside it (you'd be surprised... for example, I had a wind chime hanging from a silver maple.. inside 3 years, the bracket was entirely gobbled inside of the tree!)
But, I can see the appeal of literally taking a tree from ground to final project. I helped a guy at work by preparing, jointing, glue up for some beautiful cherry wood he had. 3" thick slabs by 4 feet long! Woah! Anyways, he was so thankful, he gave me all the cut offs (3" thick x 7" wide x 2' long). I got to asking about the wood, and it turns out his dad had a huge cherry tree fall on his property. A local guy came and, for a fee, milled it into the boards. I'll turn it into a coffee table and always remember that story.
fergus, great to hear from you! How's it been going? You can rent portable mills to bring to the tree, or even hire someone that does that work. Most mills don't want you to bring in trees for fear that there's hidden metal inside it (you'd be surprised... for example, I had a wind chime hanging from a silver maple.. inside 3 years, the bracket was entirely gobbled inside of the tree!)
But, I can see the appeal of literally taking a tree from ground to final project. I helped a guy at work by preparing, jointing, glue up for some beautiful cherry wood he had. 3" thick slabs by 4 feet long! Woah! Anyways, he was so thankful, he gave me all the cut offs (3" thick x 7" wide x 2' long). I got to asking about the wood, and it turns out his dad had a huge cherry tree fall on his property. A local guy came and, for a fee, milled it into the boards. I'll turn it into a coffee table and always remember that story.
fergus
Well-known member
Its going good here. I'm finally getting to a few projects I've been wanting to do. I've made my first shop drawer with dadoes and reinforced rabbets today...let's just say I hope to someday look back and laugh! We've all got to start somewhere...and today that is just what I did.
Bob, thanks for the lesson on quarter sawn lumber. I've never understood exactly what it was...other than a good quality for hardwood to possess.
I've always thought it would be super cool to actually fall and mill my own timber for a project. That's one of those "way out in the future" long range project ideas...
+1 on the 1/4 sawn lesson - thanks rieferman.
And I've often thought some of the larger trees I've cut down would make some great project lumber. I always thought it would be cost prohibitive, but who knows - I never actually got a quote yet.
Wow, I just got done reading this whole thread, although I admit not all at once. I started a couple of weeks ago and pecked at it. It really feels like I just read your autobiography, a chronicle of your life for the last couple of years, it is interesting seeing how your life has shifted its course. One thing REALLY struck me was when you posted :
" Doing nothing would change nothing, but doing something would surely lead somewhere. Who knew where?
I had to cut and paste this passage because it is just plain great advice. Congrats on your journey and development.
" Doing nothing would change nothing, but doing something would surely lead somewhere. Who knew where?
I had to cut and paste this passage because it is just plain great advice. Congrats on your journey and development.
Fergus wrote:
NICE! I demand pictures!!!!! (or a link to where you've posted them already!). I haven't decided if I want to dado with my router or with my table saw yet. I learned both ways, and both have advantages... What do you opt for?
shopnut wrote:
My friend had a bunch of lumber at his house milled. 2nd hand info was that since he had several trees milled (rather than just one) and since he had fallen the trees himself first, that the price per board foot was very good, plus the emotional attachment of lumber from his own lot. However, keep in mind that you'd need to be able to true up the lumber with a jointer and planer still (the service you bring in typically only will rough cut). Also, you will need to allow the lumber to dry before it will be usable.
Pete wrote:
Thank you for taking time to read and comment I personally find life to be quite overwhelming, especially as I have a family depending on me now (wife is a stay at home mom, 2 kids), so it's difficult to create a life map that's clear and accurate. Given that, I try to follow my own advice and take an educated guess as to which path I should start walking on.... and then start walking on it. More often than not, the path meanders, but it's also generally moving forward while it does so.
because, I wrote:
And, because every post is better if it includes a picture, here's a very un-meaty update on my chair project.
I've been sick as a dog for a few days, but got a chance to start assembling my chair.
Tips from yesterday's session:
- Drill your plugs ahead of time so that you can glue and plug each screw as you assemble each portion of the project.
- Set your countersink depth to match the size of the plugs that you just cut so that you don't have to sand plugs standing proud of the countersink.
- Line up the grain of your plug and the grain of your piece for best look.
- I always dry screw to test fit, then unassemble, glue and screw. Takes a little bit longer, but you'd be surprised how often you make a small adjustment.
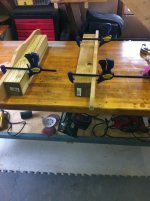
- If working alone, and trying to balance a piece of your project for assembly purposes, simple solutions are often the best. I keep cut offs of 4x4 posts to use as extra hands. In this picture, I just clamped the sides of my chair to the blocks so that they would hold still while getting my glue and screw task completed. Not the most elegant solution, but sure works great (and it's free).
I've made my first shop drawer with dadoes and reinforced rabbets today...let's just say I hope to someday look back and laugh! We've all got to start somewhere...and today that is just what I did.
NICE! I demand pictures!!!!! (or a link to where you've posted them already!). I haven't decided if I want to dado with my router or with my table saw yet. I learned both ways, and both have advantages... What do you opt for?
shopnut wrote:
And I've often thought some of the larger trees I've cut down would make some great project lumber. I always thought it would be cost prohibitive, but who knows - I never actually got a quote yet.
My friend had a bunch of lumber at his house milled. 2nd hand info was that since he had several trees milled (rather than just one) and since he had fallen the trees himself first, that the price per board foot was very good, plus the emotional attachment of lumber from his own lot. However, keep in mind that you'd need to be able to true up the lumber with a jointer and planer still (the service you bring in typically only will rough cut). Also, you will need to allow the lumber to dry before it will be usable.
Pete wrote:
Congrats on your journey and development.
Thank you for taking time to read and comment
I personally find life to be quite overwhelming, especially as I have a family depending on me now (wife is a stay at home mom, 2 kids), so it's difficult to create a life map that's clear and accurate. Given that, I try to follow my own advice and take an educated guess as to which path I should start walking on.... and then start walking on it. More often than not, the path meanders, but it's also generally moving forward while it does so.because, I wrote:
Doing nothing would change nothing, but doing something would surely lead somewhere.
And, because every post is better if it includes a picture, here's a very un-meaty update on my chair project.
I've been sick as a dog for a few days, but got a chance to start assembling my chair.
Tips from yesterday's session:
- Drill your plugs ahead of time so that you can glue and plug each screw as you assemble each portion of the project.
- Set your countersink depth to match the size of the plugs that you just cut so that you don't have to sand plugs standing proud of the countersink.
- Line up the grain of your plug and the grain of your piece for best look.
- I always dry screw to test fit, then unassemble, glue and screw. Takes a little bit longer, but you'd be surprised how often you make a small adjustment.
- If working alone, and trying to balance a piece of your project for assembly purposes, simple solutions are often the best. I keep cut offs of 4x4 posts to use as extra hands. In this picture, I just clamped the sides of my chair to the blocks so that they would hold still while getting my glue and screw task completed. Not the most elegant solution, but sure works great (and it's free).
Attachments
Alfred8100
Member
- Joined
- Jan 30, 2012
- Messages
- 5
This is really helpful to take nice ideas to make your home kitchen more beautiful.My wife tell me about this to see and i see really good...this will be helpful for me....Thanks for sharing this....really done nice job there man...FINISHED!!
Jim came over yesterday and did masterful plumbing (the setup under the sink just makes soooo much sense.. such a nice clean job) while I tiled, and we got the final steps of the kitchen finished (sppliance garage was such a PITA!!!!). I have to caulk a few areas today and the wife needs to nest a bit, but close enough for pics to be shared. We LOVE it. 8 weeks from gut to finish. Total spend = $12,000 (major savings on all carpentry, plumbing, electrical, cabinet install, appliance install, design.. since we did it ourselves). Oh, and props to the wifey for big time help painting, grouting, and other detail tasks along the way... plus keeping the fam going without a kitchen!!
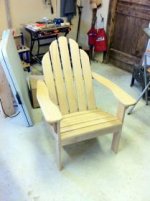
Other than trimming a few plugs, final sanding, and applying a coat of outdoor poly (a UV protecting spar varnish type of thing), chair #2 is done!
What I learned this time:
- Jigs, jigs, and more jigs are the key to easy, accurate furniture making.
- Shop flow is sooooo much better than before.
- A solid, heavy, correct height, correct size assembly table is the most used and best tool in the shop.
- I reduced the recline position slightly and the chair is MUCH more comfortable as a result.
Next time around, I'm going to build 2 at once. I believe it took me about 5 hours to build this chair, and I think it will take about 5 hours to build 2 next time (because I'm faster with some of the process improvements I learned this time).
Also, here's what my shop usually looks like.. Nice and messy and mid-project.
edit: pics not working right now, will try again shortly
What I learned this time:
- Jigs, jigs, and more jigs are the key to easy, accurate furniture making.
- Shop flow is sooooo much better than before.
- A solid, heavy, correct height, correct size assembly table is the most used and best tool in the shop.
- I reduced the recline position slightly and the chair is MUCH more comfortable as a result.
Next time around, I'm going to build 2 at once. I believe it took me about 5 hours to build this chair, and I think it will take about 5 hours to build 2 next time (because I'm faster with some of the process improvements I learned this time).
Also, here's what my shop usually looks like.. Nice and messy and mid-project.
edit: pics not working right now, will try again shortly
Last edited:
Kevin54
MEMBER EMERITUS
Yay, the shed is moved in!
This is barn/garage related because... Well, the barn currently has an area containing the 48" walk behind mower, garden tools, potting soil, bunny food, etc. etc. etc.
All that stuff will be moving to the shed, thus allowing me to convert the area in the barn to my Kistler office. That conversion will involve moving a door in my woodshop, thus gaining more wall space (and ultimately a router table station).
Soooo, shed is step 1 in a multi-step barn improvement.
The shed is also largely for the wifey. She loves the animals and wants a vegetable garden. So I'm setting her up real nice in the shed to have her own little work area. I saved the cabinets from the kitchen remodel, so she'll have lots of storage. I have some scrap corian counter top, so she'll have a nice easily-cleaned work top. Jim and I are running electric and water down to the shed in the spring time too. This will be a fun project and will make her happy. Happy wife = happy life right? Right!
next week, the privacy fence goes in
At sounding a little dumb, but what is a Kistler Office?

Never mind, I looked at the link in your sig and see where you work for a company called Kistler. I'll be alright!!!
BTW...nice moves on the hackey sack. I watched the video clip and I couldn't keep my eye on it, let alone seeing how you do it!!!


Last edited:
Hmmm, I still can't post pics. I sent a message to admin, no response yet.
Anyways, Hey Kevin! Thanks for stopping in. I see you figured out the Kistler reference - that's the builder I work for. Top notch in every way. It's a great place to work, I love it.
And, thanks for the hacky sack props. I just started playing again after a couple months away from it. I had too many things going on to focus on it, but it's time to get back in shape and I prefer hacky sack to running on a treadmill
edit: Switched to gif file instead of jpeg and files are working? whatever, here you go, commentary for these pics is in my last post
Anyways, Hey Kevin! Thanks for stopping in. I see you figured out the Kistler reference - that's the builder I work for. Top notch in every way. It's a great place to work, I love it.
And, thanks for the hacky sack props. I just started playing again after a couple months away from it. I had too many things going on to focus on it, but it's time to get back in shape and I prefer hacky sack to running on a treadmill
edit: Switched to gif file instead of jpeg and files are working? whatever, here you go, commentary for these pics is in my last post
Attachments



Last edited:

Omphaloskeptic
Well-known member
rieferman, congrats on the new company truck! Do you get to have your contact number on the doors, I couldn't tell from the pic? Seems like your company is going to take care of you; you must be doing something right.
fergus
Well-known member
Cool perk man. Does that mean the transition is complete, or are you still a part timer for Kistler?
Hey guys! Thanks for the congrats, I've been dreaming of a truck like this for a long time so it's really exciting. Plus, the financial side of it (and the peace of mind that brings) is so nice.
ompha... wrote:
Just the main number on the truck, but all leads are territory driven and I'm really the only one in my territory anyways, so I'm cool with it. 1-800-KISTLER is easy for people to remember.
The DO pay for all my marketing activities, and allow me to list my own information on all of that type of stuff. Chamber of commerce, local mailers, direct mail pieces etc. And, I list my contact info on job signs at my builds-in-process. I get about a lead per day overall.
and he wrote:
Yeah, they're really cool. Computer, phone, marketing/tradeshows expenses, leads, training. The president and vice president routinely come on calls with me when I need a little extra help for any reason. The construction manager teaches me constantly. I've been working my **** off and bringing process improvements and marketing strategy to the table... and hopefully the pipeline of business that I have bulding will really bust open any time now. It's poised to do so!
fergus wrote:
Yup! Complete for a few weeks now. I've basically been putting in 40 hrs per week for 6 months, but now I can just focus on this. The biggest benefit is work-life (errrr... work/wife) balance, and that I can get to job sites while my teams are still there.
The other thing is, I don't dread a minute of my day anymore! I'm sitting in my barn that I rebuilt right now, listening to ESPN radio, looking out the window at my daughter digging in the sand box. By lunch time, my pricing and paperwork will be done, and then I'm visiting some possible vendors for a job I have coming up. Nice!
Yesterday, I visited with a potential customer that owns 50 beautiful acres of land with a 1750's bank barn on site. We toured the barn, which had about a dozen vintage cars and trucks of all types tucked here and there throughout the entire thing. Four car lifts in that barn!!
Living the dream!
ompha... wrote:
Do you get to have your contact number on the doors
Just the main number on the truck, but all leads are territory driven and I'm really the only one in my territory anyways, so I'm cool with it. 1-800-KISTLER is easy for people to remember.
The DO pay for all my marketing activities, and allow me to list my own information on all of that type of stuff. Chamber of commerce, local mailers, direct mail pieces etc. And, I list my contact info on job signs at my builds-in-process. I get about a lead per day overall.
and he wrote:
Seems like your company is going to take care of you; you must be doing something right.
Yeah, they're really cool. Computer, phone, marketing/tradeshows expenses, leads, training. The president and vice president routinely come on calls with me when I need a little extra help for any reason. The construction manager teaches me constantly. I've been working my **** off and bringing process improvements and marketing strategy to the table... and hopefully the pipeline of business that I have bulding will really bust open any time now. It's poised to do so!
fergus wrote:
Does that mean the transition is complete
Yup! Complete for a few weeks now. I've basically been putting in 40 hrs per week for 6 months, but now I can just focus on this. The biggest benefit is work-life (errrr... work/wife) balance, and that I can get to job sites while my teams are still there.
The other thing is, I don't dread a minute of my day anymore! I'm sitting in my barn that I rebuilt right now, listening to ESPN radio, looking out the window at my daughter digging in the sand box. By lunch time, my pricing and paperwork will be done, and then I'm visiting some possible vendors for a job I have coming up. Nice!
Yesterday, I visited with a potential customer that owns 50 beautiful acres of land with a 1750's bank barn on site. We toured the barn, which had about a dozen vintage cars and trucks of all types tucked here and there throughout the entire thing. Four car lifts in that barn!!
Living the dream!
Originalspanksta
Active member
Nothing much to add, except that I think it's great seeing you save (and ultimately, perfect) this great old barn. As someone semi-local to you, (Grew up in chester county, then moved to montco and philly, now i'm buying a house in lower bucks) all too often i see these great old barns in our area lost to decay and disrepair. It's nice to see someone interested in saving it, rather than knocking it down. Bravo.
) all too often i see these great old barns in our area lost to decay and disrepair. It's nice to see someone interested in saving it, rather than knocking it down. Bravo.Originalspanksta
Active member
I'd say yes, but the house already comes with a 23x25 detached!
fergus
Well-known member
So how goes it? Selling barns to the rich and famous ? Anything new going on with your place?
Anything new going on with your place?Hey! Wow, it's been awhile, my bad! Thanks for stopping in! Some developments lately that I will post about shortly. Barn stuff, just woodworking a lot lately. I re-milled a bunch of saved barn beams and some shipping pallets and made a cool table for our porch most recently. It looks awesome with the character of the wood chosen. Will try to post a picture at some point, I have to figure out how to re-size pics so they'll fit on this forum. More soon
Well, here's the update.... I've left Kistler Buildings. It was a great journey, and I learned a lot, but there's just no way (especially in this economy) to do the right thing financially for my family if I ignore my corporate earning power. So, I'm heading into management consulting starting next week. I thought I'd be sadder about this, but honestly, after the initial "wow I created THAT?!?!" feeling, I found the industry to be plagued by the same problems as more corporate work, and for way less pay, worse benefits, long always-on hours, and thankless customers. So, while it will always be a step on the path, I'm glad to be past the step. The new opportunity earns well, is very challenging, and I'm close friends with one of the principals of the company. I'm looking forward to it!
At the end of the day, no matter how carefully you plan, a certain amount of reacting to the unknown is part of life I guess. You just have to do the best you can with the information in front of you, and hope that you get smarter and stronger along the way. Those of you that walked into your dream career on day 1, and never had to experience the angst of the life search, consider yourselves blessed.
edit: And with this change, I will again be able to afford hobby expenses, so I expect barn related posts to return soon! Thanks for staying tuned.
At the end of the day, no matter how carefully you plan, a certain amount of reacting to the unknown is part of life I guess. You just have to do the best you can with the information in front of you, and hope that you get smarter and stronger along the way. Those of you that walked into your dream career on day 1, and never had to experience the angst of the life search, consider yourselves blessed.
edit: And with this change, I will again be able to afford hobby expenses, so I expect barn related posts to return soon! Thanks for staying tuned.
Last edited:
Congrats on the new career and I'll be waiting on more updates to the barn saving that brought me to the site.
I just finished my first week at the new job, and am really excited about the culture that they have there. It's a mid-sized management consulting company focused on the healthcare industry, so the project work is interesting and challenging. On Monday, I will begin at a client site. Hitting the ground running!
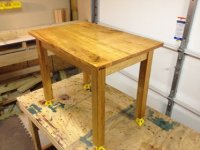
Lately, before I got this new job, cash was very tight, so I went into a mode of only building furniture that I could complete for free. For example, I built a table for our porch out of barn beams, and old pallets.
And I just finished this side table for our living room. The legs are barn beam cutoffs that I had leftover. I milled and glued them up to create what you see in the picture. The apron is leftover white oak from adirondack chairs that I built over the summer. And the top is from a huge chunk of cherry that I got from a friend's father's yard. He had given me the cherry as thanks for helping him with a project, and I milled and glued it up. (btw, by "milled" I mean I took the rough lumber through the process of making it a pretty board... I don't mean that I took a portable bandsaw out into the woods etc.). The top will get deep red as UV light hits it over the years. I used mortise and tenon joinery.
Also, meet our newest addition, Buttercup. (aka, the best dog ever.. seriously, she's soooo sweet)
Edit: Now that I figured out how to post pics again, here's that porch table I mentioned. The top is made from two really old shipping pallets (I milled everything to the common size that you see... a really pita process) and the rest is old barn wood. No fancy joinery on this one, but it's still a really nice place to eat pizza with the family!
Lately, before I got this new job, cash was very tight, so I went into a mode of only building furniture that I could complete for free. For example, I built a table for our porch out of barn beams, and old pallets.
And I just finished this side table for our living room. The legs are barn beam cutoffs that I had leftover. I milled and glued them up to create what you see in the picture. The apron is leftover white oak from adirondack chairs that I built over the summer. And the top is from a huge chunk of cherry that I got from a friend's father's yard. He had given me the cherry as thanks for helping him with a project, and I milled and glued it up. (btw, by "milled" I mean I took the rough lumber through the process of making it a pretty board... I don't mean that I took a portable bandsaw out into the woods etc.). The top will get deep red as UV light hits it over the years. I used mortise and tenon joinery.
Also, meet our newest addition, Buttercup. (aka, the best dog ever.. seriously, she's soooo sweet)
Edit: Now that I figured out how to post pics again, here's that porch table I mentioned. The top is made from two really old shipping pallets (I milled everything to the common size that you see... a really pita process) and the rest is old barn wood. No fancy joinery on this one, but it's still a really nice place to eat pizza with the family!
Attachments


Last edited:
Nice looking tables and Buttercup looks like a sweetheart.