To avoid these ads, REGISTER NOW!

west of Philly - barn saving

markviii

Well-known member
Joined
Jan 25, 2010
Messages
1,310
Location
east central IL
I'm still following your projects when you post. Nice tables - I'm sure they fit your needs and will last a long time.
Sounds like the new job is in the right field at the right time.
The dog looks like a keeper, for sure!

Chris
 
To avoid these ads, REGISTER NOW!
OP
R

rieferman

Well-known member
Joined
May 18, 2009
Messages
2,586
Location
Collegeville PA (30 min west of Philly)
I'm so heart broken to say that Piggy's last day with us was last weekend. He faded very fast, so it was a blessing that he (and the family) didn't experience a long drawn out decline. He was nearly 14 years old, and the best dog in the world. This picture was taken 5 minutes before I carried him to the car to bring him to the vet. He wagged his tail until the very last minute, and it's killing me to even think/type about it. We told the kids that Piggy told us that they could say "hi" to him in heaven by giving Buttercup extra petting and attention. They're taking their responsibility very seriously. Rest in peace Piggy, we miss you so much!
 

Attachments

  • IMG_0146.JPG
    IMG_0146.JPG
    64.7 KB · Views: 243
  • IMG_0149.JPG
    IMG_0149.JPG
    57.3 KB · Views: 240
Last edited:

Ford52PU

Well-known member
Joined
Aug 7, 2007
Messages
798
Location
Coatesville PA
So sorry for your loss. I am still getting over the loss of Max, our rescue schnauzer in August. They become such a part of your life, it makes old men cry like baby's. At least you have the puppy to raise. Take care.
 

ThreeJ97

Well-known member
Joined
Jan 28, 2010
Messages
74
Awwww... I hate losing a Best Friend. I bet you gave him the best years of your life.
 
Last edited:

Kevin54

MEMBER EMERITUS
Joined
Jan 12, 2005
Messages
29,341
Location
Urbana, Ohio
I'm so heart broken to say that Piggy's last day with us was last weekend. He faded very fast, so it was a blessing that he (and the family) didn't experience a long drawn out decline. He was nearly 14 years old, and the best dog in the world. This picture was taken 5 minutes before I carried him to the car to bring him to the vet. He wagged his tail until the very last minute, and it's killing me to even think/type about it. We told the kids that Piggy told us that they could say "hi" to him in heaven by giving Buttercup extra petting and attention. They're taking their responsibility very seriously. Rest in peace Piggy, we miss you so much!

Riefer....I know exactly how you feel. Brandi (our golden) we just found out she has cancer. The vet said in maybe a month we'll have to give her, her last ride. It brings tears to my eyes just thinking about it. She's the best dog that we ever owned. I just know I'll ball like a little school girl when the day arrives. My condolences to you and your family. Sometimes it's harder to lose a pet than it is to lose an animal.
 

elikeith

New member
Joined
Dec 12, 2012
Messages
1
Greetings,
I have a 30X50x16 Metal building on some land in the country. The floor is dirt. I want to take the first 20 feet of it and turn that into living space which would allow me 600sf. There are two sliding doors on each end of the building and a regular door on each side. I would likely have to cover up or build over the doors on the end I'm intending to live in. I don't know for sure and that is why I'm here. I have no idea where to start or how but I have a lot of determination and love working. Any suggestions would be greatly appreciated.
Thanks,
Eli
 
OP
R

rieferman

Well-known member
Joined
May 18, 2009
Messages
2,586
Location
Collegeville PA (30 min west of Philly)
Hi Eli - I would start with structural and the floor. That is, look at the structure and determine if it's good and strong. If you're not "in the know" on that topic, many contractors will accept a consulting fee (like a few hundred dollars) to come out and help you make that determination. And then get a floor down. Concrete floors are a topic of much angst for many, so here's a can't-go-wrong recipe:
- ensure that the "dirt layer" is compacted and free of organic matter (like tree roots etc.)

- 4 inches of gravel also compacted

- you do want a vapor barrier under the pour - this is not to keep water out of your building, it is it to keep moisture in the slab while it cures.

- fiber mesh in the mix is fine, but I would still opt for wire mat rebar. Some will say that true rebar (the rods) is needed. If you are working on extremely heavy stuff or in a shifty area, ok. But otherwise, I don't know that I'd call this a must have expense.

- expansion joints around the permiter of your structure, and relief cuts in the field of the pour.

- coat of sealer (another "keeps moisture in the slab during the cure" step)

- A real nice to have, that I would do if I could go back in time, is to insulate (rigid foam boards meant for this application) under the slab. Without this, the slab becomes a hard to overcome heat sink in winter.

- Another nice to have is pex tubes (for future radiant floor heat) in the slab. It's cheap to do now, impossible to do later. And the radiant floor heat is glorious.

Of course, many slabs are poured without all these steps (my own barn for example because I didn't know then what I know now) and are just fine, but if you were to hire someone to follow these steps, you'll be in good shape and won't need to wonder.

Once you get through structural and floor, post back and we'll have lots of additional advice.

Oh, and don't pour 1/2 the building floor. Just save longer and do the whole floor at once. It will turn out better.

-------------

Signed the contract for the barn siding btw. OMG I've been waiting so long! I will post pics soon!
 

timbitca

Well-known member
Joined
Aug 7, 2012
Messages
966
Location
Moncton, NB, Canada
Well, just got done going through this thread. I don't know how I managed to not notice it until now.

Love what you've done with your old barn, and it's been quite a journey since 2009!

Now I'm off to bed.
 

NUTTSGT

Super Moderator
Staff member
Joined
Sep 14, 2009
Messages
51,074
Location
Northern Central Ohio
Hi Eli - I would start with structural and the floor. That is, look at the structure and determine if it's good and strong. If you're not "in the know" on that topic, many contractors will accept a consulting fee (like a few hundred dollars) to come out and help you make that determination. And then get a floor down. Concrete floors are a topic of much angst for many, so here's a can't-go-wrong recipe:
- ensure that the "dirt layer" is compacted and free of organic matter (like tree roots etc.)

- 4 inches of gravel also compacted

- you do want a vapor barrier under the pour - this is not to keep water out of your building, it is it to keep moisture in the slab while it cures.

- fiber mesh in the mix is fine, but I would still opt for wire mat rebar. Some will say that true rebar (the rods) is needed. If you are working on extremely heavy stuff or in a shifty area, ok. But otherwise, I don't know that I'd call this a must have expense.

- expansion joints around the permiter of your structure, and relief cuts in the field of the pour.

- coat of sealer (another "keeps moisture in the slab during the cure" step)

- A real nice to have, that I would do if I could go back in time, is to insulate (rigid foam boards meant for this application) under the slab. Without this, the slab becomes a hard to overcome heat sink in winter.

- Another nice to have is pex tubes (for future radiant floor heat) in the slab. It's cheap to do now, impossible to do later. And the radiant floor heat is glorious.

Of course, many slabs are poured without all these steps (my own barn for example because I didn't know then what I know now) and are just fine, but if you were to hire someone to follow these steps, you'll be in good shape and won't need to wonder.

Once you get through structural and floor, post back and we'll have lots of additional advice.

Oh, and don't pour 1/2 the building floor. Just save longer and do the whole floor at once. It will turn out better.

-------------

Signed the contract for the barn siding btw. OMG I've been waiting so long! I will post pics soon!

Good information. I'd also suggest making sure your posts and skirt boards are in good shape before you pour. Leave that door onthat end till after the pour, it'll make the pour that much easier.
 
OP
R

rieferman

Well-known member
Joined
May 18, 2009
Messages
2,586
Location
Collegeville PA (30 min west of Philly)
Good additional advice from Eric above (not a shocker, as all his posts are on the money).

--------

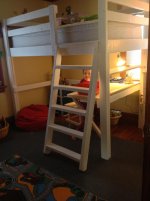
Merry Christmas GJ! The last couple years I did a shop tour at this time of year, but nothing changed this year, so I'll show a Christmas present I made for both kids. I made 2 of these (the close up is my daughter's, the far away shot is my sons).

These were designed by me to be:
- super strong
- super simple to construct
- inexpensive
- functional
- and low waste

To those points:
- It's designed the same way you'd hold up a load in a building.
- All 2x4's, 2x4's ripped in half to create 2x2's, 2x6's, and sheet goods. Total build time plus install time for everything came to about 10 hours.
- Two beds (along with the ladders, desks, shelves, and stools), start to finish (with all paint, fasteners, lumber, everything) came to $325. Also, I designed to accept the mattresses we already had (as opposed to thinner bunk bed mattresses) so no additional expense there.
- In our small farmhouse bedrooms, getting the additional space underneath, as well as the desk area, is about a 20% increase in usable bedroom space for both kids.
- At the end of the project (again, after building 2 of these) I had about 10 pieces of 2x4 cutoff at an average of 12" long each, some scrap plywood, MDF, and hard board (which will all be used around the shop), and about 1 cup of paint.

Not fine woodworking by any means, but it meets my Yankee Frugal requirements and the kids are over the moon about it.

Happy holidays!
 

Attachments

  • IMG_0210.jpg
    IMG_0210.jpg
    130.1 KB · Views: 331
  • IMG_0212.jpg
    IMG_0212.jpg
    129.1 KB · Views: 305
Last edited:

nkachur

Well-known member
Joined
Jun 29, 2008
Messages
798
Location
Manitoba Canada
Those beds look great. I am sure your children will love the added space in their rooms.

Merry christmas, I hope you have a great day.
 
OP
R

rieferman

Well-known member
Joined
May 18, 2009
Messages
2,586
Location
Collegeville PA (30 min west of Philly)
Thanks guys! We had a really nice holiday and I hope you all did too!

The barn siding project is finally (FINALLY!!!!!) upon us. I hired a crew to do this job as I have neither the expertise or time to learn. And, while the inside can be trial and error, the part that we look at needs to be great right away.

Anyways, barn red steel (like used on pole barns) will be used on the walls. We are not touching the roof at this time as it is in good shape.

Besides the siding, we are also having this work done:
- One man entry door will be replaced with a newer model
- One plywood door will be replaced with a new man entry door
- 6 new windows will be installed on the 2nd story
- Soffit, facia, gutters, downspouts to be installed

My existing hay door will no long be operational after this job, so I took advantage of the door and some mild weather to clear out the 2nd story so that the crew can frame for the new windows, and so that I don't have to take a zillion trips up and down the stairs later.

After the siding goes on, I will begin the task of converting the 2nd story into a fully finished recreation room, and a large storage area.

To do on that project:
- Re-do the entire subfloor, including shimming sleepers to level and 3/4 ply
- Stick frame all walls and ceiling
- Stick framing effort will also include installation of collar ties as well as building what I'll call a "pilots house" (although it's not truly that) around the top of the stairs so that I can climate control the upstairs separately from the shop below and also keep dust out.
- All interior and exterior electric
- electric
- hire in installation of mini-split heating/cooling unit
- sheetrock / paint
- install finish floor (likely pergo type of product)
- build bar
- furnish

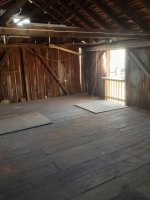
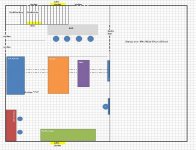
The attachments will show you the starting point, as well as the floor plan I'm moving towards. It's hard to read the small print, so here's the nutshell description:
- Air hockey
- 9' shuffleboard table
- Indoor mini-basketball hoop area
- couch/TV area
- bar
- Tons of storage

Pics of siding soon!!!!
 

Attachments

  • Barn 2nd story before.jpg
    Barn 2nd story before.jpg
    137.2 KB · Views: 253
  • Barn 2nd story floor plan.jpg
    Barn 2nd story floor plan.jpg
    130.8 KB · Views: 227
OP
R

rieferman

Well-known member
Joined
May 18, 2009
Messages
2,586
Location
Collegeville PA (30 min west of Philly)
While casually looking on craigslist (oh, ok, you got me, I've been pricing and scouring for weeks!) I found an amazing deal on some items that will live upstairs in the barn. I guess I have to build the space now! No turning back!

Also, I decided on and ordered the exterior lights for the barn - I will install after the siding is on. I chose barn style "pie pan" type of lights for above the man door and overhead door - these will be operated on a dawn/dusk sensor that I will install on the sunny side of the buildingn. Additionally, I also have spot lights on motion sensors to light certain traffic areas (e.g. where I take the garbage out etc.).
 

Attachments

  • barn exterior light.jpg
    barn exterior light.jpg
    4.2 KB · Views: 90
  • game room 1.jpg
    game room 1.jpg
    134.9 KB · Views: 139
  • game room 2.JPG
    game room 2.JPG
    67.8 KB · Views: 107
To avoid these ads, REGISTER NOW!
OP
R

rieferman

Well-known member
Joined
May 18, 2009
Messages
2,586
Location
Collegeville PA (30 min west of Philly)
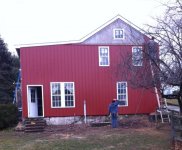
A few more that my wife just texted me. Woo hooo!!!!!!!!

Things I'm noticing:
- Wow, it looks so much better
- The roof that I can't afford to re-do now, suddenly looks so much worse than it did before. It's sound, but it's on my radar now.
- While I straightened the building out considerably, I knew it would never truly look straight when looking at it from the garage door side. That's been proven true (but it is what it is).
 

Attachments

  • barn make over 2.jpg
    barn make over 2.jpg
    142.2 KB · Views: 372
  • barn make over 3.jpg
    barn make over 3.jpg
    136 KB · Views: 403

nkachur

Well-known member
Joined
Jun 29, 2008
Messages
798
Location
Manitoba Canada
All of that work to save an old barn and now you have gone and got a "New" Building.

But honestly it really looks great. Congrats.
 
OP
R

rieferman

Well-known member
Joined
May 18, 2009
Messages
2,586
Location
Collegeville PA (30 min west of Philly)
Thanks guys!! We are so excited, and the neighborhood is too based on the number of calls and texts I received so far.

Over the years I've learned that not everyone has the same ability to envision the end state of a project. I can clearly see where projects will go very early on, but I would say that most people can't. It's interesting to me that friends and neighbors are just now seeing what I've been seeing in my mind all along. I bet the barn feels good about herself too. ;-)

Funny story... I was talking with the owner of the company I hired this morning. He knows my recent work experience in the industry, and we've had a really easy time working together as a result. Plus, we just get along really well. Anyways, he asked me if I'd be interested in returning to the industry. He said I'd be able to sell his product really well due to the quality and price point (as opposed to the premium price strategy environment that I was in before). It was very flattering and validating to hear this from him, but I politely declined at this time.

Eric wrote:
That barn looks about 25% bigger now

I know, right?! It's crazy. I was staring at it this morning thinking the same thing.


nkachur wrote:
All of that work to save an old barn and now you have gone and got a "New" Building

Ha ha, yes, I've heard from many a barn purist (I know you're kidding around, so I'm not grouping you with them necessarily) throughout this project arc begging me to keep everything "original" etc. I can see that point of view, but it's just not my point of view.

If I had lump sum cash, and knew township zoning would be equally favorable (I haven't needed a single permit, nor have my taxes changed etc.), I would have seriously considered building a new building in the first place. But, this project is about 1/3 the price of what I would have spent going that route, and I spent in drips and drabs as budget allowed. But, to be certain, the goal was always functionality and low maintenance.

It rained HARD yesterday and last night. Normally this would have meant wet barn inside. This morning, I checked. Dry as a bone.

YAY!

Material order for the rec room build upstairs has been placed. Stay tuned, and thanks for the encouragement as always.
 

NUTTSGT

Super Moderator
Staff member
Joined
Sep 14, 2009
Messages
51,074
Location
Northern Central Ohio
Neighbors calling and texting favorably about it is a good thing. A job offer out of it too ? Damn, sounds like you are doing great. :thumbup:
 

Dividing Creek

Well-known member
Joined
Nov 17, 2011
Messages
188
Location
Central Virginia
while its lost that charming old barn patina/look and looks more like a residence, you have done a great job saving a structure most would have knocked down.

I have a huge barn on my property calling to me to save it.
 
OP
R

rieferman

Well-known member
Joined
May 18, 2009
Messages
2,586
Location
Collegeville PA (30 min west of Philly)
Eric - Yeah, a good way to start the day :)

Dividing creek - The barn patina in my case was only on 2 of 4 sides (the other two sides were plywood from a previous owner) and because the barn still leans, the water was just killing the building.

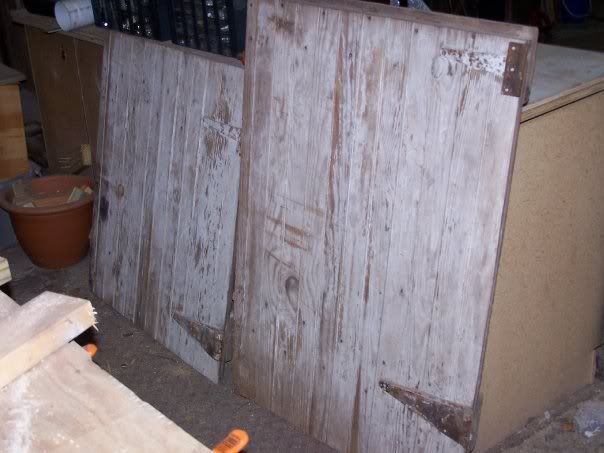
BUT.... I've taken great pains to save patina INSIDE. Leaving beams exposed, re-using old/existing doors etc.
 
OP
R

rieferman

Well-known member
Joined
May 18, 2009
Messages
2,586
Location
Collegeville PA (30 min west of Philly)
Well, I have to say that it's like "old times" to be back in barn building mode, and it feels good. And sore. But mostly good.

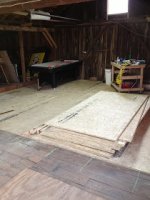
This weekend, I got all the subfloor up to the 2nd story (a couple neighbors helped in shifts, I was constant to all shifts), figured out where the joists were, and got 2/3 of the way finished with making it not be a death trap up there! So far so good, I remember how to swing a hammer is seems.

Over the next couple weeks, framing will occur. More pics then.
 

Attachments

  • IMG_0274.JPG
    IMG_0274.JPG
    47.1 KB · Views: 164

Bull

Super Moderator
Joined
Dec 12, 2005
Messages
16,189
Location
MA
I haven't been posting in here much, but I always come back to this thread. My old barn needs a rehabilitation like yours. Too bad you don't like next door to me to come over and say "listen, here's what you gotta do" over a couple of beers.

The barn is looking great, and the upstairs rec room is an exciting stage of development.
 
OP
R

rieferman

Well-known member
Joined
May 18, 2009
Messages
2,586
Location
Collegeville PA (30 min west of Philly)
Great to hear from you Bull! If I lived next door, we would definitely be beering and barning. Side note, George A. recently stayed at my place on his way through our area. We talked barns and ate pasta and meatballs. We're not sure where that will lead (if anywhere) but it was really a neat experience and idea sharing. We did talk about your barn a bit too.
 

gayler

Well-known member
Joined
Sep 22, 2011
Messages
3,282
Location
Lakin Kansas
originalbarndoor.jpg


I've saved a nice big pile of barn wood and beams etc. My plan is to start my wood working side career by using the materials for making some rustic furniture, tables etc. Just simple, sturdy items with lots of character.

Don't forget old barn wood makes some darn nice guitars! What kink of wood is it anyways? Pine?
 
OP
R

rieferman

Well-known member
Joined
May 18, 2009
Messages
2,586
Location
Collegeville PA (30 min west of Philly)
Eric wrote:
Are you going to change your avatar now or leave the current one as to pay homage ?

Good question.. I was leaning towards leaving the old pic (pay homage) but I haven't landed on that decision completely.

Gayler - Nice digging through this thread to find that old picture! That door is actually the door to my shop to this day. I've used a bunch of barn wood for projects so far. I know the siding type of material (such as the pic you attached) in the building is pine whereas the posts and joists are so hard and heavy and old that it's hard to guess - my dad said hickory, someone else said stone wood. It doesn't look like oak or maple, and it's certainly not pine or cedar. I'm really not sure, but it's nice looking when milled.
 
OP
R

rieferman

Well-known member
Joined
May 18, 2009
Messages
2,586
Location
Collegeville PA (30 min west of Philly)
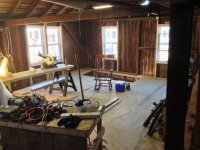
Happy Monday! I made good progress in the barn this weekend, getting the subfloor work finished, and setting up my temporary work station for the framing work that I will begin next weekend.

My material calculation resulted in about 1/2 of a sheet of plywood extra. Not bad, alsmost like I figured this stuff out for a living at one point. LOL

Toughest part of this portion of the project was that I wanted all my fasteners to drive into joists below (not just through the exsiting barn board flooring) but the joists were unevenly spaced, and not always perfectly parallel. So, from underneath I drilled "finder holes" to mark either edge of each joist and then marked them with chalk from above. Tedious, but it worked well and the floor is solid now.

Also, from underneath in my woodshop, the old barn boards still make up my ceiling, so the character was partially preserved.

The wife and I also decided that we will take part of the storage area to create a few more square feet of finished rec room. Still will have a ton of storage, and with quickly growing kids, space is always good.
 

Attachments

  • IMG_0278.jpg
    IMG_0278.jpg
    134.7 KB · Views: 308
  • IMG_0279.JPG
    IMG_0279.JPG
    78.8 KB · Views: 304

shopnut

Well-known member
Joined
Feb 22, 2006
Messages
4,237
Location
Florida
Well, I have to say that it's like "old times" to be back in barn building mode, and it feels good. And sore. But mostly good.

Great to see you back at it, rieferman.

Lot's of progress there for sure. The siding makes that place look quite a bit bigger for some reason.

Keep up the good work.
 
To avoid these ads, REGISTER NOW!
Top Bottom