To avoid these ads, REGISTER NOW!

west of Philly - barn saving

To avoid these ads, REGISTER NOW!
OP
R

rieferman

Well-known member
Joined
May 18, 2009
Messages
2,586
Location
Collegeville PA (30 min west of Philly)
Ha ha, I think it will end up being a little bit of both. With the play loft, air hockey, activity table area (for arts and crafts, board games, lego building etc.), shuffle board, mini basketball hoop, dart board, TV, and Wii system (which we let them play about 1 hour per week), there's no shortage of fun things to keep the kids busy. And, with the mini-fridge and bar, the adults should be in good spirits (pun intended) as well! I can't WAIT!
 
OP
R

rieferman

Well-known member
Joined
May 18, 2009
Messages
2,586
Location
Collegeville PA (30 min west of Philly)
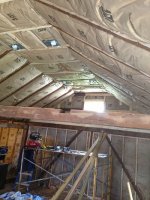
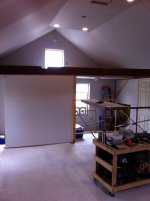
Not much barn work this weekend as we had some work to finish at Jim's instead. I did get the vaulted ceiling insulation finished. That was the hardest part so the final bit of insulation should be easily finished next weekend. Then, on to sheetrock!!!!!!!
 
OP
R

rieferman

Well-known member
Joined
May 18, 2009
Messages
2,586
Location
Collegeville PA (30 min west of Philly)
Three cheers for finishing all the insulating this weekend!!!!!!! Hip hip hoorayyyyyyyyyyyyy!

As you can tell, I hate insulating. And boy did I have a lot of it to do. 22 rolls of wall insulation at 32' long each and 81 batts of ceiling insulation at 8' long each. That's about 1300 linear feet worth of insulating, an untold number of staples to keep it in place, and countless trips up and down the scaffolding. Nearly every batt installed had to be customized in some way due to crazy barn shape. At least putting the ventilation baffles in was easy. LOL

:lol_hitti

Anyways, that's done, and sheetrock starts next weekend. That's a big deal. Although sheetrock in this space will be tough (again, due to crazy barn shape) it's such a validating step in the process. It starts to really truly feel like a finished space. And of course, it really is close to the finish line once you hit this stage. My goal is to be finished by end of May so I can enjoy family time this summer.

As a side note: The wife and I agreed to a no-alcohol month this month. We do this periodically to jump start health goals. Not that we're drinking our faces off anyways, but it helps cut a ton of calories with not much lifestyle change. I only note this because I sure could have used a couple beers this weekend.

:beer:

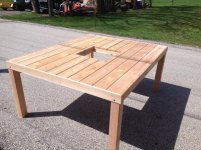
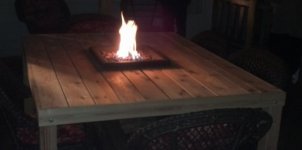
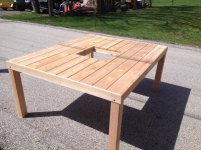
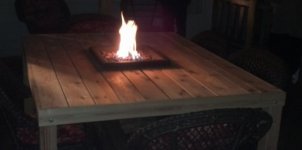
Well, after the barn work, I cleaned up the shop a bit because Jim was coming over on Sunday (yes, all the above happened on Saturday... that was a long day) so I could build him a patio table to go under the patio roof that we just finished for him last weekend (and damn did that turn out awesome! 20x20 covered space right by his pool and barbecue!!). I came up with a design where the skirt boards would have a rabbit cut all the way around for the top boards to settle on, and the legs would be shoulder cut so that the table would be point loaded to the ground. Very strong design. Jim has a cool propane fire pit that was to be featured in the center of the table, so we had to account for that. He bought his pocket hole jig with him and we worked together to assemble the whole thing so that no fasteners are visible on the table top. All made from dimensional cedar lumber, this was a fun project that turned out great. Can't wait to picnic at Jim's house this summer!
 

Attachments

  • Insulation DONE.JPG
    Insulation DONE.JPG
    125.9 KB · Views: 297
  • Jims table.jpg
    Jims table.jpg
    58.1 KB · Views: 280
  • Jims table 2.JPG
    Jims table 2.JPG
    72.1 KB · Views: 289

intimadatorsquizz

Well-known member
Joined
Feb 12, 2010
Messages
245
Location
Telford,PA
Yup the barn is ready for drywall. Should get it all done on saturday.

Thanks again for the table build Bob. It turned out awesome. We will have the picnic after your sober period....
 
OP
R

rieferman

Well-known member
Joined
May 18, 2009
Messages
2,586
Location
Collegeville PA (30 min west of Philly)
I wish, the wife wouldn't budge on the no-alcohol policy despite my protests.

As a side note, the newer insulation (the white stuff) isn't itchy anymore. At least I didn't think so. I had to wear a respirator mask the entire time (else I was sneezing like crazy) but otherwise pretty pleasant to work with.
 

NUTTSGT

Super Moderator
Staff member
Joined
Sep 14, 2009
Messages
51,081
Location
Northern Central Ohio
I wish, the wife wouldn't budge on the no-alcohol policy despite my protests.

As a side note, the newer insulation (the white stuff) isn't itchy anymore. At least I didn't think so. I had to wear a respirator mask the entire time (else I was sneezing like crazy) but otherwise pretty pleasant to work with.

O'douls ?


I was wondering if that was itch free stuff, question answered.
 
OP
R

rieferman

Well-known member
Joined
May 18, 2009
Messages
2,586
Location
Collegeville PA (30 min west of Philly)
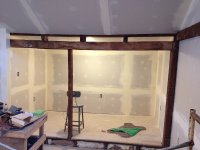
Sheetrock madness:

oh..... my..... god..... IAMSOFREAKINGTIREDANDSORE

Starting on Friday, through Sunday, I put in about 24 hours of barn work this weekend. Luckily, Jim put in two long days with me, Nick (Jim's brother and pro contractor) and Franky (Jim’s son) put in a full day each, and Sean (neighbor across the street) put in a day and a half.

Good friends!!!!!!!!!

Friday: I had all sorts of prep work to do to be sure we had a productive day on Saturday.

Saturday:
By 7:30 a.m. Sean and I were on the way to pick up a stack of 68 sheets of drywall. Thank goodness he has a huge trailer and is a professional driver/hauler. As soon as we got back to my house, we lifted all the sheets to the 2nd story.

By 10 a.m. Nick and Jim arrived and we started working. First, Nick gave us all some tutorials on how to deal with all the off angles in the space – super helpful, and we were able to get nice tight joints. Then, Nick spent the rest of the day doing the vaulted ceiling with Sean as his helper. That ceiling had all sorts of dips and dives and inconsistencies from years of barn settling and leaning, but damn did he do a great job. Meanwhile, Jim and I, with Franky as our helper, did walls. We glued as we hung sheets. By the end of the day, the ceiling was done and about ½ of the walls were finished as well.

Sunday:
Jim arrived at 9 a.m. sharp and we started back up on the walls. Sean popped in for a few hours to help too. Having to scribe, off-angle cut, and custom measure every single piece was tedious, but we kicked major **** and finished the rest of the room! The funniest part was when Jim was working inside the entertainment center built in. “Huge man in a tiny space”.

-----------

The wife and I will finish up by sheetrocking the storage area next weekend. That job doesn’t need to be as perfect since the walls will be entirely covered with shelving and storage cabinets. I’m really just covering the walls/ceiling in there to protect the insulation. Still won’t be fun, but not a rough weekend like we just had.

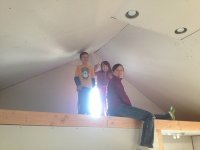
Once I have the place cleaned up a bit and can take some proper pics, I will post them. In the meantime, here’s one of the family up in the loft area.
 

Attachments

  • sheetrock.JPG
    sheetrock.JPG
    66.4 KB · Views: 432

Omphaloskeptic

Well-known member
Joined
Oct 11, 2008
Messages
2,346
Location
Ultima Ratio, Wa.
Major milestone! Good to have good friends who are willing to lend a hand; you are indeed blessed!

You'd better hurry finishing the kid's loft; it looks like they're growing quickly. lol
 

OldH1

Well-known member
Joined
Apr 18, 2013
Messages
54
Location
FL & AL
GREAT THREAD! GREAT WORK and GREAT SCOTT...I was blown away when I seen the pic after you painted it...no one driving by would have a clue that was such an old building...fantastic work on saving it!!! You are DA MAN!!
 

intimadatorsquizz

Well-known member
Joined
Feb 12, 2010
Messages
245
Location
Telford,PA
what a long A$$ weekend. Glad it is over and done with. It turned out freaking great.
WTF is with the HUGE man in the tiny space? I'm not that damn large...lol
 
OP
R

rieferman

Well-known member
Joined
May 18, 2009
Messages
2,586
Location
Collegeville PA (30 min west of Philly)
Hey guys! Thanks for the comments!

Here's some updated pics my wife just sent me after she cleaned up the space to get ready for next stage.

I love it!!!!!!!!!!!
 

Attachments

  • IMG_0446.JPG
    IMG_0446.JPG
    60.1 KB · Views: 327
  • IMG_0445.JPG
    IMG_0445.JPG
    66 KB · Views: 367
  • IMG_0444.JPG
    IMG_0444.JPG
    65.1 KB · Views: 396
  • IMG_0443.JPG
    IMG_0443.JPG
    61.9 KB · Views: 381
OP
R

rieferman

Well-known member
Joined
May 18, 2009
Messages
2,586
Location
Collegeville PA (30 min west of Philly)
:) I agree completely. We've been married for almost 12 years now, and I'm aiming to keep that streak alive permanently. Supportive of projects, she has learned how to see the vision (that took some trial and error, but she has it down now), and she understands that the time she spends on the smaller tasks helps me power through the bigger tasks faster.
 

OldH1

Well-known member
Joined
Apr 18, 2013
Messages
54
Location
FL & AL
Nice table!! how is the propane attached or hidden under the table or is it contained inside the pit itself?
 
To avoid these ads, REGISTER NOW!

intimadatorsquizz

Well-known member
Joined
Feb 12, 2010
Messages
245
Location
Telford,PA
Nice table!! how is the propane attached or hidden under the table or is it contained inside the pit itself?

It is a firepit I bought from Lowes. It is all self contained under the table. It Was not meant to be used the way it is. We made our our custom look. Funny thing is the box say not to use it on a Wooden deck... Well we built it into a wooden table on the wooden deck.
 

shopnut

Well-known member
Joined
Feb 22, 2006
Messages
4,237
Location
Florida
I wish, the wife wouldn't budge on the no-alcohol policy despite my protests.

As a side note, the newer insulation (the white stuff) isn't itchy anymore. At least I didn't think so. I had to wear a respirator mask the entire time (else I was sneezing like crazy) but otherwise pretty pleasant to work with.

I thought the white Johns Manville insulation was much better to work with too. (JM looks like the brand you used, anyway). It was a little different for me though since I didn't feel the need to wear a mask with this stuff - didn't make my nose run at all. I have no idea, but maybe it was the formaldehyde-free aspect that was helping me out :dunno:. I've always been pretty tolerent of the fiberglass fibers, at least on my arms, so I didn't notice a big difference from that standpoint.

Anyways, congrats on the progress you're making - It all looks great! I'll drink an extra beer for you tonight :beer:
 
OP
R

rieferman

Well-known member
Joined
May 18, 2009
Messages
2,586
Location
Collegeville PA (30 min west of Philly)
Hey Shopnut,
Yes, the insulation is the JM brand as you guessed. I was only able to fit R19 in the ceiling and R13 in the walls, but as a secondary use space (i.e. not our main home) it'll be alright. I agree it wasn't itchy for me, but it did make me sneeze/cough a lot so I wore a mask throughout.

And, thanks for the congrats! Almost done!!!!!!!!!!
 
OP
R

rieferman

Well-known member
Joined
May 18, 2009
Messages
2,586
Location
Collegeville PA (30 min west of Philly)
Ouch. Pulled my back slightly out on Thursday before the weekend. Ice and advil allowed me to do some barn work on Saturday but I was pretty limited. Then, on Sunday morning, I got up out of bed and my back went the rest of the way out. I muscled through the day to build Jim's barbecue cart but am home from work today recuperating.

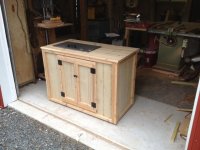
The cart is topped and trimmed in cedar, and skinned with a T-111 type of panel. The cooler is a custom welded stainless steel beauty that Jim's brother made for him. We built the cart so it can drop right in. The rest of the top surface will be a nice counter area during grilling/bbq activities. The whole thing is on casters and has plenty of storage beneath. Turned out nice!
 

Attachments

  • jims cart.jpg
    jims cart.jpg
    120.2 KB · Views: 253
OP
R

rieferman

Well-known member
Joined
May 18, 2009
Messages
2,586
Location
Collegeville PA (30 min west of Philly)
Mostly had a family weekend this weekend. Hiking, baseball, spending tons of time outside etc. It was nice.

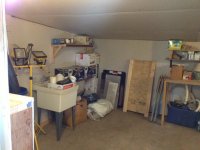
However, I did have a chance to finish the storage area in the 2nd story. Basically, I used up every bit of scrap sheetrock, plywood, whatever else I could find, to close in the ceiling and walls back there. Then I used scrap 2x4's and whatever else I could find to craft some basic shelving. Used some old beat cabinets too. The goal was NOT pretty, and was definitely NOT to have it be a time consuming effort. I just wanted to protect the insulation, make it a bit harder for critters to want to live back there, and give myself surfaces to attach shelving etc. Quick and "close enough".

Anyways, got that finished, and it's perfect for what we were aiming for. We have more than enough room for all of our storage needs, a good spot for my infrequently used items that don't need to chew up space in my woodshop (namely, electrical and plumbing stuff), and I'll be installing a 10' long x 7' wide x 5' tall dedicated lumber rack too once the furniture is moved out of there and into the rec room. That's a big win for the woodshop below which is currently constantly busting out with wood everywhere.

Well, here's my embarrassingly poorly finished, but entirely perfectly functional storage space. Don't ever accuse me of only showing you the cool pictures :)
 

Attachments

  • resting after storage.jpg
    resting after storage.jpg
    58 KB · Views: 444
  • storage 3.jpg
    storage 3.jpg
    97.4 KB · Views: 294
  • storage 2.jpg
    storage 2.jpg
    122 KB · Views: 304
  • storage.jpg
    storage.jpg
    110.7 KB · Views: 308

Omphaloskeptic

Well-known member
Joined
Oct 11, 2008
Messages
2,346
Location
Ultima Ratio, Wa.
"Well, here's my embarrassingly poorly finished, but entirely perfectly functional storage space."


Sometimes, you just have to get your head down, grit your teeth, and 'git'r'dun'! lol
 
OP
R

rieferman

Well-known member
Joined
May 18, 2009
Messages
2,586
Location
Collegeville PA (30 min west of Philly)
Exactly! Luckily my version of OCD has a filter that enables me to separate "critical-must-be-perfect" from "function-over-beauty, protect-my-time" types of projects.

Well, we got the bids back for mudding the room, and there's no way in hell I'm paying that. Guess I'll buy some joint compound on the way home tonight and get started.
 

Omphaloskeptic

Well-known member
Joined
Oct 11, 2008
Messages
2,346
Location
Ultima Ratio, Wa.
Exactly! Luckily my version of OCD has a filter that enables me to separate "critical-must-be-perfect" from "function-over-beauty, protect-my-time" types of projects.

Well, we got the bids back for mudding the room, and there's no way in hell I'm paying that. Guess I'll buy some joint compound on the way home tonight and get started.


I'm in the same boat with the joint compound; it's time for me to get back at it. You might search YouTube for how-to videos on its application. I looked at them a while back and now I need to review them to possibly save myself some grief. It might be worth your while to see how others approach the 'art' of applying compound. There are tricks to make it doable by the average guy. One tip I just read about on a recent GJ thread was to use some blue 'string chalk' mixed into the pan so you can easily see what's been done and with which knife. I'm going to give this a shot as my shop is so large that there is no way in hell that I can knock the job out in a weekend.:mad:
 
OP
R

rieferman

Well-known member
Joined
May 18, 2009
Messages
2,586
Location
Collegeville PA (30 min west of Philly)
Totally agree with studying up on you tube. While I'm pretty capable at this task and am confident I can get near-pro (if not pro) results, anything that makes me faster, more efficient, or better is well worth the time spent. I found a lot of good tutorials.

Also, my view on mudding is that less is more. I usually barely have to sand (or just use a wet sponge) because I apply very little mud per coat and "sneak up" on the final result. It usually takes me 4 coats whereas a pro could do it in 3 coats. But I'm ok with that due to how infrequently I need to mud anything.
 
OP
R

rieferman

Well-known member
Joined
May 18, 2009
Messages
2,586
Location
Collegeville PA (30 min west of Philly)
Well, time to put my money where my mouth is (reading my own confident words above) and get to 4 days of trying to finish this project. I have today and tomorrow off from work, and the weekend (except for little league, which seemingly rules our existence) to do it. The plan is to begin each day mudding, and use the tail end of each day for trim work (I am cutting, labeling all trim.. wife is painting it... we will assemble after the walls are painted) and for building the bar. If I can complete all those tasks this weekend, the wife will be painting this week while I'm at work, and I will install the trim next weekend and call in the pros to install the carpet and the mini-split HVAC system.

Wish me luck!

(edit... btw, I started this thread on 05/18/2009... today it is 5/16/2013.. almost 4 years exactly... the thought of being so close to done after all this time is indescribable.)
 

oldsfan442

Active member
Joined
Nov 15, 2011
Messages
36
GOOD LUCK!!

Been following this thread closely and love every page of it. You can do it!

Bryan
 
OP
R

rieferman

Well-known member
Joined
May 18, 2009
Messages
2,586
Location
Collegeville PA (30 min west of Philly)
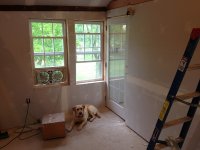
Thanks for the encouragement guys! 4 days and 40 hours of labor later (and that doesn't include the 10 hours of help my wife gave me too) we are mudded and sanded. There wasn't much sanding to do and things look pretty darn good.

The wife is the painter, so she'll be working on this over the next 2 weeks while I build the bar.

I'd hoped to have trim done this weekend as well, but my back went out again, so I'm feeling fortunate that we get through this much. Looks great!
 
OP
R

rieferman

Well-known member
Joined
May 18, 2009
Messages
2,586
Location
Collegeville PA (30 min west of Philly)
Thank goodness I'm back to work so I can rest!

:lol_hitti

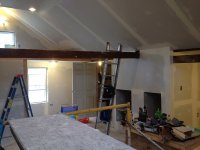
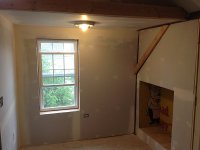
Got a chance to upload pics of the space after mudding.
 

Attachments

  • mudding 2.JPG
    mudding 2.JPG
    81.4 KB · Views: 221
  • mudding 3.JPG
    mudding 3.JPG
    79.3 KB · Views: 208
  • mudding 4.JPG
    mudding 4.JPG
    76.7 KB · Views: 215
  • mudding 5.JPG
    mudding 5.JPG
    67.8 KB · Views: 201
  • mudding 7.JPG
    mudding 7.JPG
    83.3 KB · Views: 195
To avoid these ads, REGISTER NOW!
Top Bottom