To avoid these ads, REGISTER NOW!

west of Philly - barn saving

slackgt

Member
Joined
Mar 18, 2011
Messages
13
Location
Boyertown,PA
I couldn't get the attachment to work yesterday,I wanted to start posting pics of our 1874 farmhouse,garage and barn. I used a lot of your ideas Rieferman to make the springhouse/summer kitchen into a gym.Still not finished yet,but getting there.Would've been a lot easier to stud it and drywall,but I didn't want to lose the "essence" of the old style. When I get this figured out,I'll be sure to post pics.
 
To avoid these ads, REGISTER NOW!
OP
R

rieferman

Well-known member
Joined
May 18, 2009
Messages
2,586
Location
Collegeville PA (30 min west of Philly)
Hey slackgt, thanks for stopping in! Great to hear from another local, and I'm looking forward to seeing pictures!

----
This is cool... One of my favorite websites is http://www.thewoodwhisperer.com/. They have great tutorials on woodworking, videos, articles etc. And the guy that runs it (Marc) is both an amazing woodworker and a really funny and thoughtful teacher.

Anyways, you can submit your woodworking space to be featured on their website - some woodworking friends told me I should submit my shop. So I submitted my story and pictures and my shop was selected to be featured. While somewhat selective, a lot of shops get featured, so don't be too impressed. But, still cool I think.

Check it out here: http://www.thewoodwhisperer.com/shop-tours/bobs-standalone-workshop/
 
Last edited:

5mall5nail5

Well-known member
Joined
May 23, 2010
Messages
1,174
Location
Bucks County, PA
Great thread - I want to read it more tonight. I just bought my first house in the Lansdale area and am doing my own garage rehab. Good to see a local'er.
 

liquidh8

Well-known member
Joined
Sep 19, 2013
Messages
119
Location
Shippensburg, PA
Yeah man. Some really nice garages getting build up for different reasons. I know my little overcrowded 2 cars hosts many beer drinking nights, lol.
 
OP
R

rieferman

Well-known member
Joined
May 18, 2009
Messages
2,586
Location
Collegeville PA (30 min west of Philly)
Wow, it's been a month since I posted last. Busy times!

Recently, I have been spending every spare moment of the weekends moving my wife's garden across the yard (described in detail on previous page of this thread). The previous location is in the way of the above ground pool that we're having installed in the spring, so I need to get it done before winter to prevent a hold up later on.

The build is going really well so far, and I am in the home stretch now. I need to finish the boardwalk on the inside and install the last two raised beds. Up until this point, we're almost entirely using recycled materials. I'll need about $200 worth of lumber and bricks to finish up. Along with money spent so far, total cost will be about $275. Not bad on the budget.

In progress picture attached.

Side note: Having a shop and tools really makes a project like this so much better. Years ago, I can remember projects being such a PITA because of lack of the right tools for the job.
 

Attachments

  • garden progress.jpg
    garden progress.jpg
    120.7 KB · Views: 342
OP
R

rieferman

Well-known member
Joined
May 18, 2009
Messages
2,586
Location
Collegeville PA (30 min west of Philly)
More locals! NICE! Thanks for stopping in!

---

Despite a cold and feeling rough this weekend, I was outside non stop doing yard work. Felt good to be outside on a nice fall day, even with a sore throat and sneezing.

I finished building the board walk in the wife's garden, and only have to buy the brick for the raised beds (where you see the grass along the interior perimeter in the picture) and fill with the soil that I transported to a staging tarp.

The wifey is very happy with how things are turning out, and that's what matters.
 

Attachments

  • garden.jpg
    garden.jpg
    56.5 KB · Views: 339

liquidh8

Well-known member
Joined
Sep 19, 2013
Messages
119
Location
Shippensburg, PA
Man you are trucking along! I can't wait to be able to really dive into my projects. Been doing a good deal of sidework to get a bit ahead.

But your stuff is looking good man!:thumbup:
 
OP
R

rieferman

Well-known member
Joined
May 18, 2009
Messages
2,586
Location
Collegeville PA (30 min west of Philly)
Hey! PM me if you're ever out this way and we'll have some barn beers (just like regular beer, but consumed in the barn).

Speaking of side gigs... For some unknown reason I accepted a side gig at the neighbors house rebuilding his front porch. This guy isn't really on the "close buddy" list (aka, the help for free, no questions asked list) but I figured it was good karma and that I'd probably end up getting a case of beer out of it. Well, he was really pleased with the work and gave me a generous gift certifcate to the big box.

I ended up adding the Milwaukee M18 impact driver to my collection. Since I have the M18 driver/drill with 2 batteries already, I was able to buy just the tool and save a bunch. With the amount of screws that I drive in the average year, I'm very excited to have more power and less shoulder/arm strain.

Then, I had enough left over to finally added the Kreg master pocket hole jig to my aresenal. We used Jim's awhile back for a project and I was very impressed with the results, so I'm excited to have one of my own.

Nice surprise to get two new tools in exchange for a job well done. Plus, my neighbor's house looks real nice thanks to the work we did.
 

liquidh8

Well-known member
Joined
Sep 19, 2013
Messages
119
Location
Shippensburg, PA
Will do! the winter time will slow my side work and the like a bit, so I will end up with free time hopefully, lol.

I down mind doing things for/with my neighbors, they are all great people and friends. :beer: I dread the day I get different neighbors and they turn out to be tools. :sad: If they are small jobs, payment by beer is usually sufficient, lol

But I keep the side work going as often as I can, I have way to many project irons in the fire and not enough funds to keep em stoked!
 
OP
R

rieferman

Well-known member
Joined
May 18, 2009
Messages
2,586
Location
Collegeville PA (30 min west of Philly)
I have some new woodworking friends coming over to check out my shop this weekend, so I've been busy getting it organized and cleaned up a bit (and boy did it need it!). I finally organized things that have needed organizing for a long time, swept and shop vac'd, waxed machine tops.. It looks great in there!

But, what I'm most proud of is that I finally dumped out the entire 1 gallon bucket's worth of miscellaneous fasteners that I have collected over the years, and organized into usable piles. I had a full box worth of deck screws in 3 different sizes, a few hundred washers of different sizes, all sorts of machine screws, etc. etc. etc. And now they're all usable instead of sitting uselessly in a big bucket. While I was at it, I took every bin and drawer that I was storing fasteners in and reorganized everything, including combining small quantities of like items etc. I have so many extra drawers now, and everything is easily able to be found when I need it.
 
OP
R

rieferman

Well-known member
Joined
May 18, 2009
Messages
2,586
Location
Collegeville PA (30 min west of Philly)
Happy Thanksgiving GJ!!!

Mrs. Rieferman decided to invite the entire extended family to our place for a holiday open house in a couple weeks, which meant that some long neglected refreshes in our house needed to occur to make sure everything was in good shape.

One of the tasks was to repaint the living room which had last been painted before the kids were born, and was showing years of them growing up in nearly every place you could look. While we had the room taken apart, I decided that the simple shelf under the TV that held our cable box and usually ended up being a catch-all for kids books, DVD's, hair brushes etc. should finally be updated.

And here's the garage (err, barn) tie in... For the price of 2 boards, and about 1.5 hours spent, the very useful and cozy barn woodshop allowed me to produce this new TV shelf. It's not fancy by any means, nor is it fine woodworking, but the results are very functional and near-professional quality. And for barely any time or money spend.

So..... For Thanksgiving this year, I am thankful for the safety, health and happiness of my family, friends, loved ones and myself.... AND, that I saved that crazy old barn and can enjoy building things to make our lives just a little bit better.

Cheers!

:beer:


edit: Oh yeah, and I'm thankful that I learned to use sketchup because it really makes figuring out measurements and details for a project an easy task. Make your mistakes on the virtual project, then get it right on the real thing.
 

Attachments

  • tv shelf.jpg
    tv shelf.jpg
    67.4 KB · Views: 193
Last edited:

liquidh8

Well-known member
Joined
Sep 19, 2013
Messages
119
Location
Shippensburg, PA
Glad you managed to get all those fasteners sorted out. As a car guy, I have a few 5 gallon buckets full of bolts, nuts, washers, (fasteners), lol. I will probably never get around to dumping them and sorting them out.

And, happy turkey! Though a day late. :beer:
 

rshoe1445

New member
Joined
Nov 28, 2013
Messages
3
Location
Louisville, KY
WOW. Incredible. Not sure what else I can say that hasn't already been said here. I've spent hours over the past couple days reading through this entire thread and your journey to save this barn and create this place. You and your work ethic are truly inspiring. This forum is full of amazing work and I'm so glad I found it but I can't think of a better place to post my first comment than in your thread. I feel like I know you and your family after reading through this. It's about as inspiring a piece as any I have ever read. My wife and I just bought a house that has a 150 year old barn on the property that I would like to convert to a shop as you did. I will no doubt draw both ideas and inspiration from your efforts. I think we have a lot in common so it's just great to see what you were able to accomplish. Thanks so much for sharing and congratulations!

Ron
 
Last edited:
OP
R

rieferman

Well-known member
Joined
May 18, 2009
Messages
2,586
Location
Collegeville PA (30 min west of Philly)
Wow Ron, that might be the nicest post in this thread yet, and that's saying something because a lot of guys have been so cool in giving encouragement and advice. Thanks for taking the time to write that - it's comments like yours that help keep the motivation going.

AND... you had better start a thread about your old barn now that you mentioned you have one!!! :)
 

rshoe1445

New member
Joined
Nov 28, 2013
Messages
3
Location
Louisville, KY
Will do. We closed on the house 10 days ago and should get the keys today. We're both really anxious - my wife is more about the house than the barn but whatever:D The sellers originally wanted 20 days to get out but we knew there was no way we'd be able to wait that long! I'll get some pics as soon as I can. One thing I remember about the barn was it actually had tree trunks for a couple of the structural supports! Not sure how I'm going to deal with that yet.

Ron
 
OP
R

rieferman

Well-known member
Joined
May 18, 2009
Messages
2,586
Location
Collegeville PA (30 min west of Philly)
Busy end to 2013, but a good one. In past years, I have done a shop tour around this time of year, but you've all seen what I built and nothing new has developed recently, so I'll instead use this post as a diary for me to look back on later - I go back and read this thread and all the great replies every now and again and love to see where I was at a given point in time. So, disclaimer, this ain't garage related at all and is probably more like those over-sharing Christmas letters that people write (and everyone complains about but loves to read anyways). Consider yourself warned.


I was promoted at work just before our holiday party recently, so that was good and a modest increase in the income bucket never hurts. Also, my current consulting engagement is in the town where I live, so I have had a great commute for the last couple months and will continue to have it for (hopefully) all of 2014. My year end "bonus" (more of a commission really) was as expected and the wife and I have given each other an above ground swimming pool as our only Christmas present this year (to be installed in April). It would have been nice to save the money, but our kids are at such a great age that we want to capture the fun now while we can. The kids are doing great - they have lots of friends, are polite and funny, and are doing very well in class (he's in 2nd, she's in 1st grade) too. The barn is done (finally!) and we have already used it so much. I have so many other home improvement projects on my radar but feel like this is the year where I finally learned to be ok with not getting everything done at once. I have some close buddies that will help me out when I need it, and that I can return the favor to when they need it. I'm coaching youth basketball for my son's team and enjoying that a lot. The wife and I have been jogging and focusing on dropping a few pounds each (well, for her a few.. for me, closer to 30 is probably about right). We've been married for over 12 years now! She also started working part time this year doing marketing work mostly from home - it's nice to have a little extra money coming in, she enjoys the challenge, and she still is around for the kids. I've completed a few woodworking projects this year and have some more planned for the near future. We're a busy and active.

And most importantly, we're all healthy and happy as a family together. I'll give away all the rest to keep this last one in check for every year to come.

Happy Holidays and almost New Year GJ!
 
Last edited:
To avoid these ads, REGISTER NOW!
OP
R

rieferman

Well-known member
Joined
May 18, 2009
Messages
2,586
Location
Collegeville PA (30 min west of Philly)
Well, even projects that you have to throw away are a learning experience I guess.

This weekend, I set about trying to build a cross cut sled for my table saw. The idea is that you build a platform that rides in the miter slots with a fence that is perfectly set at 90 degrees to the blade. This setup allows for perfect cross cuts by giving your piece a ride on the platform and through the blade.

The project at a high level is pretty simple. You make a couple runners to fit in the miter slots, affix a platform to the runners, affix a front and back fence to the platform set at 90 degrees to the blade.

But, the devil is in the details... I took great pains to make everything accurate and perfect. Countersunk all my screws. Measured twice cut once. Except for one step.... I forgot to joint a flat edge on the back fence. So, when I attached it, it pulled my platform ever so slightly out of alignment, causing slop / play to be introduced to my previously tight fitting runners and platform setup.

Even worse, I discovered my mistake only after making my first test cut through the entire platform... so, I couldn't simply unattach the fence and try it again.

Score one more for the scrap pile. My next attempt should turn out perfect without much effort. I learned a little bit more today.
 

slackgt

Member
Joined
Mar 18, 2011
Messages
13
Location
Boyertown,PA
Finally got caught up with the posts,lol. Thought I was getting a table saw for Christmas,but the wife wants me to pick the right one:) Been down for a few months now,knee surgery on the 5th,then back in action.Post pics of the sled when you redo it.
 
OP
R

rieferman

Well-known member
Joined
May 18, 2009
Messages
2,586
Location
Collegeville PA (30 min west of Philly)
Thanks for dropping in guys!

OK, I need some opinions on this one..

I have this great maple butcher block top that serves as my workbench top. This is mainly my assembly table, but also used for general purpose workshoppy stuff. Underneath, I just have a single shelf and the metal legs that came with this when I picked it up from an old manufacturing plant that was closing down.

Because I need more storage, and would also like some practice building some cabinets and drawers, I thought a fun project would be to replace the base with something shop built.

Besides building some new skills, my goals of the storage are:
- Must be able to clamp things to table top (need a lip all the way around)
- Would like to be able to install a woodworking vice on one end
- Power tool storage
- Frequently used glue and paint/stain/poly storage
- shop vac garage (while I have a dust collector for my stationary tools, some tasks benefit from a shop vac connection)
- lots of shallow drawers for things like squares, paper, calculators, sand paper, knives, tape measures, planes, chisels etc.)


Now, before I go ahead and do a sketchup of this (which is often nearly as time consuming as building it... but is a nice way to "make mistakes virtually" without wasting real material) I wanted to get everyone's opinions on this first rough draft.

I've also included a "today" picture so you can see the location and envision it.

THANKS!


edit: btw, on the drawings, each square is 1 inch and the drawing is done to proper scale
 

Attachments

  • new work bench front view.JPG
    new work bench front view.JPG
    145.8 KB · Views: 93
  • new work bench back view.JPG
    new work bench back view.JPG
    125.8 KB · Views: 99
  • assembly area.JPG
    assembly area.JPG
    72.8 KB · Views: 245
Last edited:
OP
R

rieferman

Well-known member
Joined
May 18, 2009
Messages
2,586
Location
Collegeville PA (30 min west of Philly)
I think I like this attempt better... It keeps the drawers that will be accessed frequently nearer to me (less bending), looks nicer, and incorporates a "jig storage" type of area.

Note: I only showed a front view this time because both sides of this design are identical. Even the shop vac garage will have cabinet doors on both sides - just one side will open to reveal shelves for paint/glue, while the other side would open to reveal the shop vac.
 

Attachments

  • new work bench take 2 front.jpg
    new work bench take 2 front.jpg
    116.3 KB · Views: 71

skippy24

Well-known member
Joined
Oct 31, 2012
Messages
546
Location
Reno, NV
rieferman,

I just spent the last few hours going over your post. Awesome job on the barn and with your woodworking projects. I have gotten in to woodworking with in the past year and can't believe how much fun it is. I'm trying to convince myself that I should start working with traditional hand tools like various hand planes, chisels, etc. First I have to convince the wife to go along with the money pit that goes along with that idea! :bounce:
 
OP
R

rieferman

Well-known member
Joined
May 18, 2009
Messages
2,586
Location
Collegeville PA (30 min west of Philly)
Hey Skippy!
Thanks for dropping by and for the nice comment.

Regarding hand tools... I can see the appeal (e.g. the "purist" aspect of working with traditional methods, less required space, more connectedness with the final project, less dust generation, less noise, less injury risk) but find that at this point in my learning curve machine based woodworking provides me a very efficient way to crank through a lot of repitions of various tasks. I tend to learn by doing, and since there are so many pieces to the woodworking puzzle, this has been an effective way for me to learn about precision, various joint types, repeatability etc. etc. Someday, I can envision the hand tool challenge being on my interest list though for the reason noted above.

As for money pit of the hobby... that's definitely an issue. I mitigated the problem by buying 100% used tools at great deals (I spent about 25% of new pricing on average). That took a lot of research to make happen, but it made a very functional shop possible for pennies on the dollar.

The other thing I do is get practice by building things that we need so that the money spent is on materials rather than a finished good (so the cost is an offset for another spend we would have budgeted). For example, we needed chairs around the fire pit... let's try to build really nice adirondack chairs. Wife needs storage in the pantry... let's figure out how to do built ins. Need a new patio set for the porch, let's try a design there too.

Another tactic that helps budget and skills is to try things with scrap lumber. I always save all sorts of construction and other materials. For example, I frequenty take standard 2x4's and rip them into other sizes to help with a test project. I've built things out of shipping pallets (be careful to remove all nails!). Leftover pine, scrap from the last project, free lumber from friends etc. If you're working with material you don't cherish, it gives you the guts to try things and improve. My existing patio table is built from pallet wood. I learned a lot, and will make a nice version when I can afford the lumber I want. The old one will be gifted to someone that wants it.
 
OP
R

rieferman

Well-known member
Joined
May 18, 2009
Messages
2,586
Location
Collegeville PA (30 min west of Philly)
Despite the continual presence of snow, ice and cold temperatures, I'm thinking about SUMMER!

After 2 years of testing out pool ownership by having a small, temporary Intex pool, we are having a 15' x 30' oval above ground pool installed this year. The kids are at a great age for it, and the wife and I both love swimming as well.

The long term plan is to enhance our existing covered porch to allow entry into the new pool, or lounging near the pool. But, that is a year or more away. In the meantime, I wanted to enable a means of hanging out by the pool.

So, I modified the adirondack chair plans to become lifeguard chair plans!

The wall of the pool is 54" tall, so I set the seat height of the new chairs at 42".

I didn't want to spend any money on this, so I took pressure treated 2x4's that I had left over from a previous project and milled them into the board thickness that I needed. I ended up having to buy a couple boards and some stain, but otherwise a free project!

This one, and its twin, will be set side by side and angled in towards each other. Then, I will connect the two with a small table that will also serve to hold the umbrella.

Still have to sand and stain.

(note: the second picture is me practicing my lifeguard-yelling-at-the-kids impression... "no running!")
 

Attachments

  • lifeguard chair.jpg
    lifeguard chair.jpg
    145.8 KB · Views: 218
  • lifeguard chair 2.jpg
    lifeguard chair 2.jpg
    143.7 KB · Views: 349

liquidh8

Well-known member
Joined
Sep 19, 2013
Messages
119
Location
Shippensburg, PA
The chairs are awesome. I have one of those metal frame INTEX pools for 4 years now, sand filter and all. Been a good pool to me so far.

I hear you on the weather too, man this *****. And we are supposed to get 2 to 4 again tonight! :(
 
OP
R

rieferman

Well-known member
Joined
May 18, 2009
Messages
2,586
Location
Collegeville PA (30 min west of Philly)
Hey thanks for the commments guys!

We started for 2 years with an Intex pool and a sand filter while the kids were learning to swim, and because that's all we had budget for at the time. We had so much fun with that little pool that we decided to go with something bigger and permanent this time. We also opted for a heater to extend the season.

At the smaller pool, we setup a small poolside sitting area and it was a huge hit. That inspired me to build the nicer version of that setup, the lifeguard chairs. As a tip to anyone newer to building stuff.... I often find that just going for an idea on the cheap, quick and easy, is a good way to figure out how to build the awesome version when funds permit. It's worked for me.

Last night, I added a connecting table between the two chairs. I built it such that the two chairs are angled slightly in towards each other. The table will be nice for snacks/drinks/sunblock etc., and I will also cut a hole to accept an umbrella for shade.

Once I get them sanded and stained, I'll snap another picture.

(Also, side note... got a bunch of PM's asking for plans... sorry to say that these came out of my mind on the fly... no plans to speak of. Sorry!)
 
OP
R

rieferman

Well-known member
Joined
May 18, 2009
Messages
2,586
Location
Collegeville PA (30 min west of Philly)
Got the chairs sanded and ready to for staining this weekend. Before hand, I dry fit them with the table to show to the wife.

The good news: She LOVES the chairs.

The other news: She wants this setup to include 4 total chairs now instead of just 2.

I built these 2 at the same time so all steps were identical... But I didn't keep notes along the way. So, I have to backwards engineer everything to figure out how to make the next 2 chairs look exactly the same.

In the end, there will be 4 chairs in a gentle arc layout with 3 tables in between. Back to work!

(I gripe, but love the work actually)
 

Attachments

  • lifeguard chairs 3.jpg
    lifeguard chairs 3.jpg
    116.7 KB · Views: 163
OP
R

rieferman

Well-known member
Joined
May 18, 2009
Messages
2,586
Location
Collegeville PA (30 min west of Philly)
In preparation of the chair building that I'm about to be doing, and because I have received a fair number of requests for plans, I decided to write plans. While I am being detailed, I'm writing the plans with the assumption that the reader has some idea how to work around a woodworking shop.

I'm about to head out to the shop to try to follow them myself. I'll take pictures as I go through it and will be able to provide the plans to anyone that requests them thereafter.

More soon!
 
OP
R

rieferman

Well-known member
Joined
May 18, 2009
Messages
2,586
Location
Collegeville PA (30 min west of Philly)
Completed the additional set of chairs and two more connecting tables yesterday. I documented the entire thing in detailed plans - PM me with your email address if you'd like the plans. Free of charge and accepting no liability.

Materials for a set of 2 chairs with a connecting table (all lumber and fasteners, not including stain or paint brushes) was $150. It took me about 6 hours to build everything this time around because I already had the spacers ready - I think add 2 hours for someone trying it the first time.

Side note: My local True Value has much lower prices on fasteners compared to Lowes/Home Depot. I thought that was surprising.
 
Last edited:

shopnut

Well-known member
Joined
Feb 22, 2006
Messages
4,237
Location
Florida
The good news: She LOVES the chairs.

The other news: She wants this setup to include 4 total chairs now instead of just 2.

How couldn't she love them. They look great rieferman!

(Edit: Sorry about the fat-finger on your name - I fixed it!)
 
Last edited:

shopnut

Well-known member
Joined
Feb 22, 2006
Messages
4,237
Location
Florida
You might notice I got just a couple things done in those 2-1/2 years :). That dang foot hasn't slowed me down much, but the pain reminds me of my stupidity every day (probably a good thing)!
 
OP
R

rieferman

Well-known member
Joined
May 18, 2009
Messages
2,586
Location
Collegeville PA (30 min west of Philly)
Ha ha, yikes, I didn't realize it was that long! To my credit, I'm a regular drop in to browse your latest pictures and accomplishments... to my discredit, I admit to skimming because I always seem to be running in a time deficit.

It's funny because the close calls (or worse) teach us so much don't they?

I still remember almost losing a hand one time. I was getting rid of an old snapper ride on mower, and we had no way to get it into the guy's truck. So we decided the two of us could just lift it in. We get half way through the lift, my back is screaming, and he loses his grip. Rather than bail, I try to save it. My left hand was in the only available open space between the mower deck and the tail gate of the truck. An inch in either direction and it would have been sheered right off. Since that day, I have a spidey sense when it comes to the proper way to lift loads, and have definitely gotten good at working smarter instead of harder.

Of course, I have lots of stories similar to that one that either ended good or not as good. But all of them have helped me to get much better at anticipating potential problems, and to listen to the "this just doesn't seem smart" voice in the back of my head. The goal being to stay away from harm all together.

But even still, sometimes it's better to be lucky than good.
 
Last edited:
OP
R

rieferman

Well-known member
Joined
May 18, 2009
Messages
2,586
Location
Collegeville PA (30 min west of Philly)
We have a wrap around porch at our farm house that was in terrible shape when we bought the house 8 years ago. At that time, I fixed it up the best that I could in what I now call “porch version 1.0”. This entailed adding railings, fixing some floor boards, and putting up screen. At the time, my tool collection consisted of a hammer, a miter saw, and the world’s most dangerous portable table saw. I may have had some screw drivers too. This was long before I had any of the skills that I’ve since developed. While porch 1.0 was terribly executed, and I cringe at its crudity, we’ve enjoyed the heck out of it.

My vision of porch 3.0 (yes, I know I skipped 2.0... we'll get to that in a minute) is very well developed at this point. I know most of the steps of the project plan, and how I’ll pull it all together. We’ll ultimately end up with a 3+ season room (we won’t quite use it full year, but will be able to get some spot winter use out of it) that’s nicely appointed and fits our lifestyle. We got some quotes and confirmed that I’ll be doing that build, but finances won’t allow it for probably about 2 more years.

Which brings us to porch 2.0 which is underway now. The goals of this project are to make the porch nice enough to function and present well enough to tide us over until porch 3.0 can become a reality. Since 3.0 will begin with a complete gut of the existing structure, we wanted to spend almost nothing to “spruce it up”. All told, the entire porch 2.0 project will total about $500. Not too shabby.

So far, I replaced a bunch of rotten floor boards and reconfigured a railing section to accept a new screen door. Once our pool, and accompanying gravel patio areas, are installed in a few weeks, I’ll add stairs with a railing to take you to the grill/cooking area, and also allow easy access to swimming or hanging out by the fire pit.

As part of step 1, we also painted the entire ceiling a very light tan color. While you can still see the nails that hold the shingles on poking through, and while we didn’t do 2 coats or aim for perfection, the overall effect of “brightening the space” is dramatic. To really take set it off, I re-ran all the existing electric to a much more useful setup. We have ample light now (on dimmer switches) and a nice double ceiling fan to help cool it off during summer.

The last steps of the porch 2.0 project are to repaint the posts and railing for a nice clean look, repair some ripped screen (using the leftovers from Mom and Dad’s project), and strip and repaint the floor boards.

So far we feel like the effort will definitely pay off when the warm weather comes, and we’ll be able to put off the sunroom build for a couple more years until finances can rebound a bit.

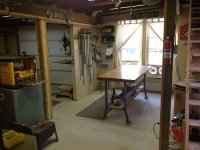
And, as always, the barn full of tools and equipment has been extremely helpful throughtout the effort so far.
 

Attachments

  • porch 2.0 step 1 a.jpg
    porch 2.0 step 1 a.jpg
    117.8 KB · Views: 192
  • porch 2.0 step 1.jpg
    porch 2.0 step 1.jpg
    123.1 KB · Views: 205
OP
R

rieferman

Well-known member
Joined
May 18, 2009
Messages
2,586
Location
Collegeville PA (30 min west of Philly)
We like the lifeguard chairs so much that we decided the fire pit area needs some (at normal chair height of course).

So, the existing hodge podge of chairs in that area will be repurposed around the yard or sold/gifted away.

Yesterday, I modified the lifeguard chair plans to make them regular chair height (but otherwise identical to the chairs you've seen already) and wrote quick plans for side tables. I ran out to True Value for fasteners, and then to Lowes for the lumber and deck stain.

All told, the bill was $210 for materials to build 6 new chairs and 3 side tables.

Tonight I'll batch cut everything, and then work through the process of shape cutting and routing throughout the week. By this weekend, I should be in the position to assemble.
 
To avoid these ads, REGISTER NOW!
Top Bottom