To avoid these ads, REGISTER NOW!

west of Philly - barn saving

onewaydave

Well-known member
Joined
Sep 28, 2009
Messages
961
Location
Down the road from Dorothy and Toto
Thanks for the thread. I've been to a couple of classes like you're taking, only shorter and more focused. Lots of fun. Take the camera. Take notes. Share. Find owwm.com if you haven't already.

Tazfink, your sig interested me. Soooo, I tallied up. My cylinder index is 56. Purty darn close. Couple more and i'll be revered. Question is by who?
 
To avoid these ads, REGISTER NOW!
OP
R

rieferman

Well-known member
Joined
May 18, 2009
Messages
2,586
Location
Collegeville PA (30 min west of Philly)
Hey guys! Thanks for the encouragement on the woodworking course. I'm actually putting certain projects on hold until I've taken the class because I know my craftsmanship will improve and it'll drive me nuts to have to re-do certain things.

But, I did do some barn work this weekend, and have a couple mini-projects lined up for Thanksgiving weekend. If any of it turns out photo worthy, you know me...

Anyways, built the top lumber storage shelf under the stairs this weekend, and finally climbed behind the shelves to get an additional (most likely unnecessary) brace in one location (what a pita that was, but it was just bugging me and bugging me). Got all my lumber nicely organized instead of haphazard mess that it was. Which will make it easier to do the next projects on my list.
 

cyclopsblown34

Well-known member
Joined
Jan 26, 2007
Messages
597
Location
Russellville, Missouri
Thanks for the thread. I've been to a couple of classes like you're taking, only shorter and more focused. Lots of fun. Take the camera. Take notes. Share. Find owwm.com if you haven't already.

Tazfink, your sig interested me. Soooo, I tallied up. My cylinder index is 56. Purty darn close. Couple more and i'll be revered. Question is by who?

Just figured mine up. I'm sick. My tally is 93. OOPS. I bet that doesn't get me revered by my wife.
 
OP
R

rieferman

Well-known member
Joined
May 18, 2009
Messages
2,586
Location
Collegeville PA (30 min west of Philly)
Got the old slider hardware down today. Just planning on cleaning it up a little with some wire brushes, lube the rollers, and then use this to cover the openings between the shop side and the garage bay side (to allow me to keep heat in the shop side.. eventually garage bay will be part of shop too, but that may be awhile away).

1st pic, all the hardware
2nd, closeup of roller
3rd, closeup of brackets that hold the track
4th, the openings where the door will be (and the new lumber shelf underneath the stairs in the background)
 

Attachments

  • barn slider and other 004.jpg
    barn slider and other 004.jpg
    141 KB · Views: 241
  • barn slider and other 005.jpg
    barn slider and other 005.jpg
    124.6 KB · Views: 227
  • barn slider and other 006.jpg
    barn slider and other 006.jpg
    146.1 KB · Views: 211
  • barn slider and other 007.jpg
    barn slider and other 007.jpg
    146.4 KB · Views: 334
OP
R

rieferman

Well-known member
Joined
May 18, 2009
Messages
2,586
Location
Collegeville PA (30 min west of Philly)
Decided to build the trap door instead of the sliding door. Used old siding that I saved to construct the door, rebuilt the edge of the door opening to support the hinges, and used some pulley and weights to assist in opening the door (the weights will be done with something better [something thin enough to be hidden behind an enclosed wall someday] later now that I've figured out exactly how heavy it needed to be)
 

Attachments

  • 2009. thanksgiving_xmas 165.jpg
    2009. thanksgiving_xmas 165.jpg
    132.3 KB · Views: 623
  • 2009. thanksgiving_xmas 161.jpg
    2009. thanksgiving_xmas 161.jpg
    144.3 KB · Views: 586
  • 2009. thanksgiving_xmas 162.jpg
    2009. thanksgiving_xmas 162.jpg
    140.5 KB · Views: 625
  • 2009. thanksgiving_xmas 164.jpg
    2009. thanksgiving_xmas 164.jpg
    144 KB · Views: 665
  • 2009. thanksgiving_xmas 163.jpg
    2009. thanksgiving_xmas 163.jpg
    135.9 KB · Views: 611
Last edited:

Bull

Super Moderator
Joined
Dec 12, 2005
Messages
16,189
Location
MA
That's trick, Bob. I like it a lot. If I am ever able to turn my old barn into something more useful, like you have done, I am going to copy this idea from you, as I have the same type of second floor access out there.
 
OP
R

rieferman

Well-known member
Joined
May 18, 2009
Messages
2,586
Location
Collegeville PA (30 min west of Philly)
Hey Bull, thanks for stopping in. The door is working great, and my workshop is holding heat a lot better now that the chimney effect has been plugged up.

---
Got a good score today. Got the following, brand new, for $10. :thumbup:

(also, scored a surface planer for FREE that I'll snap a picture of later)
 

Attachments

  • cart.jpg
    cart.jpg
    31.2 KB · Views: 122

Cobra4B

Well-known member
Joined
Feb 26, 2006
Messages
1,200
Location
Virginia Beach, VA
Wow... just found this thread and clicked through it all. Amazing work. I too got some of my grandfather's tools when he passed :beer:

I can do most of the finishing work stuff like you did, but the part that I am really impressed by is the first part... whre you leveled out the structure like that. I would have no clue where to start and/or how to setup pullied and jacks like that. What's your background in? How'd you know where to start?
 
OP
R

rieferman

Well-known member
Joined
May 18, 2009
Messages
2,586
Location
Collegeville PA (30 min west of Philly)
Hey cobra, thanks for the nice comment :)

My background is all pencil pusher stuff. Marketing, computer stuff etc. But my interests are more blue collar.

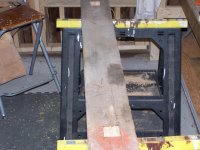
As to how I learned this stuff, a lot of talking to experts, tons and tons and tons of reading (recommend: Renovating Barns Sheds and Outbuildings by Nick Engler), had an Amish barn builder out to my place for consultation.. And just figuring it out as I went.

I was really concerned with safety throughout as knocking down a building like this one would definitely hurt you really badly. But even with all precautions, there were a few really close calls.

For example, while straightening out the building, an eye bolt started uncurling while I was cranking the come along. Had it given way, the building could have gained momentum and tipped over... or the strapping could have shot through the air and ripped my arm off.

Would I do it again?

I would only do this job again if I had the resources to store everything someplace, money to buy the right tools as needed, could have a high lift at my disposal, and if I could rip all the siding off before fixing the structure.

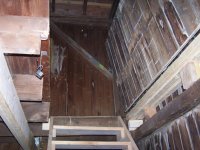
Working with a building with all the siding in place makes the job more than twice as difficult. It doesn't want to be moved from side to side, and it's much heavier for lifting up and down. Think of a simple box construction. Pretty flimsy. Add plywood skin. Sturdy for 20 years. Same principle.

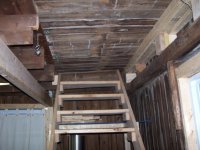
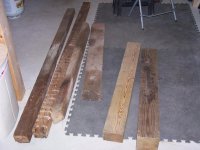
One of the biggest things I learned in the process is to think through cause and effect of a building. How does downward force work? You can visually follow a beam to a post to the ground, and diagnose areas of weakness. How does racking occur? Again, visually studying will show you where the problems are.

Another big thing I learned is that buildings are systems. It wasn't feasible to replace every piece of the barn. Nor would I have wanted to because the point was to save the building. So, there are definitely weak spots hiding throughout the building. But, there are more strong spots than weak spots. The goal is for the strong pieces to compensate for any deficiencies to the point where you have a sound structure. I've very confident that I've achieved that, and am 150% comfortable with having my wife and kids spend time in there.

sorry, that's probably so much boring information, I just love talking about this stuff, and no one usually cares about the details :)
 

TBone69

Well-known member
Joined
Sep 9, 2009
Messages
56
Location
NJ
Awesome Thread, Awesome Job!

Just spent the last hour or so reading it thru, disappointed I am at the end.

Looking forward to the updates and my search for SweetWater beer has begun :)
 
OP
R

rieferman

Well-known member
Joined
May 18, 2009
Messages
2,586
Location
Collegeville PA (30 min west of Philly)
Thanks guys!

Short work week, then off for 11 days!!!!!!!!!!!!!!!!! I have to say though, being with the kids (vs. being with coworkers) is extremely tiring.. So hopefully I'll retire to the barn quite a bit as a "man break" :)

Anyways, here's a pic of the planer that I just got for FREE from a coworker. 3 hours of use on it. 2 sets of brand new blades (which go for about $50 per set). Planer is about a $400 value. NICE.

2nd pic is an arts/crafts table I whipped together for the kids yesterday. The goal was functional and free. It's both. But the real reason I'm showing you this (since it isn't in the barn and thus doesn't really pertain to this blog) is that I did the sanding/cutting/drilling etc. on top of that rubbermaid cart above. Which stands at 33" tall. I really liked this lower height for this type of "get over top of the material" type of effort. So, I think my assembly/work table will be in the 30-33" realm, whereas my main counter top is about 38" tall - at that height, it's good for lots of things, but not great for assembly.

ha ha, that was a long winded way of saying "as everyone already knows, different heights suit different purposes within the workshop"

cheers
 

Attachments

  • DW734_1.jpg
    DW734_1.jpg
    36.1 KB · Views: 165
  • art table.jpg
    art table.jpg
    136.1 KB · Views: 289

Cobra4B

Well-known member
Joined
Feb 26, 2006
Messages
1,200
Location
Virginia Beach, VA
Anyone else start huming the theme to The Fresh Prince of Bel Air when they read this thread title?

"Fresh Prince Of Bel-Air (Theme Song)"

Now, this is a story all about how
My life got flipped-turned upside down
And I liked to take a minute
Just sit right there
I'll tell you how I became the prince of a town called Bel Air

In west Philadelphia born and raised
On the playground was where I spent most of my days
Chillin' out maxin' relaxin' all cool
And all shootin some b-ball outside of the school
When a couple of guys
Who were up to no good
Startin making trouble in my neighborhood
I got in one little fight and my mom got scared
She said 'You're movin' with your auntie and uncle in Bel Air'

I begged and pleaded with her day after day
But she packed my suite case and send me on my way
She gave me a kiss and then she gave me my ticket.
I put my walkman on and said, 'I might as well kick it'.

First class, yo this is bad
Drinking orange juice out of a champagne glass.
Is this what the people of Bel-Air Living like?
Hmmmmm this might be alright.

But wait I hear there're prissy, wine all that
Is Bel-Air the type of place they send this cool cat?
I don't think sow
I'll see when I get there
I hope they're prepared for the prince of Bel-Air

Well, the plane landed and when I came out
There was a dude who looked like a cop standing there with my name out
I ain't trying to get arrested
I just got here
I sprang with the quickness like lightening, disappeared

I whistled for a cab and when it came near
The license plate said fresh and it had dice in the mirror
If anything I can say this cab is rare
But I thought 'Now forget it' - 'Yo homes to Bel Air'

I pulled up to the house about 7 or 8
And I yelled to the cabbie 'Yo homes smell ya later'
I looked at my kingdom
I was finally there
To sit on my throne as the Prince of Bel Air
 
OP
R

rieferman

Well-known member
Joined
May 18, 2009
Messages
2,586
Location
Collegeville PA (30 min west of Philly)
merry christmas GJ, hope everyone is doing well :)

I'm at my folks' place and my dad has retrieved another box of treasures from my grandfather's place for me to have. Some cool stuff, will share it when I get back home to normal computer/camera etc. Coolest are some neat USA made hand tools from late 1940's (and a couple pieces from 1920's).
 
OP
R

rieferman

Well-known member
Joined
May 18, 2009
Messages
2,586
Location
Collegeville PA (30 min west of Philly)
Hey guys, thanks a ton for the comments. I really appreciate it when people stop in here to say hi :)

Anyhow, just finished a mini-project today. I wanted to build really beefy sawhorse to hold my mega-vice and newly aquired benchtop grinder. And to give me a place to hammer and bang on stuff in general.

Goals of the project:
- Super heavy duty / sturdy
- use stuff I had laying around
- try my hand at mortise/tenon joinery

So, I found some wood I liked and used a wire brush to clean it up a bit.

Then, I figured out where the mortise would be. I used a spade bit to drill at specific spots to clear out most of the material. I put a piece of tape on the bit to mark how far to drill each hole.

For the tenons, I used the circular saw to make the cuts. At one point it was useful to clamp the legs of the sawhorse into the vice while I made cuts.

Since my chisels ****, and since this is a thing I will beat on, I didn't worry even a little bit about perfection. Functional was the goal.

At the end, I used some 45 degree angle braces to keep everything in line. I did toe nail it all together with my framing nailer, so a little bit cheater compared to ******* it all together. But whatever, it's rock solid.

Left end is for banging stuff, middle is for grinding stuff, and other end is my vice.
 

Attachments

  • saw horse 12-31-2009 004.jpg
    saw horse 12-31-2009 004.jpg
    143.5 KB · Views: 314
  • saw horse 12-31-2009 003.jpg
    saw horse 12-31-2009 003.jpg
    141.9 KB · Views: 347
  • saw horse 12-31-2009 002.jpg
    saw horse 12-31-2009 002.jpg
    146.7 KB · Views: 289
  • saw horse 12-31-2009 001.jpg
    saw horse 12-31-2009 001.jpg
    142 KB · Views: 296
OP
R

rieferman

Well-known member
Joined
May 18, 2009
Messages
2,586
Location
Collegeville PA (30 min west of Philly)
more pictures of the process
 

Attachments

  • saw horse 12-31-2009 005.jpg
    saw horse 12-31-2009 005.jpg
    142.9 KB · Views: 398
  • saw horse 12-31-2009 006.jpg
    saw horse 12-31-2009 006.jpg
    141.7 KB · Views: 435
  • saw horse 12-31-2009 007.jpg
    saw horse 12-31-2009 007.jpg
    138.1 KB · Views: 412
  • saw horse 12-31-2009 008.jpg
    saw horse 12-31-2009 008.jpg
    145.2 KB · Views: 425
To avoid these ads, REGISTER NOW!
OP
R

rieferman

Well-known member
Joined
May 18, 2009
Messages
2,586
Location
Collegeville PA (30 min west of Philly)
(edit: two additional posts with pictures on the previous page explain the project and show the process)

and finally, the finished product (well, I still have to bolt the grinder on, but it's pretty darned close)

anyways, Happy New Years fellas. Really glad to have met you this year, and looking forward to 2010

:beer:

(edit on 12/3/13 - Oh man, I'm so embarassed that I posted this beast here. It has since been dismantled and disposed of thank god. But, I guess I did learn some basic skills while creating it... lol)
 

Attachments

  • saw horse 12-31-2009 009.jpg
    saw horse 12-31-2009 009.jpg
    141 KB · Views: 780
  • saw horse 12-31-2009 012.jpg
    saw horse 12-31-2009 012.jpg
    127.6 KB · Views: 649
  • saw horse 12-31-2009 011.jpg
    saw horse 12-31-2009 011.jpg
    135.3 KB · Views: 569
  • saw horse 12-31-2009 010.jpg
    saw horse 12-31-2009 010.jpg
    129.4 KB · Views: 681
Last edited:

Turbo1Ton

Well-known member
Joined
Dec 23, 2007
Messages
53
Nice work! I really enjoyed readying about your resurrection of the barn. I'm also enjoying the updates from time to time.

Jeff
 

DIYnotBUY

Active member
Joined
Nov 24, 2009
Messages
36
Location
Chapman, NE
alright so i think im totally gonna steal the super sawhorse idea for another use!! What do you plan to be your first real project in the semi finished shop??
 
OP
R

rieferman

Well-known member
Joined
May 18, 2009
Messages
2,586
Location
Collegeville PA (30 min west of Philly)
Cool, what's the other purpose? Maybe I'll build a second one for that purpose too! :)

My first real project... Hmmm, I'm pretty far away from doing it I think. My woodworking course isn't until April and I have to get equipment before I can do anything really cool. BUT, I'll probably start simple with some adirondak chairs, and some "washers" game sets for family and friends. Just practicing table saw usage, router work, simple joinery etc.

Long term, I'm interested in building all manner of country/rustic furniture. Farm kitchen tables, simple benches and hall tables, toy boxes, headboards.. stuff like that. Character, sturdy structure, and fair price will be my selling points. (edit: what I mean is that I'm not interested in building "fine furniture" or anything very intricate.. more of a farm house style of furniture) But this is all from the cheap seats. We'll see how well I can actually build stuff first!! :)
 

DIYnotBUY

Active member
Joined
Nov 24, 2009
Messages
36
Location
Chapman, NE
my idea is the base for a my slider compound miter saw!! I would make it a little taller of course then i have some serious thick 3 1/2''thick by 18''wide boards i got from a guy from work and i think they would make a great bolt on deck for the top of sawhorse under the saw i.e. table top also for parts and pieces tools etc. Then i would make two adjustable rollers for longer stock. I know this seems a little overkill but it will be the most used tool in my woodshop area for sure and i have a ton of 4x4s and 4x6s laying around i kinda have a sweet deal with a remodeling crew where i get to go through all there old wood they dont use and get to go through there scaps before they burn all for free i have gotten easily a couple thousand dollars in free wood that is all good with little to no imperfections!!

I have been contemplating making my first project a new crib for my soon to be born
2nd daughter but that is well alot of work and not as cost effective as i would have hoped so i think i will not be taking that endevor on in exchange for something more my level so just above homemade sawhorses and building garages and just below i dont know anything with a dovetail joint haha!!
 
OP
R

rieferman

Well-known member
Joined
May 18, 2009
Messages
2,586
Location
Collegeville PA (30 min west of Philly)
Cool idea, take pics!!

Yeah, I agree about skipping the crib project. For one, it's not cost effective. And secondly, babies are crafty at getting injured so I'd prefer something that's been tested to high heaven by a corporation. Congrats on the 2nd child on the way! I have a 4 year old boy and 2 year old girl. We're SOOO close to having her potty trained. Can't wait. :)

Thanks again for stopping in!
 
OP
R

rieferman

Well-known member
Joined
May 18, 2009
Messages
2,586
Location
Collegeville PA (30 min west of Philly)
Well, I'm almost embarassed (ok, I'm embarassed) to even post this... But in my defense, it's just a TEMPORARY (and FREE) solution.

Basically, I installed my G73 heater (actually the Farenheat version of the same thing... saved $50) yesterday. Until I get the garage bay side converted into my woodshop and insulated, it just doesn't make sense to heat both sides. But it will eventually, so I didn't want to spend money on the solution.

So, Used a scrap piece of plywood, some old windows and siding from the barn rennovation, and some cardboard, to separate one side from the other.

Ehhh, it'll work, and it was free. That's about all I can say about it. But I can never be accused of only showing you the projects that turn out good.

:)
 

Attachments

  • heater and temp door 01-2010 001.jpg
    heater and temp door 01-2010 001.jpg
    134.6 KB · Views: 740
  • heater and temp door 01-2010 002.jpg
    heater and temp door 01-2010 002.jpg
    137.9 KB · Views: 729
  • heater and temp door 01-2010 003.jpg
    heater and temp door 01-2010 003.jpg
    134.3 KB · Views: 669
  • heater and temp door 01-2010 004.jpg
    heater and temp door 01-2010 004.jpg
    143.8 KB · Views: 695

D KRAGER

Well-known member
Joined
Oct 16, 2007
Messages
581
Location
Central IL
Well, I'm almost embarassed (ok, I'm embarassed) to even post this... But in my defense, it's just a TEMPORARY (and FREE) solution.

Basically, I installed my G73 heater (actually the Farenheat version of the same thing... saved $50) yesterday. Until I get the garage bay side converted into my woodshop and insulated, it just doesn't make sense to heat both sides. But it will eventually, so I didn't want to spend money on the solution.

So, Used a scrap piece of plywood, some old windows and siding from the barn rennovation, and some cardboard, to separate one side from the other.

Ehhh, it'll work, and it was free. That's about all I can say about it. But I can never be accused of only showing you the projects that turn out good.

:)

Nothing to be embarassed about. Just being resourceful within your means. If it makes you feel any better, I had a tarp separating my space for a year so I could get a little heat in there, you gotta do what ya gotta do!
 

erda

Well-known member
Joined
Mar 5, 2007
Messages
73
Location
Great White North, Eh!
Hey, it's functional. What else really matters?

I actually really like the use of windows in the divider. I think it allows any natural light to travel through. Plus it gives you something to "look out" while contemplating your project :bounce:
 

BuickFarmer

Well-known member
Joined
Apr 5, 2006
Messages
1,415
Location
Athens, Georgia
Been taking advantage of bad weather days to catch up on my GJ reading and MAN, WHAT A PROJECT!!!! You've been able to not only maintain the character of the original building but are adding a lot of your own.

I've been considering a floor door for my barn and you've given me the inspiration to actually do it. (Right after building the new lean to, which was also inspired by another GJ article I just read. Man this site will keep one busy and out of trouble won't it!!!)

Just wanted to give a quick kudos and say thanks for all the time and dedication to showing and telling it all here for us all to enjoy. :thumbup:
 
OP
R

rieferman

Well-known member
Joined
May 18, 2009
Messages
2,586
Location
Collegeville PA (30 min west of Philly)
Uh Oh! As feared, caulking around the windows in the barn is no match for freeze/thaw cycles of a PA winter. Yesterday, it was 40+ degrees F, and pouring all day. Major leakage. Got up there in the rain with some flashing to build a temporary rain guard above each affected window, which helped. But, some insulation inside the walls definitely got wet, and I had some puddles to clean up.

In the long run, there will be metal vertical siding on the building (re-skin the building overtop of the wood siding) that will allow me to properly seal up such issues. But now I'm stressing that "long term" needs to be "as soon as I can possibly afford it" (aka, not that soon).

stresssssssssssssssssssss


(edit on 12/3/13 - I still remember this day and the stress I felt. It still stresses me out now just to think back to it! I'm so glad this is in the past.)
 
Last edited:
OP
R

rieferman

Well-known member
Joined
May 18, 2009
Messages
2,586
Location
Collegeville PA (30 min west of Philly)
Thanks Sam :)

--

Heater is up and running! 64 degrees in the shop last night within 45 minutes of starting it up. Of course, when I insulate and open up both sides to be heated, the equation will change a bit, but so far, so WARM.
 

lost

Member
Joined
Jun 17, 2008
Messages
9
Great thread!!! I saw one of the first pics with the gator (your profile pic also) in the garage opening and thought "wow that's a huge barn, look how small the gator looks!!". lol. Then I saw later that it's a kids gator. Anyways great thread, and the barn looks top knotch.
 
OP
R

rieferman

Well-known member
Joined
May 18, 2009
Messages
2,586
Location
Collegeville PA (30 min west of Philly)
Thanks guys! :)

---
Ok, this isn't really garage progress so much as it is garage research.

Although I don't want vinyl siding on the barn, I have to turn over every rock else it chews me up alive later wondering about it. So I had power windows and siding over last night. I knew they'd be professional and overpriced.

And they were both.

Just guess what they quoted me for putting siding on that building? 26x32 footprint, 2 stories.. With a couple runs of gutters...


wait for it


$30,000


Yeah, you read that right. Thirty grand. ha ha ha ha ha haaaaaa. Yeah, ok.


Even funnier... He says "Listen, if you decide right now to go with this, I can knock off $10,000. But you have to sign now".

Apparently I give off the "I was just born yesterday" vibe.
 

Riverfarm

Well-known member
Joined
Jan 23, 2010
Messages
131
I wrapped my old Tobacco barns in metal both sides and roof. While not as elegant a solution as wood, I liked it a lot better than vinal and it was much cheaper, 14K in all.

I love what you have done so far...great project, well executed!
 

Attachments

  • IMG00283.jpg
    IMG00283.jpg
    146.9 KB · Views: 430
To avoid these ads, REGISTER NOW!
Top Bottom