
You are using an out of date browser. It may not display this or other websites correctly.
You should upgrade or use an alternative browser.
You should upgrade or use an alternative browser.
west of Philly - barn saving
- Thread starter rieferman
- Start date
The dining set is done now! 5 chairs are made from mineral stained poplar like the rest of the set.
I used some large dovetail joints for some visual interest and a challenge. Makes for a strong chair too.
The back rests were contoured using power-carving techniques with angle grinder.
My son helps me a lot these days, which is such an amazing way to spend time together.
Next up, luxury dog crate for the third pup at our house... a mini-aussie shepherd.. she joins us in 3 weeks!

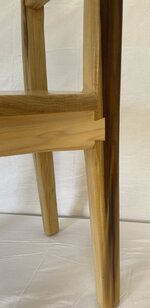


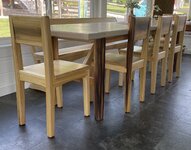
I used some large dovetail joints for some visual interest and a challenge. Makes for a strong chair too.
The back rests were contoured using power-carving techniques with angle grinder.
My son helps me a lot these days, which is such an amazing way to spend time together.
Next up, luxury dog crate for the third pup at our house... a mini-aussie shepherd.. she joins us in 3 weeks!
Max Power
Well-known member
I really love the look of this set. While some may see the color variation as a flaw I think it makes the set pop. Also, the joinery is looking great.
Thanks! In this case, the natural variation in the wood (due to the mineral staining) was intentionally highlighted for visual interest / unique look. I used some "ambrosia maple" awhile back for the same reason (beetles boring in the wood cause random streaking).
In other cases, extreme consistency is the goal.. I like walnut and cherry (and other options) for those sorts of projects.
I just got another customer order for a table, so that will be fun to figure out. And the luxury dog crate for our own use will be a good project too.
In other cases, extreme consistency is the goal.. I like walnut and cherry (and other options) for those sorts of projects.
I just got another customer order for a table, so that will be fun to figure out. And the luxury dog crate for our own use will be a good project too.
I'm unsure if I have introduced Daisy yet.. She is a mini-aussie shepherd that joined us about 2 weeks ago. She will grow to about 20-25 pounds full grown, so she's a pretty small dog... but they're fast as lightning and smart as can be, so she'll do great with Buttercup and Mabel.

Since the other two dogs share a "luxury crate" already, it only seemed fitting to build the same for Daisy. This is the result from black walnut:


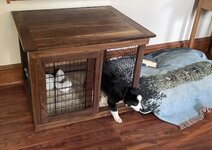
Since the other two dogs share a "luxury crate" already, it only seemed fitting to build the same for Daisy. This is the result from black walnut:
Wiz02
Well-known member
Daisy is a cutie!! I'll bet you have her spoiled.Excellent job on the "Luxury Crate".
@rieferman, Second the comments on Daisy and her new domicile, since crate even with a luxury adjective, doesn't do justice to your work. May I ask where you got her? I've been threatening my wife with a collie and a mini aussie shepherd may just be the compromise ticket.
Thanks guys! The first version of luxury crate (a double-wide with center divider... also out of walnut) for my other dogs locked me into having to repeat for the new pup. Wife is happy too
Wiz02 - we had a wonderful experience with Hayley at https://www.midatlanticminiaussies.com/ She kept us updated throughout, including a daily "puppy cam", and ran a smooth and personable operation. The puppies are raised in her own home which was important to us. This puppy is hell on wheels so far (just wants to fight the world... socks, the other dogs, shadows, ants...) but as we get her into a training rhythm it will settle in.
Wiz02 - we had a wonderful experience with Hayley at https://www.midatlanticminiaussies.com/ She kept us updated throughout, including a daily "puppy cam", and ran a smooth and personable operation. The puppies are raised in her own home which was important to us. This puppy is hell on wheels so far (just wants to fight the world... socks, the other dogs, shadows, ants...) but as we get her into a training rhythm it will settle in.
Wiz02
Well-known member
Thanks for the update. I will dedinitely check out the link. All our dogs to date have been shelter dogs, so we shall see if we buy our next one or get another shelter dog.Thanks guys! The first version of luxury crate (a double-wide with center divider... also out of walnut) for my other dogs locked me into having to repeat for the new pup. Wife is happy too
Wiz02 - we had a wonderful experience with Hayley at https://www.midatlanticminiaussies.com/ She kept us updated throughout, including a daily "puppy cam", and ran a smooth and personable operation. The puppies are raised in her own home which was important to us. This puppy is hell on wheels so far (just wants to fight the world... socks, the other dogs, shadows, ants...) but as we get her into a training rhythm it will settle in.
kj_mustang
Well-known member
Nice looking Tri Aussie pup. I have two full size sisters, a Blue Merle and a Red Bicolor. They need more work to do to keep them from chasing things that they shouldn't.
Holy cow, you're telling me! Every time I turn around she's running across the room with a sock or a hat or a spoon or another dog in her mouth. Her head seemingly spins around like she's possessd by a demon.
We're finding that training sessions are a bit like having a "job" for her... fetch seems to be of interest... Add in some walks, and lots of play time help feed her need to burn energy.
We're finding that training sessions are a bit like having a "job" for her... fetch seems to be of interest... Add in some walks, and lots of play time help feed her need to burn energy.
Last edited:


A few shop improvements lately as I am between projects.
One... With profits from recent customer work, I finally added some parallel clamps and some beefier quick clamps to my arsenal. They say you can never have too many clamps, but I'll say that I've rarely run out thus far... and feel like with the additions I should be in pretty darn good shape. I mounted these in my assembly room and used a cutoff of a butcher block underneath as a good spot to set glue bottles etc.

Then, it was time to redo my miter saw station. The original design had been mostly in-place since about 2010 and I knew I mostly liked it, so this looks similar but actually incorporates a number of key improvements.
I went with melamine this time. In the past, I had used a sacrificial top... but they last a decade anyways, so that seemed unnecessary. I embedded t-track again like last time, but set it back a little bit... rough lumber is often bowed, so having the track in this position keeps it from accidentally interfering with cuts.

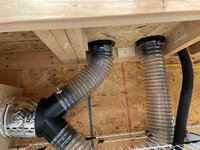
For dust collection, I have always drawn from under the saw through a centered 6" port... but when I upgraded to the Bosch Glide saw, the back "boom arm" (or whatever it's called) directly blocked the collection point. So, this time I split two 4" ports on the back left and back right, and also split for a shop vac connection to the saw-provided port. My dust collector is capable of pulling through all three at the same time, so a single blast gate enables me to open them in one shot.
Then, the dust hood... Using the scrap melamine, I made a simple, knock-down hood. It is entirely held together by three drop-in pins, so I am able to remove it in about 10-15 seconds, and reinstall just as easily. I rarely need to remove the hood as I do nearly 100% straight cuts on this saw, but having the ability to make angle cuts here in some situations is handy.
I also installed a zero clearance fence, and the base plate is being swapped for zero clearance as well. These will reduce tear out on cuts. Not critical as I rarely make finish cuts here, but nice for the instances where I do need a cleaner cut.
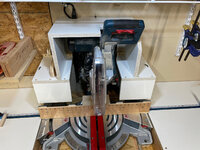
The whole thing looks like this:

One... With profits from recent customer work, I finally added some parallel clamps and some beefier quick clamps to my arsenal. They say you can never have too many clamps, but I'll say that I've rarely run out thus far... and feel like with the additions I should be in pretty darn good shape. I mounted these in my assembly room and used a cutoff of a butcher block underneath as a good spot to set glue bottles etc.
Then, it was time to redo my miter saw station. The original design had been mostly in-place since about 2010 and I knew I mostly liked it, so this looks similar but actually incorporates a number of key improvements.
I went with melamine this time. In the past, I had used a sacrificial top... but they last a decade anyways, so that seemed unnecessary. I embedded t-track again like last time, but set it back a little bit... rough lumber is often bowed, so having the track in this position keeps it from accidentally interfering with cuts.
For dust collection, I have always drawn from under the saw through a centered 6" port... but when I upgraded to the Bosch Glide saw, the back "boom arm" (or whatever it's called) directly blocked the collection point. So, this time I split two 4" ports on the back left and back right, and also split for a shop vac connection to the saw-provided port. My dust collector is capable of pulling through all three at the same time, so a single blast gate enables me to open them in one shot.
Then, the dust hood... Using the scrap melamine, I made a simple, knock-down hood. It is entirely held together by three drop-in pins, so I am able to remove it in about 10-15 seconds, and reinstall just as easily. I rarely need to remove the hood as I do nearly 100% straight cuts on this saw, but having the ability to make angle cuts here in some situations is handy.
I also installed a zero clearance fence, and the base plate is being swapped for zero clearance as well. These will reduce tear out on cuts. Not critical as I rarely make finish cuts here, but nice for the instances where I do need a cleaner cut.
The whole thing looks like this:
Finished my new and improved shop cart this weekend.
Started with a HF poly cart, added an MDF topper, a shelf, and better casters that I had on hand.

Then, I squared up some 2x4's and cut a few grooves to enable them to interlock. A couple of 3/4" dowels in the long rails reference into corresponding holes on the MDF top, and then the short rails nest and are held by gravity to create a 4 foot wide x 6 foot long support surface.


The result is a light (yet tough) and nimble cart that will be handy for holding components as I work between stations - I have always had a cart in this spot, so a more mobile version is just what I needed. AND, when the rails are installed on top, I have a great spot to use the track saw without damaging the cart itself. The rails store overhead when not in use, and assembly/disassembly takes about 30 seconds.
Started with a HF poly cart, added an MDF topper, a shelf, and better casters that I had on hand.
Then, I squared up some 2x4's and cut a few grooves to enable them to interlock. A couple of 3/4" dowels in the long rails reference into corresponding holes on the MDF top, and then the short rails nest and are held by gravity to create a 4 foot wide x 6 foot long support surface.
The result is a light (yet tough) and nimble cart that will be handy for holding components as I work between stations - I have always had a cart in this spot, so a more mobile version is just what I needed. AND, when the rails are installed on top, I have a great spot to use the track saw without damaging the cart itself. The rails store overhead when not in use, and assembly/disassembly takes about 30 seconds.
Kevkx125
Well-known member
Cool work on the cart . well thought out. I like it Bob!!
Hey Bob!
I like the dust collection rig that you made for your miter saw. Makes sense to build a compact rig that’s focused on straight cuts since those are mostly what one does.
I like how it breaks down quickly and doesn’t take up much space.
For my miter saw, I have a big Roseau dust hood. On the plus side, it ***** down dust like a champ and allows room for angle and miter and sliding cuts. But it’s huge when set up and makes a mess when you break it down. I think it would be a great solution if I could leave it up permanently, but that’s just not the case in a space limited shop.
Anyway… I like what you did with the miter saw, so I’m curious how you control the dust on your table saw. Mine’s a filthy beast and one of these days I’d like to have a clean shop!
Cheers,
Ed
PS- do you have any dust extractors hanging from the ceiling? I ordered filters to build something like a Corsi Rosenthal box fan jawn, curious what you think of those.
PPS- your repurposed cart looks great, love how you’re building stuff that breaks down quickly and stores easily. Smart!
I like the dust collection rig that you made for your miter saw. Makes sense to build a compact rig that’s focused on straight cuts since those are mostly what one does.
I like how it breaks down quickly and doesn’t take up much space.
For my miter saw, I have a big Roseau dust hood. On the plus side, it ***** down dust like a champ and allows room for angle and miter and sliding cuts. But it’s huge when set up and makes a mess when you break it down. I think it would be a great solution if I could leave it up permanently, but that’s just not the case in a space limited shop.
Anyway… I like what you did with the miter saw, so I’m curious how you control the dust on your table saw. Mine’s a filthy beast and one of these days I’d like to have a clean shop!
Cheers,
Ed
PS- do you have any dust extractors hanging from the ceiling? I ordered filters to build something like a Corsi Rosenthal box fan jawn, curious what you think of those.
PPS- your repurposed cart looks great, love how you’re building stuff that breaks down quickly and stores easily. Smart!
Hey Burger! Nice to see another "local" here!
I have a Grizzly air cleaner hanging up on my ceiling, with a Penn State Industries filter. Honestly, I don't run it near as often as I should. I had considered building my own at one point, but found them readily available on the used market so I picked this one up for about $100. The key is to place it in a location where it can create a circular air pattern around the room.
I used the cart last night on a small project (neighbor wanted a set of ******** boards so I hooked him up) and it was just what I hoped. I used the extension grid to break down a piece of Azek (used for the top of the ******** set), and then later used the cart again (without the ext. grid now) during other steps. All worked as it should
For things that you plan to break down, I find the keys to success are... It must be fast/easy to break down, therefore no (or at least very minimal) fasteners), and it must be easily stored when broken down.
I have a Grizzly air cleaner hanging up on my ceiling, with a Penn State Industries filter. Honestly, I don't run it near as often as I should. I had considered building my own at one point, but found them readily available on the used market so I picked this one up for about $100. The key is to place it in a location where it can create a circular air pattern around the room.
I used the cart last night on a small project (neighbor wanted a set of ******** boards so I hooked him up) and it was just what I hoped. I used the extension grid to break down a piece of Azek (used for the top of the ******** set), and then later used the cart again (without the ext. grid now) during other steps. All worked as it should
For things that you plan to break down, I find the keys to success are... It must be fast/easy to break down, therefore no (or at least very minimal) fasteners), and it must be easily stored when broken down.
Hey Bob,
Howdy neighbor!
On the cart, are the extension boards “sacrificial” in that you’ll use them to cut through? I have some cheap plastic sawhorses that I use like that even though I don’t think they’re supposed to be used like that.
I do have good metal sawhorses with proper 2x4’s for cutting through, but somehow they’re my “good” set so I use the cheap plastic ones instead and cut through them like I don’t care.
Ed
Howdy neighbor!
On the cart, are the extension boards “sacrificial” in that you’ll use them to cut through? I have some cheap plastic sawhorses that I use like that even though I don’t think they’re supposed to be used like that.
I do have good metal sawhorses with proper 2x4’s for cutting through, but somehow they’re my “good” set so I use the cheap plastic ones instead and cut through them like I don’t care.
Ed
Howdy neighbor! Yup! That's exactly the plan... that the extension grid can be cut into (while the cart itself is saved). I typically set my track saw so that it only cuts about 1/8" deeper than the material I'm cutting, so the grid ought to be able to handle thousands of cuts before needing any attention.... and at that point, cleaning the extension rails up at the table saw will make them good as new for another couple thousand cuts. At some point the grid will need to be rebuilt, but I expect that to be multiple years from today.
----
I had a really good day of mini-improvements in the shop, implementing a few easy / not-glamorous things that had been top of mind for awhile now. I'm gearing up for my next furniture project and like to get these ideas out of my head and into the shop so I can test during a real project.
First up, a couple old buckets/garbage cans were quickly altered with some scrap so that I have a good spot for small through long dowels. Woodworking accumulates dowels for many purposes, so this was much needed. While I was at it, I rationalized my scrap bin down to stuff that was worth keeping. Both of these very effective storage solutions show that function is greater than form on some things

Next, I gave the sink area a bit of attention. I had a cobbled together setup and found that I was constantly knocking things over etc. So, I added two shelves out of Azek (PVC-like material) and a magnet bar is a great place for brushes to dry. Again, function over form. I can't justify spending too much time making it pretty, but this will work a lot better for me.

The extension grids also needed a place to live. I wanted these near my cart, but the length of the rails limited my options for storage. I built a quick jig to enable me to drill dowel holes in my center post (about 2 steps from the cart's parking spot) at 90 degree angles and proper spacing. A dab of glue and inserting a couple 1/2" dowels made for sturdy and accessible rail storage.

While I was building the extension grid, I had taken the time to prepare 3 more sets of 4 foot long cauls. When I made the rest of my cauls, I had miscalculated the amount of lumber needed, and was 3 sets short, so I was remedying that issue. Making good cauls takes some attention to detail, so yesterday was the day to get that done. While I was at it, I applied a fresh wrap of packing tape (which repels glue drips), and used the same dowel method to make a sturdy rack for them to all live... about 1 step from my glue up table.

Lastly, all that hole drilling finally raised my annoyance with my drill press depth stop to a level where I had to fix it. The story goes... I wanted push-button thumb screws on my depth stop but could only find them in a specific thread pitch (and believe me, I looked and looked and looked). So, I bought threaded rod with that thread, and prototyped installing it on the drill press. The setup worked well except that my prototype had too much flex in it so my depth setting was a bit inaccurate / inconsistent.
Recently, I installed a TV in my daughter's bedroom and had a bunch of leftover optional parts from the wall mount kit. It was very rigid and had hole spacing that would fit my drill press situation... So I cut and filed and customized a bit.... and now have a very solid, and much more accurate, depth stop setup. Much better!

Edit: Take note in the background behind the drill press of a laminated picture on the wall... Can anyone tell me what it is?
----
I had a really good day of mini-improvements in the shop, implementing a few easy / not-glamorous things that had been top of mind for awhile now. I'm gearing up for my next furniture project and like to get these ideas out of my head and into the shop so I can test during a real project.
First up, a couple old buckets/garbage cans were quickly altered with some scrap so that I have a good spot for small through long dowels. Woodworking accumulates dowels for many purposes, so this was much needed. While I was at it, I rationalized my scrap bin down to stuff that was worth keeping. Both of these very effective storage solutions show that function is greater than form on some things
Next, I gave the sink area a bit of attention. I had a cobbled together setup and found that I was constantly knocking things over etc. So, I added two shelves out of Azek (PVC-like material) and a magnet bar is a great place for brushes to dry. Again, function over form. I can't justify spending too much time making it pretty, but this will work a lot better for me.
The extension grids also needed a place to live. I wanted these near my cart, but the length of the rails limited my options for storage. I built a quick jig to enable me to drill dowel holes in my center post (about 2 steps from the cart's parking spot) at 90 degree angles and proper spacing. A dab of glue and inserting a couple 1/2" dowels made for sturdy and accessible rail storage.
While I was building the extension grid, I had taken the time to prepare 3 more sets of 4 foot long cauls. When I made the rest of my cauls, I had miscalculated the amount of lumber needed, and was 3 sets short, so I was remedying that issue. Making good cauls takes some attention to detail, so yesterday was the day to get that done. While I was at it, I applied a fresh wrap of packing tape (which repels glue drips), and used the same dowel method to make a sturdy rack for them to all live... about 1 step from my glue up table.
Lastly, all that hole drilling finally raised my annoyance with my drill press depth stop to a level where I had to fix it. The story goes... I wanted push-button thumb screws on my depth stop but could only find them in a specific thread pitch (and believe me, I looked and looked and looked). So, I bought threaded rod with that thread, and prototyped installing it on the drill press. The setup worked well except that my prototype had too much flex in it so my depth setting was a bit inaccurate / inconsistent.
Recently, I installed a TV in my daughter's bedroom and had a bunch of leftover optional parts from the wall mount kit. It was very rigid and had hole spacing that would fit my drill press situation... So I cut and filed and customized a bit.... and now have a very solid, and much more accurate, depth stop setup. Much better!
Edit: Take note in the background behind the drill press of a laminated picture on the wall... Can anyone tell me what it is?
Oh, and Burger, I missed your question above about the table saw, so just looping back to answer that too...
I have a 6" dust pipe that splits just near my table saw into 2 smaller 4" dust pipes. One draws from the cabinet below, and the other is connected to a "Shark Guard" (basically a blade cover that accepts dust suction). The combination works well... but....
- Nibble cuts spew dust past the Shark Guard
- And, because the Shark Guard that I have attaches to the splitter, I frequently need to remove it when making really small sliver cuts, using the cross cut sled, and using the dado stack
At some point, I will look into similar solutions that aren't mounted to the splitter so that I can leave the guard in place more often.
I have a 6" dust pipe that splits just near my table saw into 2 smaller 4" dust pipes. One draws from the cabinet below, and the other is connected to a "Shark Guard" (basically a blade cover that accepts dust suction). The combination works well... but....
- Nibble cuts spew dust past the Shark Guard
- And, because the Shark Guard that I have attaches to the splitter, I frequently need to remove it when making really small sliver cuts, using the cross cut sled, and using the dado stack
At some point, I will look into similar solutions that aren't mounted to the splitter so that I can leave the guard in place more often.
ha! I *try* to win that battle with varying degrees of success!!
Cauls come in pairs (a top and bottom "twin"). The back side of each caul is flat, and the other side (the side that touches your woodworking project) is every-so-slightly crowned. Because of this crown, when you use some clamps to "pinch" the ends of the cauls together you will first get pressure in the middle (the high spot of the crown)... as you tighten the clamps further, you get even pressure across. Basically, you're clamping the cauls until they are straight along your work piece, and the crown causes an evenly distributed pressure (whereas a straight board would have tons of pressure at the edges but almost none in the middle).
Here's an example from Highland Woodworking's website. The sides of the cauls touching the board are crowned, but you can see the portion near the clamps is touching the board for nice even pressure applied.
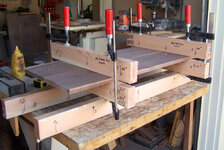
The two most common uses for cauls in my shop are:
1. Ensuring the edges of boards are nicely aligned when making a panel (like a table top). That's what you see in this sample picture. First, you use the cauls to ensure alignment, then you add clamps the other direction to pull the edges together. For me, this works better and is faster than using biscuits, dominoes, or whatever other method.
2. If I'm laminating two boards together (like stacking on on top of the other) is can be hard to apply pressure in the center of the stack... Cauls are helpful in this case too.
Does that make sense?
Cauls come in pairs (a top and bottom "twin"). The back side of each caul is flat, and the other side (the side that touches your woodworking project) is every-so-slightly crowned. Because of this crown, when you use some clamps to "pinch" the ends of the cauls together you will first get pressure in the middle (the high spot of the crown)... as you tighten the clamps further, you get even pressure across. Basically, you're clamping the cauls until they are straight along your work piece, and the crown causes an evenly distributed pressure (whereas a straight board would have tons of pressure at the edges but almost none in the middle).
Here's an example from Highland Woodworking's website. The sides of the cauls touching the board are crowned, but you can see the portion near the clamps is touching the board for nice even pressure applied.
The two most common uses for cauls in my shop are:
1. Ensuring the edges of boards are nicely aligned when making a panel (like a table top). That's what you see in this sample picture. First, you use the cauls to ensure alignment, then you add clamps the other direction to pull the edges together. For me, this works better and is faster than using biscuits, dominoes, or whatever other method.
2. If I'm laminating two boards together (like stacking on on top of the other) is can be hard to apply pressure in the center of the stack... Cauls are helpful in this case too.
Does that make sense?
Jayman17
Well-known member
The picture behind the DP looks like a screen shot of the GJ website before they made
the software update. Do I win anything?
Jay
the software update. Do I win anything?
Jay
Been really busy with life, work, puppies, and workshop projects for a bit. Nothing "finished" to post this time around, but I can share some in-progress shots.
First... Puppies!!!!!!!!!!!!!!!!
Daisy is fitting right in. Devilish at times, sweet at others. Mostly devilish. Fast, but not as fast as Mabel yet.

She has a totally different relationship with our other two dogs. She definitely treats Buttercup as more of a "mom" figure. They play a lot of tug of war, and like to steal toys from each other. It makes us really happy as Buttercup is definitely in her final chapter - a couple of seizures lately, a scare where she wouldn't eat for a couple of days (she now enjoys rice and chicken for each meal), and her hips don't allow her to move around much. But, she barks and shuffles around the yard and seems happy.

Daisy then treats Mabel as an older sibling basically. Constantly play fighting with her, and they love to chase each other around the yard. Mabel is so damn fast it's crazy, so she toys with Daisy... but Daisy's day is coming because she's getting quicker by the day.

In the shop, I have been working on a new "hutch" for our entry area. For years, we've had a cheap store-bought hutch where we store shoes in the lower bench portion, and hang coats above. Beyond being cheap and ugly, it also blocks the view of our stone wall in our living room.

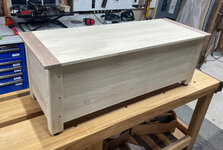
So, I'm building a nicer version as a two-piece system (to allow more wall to show) and incorporating cubbies in the lower portion, and cubbies and coat hooks above too. Here's the lower portion nearly ready for assembly:
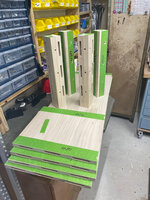
To make this more fun, I'm calling this the "breadboard hutch" because I'm using breadboard ends style of joinery all over the place. The legs of the lower portion (aka the "toybox") are joined using breadboard technique and walnut pins. The top of the toybox uses walnut breadboards and poplar pins. Etc.

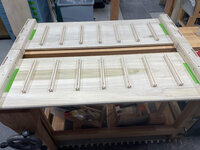
All of this will receive Danish oil with a walnut tint, so the contrast between woods will be a bit more subtle in the end.
The interior of the toybox has a series of cubbies. Each one will fit a single "sneaker" or can fit 2 smaller shoes such as my wife's dress flats. There are 16 cubbies, so a lot of footwear can be hidden away in an organized fashion.

Here's approximately what the toybox will look like when fully complete:
First... Puppies!!!!!!!!!!!!!!!!
Daisy is fitting right in. Devilish at times, sweet at others. Mostly devilish. Fast, but not as fast as Mabel yet.
She has a totally different relationship with our other two dogs. She definitely treats Buttercup as more of a "mom" figure. They play a lot of tug of war, and like to steal toys from each other. It makes us really happy as Buttercup is definitely in her final chapter - a couple of seizures lately, a scare where she wouldn't eat for a couple of days (she now enjoys rice and chicken for each meal), and her hips don't allow her to move around much. But, she barks and shuffles around the yard and seems happy.
Daisy then treats Mabel as an older sibling basically. Constantly play fighting with her, and they love to chase each other around the yard. Mabel is so damn fast it's crazy, so she toys with Daisy... but Daisy's day is coming because she's getting quicker by the day.
In the shop, I have been working on a new "hutch" for our entry area. For years, we've had a cheap store-bought hutch where we store shoes in the lower bench portion, and hang coats above. Beyond being cheap and ugly, it also blocks the view of our stone wall in our living room.
So, I'm building a nicer version as a two-piece system (to allow more wall to show) and incorporating cubbies in the lower portion, and cubbies and coat hooks above too. Here's the lower portion nearly ready for assembly:
To make this more fun, I'm calling this the "breadboard hutch" because I'm using breadboard ends style of joinery all over the place. The legs of the lower portion (aka the "toybox") are joined using breadboard technique and walnut pins. The top of the toybox uses walnut breadboards and poplar pins. Etc.
All of this will receive Danish oil with a walnut tint, so the contrast between woods will be a bit more subtle in the end.
The interior of the toybox has a series of cubbies. Each one will fit a single "sneaker" or can fit 2 smaller shoes such as my wife's dress flats. There are 16 cubbies, so a lot of footwear can be hidden away in an organized fashion.
Here's approximately what the toybox will look like when fully complete:
Attachments

Wiz02
Well-known member
Love the doggie pics and your woodworking ain't too shabby eitherBeen really busy with life, work, puppies, and workshop projects for a bit. Nothing "finished" to post this time around, but I can share some in-progress shots.
First... Puppies!!!!!!!!!!!!!!!!
Daisy is fitting right in. Devilish at times, sweet at others. Mostly devilish. Fast, but not as fast as Mabel yet.
She has a totally different relationship with our other two dogs. She definitely treats Buttercup as more of a "mom" figure. They play a lot of tug of war, and like to steal toys from each other. It makes us really happy as Buttercup is definitely in her final chapter - a couple of seizures lately, a scare where she wouldn't eat for a couple of days (she now enjoys rice and chicken for each meal), and her hips don't allow her to move around much. But, she barks and shuffles around the yard and seems happy.
Daisy then treats Mabel as an older sibling basically. Constantly play fighting with her, and they love to chase each other around the yard. Mabel is so damn fast it's crazy, so she toys with Daisy... but Daisy's day is coming because she's getting quicker by the day.
In the shop, I have been working on a new "hutch" for our entry area. For years, we've had a cheap store-bought hutch where we store shoes in the lower bench portion, and hang coats above. Beyond being cheap and ugly, it also blocks the view of our stone wall in our living room.
So, I'm building a nicer version as a two-piece system (to allow more wall to show) and incorporating cubbies in the lower portion, and cubbies and coat hooks above too. Here's the lower portion nearly ready for assembly:
To make this more fun, I'm calling this the "breadboard hutch" because I'm using breadboard ends style of joinery all over the place. The legs of the lower portion (aka the "toybox") are joined using breadboard technique and walnut pins. The top of the toybox uses walnut breadboards and poplar pins. Etc.
All of this will receive Danish oil with a walnut tint, so the contrast between woods will be a bit more subtle in the end.
The interior of the toybox has a series of cubbies. Each one will fit a single "sneaker" or can fit 2 smaller shoes such as my wife's dress flats. There are 16 cubbies, so a lot of footwear can be hidden away in an organized fashion.
Here's approximately what the toybox will look like when fully complete:
 I'd love to play with your dogs as my little rescue Shih Tzu never caught on to the concept of play.
The upper hutch has been a really fun build.
Because the bench had a top with walnut breadboard ends, I wanted to do the same theme above.... which amount to a whole lotta breadboard panel building.
With woodworking, I find it very important to keep parts square for as long as possible. Here, after lots and lots of careful alignment and cutting of grooves, I was able to shape-cut the sides and do the final dry fit last night.

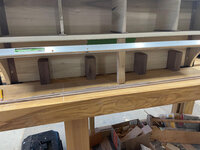
No matter how carefully you measure, it can be very difficult to know if parts will line up as you hope until the final dry fit. In this case, all of the breadboard ends throughout the piece need to line up perfectly, as well as shelf, top, back, and dividers... I was definitely a little anxious. But, success! You can see here an example of the fit (of course, not final sanded yet, so ignore the crumbs).

This upper portion of the hutch will be hanging on a stone wall as I noted earlier, which creates a strong but uneven surface... The back of the hutch is recessed so that a French cleat can hide behind the unit as I adjust against the wall.

For the coat hooks, I created some walnut blanks that will be cut to a suitable shape, and will be affixed using a sliding dovetail. Each hook will have a decorative poplar plug to mimic all the breadboard plugs that are elsewhere in the piece.

And here's a mockup of where those hooks will be approximately when all is said and done.
Final sanding and assembly, and applying finish are the final steps before the interior install (which will be a bit of an adventure)
Because the bench had a top with walnut breadboard ends, I wanted to do the same theme above.... which amount to a whole lotta breadboard panel building.
With woodworking, I find it very important to keep parts square for as long as possible. Here, after lots and lots of careful alignment and cutting of grooves, I was able to shape-cut the sides and do the final dry fit last night.
No matter how carefully you measure, it can be very difficult to know if parts will line up as you hope until the final dry fit. In this case, all of the breadboard ends throughout the piece need to line up perfectly, as well as shelf, top, back, and dividers... I was definitely a little anxious. But, success! You can see here an example of the fit (of course, not final sanded yet, so ignore the crumbs).
This upper portion of the hutch will be hanging on a stone wall as I noted earlier, which creates a strong but uneven surface... The back of the hutch is recessed so that a French cleat can hide behind the unit as I adjust against the wall.
For the coat hooks, I created some walnut blanks that will be cut to a suitable shape, and will be affixed using a sliding dovetail. Each hook will have a decorative poplar plug to mimic all the breadboard plugs that are elsewhere in the piece.
And here's a mockup of where those hooks will be approximately when all is said and done.
Final sanding and assembly, and applying finish are the final steps before the interior install (which will be a bit of an adventure)
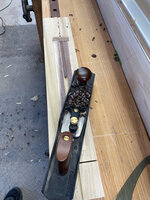
The cubbies are going to be trimmed with thin pieces of walnut as seen in the dry fit pics above. But, I thought square trim was too... err... square. So I wanted to bevel the top edge to mellow it out a bit.
I cut a notch in a scrap board, and put some thin runners on either side. The trim rests in the notch and the hand plane rides on the runners.
The parts turned out nice!
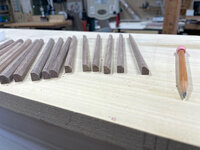
Then, it was time to turn the block blanks into actual coat hooks. I started by cutting and fitting a sliding dovetail into each block.

The poplar (blonde wood) will be affixed to the hutch with glue and fasteners, and the block will slide over top to hide the fasteners.
Each sliding dovetail was taped in place during shaping and drilling to ensure a perfect fit. Once installed, a poplar peg will go through the assembly, which (when combined with glue) will make a very strong connection. And the poplar peg will be aligned with other pegs on the piece for a nice consistent look.
Here, the pieces are just about finished.

I cut a notch in a scrap board, and put some thin runners on either side. The trim rests in the notch and the hand plane rides on the runners.
The parts turned out nice!
Then, it was time to turn the block blanks into actual coat hooks. I started by cutting and fitting a sliding dovetail into each block.
The poplar (blonde wood) will be affixed to the hutch with glue and fasteners, and the block will slide over top to hide the fasteners.
Each sliding dovetail was taped in place during shaping and drilling to ensure a perfect fit. Once installed, a poplar peg will go through the assembly, which (when combined with glue) will make a very strong connection. And the poplar peg will be aligned with other pegs on the piece for a nice consistent look.
Here, the pieces are just about finished.
Working around busy work and holiday responsibilities, my family has continued to support my "me time" in the shop. I no longer need to coach the kids or drive them about, and our home renovations are complete... so I get to spend hours in the shop on a weekly (not daily) basis now. While I wish I could slow down time with the kids, having time for my own passion is not a bad trade off.
As such, I got the most recent hutch project completed, with only applying the finish and installing it left to go. I dry fit projects many times along the way, so I'm not surprised when everything fits... but with the pressure of drying glue, final assembly is always stressful.
I also tested the install method in my shop last night, and kicked my feet out to enjoy a couple cold beverages while staring at my accomplishment
Happy Thanksgiving GJ!

As such, I got the most recent hutch project completed, with only applying the finish and installing it left to go. I dry fit projects many times along the way, so I'm not surprised when everything fits... but with the pressure of drying glue, final assembly is always stressful.
I also tested the install method in my shop last night, and kicked my feet out to enjoy a couple cold beverages while staring at my accomplishment
Happy Thanksgiving GJ!
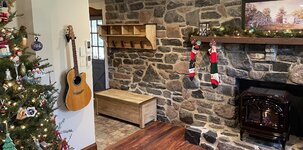


I survived the year-end "work tornado" (aka, extremely hectic & busy time) and am now into my holiday time off for the next 2 weeks. I've been burning the candle at both ends for about a full year now and really can use the time to reset.
With that, I asked two customers to delay their projects a short while so that I can focus on an easier build at our place. Sometimes I need woodworking as a deep challenge, and sometimes I need it as a "mindless" escape... this time around, I need the latter.
So... we have gate that I slapped together years ago to enable us to pass from our front door to our parking through the fence that separates those two areas. The damn gate just kept on ticking all this time, so it was never a priority... but it's just not doing our property justice, so it's time to upgrade.
With wooden exterior gates, the biggest factor you are fighting in terms of having a smooth and consistent operation is "movement". Most significantly, fence posts (even those set in concrete) will want to lean this way and that way over time, and through changes of seasons. The gate itself will want to swell and shrink too. This can lead to gates sticking sometimes, missing the latch other times, looking crooked etc. etc. etc.
The two most common solutions to deal with the post movement are to really really really beef up the strength of the posts, or implement a trellis design. I'm going with the trellis option. Basically, the trellis creates similar strength as a door frame, which greatly reduces the post movement dynamic. With a bit of creativity, the trellis can become an attractive and welcoming feature that also can support lighting or growing ivy etc.
With post movement being managed, you can then focus on the gate. Creating a design that is "sag proof" is the most important detail here. I have plans for that, and will share more as I build. Also, great hardware is worth it - we are using a lever handle set that operates from both sides (like a door knob would) and very strong / matching pin hinges. This will not only look nice, but is easy to operate and adjust if needed.
Lastly, I have long been thinking about a modular "gate decoration" idea where I could create a bunch of different house number versions for my wife (e.g., Christmas themed, Spring themed, etc.) to just swap in as she does her cycle of home decorating throughout the year. I think that will be the cherry on top for this project.
I'm using cedar for this project, and am currently leaning towards a marine-grade clear finish that would allow the wood's natural beauty to show. More research needed, but that's where my head is so far.
With that, I asked two customers to delay their projects a short while so that I can focus on an easier build at our place. Sometimes I need woodworking as a deep challenge, and sometimes I need it as a "mindless" escape... this time around, I need the latter.
So... we have gate that I slapped together years ago to enable us to pass from our front door to our parking through the fence that separates those two areas. The damn gate just kept on ticking all this time, so it was never a priority... but it's just not doing our property justice, so it's time to upgrade.
With wooden exterior gates, the biggest factor you are fighting in terms of having a smooth and consistent operation is "movement". Most significantly, fence posts (even those set in concrete) will want to lean this way and that way over time, and through changes of seasons. The gate itself will want to swell and shrink too. This can lead to gates sticking sometimes, missing the latch other times, looking crooked etc. etc. etc.
The two most common solutions to deal with the post movement are to really really really beef up the strength of the posts, or implement a trellis design. I'm going with the trellis option. Basically, the trellis creates similar strength as a door frame, which greatly reduces the post movement dynamic. With a bit of creativity, the trellis can become an attractive and welcoming feature that also can support lighting or growing ivy etc.
With post movement being managed, you can then focus on the gate. Creating a design that is "sag proof" is the most important detail here. I have plans for that, and will share more as I build. Also, great hardware is worth it - we are using a lever handle set that operates from both sides (like a door knob would) and very strong / matching pin hinges. This will not only look nice, but is easy to operate and adjust if needed.
Lastly, I have long been thinking about a modular "gate decoration" idea where I could create a bunch of different house number versions for my wife (e.g., Christmas themed, Spring themed, etc.) to just swap in as she does her cycle of home decorating throughout the year. I think that will be the cherry on top for this project.
I'm using cedar for this project, and am currently leaning towards a marine-grade clear finish that would allow the wood's natural beauty to show. More research needed, but that's where my head is so far.
Well, I spoke too soon about surviving the work tornado.... I was supposed to be on vacation last week but ended up needing to work about 1/2 day each day... continued stress and fatigue and too many hours sitting at a computer.... and then my lower back seized up, badly.
So, instead of spending my entire vacation relaxing and woodworking and going to parties, I spent the last 5 days immobilized. Unable to do anything except lay down or sit in a recliner. I could (just barely) dress myself with a lot of pain, but otherwise was down for the count.
Little by little, freedom of movement is returning, and a cycle of prednisone is helping a ton. So today I plan to get back out to the shop to continue on the project described above. I had made good progress before getting injured and am at a place where I can direct my teenagers to complete steps without having to be too involved myself. Will be good to teach a bit, and I'm thankful my situation was only this level of seriousness (so many others face far worse).
I hope everyone else's holidays are going well!!!
So, instead of spending my entire vacation relaxing and woodworking and going to parties, I spent the last 5 days immobilized. Unable to do anything except lay down or sit in a recliner. I could (just barely) dress myself with a lot of pain, but otherwise was down for the count.
Little by little, freedom of movement is returning, and a cycle of prednisone is helping a ton. So today I plan to get back out to the shop to continue on the project described above. I had made good progress before getting injured and am at a place where I can direct my teenagers to complete steps without having to be too involved myself. Will be good to teach a bit, and I'm thankful my situation was only this level of seriousness (so many others face far worse).
I hope everyone else's holidays are going well!!!
On Monday (when I wrote the post above) my kids (15 year old daughter, 17 year old son) were super helpful towards a productive day in the shop. My boy was working the festool domino a bunch, and my daughter was glueing floating tenons for me.
By Tuesday, my strength was really coming back and I was able to put in about 6 (careful) hours in the shop. I got the main panel for the gate glued up and sanded, and both sides of the trellis are complete other than some profile routing and sanding etc..
Mocked up last night to help me visualize some design decisions

Also, my neighbor is really into drones and got a new one for Christmas... Took this cool shot of our property that I thought I'd include here for fun.

By Tuesday, my strength was really coming back and I was able to put in about 6 (careful) hours in the shop. I got the main panel for the gate glued up and sanded, and both sides of the trellis are complete other than some profile routing and sanding etc..
Mocked up last night to help me visualize some design decisions
Also, my neighbor is really into drones and got a new one for Christmas... Took this cool shot of our property that I thought I'd include here for fun.
My back is so damn sore still but I was able to gingerly work to get the trellis and gate nearly complete now.
I made the top and bottom rails thicker and installed in a tongue/groove fashion over the main panel. They will be pinned like a breadboard end with cedar dowels.
Still a bit of edge routing to do and applying the finish, and we'll be ready to install outside when a nice-enough weather day comes along.
I would post the pic of this progress, but I cannot post for some reason. The one pic I want to post give me an "oops" error every time. I can post other pics following the same procedure. Any ideas?
I made the top and bottom rails thicker and installed in a tongue/groove fashion over the main panel. They will be pinned like a breadboard end with cedar dowels.
Still a bit of edge routing to do and applying the finish, and we'll be ready to install outside when a nice-enough weather day comes along.
I would post the pic of this progress, but I cannot post for some reason. The one pic I want to post give me an "oops" error every time. I can post other pics following the same procedure. Any ideas?
Wiz02
Well-known member
How large is the file size of the picture that you are trying to upload? See if you can upload a lower resolution picture that has a smaller file size.
So weird.... It's literally one specific iphone pic that won't load, but all others (using same process and same file size) are fine. Shrug.
In this pic you can see all edge work is done, gate is trimmed to final width, and the modular gate decoration system in the center of the gate has been installed. Basically, I glued/screwed the male side of a cedar sliding dovetail to the center of the gate, and then made 20+ female pieces out of PT Pine. Each season of the year, the female "blanks" can accept my wife's latest gate decoration and slide in place without need for tooling etc.
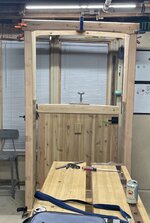
In this pic you can see all edge work is done, gate is trimmed to final width, and the modular gate decoration system in the center of the gate has been installed. Basically, I glued/screwed the male side of a cedar sliding dovetail to the center of the gate, and then made 20+ female pieces out of PT Pine. Each season of the year, the female "blanks" can accept my wife's latest gate decoration and slide in place without need for tooling etc.
Last edited:
manbike26
Well-known member
Back pain is no joke, I’m sorry you’re suffering through it. Seems like every person is unique in how it manifests. My experience was that once I could move, I felt better with small, short bouts of movement followed by short periods of rest.…Little by little, freedom of movement is returning, and a cycle of prednisone is helping a ton. So today I plan to get back out to the shop to continue on the project described above. I had made good progress before getting injured and am at a place where I can direct my teenagers to complete steps without having to be too involved myself. Will be good to teach a bit, and I'm thankful my situation was only this level of seriousness (so many others face far worse)…
Good luck. Do your physical therapy and take the meds that help you rest!
Thanks Mike! Chiro today and PT setup on a Tues/Thurs schedule for a bunch of weeks. More importantly, I'm going to start taking back at work a bit.... I've been regularly working 10-12 hour days for about the past year, often times on weekends and holidays too... and that's just not healthy for me.
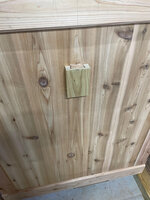
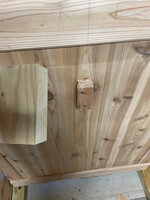
I finally got a pic to post (above) and will add a bit more about the modular gate decoration system here.
My wife likes to swap out gate signs as seasons and holidays change, and our old method was using zip ties. Unsightly and cumbersome.
The new system uses a sliding dovetail, and I have created over 20 "blanks" that we can outfit with her favorite decorations. Now she'll be able to simply swap gate signs at a moments notice.
This simple design came after lots of thinking.... Any "hook" solution suffers from gate signs "swinging" a lot and scraping the gate... French cleat designs would create "gutter" that would trap moisture and invite rot. The sliding dovetail eliminates both of these problems (and I even cut a 45 angle in the top of the dovetail to run water away.
The blanks are cut "loose" to allow for wood movement and easy installs.
I finally got a pic to post (above) and will add a bit more about the modular gate decoration system here.
My wife likes to swap out gate signs as seasons and holidays change, and our old method was using zip ties. Unsightly and cumbersome.
The new system uses a sliding dovetail, and I have created over 20 "blanks" that we can outfit with her favorite decorations. Now she'll be able to simply swap gate signs at a moments notice.
This simple design came after lots of thinking.... Any "hook" solution suffers from gate signs "swinging" a lot and scraping the gate... French cleat designs would create "gutter" that would trap moisture and invite rot. The sliding dovetail eliminates both of these problems (and I even cut a 45 angle in the top of the dovetail to run water away.
The blanks are cut "loose" to allow for wood movement and easy installs.