To avoid these ads, REGISTER NOW!

What did you do "IN" your garage today?

Outlawmws

Well-known member
Joined
Aug 9, 2011
Messages
39,314
Location
The Badlands
Helped the youngest daughter with a Cosplay Prop, messed with lantern tools I'm setting up for a dedicated set

Modified an extra T-55 socket flat so it does not bend screens when used on burner rings -Needs an E-rust bath:

Lantern tools T-55 b.jpg

Lantern tools

Sunday I bent a wrench for clearance, I had bought the other 2 Sat. and those already clear:
220 DOE Wrenches angle.jpg

I need a super short 5/15 Open end, and am deciding which to sacrifice, and how (Cut or bend...)

The 4 at the top are part of the dedicated set The tubing 5-8 actually clears the burner tube, other brands did not...

But I need to also check for all the other required sizes for the lanterns I work on the most. Not all need obstruction wrench status, or open ends...
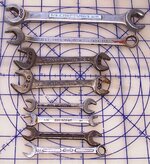
Lantern tools Wrenches.jpg
 
To avoid these ads, REGISTER NOW!

ZRX61

Well-known member
Joined
Aug 15, 2006
Messages
28,716
Location
Solar Blight Valley, SoCal
Faffed about with the bookcase I built (over a week ago) for the top of a metal cabinet in the garage, at least it's square now... Fitted the proper screws (brass, with finishing washers).
Next up is sanding & spar varnish... hopefully I can just lift it off the cabinet, but it appears to be an interference fit.
 

Bessy

Well-known member
Joined
Dec 18, 2012
Messages
995
Location
Ontario, Canada
Decided I would FINALLY mount the router lift in a makeshift table so I could use it, while still putting off building a proper router table for the shop. I don't really have the room for a full blown router table build right now, nor do I have the design worked out just yet.

With the table mounted in a piece of MDF, it was off to the races. Chucked up a couple of bits, and ran the oar lock pieces through to get myself a bit of a cove to fit around the top rail of the tin boat. Next was a cut on the table saw (which reminded me that I've still got to take care of the rusted top from all the condensation we got a couple weeks back), and a whole lot of hand tooling, sanding, filing, sanding, planing, chiseling, swearing, etc. I got it reasonably close, but ultimately I don't really love the way the oar locks are seated. Pressed in the brass bushings and called it good enough for this summer. I'll take them back to the drawing board in the fall, unless I experience a catastrophic failure this summer warranting a full blown revision. We don't row this boat anyway, unless we run into engine trouble or get in too shallow.
 

Attachments

  • Messenger_creation_3d2f5229-f027-49af-a4f2-2b668ccc0263.jpg
    Messenger_creation_3d2f5229-f027-49af-a4f2-2b668ccc0263.jpg
    121.7 KB · Views: 46
  • Messenger_creation_1c1b34d9-ba63-4761-9064-8035929103ba.jpg
    Messenger_creation_1c1b34d9-ba63-4761-9064-8035929103ba.jpg
    459.5 KB · Views: 57

rayra

Well-known member
Joined
Dec 1, 2014
Messages
4,724
Location
Escaped from Los Angeles
Also started whipping up a stand for the various tool heads for the reloading press. I have a few more in various colors inbound from an eBay vendor, cost about half as much as those direct from Dillon. Been reloading for well over 30yrs and for the longest time I got by on just 3 toolheads, leaving two set up for the primary rifle and pistol calibers I load for. And using the 3rd as an ad hoc thing, constantly swapping die sets into it. Over the middle years I added three more. And just ordered another three. Timing is kind of poor on the fresh purchase, as components have become ludicrously expensive as well as often unobtanium. But I spent a small fortune on primers recently and all the planets have aligned to where I can reload a bunch of stuff, so decided 'why not'.

All the tooling has also really increased in price the last several years, as well. Fortunately the more you get into it, the more commonalities in parts arise such that you don't have to buy a complete set of everything each time you add a caliber to your repertoire.

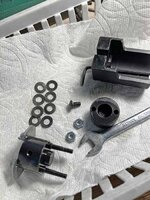
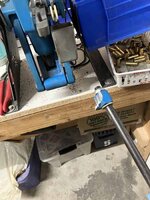
Also got some hand cramps using my 'new' case trimmer. I bought it 3yrs ago July, but it never worked. This new model has that lever on the left that conveniently opens its jaws to grasp the base of the casing. Except mine didn't. Wouldn't budge. It's a simple machine, I was sure I could figure it out, got some troubleshooting and 'how to' directions from RCBS and then promptly ignored the situation. So a couple days ago I finally broke it down and discovered it had an extra 8th cupped washer and that they were stacked wrong. Instead of acting as a spring mechanism, the stack was just a rigid spacer. So I rearranged those guts and it works fine. In the intervening years I'd been too busy to reload much anyway.
 

Attachments

  • toolhead organizer.jpg
    toolhead organizer.jpg
    69.3 KB · Views: 40
  • TrimmerII.jpg
    TrimmerII.jpg
    77.8 KB · Views: 33
  • TrimmerII guts.jpg
    TrimmerII guts.jpg
    69.6 KB · Views: 28
Last edited:

rktinc

Well-known member
Joined
Nov 25, 2007
Messages
387
Location
Midwest/USA
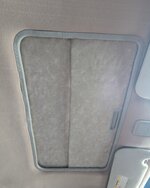
Found a stash of old beadboard to patch a bad spot in this old skylight area. got lucky with the match and fit. Should blend right in after sanding, primer, and a couple coats of paint. Ceiling is insulated and plan to build a faux skylight with LED panels. I am thinking it will create a shaft/beam of light on the floor. cool place to display a car:)

BEF193DF-4BBC-4FBA-9E45-DD96F7C1B7B8_1_105_c.jpeg

493AB8CE-AEEA-4AED-A643-15557CCFF033_1_105_c.jpeg
 

Burt Shaver

Well-known member
Joined
Dec 7, 2023
Messages
1,272
Location
Iroquois, Ontario Canada
0C75C1C8-33D0-4A9A-9194-92AA81C725DD.png
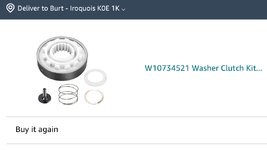
THIS COULD BE HELPFUL, our washer quit working about 8 days ago, it’s a Maytag Commercial Technology direct drive. Went online and found out how to run diagnostics, you press temperature, then soil level, then spin speed in a row 3 times over as quick as possible while there are no lights on the washer but plugged in of course. It three code F7 E5. Searched online and possible causes where bad connection room to the control board, bad control board, clutch and slider assembly, but the most likely was clutch or slider assembly. Since my control panel seemed to be working correctly I changed the clutch for about 57.00, after I got the new clutch in it was still throwing code F7 E5 but I was able to clear the code by hitting start twice and then power or by just unplugging the machine for a minute, I didn’t know for sure what I was doing. So it worked for about 3 loads and then stopped again, back online trying to find how to diagnose each component individually from the control panel, no real luck, called Maytag and asked for the service manual that would show how to run diagnostics from the control panel, I know it exists because I seen I guy online that had a paper but I couldn’t quite make it out, The lady at Maytag said she knew what I meant but didn’t have it, she asked what code it was throwing and she said it was the control panel which ironically is the most expensive part on the whole machine, about half the cost of the whole washer, she also said if I was buying a new machine to call in and get 15 percent off. Lol. My point is nowhere online did any of the videos go directly to the control panel, I believe Maytag was saying this for a sale. So I ordered the other most common part tha to throws this code which is the slider assembly for 30.00 which I should mention the splines that’s the slider slides on, on mine where pretty rusty so I was hopeful. Changed it this morning, cleaned up the spline really well and put it together. About 40 minutes total getting tools, repairing. Plugged it in, starter working right away, no code and washing as I write. DONT TRUST MAYTAG (WHIRLPOOL). I didn’t take any pics while doing the repair but posted a pic of the slider I ordered. If anyone ever reads this, reach out if you have any questions, could save you 1000.00 for a new machine
 

SaabN

Member
Joined
Dec 14, 2023
Messages
6
Lately, everything has been about the garden. Spent all Spring building raised beds and moving dirt around to get set up at the new house, and now my wife is on me about building trellises. Hopefully I'll get that finished tonight, so I'll have the weekend to piddle around in the shop.
 

Olsa Tools

Well-known member
Joined
Jun 19, 2017
Messages
84
Location
Edmonton, Alberta, Canada
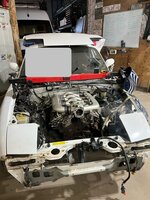
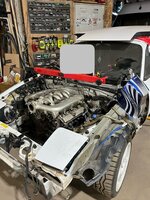
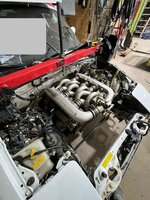
This is my NA6 Miata. After turboing the stock 1.6L motor in there, I learned a lot and decided to tackle a bit of a bigger project with it. That's when I decided that I wanted to rip everything out and drop a v6 SHO in there!

For the transmission, I'm using a Mazda M5OD-R1 since it bolts directly onto the SHO without the need for an adapter.

Rear end is a Ford 8.8 IRS. We're gonna have to figure some stuff out to get it working with the stock knuckle... open to any ideas you might have too.

Here are a few pics of the mockup. Motor and transmission alignment/placement has been figured out.

Now I just have to:
  • Finish fabbing the transmission mount/crossmember and bolt it up
  • Start fabbing the motor mounts
  • Start fabbing the custom low profile oil pan
  • Start fabbing both exhaust manifolds
  • Figure out all the electrical components
  • Get the car started!!

There's a high likelihood that all this won't fit under the stock hood... so what do you guys think? Should I do a clean cutout on the hood or make a hood scoop?

I also had to delete the powerplant frame to make room for the new transmission. Not sure how much it'll affect handling, but I know that there's gonna be some loss in chassis rigidity. Do you think this'll be a big issue? I plan on making this a street legal track car.

Also curious if you have any insights on what other "small things" I should be prepared for during the process?

- Fernand @ Olsa Tools
 

Attachments

  • Facebook photo.jpg
    Facebook photo.jpg
    750.2 KB · Views: 45
  • Facebook photo (2).jpg
    Facebook photo (2).jpg
    809.6 KB · Views: 48
  • Facebook photo (1).jpg
    Facebook photo (1).jpg
    686 KB · Views: 60

rd65

Well-known member
Joined
Sep 29, 2017
Messages
2,819
Location
Granite Falls, WA
This is my NA6 Miata. After turboing the stock 1.6L motor in there, I learned a lot and decided to tackle a bit of a bigger project with it. That's when I decided that I wanted to rip everything out and drop a v6 SHO in there!

For the transmission, I'm using a Mazda M5OD-R1 since it bolts directly onto the SHO without the need for an adapter.

Rear end is a Ford 8.8 IRS. We're gonna have to figure some stuff out to get it working with the stock knuckle... open to any ideas you might have too.

Here are a few pics of the mockup. Motor and transmission alignment/placement has been figured out.

Now I just have to:
  • Finish fabbing the transmission mount/crossmember and bolt it up
  • Start fabbing the motor mounts
  • Start fabbing the custom low profile oil pan
  • Start fabbing both exhaust manifolds
  • Figure out all the electrical components
  • Get the car started!!

There's a high likelihood that all this won't fit under the stock hood... so what do you guys think? Should I do a clean cutout on the hood or make a hood scoop?

I also had to delete the powerplant frame to make room for the new transmission. Not sure how much it'll affect handling, but I know that there's gonna be some loss in chassis rigidity. Do you think this'll be a big issue? I plan on making this a street legal track car.

Also curious if you have any insights on what other "small things" I should be prepared for during the process?

- Fernand @ Olsa Tools
What will be happening to the NA6 ECU? I am assuming you were using a stand alone of some type. I have a FM turbo in my 91 using their piggyback box but am wanting to add boost to the current 8psi. In order to add more boost I will need injectors and aftermarket ECU. I am limited to 200-220 rwhp by the stock rear end.
Have you researched any of the v8 builds that are out there? They all appear to fit under the hood. Monster Miata offers a v8 kit, there might be some pics on their site that could help.
 

Olsa Tools

Well-known member
Joined
Jun 19, 2017
Messages
84
Location
Edmonton, Alberta, Canada
What will be happening to the NA6 ECU? I am assuming you were using a stand alone of some type. I have a FM turbo in my 91 using their piggyback box but am wanting to add boost to the current 8psi. In order to add more boost I will need injectors and aftermarket ECU. I am limited to 200-220 rwhp by the stock rear end.
Have you researched any of the v8 builds that are out there? They all appear to fit under the hood. Monster Miata offers a v8 kit, there might be some pics on their site that could help.

The NA6 ECU, I sold along with the old motor and turbo/components. When I had my NA6 motor turboed, I just used SpeedyEFI's standalone ECU. Pretty solid, but it had some features missing with its integration with TunerStudio. I can't remember exactly what was missing, but it was some neat features for ignition. A buddy of mine is actually working on designing his own ECU; they're finalizing the PCB design right now, but that custom standalone will be a beast! It will even have Bluetooth tuning capability which I'm super stoked on.

Injectors are really important, especially if you want to crank more boost out of your setup. If you want any recommendations, I'm happy to help out!

I have researched the v8 builds out there. Amazing what some guys did to make everything fit. Some of them even chopped off the entire front end and rebuilt the subframe with a tubular setup for more clearance. I want to avoid that as much as possible (too much work!!!!) so what we're planning on doing is fabbing up a custom low-profile oil pan. Really hoping that it fits under the hood with this custom oil pan. The SHO has been tough to work with as the block is super tall with the whole intake at the top of it. We might even get rid of the original throttle body and make a custom electronic dual throttle body setup on both sides to save some front-end clearance with the original throttle body at the front... but we'll see! Overall, it's been a really fun project to work on.
 

rlwhitetr3b

Well-known member
Joined
Aug 26, 2008
Messages
683
Location
East Central Illinois
I pulled out an 8 foot fluorescent lamp from above my workbench yesterday. It was installed before I moved in. But I found I cannot buy 8' bulbs at the local hardware store. So, since I already had a 4 foot lamp in the shed that I brought with me when I moved in, I decided to put that on up in place of the 8 footer.
Went to the hardware store and they didn't have any 4' fluorescent bulbs with two prongs in stock (but they normally do). But they did have "auto-adapt" LEDs. I though why not? The box says they work in all fixtures. And I heard they were pretty bright. Well, they are bright. Which I like. But they only run for 30 seconds then turn off. :cry:

So now I have to go get my $28 back.

Also started weed whacking the new weeds in the gaps between the pavers on the patio. After covering about 400 square feet of patio and re-winding the tiny spool with super thin whacker wire once - then having it jam not once but four times in the span of 45 minutes - I decided I was done with the cheezie electric weed whacker. That is going to the dump today because it is no longer in one piece. Now I need to find a gas whacker which can take heavy gauge wire so I don't have to rewind the thing every 10 minutes. Besides that, I was already frustrated because I've always had trouble stringing together every extension cord I own in order to cover the entire yard. Now that I've moved here my yard is even bigger. So this makes sense in a way.
I have Troy Bllt 4 cycle string strimmer that I really like. I use Grass Gator .105 which seems to feed on its own and does the job on even the big weeds in our yard
 
To avoid these ads, REGISTER NOW!

rayra

Well-known member
Joined
Dec 1, 2014
Messages
4,724
Location
Escaped from Los Angeles
Welp I managed to bust my reloading press yesterday. Talked to Dillon this morning and a replacement crank / subframe will be in the mail shortly. 36yrs, well over 100k rounds. Their "No BS Guarantee" is just that. A few worn or broken subcomponents over the decades all replaced without additional cost.
 

Attachments

  • press broke 1.jpg
    press broke 1.jpg
    68.3 KB · Views: 50

Matt018888

Well-known member
Joined
Sep 29, 2021
Messages
284
Location
Shelby TWP Michigan
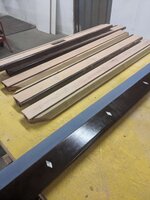
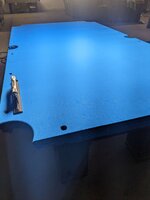
Finally finished re-finishing my cherry pool table. Re leveled, waxed seems, stripped down and refinished rails even milled a new one. New bumpers and felt. Ready to play tomorrow night.
 

Attachments

  • Compress_20240517_231054_4015.jpg
    Compress_20240517_231054_4015.jpg
    234.4 KB · Views: 42
  • Compress_20240517_231054_4281.jpg
    Compress_20240517_231054_4281.jpg
    191.1 KB · Views: 38
  • Compress_20240517_231054_4498.jpg
    Compress_20240517_231054_4498.jpg
    125.6 KB · Views: 38
  • Compress_20240517_231054_4727.jpg
    Compress_20240517_231054_4727.jpg
    173.8 KB · Views: 39
  • Compress_20240517_231054_4986.jpg
    Compress_20240517_231054_4986.jpg
    275.6 KB · Views: 43
  • Compress_20240517_231053_3023.jpg
    Compress_20240517_231053_3023.jpg
    161.4 KB · Views: 41

Black300zx

Well-known member
Joined
Apr 8, 2019
Messages
782
Location
Elkton, Md
My Z has been up on jackstands for the past 2 weeks while the wheels are off getting powdercoated and new tires installed. A few years ago I refreshed the suspension and bought new wheel studs for all 4 corners, but only installed the rears. Staring at it up on jackstands earlier this week, I had the following conversation w/ myself:
I should install those front wheel studs while it's apart. On second thought, instead of knocking them out and back in while fighting w/ knuckle clearance, maybe I should just pull the hubs, press the studs out and back in, and replace the 205k mile wheel bearings while I'm in there. On third thought, maybe I should add rear wheel bearings to the RockAuto order while I'm at it and replace them too...
So I spend the day giving my 12T HF press and Bauer impact a workout. R&R'd the rears and got the suspension and brakes put back together. Remove the front knuckles, pressed out the outer race and wheel studs. Tomorrow the inner front races get pressed out and the front goes back together
 

Attachments

  • 20240518_110550-1200.jpg
    20240518_110550-1200.jpg
    97.9 KB · Views: 16
  • 20240518_122206-1200.jpg
    20240518_122206-1200.jpg
    163.6 KB · Views: 17
  • 20240518_153609-1200.jpg
    20240518_153609-1200.jpg
    145.5 KB · Views: 17
  • 20240518_162941-1200.jpg
    20240518_162941-1200.jpg
    188 KB · Views: 17
  • 20240518_163738-1200.jpg
    20240518_163738-1200.jpg
    204.7 KB · Views: 23
Last edited:

Jure

Well-known member
Joined
Jun 1, 2011
Messages
1,780
Location
Croatia
I thought you grew out of mopeds? :sneaky:
Nooo,its a keeper,it was thrown in the corner for years,father was bored and fixed it. Full engine rebuild,and a bunch of new parts. Damn Roger i TRASHED that poor thing lol. Father rides it on a daily base,with this setup it tops at 108 km/h has 5 gears and its two stroke. It aint fast,but it pops straight to balance point in 5th at 80 kmh,great little bike for around the village. Went with k2 1000 for a coffee this morning and rode that 2 stroke for hours down the river lol. I missed the sound and smell of 2t.😁
 

Old Man Roger

Well-known member
Joined
Apr 6, 2017
Messages
17,767
Location
Palm Coast Florida
Nooo,its a keeper,it was thrown in the corner for years,father was bored and fixed it. Full engine rebuild,and a bunch of new parts. Damn Roger i TRASHED that poor thing lol. Father rides it on a daily base,with this setup it tops at 108 km/h has 5 gears and its two stroke. It aint fast,but it pops straight to balance point in 5th at 80 kmh,great little bike for around the village. Went with k2 1000 for a coffee this morning and rode that 2 stroke for hours down the river lol. I missed the sound and smell of 2t.😁
I know you loved that thing..lol
 
To avoid these ads, REGISTER NOW!
Top Bottom