To avoid these ads, REGISTER NOW!

What is this wood plane for?

Cleave

Well-known member
Joined
Jul 11, 2018
Messages
353
Location
Back Porch
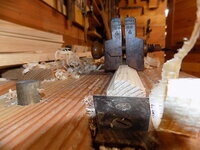
Here's an odd wood plane I picked up recently at an estate sale for $10,
Looks like you plane the edge of a board and it cuts a sloped feature on one side and a flat shelf on the other side?
Maybe for some style kinda like tongue and groove wall paneling?
You can adjust it to the width of your board with the wooden screws.
This one needs some work - one of the screws is snapped, I need to free it, drill in and glue it with a piece of steel in it, then tune up the rest.
Anybody know what this was for?

DSCN7450.JPGDSCN7453.JPG
DSCN7452.JPG
DSCN7454.JPG
 
To avoid these ads, REGISTER NOW!

RTM

Well-known member
Joined
May 13, 2019
Messages
13,164
Location
SF Bay Area
For Tongue and groove joints, cuts the tongue side. We used to call that angled edge (right in your 4th pic) something specific, but I forget what.

Top edge of this pic
1665182503910.png

If you can get a better image of the name on the last pic, I can see if I can get the real #133 plane name
 
OP
C

Cleave

Well-known member
Joined
Jul 11, 2018
Messages
353
Location
Back Porch
Yeah, that's what I was thinking more or less. Then you adjust the wooden screws to get the tongue the right size I guess.
The name is hard to read in real life but I'll try to figure it out.
It is located on N 03 Main St, St Louis...
 

RTM

Well-known member
Joined
May 13, 2019
Messages
13,164
Location
SF Bay Area
Looks like Shapleigh Day & Co. a hardware dealer who marked tools made by others. They worked 1847- 1863, so the list of potential makers might be pretty slim.

Doesn’t look like a Sandusky 133 which is just a plow.

Sargent didn’t have any numbered that low.

Chapin was a nosing or step plane.

Looks like power wagon may be on it. Ohio tools made a 133 Sash Plane with screw arms self-regulating dovetailed boxed Gothic or Ogee profiles.

No pic of the plane in the c 1910 catalog, but here is a pic of the catalog entry.

1665191657867.jpeg
 
OP
C

Cleave

Well-known member
Joined
Jul 11, 2018
Messages
353
Location
Back Porch
Great info RTM, so you think its 1847-1863 just off the Shapleigh Day and Co marking?

Now, I looked into that broken screw a bit - the side with the knob is captive. I'd have to drill, pin, and glue it right there in the plane and don't want to risk getting squeeze out where it shouldn't go. Any ideas on how to get the knob off, to do this? Or would it be reasonable to get a replacement screw somewhere? Its about 3/4" 7 tip.
There is a pressed in insert that determines the shape, like they could bulk produce the main body then just put in an insert and irons to order.
 
OP
C

Cleave

Well-known member
Joined
Jul 11, 2018
Messages
353
Location
Back Porch
chrome-extension://efaidnbmnnnibpcajpcglclefindmkaj/http://www.thckk.org/history/shapleigh-history.pdf

Here's a history of the Shapleigh company, looks like the "Shapleigh Day and Co" was only from 1847 - 1863, that makes it my "oldest known tool" beating out my Fischer Norris 60 lb anvil marked 1887.

Thanks all, hopefully I can get it going again.
 
OP
C

Cleave

Well-known member
Joined
Jul 11, 2018
Messages
353
Location
Back Porch
However, I have another contender from the same estate sale, a jointer marked D.I. Washburn at each end. Maybe related to Fox and Washburn? I can get pictures tonight if I remember.
 

RTM

Well-known member
Joined
May 13, 2019
Messages
13,164
Location
SF Bay Area
My Dating of Shapleigh Day and Co comes from DAT, the Directory of American Toolmakers (Pre-1900). Published in 1999 or so, there is a lot more data being found that might extend or contract their ranges a bit.

Pages like this, and others seem to support those dates, but they could all be reading off the wrong initial sources, and just repeating the errors.

But literature like this, almost contemporaneous, seem to agree with those dates.


IF a tool is marked more than once, I figure its an owner's mark, not a maker's mark.

oops, you are searching faster than I am typing
 
OP
C

Cleave

Well-known member
Joined
Jul 11, 2018
Messages
353
Location
Back Porch
Here's the plan for repairing that broken wooden screw.

Splice with two holes drilled into each side, with a nipped off framing nail into each side. I made a pair of custom "dowel centers" from another nail to transfer the hole locations to the other side.
The drilled holes are just a couple thousanths undersize for a slight interference fit with the steel pins.

Then glue the pins in one side, make a little moat of beeswax around the other side to protect from any glue squeeze, and carefully glue the pins into the other side (the side captive in the plane body).

Any recommends on glue type? I have thin and medium CA glue, but don't want it to set up before getting it all together. Or there's JB weld. I don't know if JB will wick into the wood fibers like the thin CA would, but it wouldn't overflow out and glue together what shouldn't be glued.

Any other tips for this procedure?
 
Last edited:

RTM

Well-known member
Joined
May 13, 2019
Messages
13,164
Location
SF Bay Area
I would use Hide Glue. Its reversible, and if your repair fails, you can easily clean out the residue. JB Weld will be a bear to remove. CA glue is very brittle, I would not use it for anything wooden besides gap filling. The slightest pressure laterally on the screw will crack it.

I also would not use good old PVA wood glue. While claimed to be stronger than the wood, if you get too much pressure, you will crack the wood in your screw further, and possibly destroy it.

The hide glue will let go somewhere between the CA and the PVA. If you want to be really particular, use Hot Hide Glue (melt it yourself from beads) for a true period correct repair.
 
To avoid these ads, REGISTER NOW!
OP
C

Cleave

Well-known member
Joined
Jul 11, 2018
Messages
353
Location
Back Porch
Good idea, I wondered about hide glue but haven't ever tried it. I did want it once though on a DIY piano repair, but I got away with Titebond on that.
Any recommends on a good general purpose hide glue? Liquid or hot are both options.
And how does hide glue grab onto steel?
 

RTM

Well-known member
Joined
May 13, 2019
Messages
13,164
Location
SF Bay Area
Easiest accessible is Titebond Hide Glue
1665708668439.png

Old Brown Glue is supposedly better, use that on my plane repairs, keep it in the fridge for longevity
1665708723106.png

For the melt your own, I think I have this stuff.

And no idea on wood to metal w hide glue, but I imagine not the best. Where are you gluing metal, I thought it was the wooden screw arm that was the problem?
 
OP
C

Cleave

Well-known member
Joined
Jul 11, 2018
Messages
353
Location
Back Porch
I drilled each side of the broken wooden screw, and have a nipped off framing nail to go in each hole.
 

Farmer J.

Well-known member
Joined
Sep 18, 2016
Messages
1,995
Location
UK, Cornwall/Hertfordshire.
I drilled each side of the broken wooden screw, and have a nipped off framing nail to go in each hole.
Please show us how it works out. I'm enjoying this thread, even though I don't collect wood planes it's interesting to see as recently completed a restoration/repair job on the original 1820's windows in a farm house. My joiner friend matched the original profiles by grinding special cutters for his router. Saved all the old timber we could and jointed in new sections but did have to make several completely new sashes.
 

RTM

Well-known member
Joined
May 13, 2019
Messages
13,164
Location
SF Bay Area
I drilled each side of the broken wooden screw, and have a nipped off framing nail to go in each hole.
so basically just holding the nail in place? May work. I was worried about a structural support, which I fear won't work.
 
OP
C

Cleave

Well-known member
Joined
Jul 11, 2018
Messages
353
Location
Back Porch
Now, I need to clean the female threads out too as they're sticky - any good cleaners for that? I may also need to make a custom internal scraper to reach in there and clean them out.
 

RTM

Well-known member
Joined
May 13, 2019
Messages
13,164
Location
SF Bay Area
Sticky often means someone put beeswax there, mineral spirits will remove that. A good v groove scraper made out of a scrap of metal will help, a soft putty knife, even a mondo toothbrush with plastic bristles will help.

Only use paraffin wax.
 
OP
C

Cleave

Well-known member
Joined
Jul 11, 2018
Messages
353
Location
Back Porch
My guess is the screw broke in the first place because the threads got sticky. There's holes drilled in the knobs like the guy needed more leverage, drilled a hole, and stuck a bar in it.
 
OP
C

Cleave

Well-known member
Joined
Jul 11, 2018
Messages
353
Location
Back Porch
Here's my thread chaser, I took a dowel down to a tight fit with a knife and the tenon cutter, then filed a nail to the right cutting shape. Then drill a tight hole for the nail, tap it to the right length, and turn it through like a tap. It cleaned the threads out nicely.
The screws still got tight at the far end of the hole. I think there's been enough wood movement that the hole isn't straight, and the screw isn't straight, and by the end of the hole it binds up. So I drilled in from the outside with a 3/4" forstner bit, to cut the last couple threads off. Now the screw runs more smoothly.
Next is finishing the broken screw splice.

DSCN7525.JPG
 
OP
C

Cleave

Well-known member
Joined
Jul 11, 2018
Messages
353
Location
Back Porch
The plane is finally working!
I found the screw knobs are retained using a wedge key. The only way to get it out is, drill a tiny hole in the wedge, super glue in some wire, and pull it out with the wire.
Then I could superglue the broken screw back together. and clean it up. The screw isn't straight, partly from age, partly from my glue prep/nail splice procedure. But it does work.

I had thought this would be for a tongue and groove with the outer face angled, for wall paneling. But this profile doesn't seem to work that way. Any ideas what this was for?
 

Attachments

  • DSCN7526.JPG
    DSCN7526.JPG
    951.9 KB · Views: 8
  • DSCN7533.JPG
    DSCN7533.JPG
    963 KB · Views: 8
  • DSCN7532.JPG
    DSCN7532.JPG
    983.5 KB · Views: 9

Farmer J.

Well-known member
Joined
Sep 18, 2016
Messages
1,995
Location
UK, Cornwall/Hertfordshire.
Clever and neat repair, well done.
As said by RTM above, I think this plane is for making style glazed window sashes. Bottom right catalogue illustration in post #6. The glass goes in the rebate on the left side in your second pic, and is held in place with linseed oil putty. The bevel (to the right in your picture) is inside the building. With this adjustable plane one could make a glazing bar or the glazed edge of a frame of a window sash any thickness, as required for strength or dictated by the window design.
 
OP
C

Cleave

Well-known member
Joined
Jul 11, 2018
Messages
353
Location
Back Porch
Very cool. Thanks for referring me back to what was already stated...
So is another piece of wood nailed on to hold the glass in?

Here's a great blog post on the topic,

 
Last edited:

Farmer J.

Well-known member
Joined
Sep 18, 2016
Messages
1,995
Location
UK, Cornwall/Hertfordshire.
So is another piece of wood nailed on to hold the glass in?
That's an excellent blog post link, interesting reading.

No, a strip of wood is not used to hold the glass on the old traditional windows. Sometimes a few small nails ('glazing brads') are put in to stop the glass falling out whilst the putty is applied, but it's the bead of putty which holds and seals the glass.
The putty becomes hard and cracks after about two hundred years, so it's a delicate job to dig it out and re putty it without breaking the historic thin brittle glass..
Here's a link to some specialist chaps who do it:
 
To avoid these ads, REGISTER NOW!
Top Bottom