

You are using an out of date browser. It may not display this or other websites correctly.
You should upgrade or use an alternative browser.
You should upgrade or use an alternative browser.
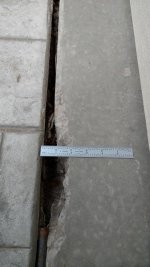
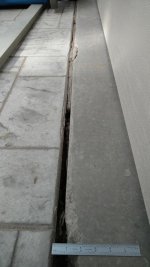
What to fill gap between driveway and slab with?
- Thread starter slowtwitch73
- Start date
tinmanwpk
Well-known member
Sikaflex
Kaizen
Well-known member
Mortar with silkaflex for top two inches let mortar be rough so silkaflex grabs it
Sent from my iPhone using Garage Journal
Sent from my iPhone using Garage Journal
OP
slowtwitch73
Well-known member
Alright.. Sika it is again. Thanks guys.
ambenz
Well-known member
Asphalt saturated fiber board...clean out the crack as good as possible and hammer it into position.... see...
Quikrete 1/2" Asphalt Expansion Joint
Model Number: 1831223 Menards® SKU: 1831223

Quikrete 1/2" Asphalt Expansion Joint
Model Number: 1831223 Menards® SKU: 1831223
Last edited:
OP
slowtwitch73
Well-known member

tinmanwpk
Well-known member
Always wanted to visit Sitka. Maybe one day.
I know a good bar or two there. Let me know!
ford33
Well-known member
Sikaflex.
Make sure you read installation directions. You want a 2 point bond meaning adhere to sides only and not the bottom of the gap. Use backer rod or sand at the bottom of the gap. I have seen installations where a light dusting of sand is applied after tooling the surface of Sikaflex. This dulls the shiny cured surface and helps the crack blend into the surrounding concrete surface.
Sikaflex installation instructions:
SITE PREP & PROCEDURE
1. Make sure that all surfaces are clean, structurally sound, dry and free from grease. Remove all
dirt, oil, moisture,and/or old sealant.
2. If joint or crack depth exceeds 1/2”, use Sika Backer Rod to control joint depth. For moving joints, use a backer rod to avoid three-point bonding. widen crack using a chisel and hammer to at least 1/4” and use wire brush to clean out debris.
3. With a utility knife, cut the tip of the nozzle at a 45° angle to the desired bead size, then puncture the seal inside of the nozzle and place the cartridge into a caulking gun.
4. Wearing protective gloves and safety goggles, hold the gun at a 45° angle and squeeze the gun handle to start the flow of sealant. Apply sealant in one continuous application to prevent any air
entrapment. One 10.1 oz. cartridge will yield 24 linear feet of sealant in a 1/4” bead.
5. Gun sealant into joint and dry tool as necessary.
6. Clean up all tools, spills, and excess material with clean rags after use. If necessary, use a paint thinner or other approved solvent, such as acetone, following the solvent manufacturer’s precautions.
Make sure you read installation directions. You want a 2 point bond meaning adhere to sides only and not the bottom of the gap. Use backer rod or sand at the bottom of the gap. I have seen installations where a light dusting of sand is applied after tooling the surface of Sikaflex. This dulls the shiny cured surface and helps the crack blend into the surrounding concrete surface.
Sikaflex installation instructions:
SITE PREP & PROCEDURE
1. Make sure that all surfaces are clean, structurally sound, dry and free from grease. Remove all
dirt, oil, moisture,and/or old sealant.
2. If joint or crack depth exceeds 1/2”, use Sika Backer Rod to control joint depth. For moving joints, use a backer rod to avoid three-point bonding. widen crack using a chisel and hammer to at least 1/4” and use wire brush to clean out debris.
3. With a utility knife, cut the tip of the nozzle at a 45° angle to the desired bead size, then puncture the seal inside of the nozzle and place the cartridge into a caulking gun.
4. Wearing protective gloves and safety goggles, hold the gun at a 45° angle and squeeze the gun handle to start the flow of sealant. Apply sealant in one continuous application to prevent any air
entrapment. One 10.1 oz. cartridge will yield 24 linear feet of sealant in a 1/4” bead.
5. Gun sealant into joint and dry tool as necessary.
6. Clean up all tools, spills, and excess material with clean rags after use. If necessary, use a paint thinner or other approved solvent, such as acetone, following the solvent manufacturer’s precautions.
fourjeepin
Well-known member
I have a couple of joints across my driveway that are about 1-1/2”. I ripped a few cedar 2x4s down to fit. Quick, easy, and inexpensive.
Renegade1LI
Well-known member
I think backer rod & urethane sealant would be better.