To avoid these ads, REGISTER NOW!

What's your workbench look like?

donnykooy

Well-known member
Joined
Dec 29, 2012
Messages
87
Location
New Mexico
dude...you have to read my post about leg vises...im have been designing a roubo style workbench for about 3 months now...i have been trying to figure out away to elimate the guide rod and pin for the leg vise and i totally hade a vision of gears to work like a chain drive vise...will this work for a leg vise..please tell me everything you can and also look at my thread on leg vises...thank you so much
 
To avoid these ads, REGISTER NOW!

someone else

Well-known member
Joined
Jan 19, 2012
Messages
64
Location
MA
Because I live in New England, year round outdoor projects are a no-go, and since I have no garage, I can't work on car projects all year long either. I needed to keep myself busy during the winter.

Aside from cleaning out the workshop/basement this winter, I went and put together an electronics workbench


I've been into electronics since I was born basically. My dad owned a TV and Radio repair shop for 20+ years, after working at it since he was 14. He sold the business in the mid 90s, as the business was getting slow because a. the city the shop was in was declining rapidly and b. a lot of stuff was going from complex repair to replace whole boards or throw the TV out. Also, he got a ton more money than the building was worth because the city wanted to tear it down and build a school. So he brought the business home, doing side work here and there and went to go work for a larger TV and Appliance dealer in their repair section (Later moving over to sales).

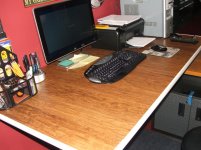
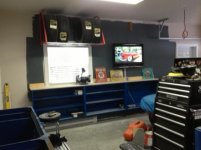
Needless to say, I've always been into electronics. I'm partial to the vintage stuff, because that's what I grew up with - my dad has always had some kickass radios around the house. Aside from that, I'm just positive I was born in the wrong decade. So here's the workbench. The top and legs came from Ikea. The top is green because a. its awesome, and b. it was the cheapest top they had - 5 foot top for like $26.


The magnifying lamp on the left was at my dad's workbench for the last..oh I dunno, 20+ years? It was made local in Worcester, MA. The lamp on the right I bought at Ikea for like $9. I'm very impressed with it for the price. Stuck an 18w directional daylight fluorescent and it does a great job

this is my soldering iron, an old Weller. another hand-me-down. Might need a new pencil, this one's getting finicky.


Above the bench, this rack was from Ikea. I keep my solder, my DMM and other small stuff in the bins. Above that is a chart of all of the Ohm's law equations. Quick reference guide - another item stolen from my father. He always had it above his bench.


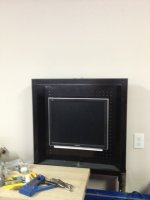
And above all that is my BK variac isolation transformer:


Basically, it protects me and my house from what I'm working on, while also allowing me to choose how much power goes to the device, from 0-130ish volts. And if you happen to know about any of this kinda stuff, BK makes some good ****.


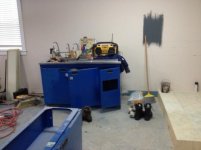
This is my toolbox, an older wooden machinist box. It needs some work. Some kid enjoyed taking things apart too much when he was 8. (Yeah, that would be me.) The tupperware on top is an Ikea special. It was only 4 bucks, and the boxes are perfect for putting pieces of a project in to keep everything together.


Under my desk are my speakers, Pioneer CS-88's, a box of assorted wire, cords, and wall transformers, a box of projects and parts, and a very special box.


The box of tubes. This old Zenith box is actually pretty collectible by Zenith fanatics. My dad used to take this along to jobs when he would go work on console radios and television on house calls. I have a couple big ones down in the basement. Likely clean them up and sell em. Maybe toss a bunch of tubes in em to drive the price up. I loaded this box up with all the tubes I have. My dad still has a box or two of tubes laying around i need to go through.
 

fred d

Well-known member
Joined
Dec 31, 2008
Messages
916
Location
Metro Houston Area
My dad built this bench while working out at US Steel in Gary In.

His truck would not handle the weight so he had to bring it home on the back of a wrecker
Top is 3/8 plate. Front sides and back are 3/16. Drawers are 1/8 with 3/16 fronts.
The missing drawer, my dad delivered some parts to a guy and never got the drawer back. I plan on making a replacement drawer and re-painting the whole bench

Still have to take the after picture with it clean
 

Attachments

  • image.jpg
    image.jpg
    137.8 KB · Views: 335

kmcphee

Well-known member
Joined
Dec 20, 2012
Messages
66
Location
Hammonds Plains, Nova Scotia, Canada
Here's my work bench areas. They came out of the local university. All steel and a 5' stainless lab sink to boot. I removed the hydraulic pop up peg board from the back of my tool box so it would fit tighter to the wall. For fun I put my computer monitor in it. For the bench top I'm making a 10' x 24" (1.5" thick) butcher block.
 

Attachments

  • workbench.jpg
    workbench.jpg
    26.5 KB · Views: 472
  • monitor up.JPG
    monitor up.JPG
    132.3 KB · Views: 364
  • shelving.jpg
    shelving.jpg
    32.9 KB · Views: 452
  • stainless sink.jpg
    stainless sink.jpg
    28.1 KB · Views: 311
  • monitor down.JPG
    monitor down.JPG
    129.2 KB · Views: 261

Cobra4B

Well-known member
Joined
Feb 26, 2006
Messages
1,200
Location
Virginia Beach, VA
Late 2010 I got 3 base cabinets, the counter top that was on top of them, and a 3-door wall cabinet from a remodel at work. The facilities manager knew I was into cars and my garage and offered them to me. They were an off-white cream color. Turned out the doors were just composite with a plastic veneer so I peeled off the ugly cream, painted the doors/drawers, and added new knobs. I purchased 3 additional wall cabinets to complete it all. If you notice I cut out the back of the base cabinets to fit against the wall where the foundation sticks out. It made the wall a PITA to use for anything since it would stick out a few inches. Back cutting the cabinets fixed it and made the entire left wall of my garage usable space. Eventually I'll cover the bench in sheet metal... but I've been saying that for over two years now.

http://sphotos-b.**.fbcdn.net/hphotos-ash3/71661_1540569365409_2372448_n.jpg
http://sphotos-a.**.fbcdn.net/hphotos-ash3/68704_1540568725393_4943594_n.jpg
http://sphotos-a.**.fbcdn.net/hphotos-prn1/67776_1540568525388_6698947_n.jpg
http://sphotos-b.**.fbcdn.net/hphotos-prn1/71739_1540569485412_2097235_n.jpg
http://sphotos-a.**.fbcdn.net/hphotos-prn1/69321_1540569725418_4516159_n.jpg
http://sphotos-a.**.fbcdn.net/hphotos-prn1/68743_1540569805420_697048_n.jpg
http://sphotos-a.**.fbcdn.net/hphotos-prn1/69829_1540569925423_3269558_n.jpg
http://sphotos-b.**.fbcdn.net/hphotos-ash3/64991_1540569125403_2951617_n.jpg
http://sphotos-b.**.fbcdn.net/hphotos-prn1/71810_1540569245406_5096754_n.jpg
 

jethrob

Well-known member
Joined
Nov 30, 2012
Messages
208
Here's mine ... on a "clean" day.

DSC_0497.jpg


DSC_0496.jpg

What kind of cabinets are on the underside? They look nice....
 

PCO6

Well-known member
Joined
Dec 25, 2008
Messages
4,573
Location
Newmarket, Ontario
jethrob - Thanks. The cabinets are "International" roller cabinets without the wheels. I bought them in about the mid 90's but my guess is that they still offer a similar cabinet. I bought a "Craftsman" roller cabinet a few years ago and it's virtually the same.

They aren't expensive cabinets. I figured they were going to stay under my bench and not move around so they woud be "good enough" ... and they have been. I still need to attach them to one another and level them out. I was happy that they are a good fit between the legs of my bench which is basically a cut down pallet rack.
 

jrg

Well-known member
Joined
Aug 29, 2012
Messages
47
Location
Seattle, WA
This is my first post here on GJ. I really enjoy this forum and all it has to offer. We moved into our first home last november and thought i'd share what i have so far.

8389234498_cbbc0b010f_z.jpg
 

someone else

Well-known member
Joined
Jan 19, 2012
Messages
64
Location
MA
Kevin: I doubt its a Gerstner. Cheaper knock off, I think. The sliding front door is particle board. When I do the resto, I'll check for a maker's mark. I've got a set of brass latches for it. I need to make a new sliding cover, sand and stain. This box will get a restored once I finish my old craftsman box that I got when I was a wee lad.
 

mwbailey

Well-known member
Joined
Jun 30, 2012
Messages
821
Location
Rock Hill, SC
Here are a few that I have -- they've been posted elsewhere, but are gathered in one place "for the first time"!

This one from an old kitchen cabinet -- repainted and 7/8" shiplap boards plus 1/8" hardboard top added.
P1000702 (2) (640x468).jpg

Two benches of similar design but one 3-footer and one 6-footer. To be used in tandem for table saw or chop saw. Made from 3X6" purlins left over from barn build with top similar to kitchen cabinet. Installed casters that can be "levered" into place to move these heavy benches.
P1000697 (2) (640x478).jpg 1221021620.jpg P1000506 (640x480).jpg

Another heavy-duty bench inherited from high school robotics program that is now defunct. All metal (except for casters) with stainless steel top.
P1010826 (640x479).jpg
 

TimTaylor75

Well-known member
Joined
Sep 15, 2010
Messages
412
Location
Lecanto, Florida
This is my main 4'x8' melamine topped work bench. I have a couple others that line the walls on this side of the garage as well that you can see the in background.

Please excuse the mess. Pictures were taken right after the main bench was completed and before I cleaned and organized.

http://sphotos-a.**.fbcdn.net/hphotos-snc7/386462_10151055795405651_97653091_n.jpg
http://sphotos-a.**.fbcdn.net/hphotos-ash4/381080_10151055796085651_808297938_n.jpg
http://sphotos-b.**.fbcdn.net/hphotos-ash4/393590_10151063639500651_1078193854_n.jpg
 

MrC1953

Active member
Joined
Jun 21, 2011
Messages
38
Here's my welding/work table.
It's 6ft by 6ft, 1/2 steel with 4x4 steel legs and thick wall 2in angle bracing underneath, my legs have a 1 foot set back so I wont bump into them.

In the pictures you can see the set back is 2ft on one side, I was going to cut the table down to 5x6, but I never ended up needing to do it. I built this monster several years ago, it has served me very well, it is bare steel, I oil it down once or twice a year. I choose this style of table cause I like to be able to weld jigs and fixtures to it also to work on axle's and heavier stuff

Recently I added a vise to the corner.

Godspeed
MrC.
 

Attachments

  • IMG00007-20130110-2213.jpg
    IMG00007-20130110-2213.jpg
    136.1 KB · Views: 118
  • right side up table.jpg
    right side up table.jpg
    3.1 KB · Views: 3,459
  • upside down table.jpg
    upside down table.jpg
    2.8 KB · Views: 3,474

TheClaw

Well-known member
Joined
Dec 25, 2012
Messages
537
Location
Chicagoland
I'm still new around here so I thought I'd join in here. Have been lurking mostly to get some ideas for my garage. I'm rebuilding my current workbench. It's a leftover dresser from a house we moved into 15 years ago and have since left. I slapped some waferboard on top and used some leftover 2x4s for legs. It's since been water damaged, moved and abused so I'm rebuilding it. Here is the before picture. I've replaced the 2x4s with 2x3s (for aesthetics, they strong enough), I'm painting it and have ordered a 1 3/8 x 2' x 8' slab of oak for the top. I'll post completed pictures soon.

the before

a>


Disassembly


a>


Progress


a>


a>


Jeff
 
Last edited:

TrooperJoe73

Member
Joined
Sep 10, 2011
Messages
24
Location
Texas of course!
Here's what recently built. I'm not much of a wood guy. Actually, this is only the second thing I've ever done with wood. However, I wanted to make my self a desk to draw on (drafting table). So, that led me to do some research and decided to practice on a work bench first. This is the second workbench I have made. The first one ended up being confiscated by the wife for out on the patio. I did a little bit of recycling of wood on this one. It's 60" wide, 21" deep and about 34" high.

20130121_174255.jpg

20130121_174001.jpg

20130121_174046.jpg

20130121_174133.jpg
 

tommyxgun

Well-known member
Joined
Jul 22, 2010
Messages
53
Location
Lees Scummit, Mo
Awesome job!


Here's what recently built. I'm not much of a wood guy. Actually, this is only the second thing I've ever done with wood. However, I wanted to make my self a desk to draw on (drafting table). So, that led me to do some research and decided to practice on a work bench first. This is the second workbench I have made. The first one ended up being confiscated by the wife for out on the patio. I did a little bit of recycling of wood on this one. It's 60" wide, 21" deep and about 34" high.

20130121_174255.jpg

20130121_174001.jpg

20130121_174046.jpg

20130121_174133.jpg
 

drewski

Well-known member
Joined
Apr 13, 2008
Messages
419
Location
Mid-Tn
I've got several work benches in my shop, but I always find myself working off this old salvaged Air Force vacuum. It is heavily built with a steel top and I weld on it, beat on it, grind, tear stuff apart on it and sometimes I just pull up a stool and read at it. I move it around to where it's convenient to what I'm working on.

P1010882.jpg


Last summer I even broke out some old lacquer and shot a base color, taped off some stripes and cleared it with some 35 year old Imron.

weld10.jpg
 

MegaManny009

Well-known member
Joined
Nov 11, 2012
Messages
100
I've got several work benches in my shop, but I always find myself working off this old salvaged Air Force vacuum. It is heavily built with a steel top and I weld on it, beat on it, grind, tear stuff apart on it and sometimes I just pull up a stool and read at it. I move it around to where it's convenient to what I'm working on.

P1010882.jpg


Last summer I even broke out some old lacquer and shot a base color, taped off some stripes and cleared it with some 35 year old Imron.

weld10.jpg
:rocker:great jobs looks very heavy duty and you made it look like new
 
To avoid these ads, REGISTER NOW!

kilgorq

Well-known member
Joined
Aug 31, 2012
Messages
52
Location
Kuna, Id USA
Work In Progress...

Still very messy but way better than 2 months ago. I tossed the old kitchen cabinets and am replacing them all with the red benches. The 4 Foot Bench (Computer Desk) is 0.065 and 0.120 Wall 1" Square tubing. and the 6 Foot Bench that is done is all 0.120 Wall 1" Tubing. The other bench that is in progress is all 0.065 1" Tubing. The 6 Foot 0.120 will get drawers in the front. The 6 foot 0.065 will be doors in the front. The 2 6 Foot Tall Cabinets will be red with Black doors and the Blueprint filing cabinet may go away. I still have not decided if I am going to keep it but It is difficult to pull a car in with it being 40" Deep. Plus the drawers are only about 2/3 of that depth usable.

The ugly drawer set will definitely be trashed. But I needed some storage until I get the other benches done.

The Rust Colored frame will have 20 2" Tall drawers in the bottom for Nut Bolt and Screw type hardware. This is what is going to replace the Blueprint filing cabinet.


The Mustang is there to stay. Hoping for a Summer completion on it... If I can quit getting distracted organizing my garage.

004.JPG


005.JPG


006.JPG


007.JPG


008.JPG


009.JPG


010.JPG


011.JPG


012.JPG


013.JPG


014.JPG


015.JPG
 

TheClaw

Well-known member
Joined
Dec 25, 2012
Messages
537
Location
Chicagoland
I've replaced the 2x4s with 2x3s (for aesthetics, they strong enough), I'm painting it and have ordered a 1 3/8 x 2' x 8' slab of oak for the top. I'll post completed pictures soon.


Progress


a>


Jeff


OK, Live and learn.

The joint where where the old dresser meets the frame failed as I tried to roll it over a crack in the driveway and a caster gave way.

Had to junk the whole right half. I have the 2x8x 1 3/4 slab of oak and I'm finishing that. I think I'll take my time. Scout around for some pieces on CL before diving right in again. Pretty frustrating. Oh well..... I"m getting some good ideas from here.


Jeff
 
Last edited:

CaptainMarvel

Well-known member
Joined
Nov 13, 2012
Messages
183
Location
Orange County, CA
Replaceable Hardwood Top - How ??

QUESTION:
As I near the construction of my workbench/assembly table - and as still quite the newbie to all of this - I have a question regarding using a "replaceable" hardwood top for the bench.

My question is ... How does one attach the hardwood top?

Is it glued/laminated on? ... Brad nailed? ... Wood screwed?


reference pic (not mine)
330615-438x.jpg


My benchtop is 3/4" MDF ... so I'm just wondering how the hardwood is attached so as to be able to remove and replace it - without it being a whole sticky/choppy residue mess, ya know? :dunno:


Looking forward to absorbing the wisdom of the MASTERS


TOM
 

agfisher

Active member
Joined
Apr 29, 2008
Messages
38
Location
West Hartford, CT
Re: Replaceable Hardwood Top - How ??

QUESTION:
As I near the construction of my workbench/assembly table - and as still quite the newbie to all of this - I have a question regarding using a "replaceable" hardwood top for the bench.

My question is ... How does one attach the hardwood top?

Is it glued/laminated on? ... Brad nailed? ... Wood screwed?

My benchtop is 3/4" MDF ... so I'm just wondering how the hardwood is attached so as to be able to remove and replace it - without it being a whole sticky/choppy residue mess, ya know? :dunno:

Looking forward to absorbing the wisdom of the MASTERS

TOM

I edged mine with a lip and let gravity hold it in place. To get it out I have holes drilled through the base and I push from the bottom lifting the hardboard. Works very well for me.
 

kfainf

Well-known member
Joined
Jul 28, 2007
Messages
300
These have been posted in different threads, but I finally finished the makeover on the Craftsman bench that I have had for 24 years now. The final step was painting the two end extensions to match the center bench. It has gone from the all charcoal gray/red top bench to the red/black/stainless & silver bench that is now 10' 11" long.
 

Attachments

  • Craftsman bench2.jpg
    Craftsman bench2.jpg
    127.9 KB · Views: 285
  • bench%20area3.JPG
    bench%20area3.JPG
    62.9 KB · Views: 338
  • workbench finish6.jpg
    workbench finish6.jpg
    141.1 KB · Views: 353
  • workbench finish4.jpg
    workbench finish4.jpg
    141.8 KB · Views: 310

BlindViper

Well-known member
Joined
Dec 1, 2009
Messages
1,304
Location
York, PA
This was my workbench after I rebuilt my d60 HP KP but before it was installed. There is 16' or so of bench in there :).
 

Attachments

  • 0910101817.jpg
    0910101817.jpg
    139.6 KB · Views: 228

Kevin54

MEMBER EMERITUS
Joined
Jan 12, 2005
Messages
29,341
Location
Urbana, Ohio
Re: Replaceable Hardwood Top - How ??

QUESTION:
As I near the construction of my workbench/assembly table - and as still quite the newbie to all of this - I have a question regarding using a "replaceable" hardwood top for the bench.

My question is ... How does one attach the hardwood top?

Is it glued/laminated on? ... Brad nailed? ... Wood screwed?


reference pic (not mine)
330615-438x.jpg


My benchtop is 3/4" MDF ... so I'm just wondering how the hardwood is attached so as to be able to remove and replace it - without it being a whole sticky/choppy residue mess, ya know? :dunno:


Looking forward to absorbing the wisdom of the MASTERS


TOM

If you are talking about the 3/4" MDF, then I would screw it down from the bottom. If you are talking about the piece of Masonite on top, then I would brad nail the Masonite to the 3/4" MDF. If you can't get the oiece of Masonite up as it looks like it's recessed, Poke a hole in the 3/4" MDF so you can stick something in the hole to push the Masonite up from underneath.
 

JimVonBaden

Well-known member
Joined
Dec 2, 2011
Messages
15,716
Location
Northern Virginia
These have been posted in different threads, but I finally finished the makeover on the Craftsman bench that I have had for 24 years now. The final step was painting the two end extensions to match the center bench. It has gone from the all charcoal gray/red top bench to the red/black/stainless & silver bench that is now 10' 11" long.

Great makeover!:rocker:

Jim :cool:
 

Kevin54

MEMBER EMERITUS
Joined
Jan 12, 2005
Messages
29,341
Location
Urbana, Ohio
Not so much a workbench, but it a desk I made in the garage. 3/4" MDF. Yesterday I had a box of leftover flooring and some trim, so an hour later I had a covering on it and was cleaned up afterwards. Now all I need to do is get a piece of plastic or glass to cover it, so I can write on it without falling into the grooves.
 

Attachments

  • DSCF5006.jpg
    DSCF5006.jpg
    144.5 KB · Views: 1,595
  • DSCF5007.jpg
    DSCF5007.jpg
    142.1 KB · Views: 1,576
  • DSCF5008.jpg
    DSCF5008.jpg
    144.1 KB · Views: 1,570
Last edited:

BB767

Well-known member
Joined
Dec 24, 2009
Messages
3,724
Location
Philo, IL
Re: Replaceable Hardwood Top - How ??

QUESTION:
As I near the construction of my workbench/assembly table - and as still quite the newbie to all of this - I have a question regarding using a "replaceable" hardwood top for the bench.

My question is ... How does one attach the hardwood top?

Is it glued/laminated on? ... Brad nailed? ... Wood screwed?


reference pic (not mine)
330615-438x.jpg


My benchtop is 3/4" MDF ... so I'm just wondering how the hardwood is attached so as to be able to remove and replace it - without it being a whole sticky/choppy residue mess, ya know? :dunno:


Looking forward to absorbing the wisdom of the MASTERS


TOM

IMG_7931.jpg


TOM, I built several benches using 1/8" tempered Masonite as the final top material. It's a sacrificial piece that can easily be removed when it gets in poor condition and replaced with a new piece of Masonite.

IMG_7685.jpg


I banded the sides with sycamore to hold the Masonite in place. The Masonite is not mechanically held in place since tempered Masonite lays very flat. To remove the Masonite...

IMG_7406.jpg


...I bored a hole in the underlying material so just using a screw driver I can push it through the hole and lift the Masonite up enough to remove it. There's a extensive write up with many pictures on the construction of these benches found in the Garage Gallery, Restored 1930's Auto Shop thread, starting on page 227, post #4521 and continuing for several posts thereafter.

I hope you find it helpful. Good luck with your bench.

Thomas from the Restored 1930's Auto Shop

http://www.garagejournal.com/forum/showthread.php?t=51567
 

Cone Eater

Active member
Joined
Mar 30, 2012
Messages
38
Location
charlottesville, VA
Just built my first bench for my first garage over the weekend. I'm really happy with how it came out. I'm finishing the surface with Tung oil and mineral spirits, so that's why there is nothing on it yet. I've got a vintage Wilton vice I just picked up off ebay for the front left corner.

workbench10.jpg


workbench16.jpg


I'm going to start a journal thread soon, and I'll have build pics there. It's just a modified 2x4Basics kit, 2.5'x6'
 

Cobra6

Well-known member
Joined
Oct 23, 2007
Messages
1,380
Location
Tennessee
This one doesn't measure up to most of the stuff I see on GJ, but I needed something I could bang on and not worry about messing it up. I have my vice mounted on it now.
 

Attachments

  • workbench.jpg
    workbench.jpg
    139.6 KB · Views: 191

kfainf

Well-known member
Joined
Jul 28, 2007
Messages
300
Just built my first bench for my first garage over the weekend. I'm really happy with how it came out. I'm finishing the surface with Tung oil and mineral spirits, so that's why there is nothing on it yet. I've got a vintage Wilton vice I just picked up off ebay for the front left corner.

workbench10.jpg


workbench16.jpg


I'm going to start a journal thread soon, and I'll have build pics there. It's just a modified 2x4Basics kit, 2.5'x6'


I really like the cut out for the stool. Great looking bench!
 

kfainf

Well-known member
Joined
Jul 28, 2007
Messages
300
This one doesn't measure up to most of the stuff I see on GJ, but I needed something I could bang on and not worry about messing it up. I have my vice mounted on it now.

Looks good and sturdy and gets the job done. Well done.
 

alpinewhite

Well-known member
Joined
Aug 4, 2012
Messages
1,315
Location
Orange County, California, USA
Just built my first bench for my first garage over the weekend. I'm really happy with how it came out. I'm finishing the surface with Tung oil and mineral spirits, so that's why there is nothing on it yet. I've got a vintage Wilton vice I just picked up off ebay for the front left corner.

workbench10.jpg
Without having to search, I was wondering how much did this kit cost?
 

Cone Eater

Active member
Joined
Mar 30, 2012
Messages
38
Location
charlottesville, VA
Without having to search, I was wondering how much did this kit cost?

The legs and such were $60 on amazon IIRC, including the shelf stands (actually enough for two, but I chose to do one tall one). Then just the cost of 2x4s and whatever surface material you choose. I probably overspent on the 3/4" Oak hardwood ply, but it's a nice sturdy surface and should look good after the oil sets in. That's also only 2 sheets of the ply, cut smart, with some nice remnants for other projects.
 

hidollartoys

Well-known member
Joined
Jul 15, 2008
Messages
594
Location
K. C. Metro area
I just purchased 5 all steel tables on an on-line auction. One is 4' x 12' w/ 1/2" steel top. 2 others are specific product welding tables with 1/2" steel tops 48 " deep and 2 are 24" deep all steel benches approx 8' long w 1/2" tops. Gave $1000 for all.
 
To avoid these ads, REGISTER NOW!
Top Bottom