To avoid these ads, REGISTER NOW!

Wheel balancer help

Danny318

Member
Joined
Aug 6, 2019
Messages
21
Location
MA
Hi, I'm new.
I picked up my first wheel balancer this weekend and am looking for some general tips and best practices from people who have used one.

It is a Snap On WB240 hand crank machine that has a few different modes and a 'fine' balancing mode for down to .1oz weights.

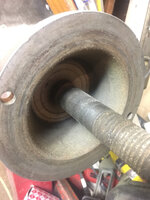
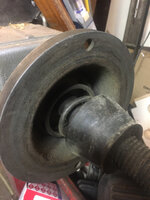
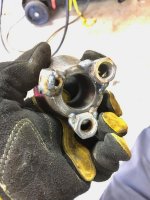
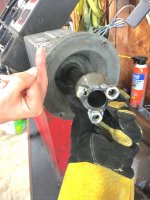
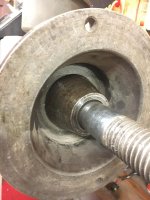
The trouble I am having is getting wheels to sit centered on the cones. Do cones 'wear' making them difficult to center? The ones I have seem well used but no obvious chips or gouges in the metal.
I can get it to visually seem to run true, and then balance it down to 0. But if I take it off and put it back on the cone and re spin, it wants more weight, which seems wrong...


I have the user manual for it and read it through - are they any good web pages or videos that are basically technician training for using balancer machines ?

Anyways, any other general advice or tips for making it easier would be appreciated !
 
To avoid these ads, REGISTER NOW!

jdjm

Well-known member
Joined
Mar 14, 2010
Messages
98
Check out youtube for videos on your machine. Us the model # and search
 

PoorOwner

Well-known member
Joined
Feb 10, 2007
Messages
5,032
Location
CA
The cone works best from the inside of the wheel, usually left side. With a cup on the other side, which has to be a cup not a ring.

Select a cone that sits about half way on the bore.

Cones usually don’t wear too much because most wheels are aluminum but I guess it gets dropped and damaged.

You need to rotate the tire towards yourself once it is almost tightened, this gets it centered.
Some wheels just cannot be mounted consistently. You do what you can.
Just look at the rim and not the tire as most tires have some wobble to them. But you should see the rim have no eccentric motion
 
Last edited:

IndyGarage

Well-known member
Joined
Apr 29, 2010
Messages
9,669
Location
Indy
I've had a couple of those WB240's - one of them worked perfectly and the other seemed to read off a little bit and I'd have to chase the balance over and over.

There is a procedure in the manual for calibrating the machine - you might try that.

As far as getting the wheel centered on the cone, I've found sometimes you have to lift some of the weight off the wheel as you are tightening the nut, so the spring action can hold the wheel centered as you tighten it.

Just a habit of mine, I always double check before I take the wheel off the machine. I slightly loosen the nut, rotate the wheel about 90 degrees on the shaft, tighten it back up then check the balance again. If it's still at the target, I'm good to go.

Another tip: I used to try to balance all the way down to zeros. I found I can't feel anything less than 1/4 ounce on the car so I normally stop when I get below that.
 
Last edited:

rlitman

Well-known member
Joined
Oct 18, 2010
Messages
24,579
Location
Long Island
I've got a WB240. Great machine.

The advice above is all good. But I think you're on the right track regarding centering, and not calibration. Calibration alters what weights are called for on the display, but doesn't alter the way that the machine senses zero. Your poorly centered wheel does.

First, check the hub for rust. Flakes that have have transferred from the rotor can alter how the wheel sits on the balancer's hub.

Second, try to support the wheel as you tighten it. I find this especially important on my LT wheels. Lighter passenger car wheels, not so much.

Third. after you tighten the nut, loosen it just enough to be able to grab the balancer hub and rotate the wheel maybe 1/4 turn, and then retighten. Sometimes that helps me get heavier wheels settled on center.

Finally, do you possibly have lug-centric wheels? A Toyota truck perhaps (those are notorious)?

And yeah, if you spin it to zero, then re-mount the wheel and it's calling for 0.25oz, then you're about as good as your'll get. Be happy with that. If it's calling for 0.75oz (or even 0.5), then sure, you did something wrong.
 

PoorOwner

Well-known member
Joined
Feb 10, 2007
Messages
5,032
Location
CA
Sometimes my machine ask for a sticker weight on the barrel side but it ask for more. Usually 0.5 more around there. I think the machine can’t tell possibly where the sticker weight is always going to be due to spokes design etc

Sometimes I do the outside weight the inside weight will change as well. So I do one side first and spin it. I noticed this is when asking for higher oz of balancing weight it gets a little less accurate.

I considered a calibration but I noticed rlitman mentioned zero is zero so I just “learn” my machine and lightly hammer or stick on the weight first. I even used the wrong mode but when it is zero I changed the mode it is also zero.
 

PoorOwner

Well-known member
Joined
Feb 10, 2007
Messages
5,032
Location
CA
For the toyota truck I bought a 6 lug finger plate, I still have some vibration, don't know what the deal is. (it is a common complain amongst owners)

Part of the problem is that the bore on these wheels is almost as big as the biggest you can fit on smaller balancers if you want inside coning.
 

rlitman

Well-known member
Joined
Oct 18, 2010
Messages
24,579
Location
Long Island
Yes, zero is still always zero (assuming the wheel is spinning true on the hub).

The WB240 isn't really designed for sticky weights, because it only takes three parameters for input. It wants to know the diameter of the weight circle, distance between the inner and outer circles, and offset from the machine. That's perfect if used with clip on weights inside and out.

The problem here is that sticky weights usually sit at a different radius than clip-ons. So, especially if you're using clip-ons on the inside and sticky on the outside, and if you choose the diameter at the clip ons, the outer diameter will be a little off, and that will throw the recommended numbers off (if the machine thinks the diameter is larger than it actually is, it will recommend too little of a weight). I'll usually split the difference, and choose a diameter in between the two to get it closest, but I think you could also input the larger diameter, and just use the next sized up weight on the smaller circle and get pretty close too. Worst case scenario, it's pretty easy to clip off the block at one end of the stick-on "chocolate-bar" if you use too much. And usually, you can tell which end you should clip it from, based on where the machine is calling for more weight.

More advanced machines can take two different radii for input, and some can even learn spoke position to allow you to hide sticky weights behind spokes. But with a little patience and understanding, you can do the same, manually, with a simple machine like this.
 
Last edited:
OP
D

Danny318

Member
Joined
Aug 6, 2019
Messages
21
Location
MA
Thank you all very much for the advice and discussion.
I think the machine has 'alu' mode where it is more able to deal with stick on weights, not sure how it does that exactly, just says the weights need to be > 4in apart. I'll try that out along with some of the other tips here.

I think like anything I will get to know the machine and get better at using it over time.
 

rlitman

Well-known member
Joined
Oct 18, 2010
Messages
24,579
Location
Long Island
...I think the machine has 'alu' mode where it is more able to deal with stick on weights, not sure how it does that exactly, just says the weights need to be > 4in apart...

I totally forgot about that useless mode. No, not > 4" apart. Exactly 4" apart.

I just use the hidden weight method, where you dial in the distance between the two weight circles. For clip on weights, you set the diameter to the sidewall diameter. For stick on, you dial in 1-1/2" less.
 
OP
D

Danny318

Member
Joined
Aug 6, 2019
Messages
21
Location
MA
I totally forgot about that useless mode. No, not > 4" apart. Exactly 4" apart.

I just use the hidden weight method, where you dial in the distance between the two weight circles. For clip on weights, you set the diameter to the sidewall diameter. For stick on, you dial in 1-1/2" less.

Ah okay that helps.
 

IndyGarage

Well-known member
Joined
Apr 29, 2010
Messages
9,669
Location
Indy
I've been using the stick on weights with mine for many years. I just adjust the rim width slightly and it seems to work just fine.
 
OP
D

Danny318

Member
Joined
Aug 6, 2019
Messages
21
Location
MA
Okay so I am 0 for 3 so far. Not sure if its just bad luck, or strange wheels, or I'm missing something.

First wheel is old e36 bmw 15in steel wheels. The center bore does not seem to be perfectly round so it does not want to sit straight. Maybe just a bad wheel will have to try the others.

Next wheel is modern cheap aftermarket 18in. The taper in the center bore is very different than the taper of the cone so it only sits on a very thin edge. That or some other reason I can only get it to sit straight 1 out of 20 times.

Next wheel is another aftermarket 16in, center bore seems to match the cone better but the face of the wheel doesnt allow the 'hold down cup' to sit against it anywhere flush. Tried using another cone as the hold down and it seemed to work but the wheel did not sit straight on the cone.

I even cleaned up and polished the cones and lubed them with fluid film, didnt change anything.

I want to blame the machine but isnt it 99% the same (mounting wise) as any other machine?
 

IndyGarage

Well-known member
Joined
Apr 29, 2010
Messages
9,669
Location
Indy
Just to be sure - you put the spring on the shaft then a steel cone with the taper away from the machine, you place the wheel on the cone - inside toward the machine, outside away from the machine.

You place a plastic cup on the inside of the nut - which has a handle on it and you tighten the nut up to where the wheel is sandwiched between the plastic cup and the face of the balancer - with the cone under tension from the spring centering the wheel. Right?

I've seen people try to do it with the cone on the outside. I'm sure there's a way to do that, but i don't know what it is. The mounting surface of the wheel should be tight against the face of the balancer with the cone holding it in the center. .
 
OP
D

Danny318

Member
Joined
Aug 6, 2019
Messages
21
Location
MA
Yes, right, exactly like you say, although I was not sure about the mounting surface of the wheel touching the face or 'hub' of the balancer. It is supposed to touch? What if it doesnt?
 

ovilla

Well-known member
Joined
Dec 18, 2005
Messages
2,342
Location
Plainfield, IL
I have a COATS 1050 wheel balancer and I normally put the wheel on first followed by a cone and then the nut wrench, since mine didn’t come with a spring or rubber hub nut pressure cup. Anyway I’ve have zero issues balancing wheels this way. I also do support the wheel as I’m clamping it down and I also do a final check (after I’ve put on the weights) by loosening the wheel and doing a 180 rotation and then balancing it again. Just be patient and keep at it. If the machine is calling for too much weight - say anything greater than 1.50 oz I normally loosen the wheel, spin it 180, and then balance it again. I also spin my wheels twice to make sure my machine is asking for the exact same weights. Also make sure to remove all tire stickers before balancing.
 

IndyGarage

Well-known member
Joined
Apr 29, 2010
Messages
9,669
Location
Indy
Yes, right, exactly like you say, although I was not sure about the mounting surface of the wheel touching the face or 'hub' of the balancer. It is supposed to touch? What if it doesnt?

Yes it must be clamped tight to the face of the balancer- like it mounts against the hub of the brake drum - otherwise the wheel is going to wobble as it spins. This may be your problem
 
OP
D

Danny318

Member
Joined
Aug 6, 2019
Messages
21
Location
MA
Yes it must be clamped tight to the face of the balancer- like it mounts against the hub of the brake drum - otherwise the wheel is going to wobble as it spins. This may be your problem

I was hoping that was the problem but I just went to try it and for some reason even tighting the wingnut super hard there is still a gap between the face of the wheel and the hub of the balancer.

Also tried the front hub method and it wobbled up and down - i think it hits the face plate before the cone gets in there tight.

:headscrat
 

rlitman

Well-known member
Joined
Oct 18, 2010
Messages
24,579
Location
Long Island
I was hoping that was the problem but I just went to try it and for some reason even tighting the wingnut super hard there is still a gap between the face of the wheel and the hub of the balancer...

Sounds like something is getting stuck. Take the cone off, and then the spring. Is there anything else on the shaft (maybe some washers in there)? Put the spring on and then the cone. You should be able to push the cone all the way down compressing the spring to the point that it sits flush with the hub on the balancer.

The cone does only touch the wheel on a narrow knife edge. It doesn't match tapers with the hub, and only serves to center the wheel as the wheel contacts the hub.
 
To avoid these ads, REGISTER NOW!

PoorOwner

Well-known member
Joined
Feb 10, 2007
Messages
5,032
Location
CA
Could be an aftermarket cone that is too long too.
Post the length of it.
 
OP
D

Danny318

Member
Joined
Aug 6, 2019
Messages
21
Location
MA
Thanks guys. I looked in where the spring goes and there is some cone looking piece of metal that looks just like part of the shaft or something. I'll take a closer look and measurements and pictures tonight.
 
OP
D

Danny318

Member
Joined
Aug 6, 2019
Messages
21
Location
MA
Its nothing too obvious. The spring looks like it binds the last two coils or so where it meats the cone, but looks like its kind of supposed to.
The cone is about 1 5/8 long
Take a look at the pics

<blockquote class="imgur-embed-pub" lang="en" data-id="a/rNWwaf5" data-context="false" ><a href="//imgur.com/a/rNWwaf5"></a></blockquote><script async src="//s.imgur.com/min/embed.js" charset="utf-8"></script>
 
Last edited:

IndyGarage

Well-known member
Joined
Apr 29, 2010
Messages
9,669
Location
Indy
I just looked at mine. Your cone is exactly the same as one of mine. The spring is correct.

Whatever that is that is on the shaft behind the spring should not be there. It looks like another cone. Can you remove it?

Mine is open so the cone can push back into the opening almost completely if necessary. Yours is going to stop as soon as the spring or the cone contacts that other piece, and wont allow the wheel to contact the face of the balancer
 
OP
D

Danny318

Member
Joined
Aug 6, 2019
Messages
21
Location
MA
So this shouldn’t be there? It does not want to move at all. I’m thinking of welding something to it so I can pull it with a slide hammer or something
 

Attachments

  • 72B03EA1-054A-468A-843F-4865D19ABFB6.jpg
    72B03EA1-054A-468A-843F-4865D19ABFB6.jpg
    92.2 KB · Views: 41

IndyGarage

Well-known member
Joined
Apr 29, 2010
Messages
9,669
Location
Indy
Correct, it should not be there. It looks like a small cone that is jammed.

There is probably a nut on the end of the shaft that allows the shaft to be removed and replaced with a different one (skinny shaft for motorcycle wheels). You might try removing the shaft and see if it comes off with it, then maybe you can find a piece of pipe to knock it off.
 

atikovi

Well-known member
Joined
Feb 14, 2009
Messages
1,992
Location
Suburban Washington DC
I've had my WB260 for nearly 20 years now. I never use that spring or those cups and use the cones from the outside. I feel the spring and plastic cones just add slop to mounting. Using the cone from the outside gives a solid attachment of the wheel to the machine.

large.jpg
 

rlitman

Well-known member
Joined
Oct 18, 2010
Messages
24,579
Location
Long Island
So this shouldn’t be there? It does not want to move at all. I’m thinking of welding something to it so I can pull it with a slide hammer or something

No, that's where the spring goes, but I can certainly understand your confusion now that I see how it looks. :)

I'd tap on it from different angles with a brass hammer and see if it comes loose.
 
OP
D

Danny318

Member
Joined
Aug 6, 2019
Messages
21
Location
MA
Correct, it should not be there. It looks like a small cone that is jammed.

There is probably a nut on the end of the shaft that allows the shaft to be removed and replaced with a different one (skinny shaft for motorcycle wheels). You might try removing the shaft and see if it comes off with it, then maybe you can find a piece of pipe to knock it off.

Okay great I was wondering if the shaft came off easily. Will do that.
Thank you so much for all the help. :bowdown:
 

rlitman

Well-known member
Joined
Oct 18, 2010
Messages
24,579
Location
Long Island
Maybe try to turn the cone with channellocks and hold the hub? I don't think it should be that badly stuck.
 
OP
D

Danny318

Member
Joined
Aug 6, 2019
Messages
21
Location
MA
The whole shaft is somehow spinning while the hub is not. It seems bad possibly very bad. The cone won’t budge on the shaft and I’m not sure what to do to get in there .
Is the hub just press fit on the shaft ? Can I just pull if off with a puller? I don’t want to kill this thing...
:confused:
 

Attachments

  • 8E60DE45-447D-4966-BF8D-22EA30CAFEB0.jpg
    8E60DE45-447D-4966-BF8D-22EA30CAFEB0.jpg
    70.2 KB · Views: 39

rlitman

Well-known member
Joined
Oct 18, 2010
Messages
24,579
Location
Long Island
94bba7ebfdf61b74e2d32525b1db8f4a.jpg
12d53e2c2f20f6ae2a8a34e87b8de77d.jpg
c61c1131ecab4209ced3b0e670af93a2.jpg

That’s how it should look.
 

Attachments

  • 12d53e2c2f20f6ae2a8a34e87b8de77d.jpg
    12d53e2c2f20f6ae2a8a34e87b8de77d.jpg
    315.1 KB · Views: 6
  • c61c1131ecab4209ced3b0e670af93a2.jpg
    c61c1131ecab4209ced3b0e670af93a2.jpg
    316.9 KB · Views: 5
  • 94bba7ebfdf61b74e2d32525b1db8f4a.jpg
    94bba7ebfdf61b74e2d32525b1db8f4a.jpg
    395.5 KB · Views: 14
OP
D

Danny318

Member
Joined
Aug 6, 2019
Messages
21
Location
MA
Maybe try to turn the cone with channellocks and hold the hub? I don't think it should be that badly stuck.

Did this, the whole shaft spins while the hub stays still. It feels really weird, it is hard to turn and then loosens up some, then tightens again. Feels like a pressure fit of some type. The cone does not spin on the shaft, must have been on there for a long time and is seized somewhat.

Does something sound broken with how the shaft spins without having the hub spin?
 

IndyGarage

Well-known member
Joined
Apr 29, 2010
Messages
9,669
Location
Indy
Hmm. That picture from rlitman above is how it should look, so that cone has to come off somehow. I might try soaking it with kroil or ATF/Acetone for a bit, and maybe heat it with a torch and see if you can loosen it from the shaft.

All else fails, your idea of welding a rod to the cone and using a slide hammer on it might be the only way.
 
OP
D

Danny318

Member
Joined
Aug 6, 2019
Messages
21
Location
MA
Yeah, I probably will end up welding something on and smashing on it.

Any comments on the way the shaft spins without the hub spinning?
 

IndyGarage

Well-known member
Joined
Apr 29, 2010
Messages
9,669
Location
Indy
Yeah, I probably will end up welding something on and smashing on it.

Any comments on the way the shaft spins without the hub spinning?

I don't think it matters. It's probably because you unbolted the shaft. Once you get the wheel clamped tight to the hub they won't spin separate - unless there's some hidden damage underneath that cone. If you can spin the hub and hear some faint clicking noises it's working correctly.
 
Last edited:
OP
D

Danny318

Member
Joined
Aug 6, 2019
Messages
21
Location
MA
Okay cool thanks I will see if I can get it off today and hopefully everything still works!
 
OP
D

Danny318

Member
Joined
Aug 6, 2019
Messages
21
Location
MA
Well I got it off. Man that was kinda hard and a little sketchy. But, I figured it was basically useless as it was so I couldnt really make it worse.

Slide hammer with a welded nut on failed quickly, too small of a bolt/nut.

Ended up welding 3 large nuts on and then using a 3 jaw puller on it.


It feels like a whole new machine mounting wheels. Went on straight first try, balanced to zero, unmounted remounted, still zero!

This is a really great place I'm glad you all could help me out!
 

Attachments

  • 68DDCD95-F3EC-4AAB-AFF4-680E8BC7F5E6.jpg
    68DDCD95-F3EC-4AAB-AFF4-680E8BC7F5E6.jpg
    94.3 KB · Views: 46
  • 1F75634F-C2B4-4F8F-B100-6ED386A8D78B.jpg
    1F75634F-C2B4-4F8F-B100-6ED386A8D78B.jpg
    93.9 KB · Views: 49
To avoid these ads, REGISTER NOW!
Top Bottom