While setting my post for the drive way gate 2x2x108". everything was squared up to 90 deg with the digital level, when I went back to check the next day, it's off by 1 or 2 degree so the top most of the post vs the bottom is about 1/4 or 1/8 inch off. What special tricks did you guys use to ensure it is level and plumb exactly 90 deg?

You are using an out of date browser. It may not display this or other websites correctly.
You should upgrade or use an alternative browser.
You should upgrade or use an alternative browser.
why can't I get my post plumb
- Thread starter dogdog
- Start date
csp
Well-known member
Is it wood or some other material?
Wood isn't perfectly straight unless you run it through a planer.
Some other details might help...
Wood isn't perfectly straight unless you run it through a planer.
Some other details might help...
If you are worried about it now just wait until the gate is hanging off of it.
I like to angle my gate posts away from the gate by a few degrees so when the additional force is applied to it, it closer to plumb
and besides if Im reading your dimensions correctly this is 9' tall? or is it 9" wide? or is it the post that...or ...never mind I actually have no idea what your dimensions are referring to. But a post being out by .25" from top to bottom is not going to be noticeable by anyone unless they are carrying around a digital level. and if its made of wood will be out by twice that amount in 2 years. I have 1 4x4 post that warped nearly 2" 4 weeks after being concreted in the ground. Nothing I could do except shim it out to keep the fence looking straight
I like to angle my gate posts away from the gate by a few degrees so when the additional force is applied to it, it closer to plumb
and besides if Im reading your dimensions correctly this is 9' tall? or is it 9" wide? or is it the post that...or ...never mind I actually have no idea what your dimensions are referring to. But a post being out by .25" from top to bottom is not going to be noticeable by anyone unless they are carrying around a digital level. and if its made of wood will be out by twice that amount in 2 years. I have 1 4x4 post that warped nearly 2" 4 weeks after being concreted in the ground. Nothing I could do except shim it out to keep the fence looking straight
posts are 2"x2" and 108" length/height 3/16 wall metal squares... it's a basic 2 vertical post and one beam across it for support all the same size material... top is exactly 89 1/2 inches squared and leveled 0 deg plumb beam, left to right measurement.... bottom is 89 3/4 or was that 89 5/8 between the two post. now after I took that measure, something always seems crooked when I looked at it again.....
Bondo
Well-known member
While setting my post for the drive way gate 2x2x108". everything was squared up to 90 deg with the digital level, when I went back to check the next day, it's off by 1 or 2 degree so the top most of the post vs the bottom is about 1/4 or 1/8 inch off. What special tricks did you guys use to ensure it is level and plumb exactly 90 deg?
Ayuh,.... Are they set in concrete,..??
Were they braced "in-place" til the concrete set-up,..??
yes, two 3/4 pins were drive to the wall and set in epoxy, and weld onto the post before setting the concrete.... was asking how do you guys do this to make sure it is dead on 90 deg ..... professionally...
I have seen posts that are dead on 90 deg and rock solid....
I have seen posts that are dead on 90 deg and rock solid....
southalabama
Well-known member
Mine were set with transit. Now weight of gate got them sagging
posts are 2"x2" and 108" length/height 3/16 wall metal squares... it's a basic 2 vertical post and one beam across it for support all the same size material... top is exactly 89 1/2 inches squared and leveled 0 deg plumb beam, left to right measurement.... bottom is 89 3/4 or was that 89 5/8 between the two post. now after I took that measure, something always seems crooked when I looked at it again.....
When they crane metal off the truck they sometimes get a "value added" treatment sometimes its called bent, check and see if they are actually straight
1953mercury
Well-known member
Just build (adjust) the gate and hinges to correct for any problem with the post. Mike
Justanoldguy
Well-known member
Should have put a spreader between the posts top and bottom and an angle brace as well before the concrete went in. Then recheck it after the concrete is in.
Did put spreaders, just didn't strap them tight with those ropes / straps. the bottom is 1/4 or 1/8 wider than the top. a pisser. after realizing that, no matter what angle I am looking at it, it still looks lob sided now. I am moving the gate 5 feet into the driveway. The gate was already build by some one, 84 1/2 inches wide by 70 inch tall. Just have to weld on the 3/4 barrel hinges and more leveling. I haven't done it yet, another reason see some tips and advices. I just build a simple jig to tack the barrel hinge to the flat stock for filling the 4.5 inch gap. that is 2.25 inch on each side under ideal conditions. I guess the next challenge is to make sure the gate is level / plumb when welding it onto the post.
j p smith
Well-known member
I am afraid that when you put the gate on to the post the post are going to bend some more. 2"x 2" is not enough for a post. I will go back and look I think you said something about anchoring to a wall, that will help.
Dugan
Well-known member
"1/4 bubble no trouble" dont use a degree finder... just grab a bubble level and do it the easy way.
I am afraid that when you put the gate on to the post the post are going to bend some more. 2"x 2" is not enough for a post. I will go back and look I think you said something about anchoring to a wall, that will help.
Hope it will be ok, the previous post was same size but only thinner material. 1/8 or 16 gauge Metal, maybe. But I just hang monkey on it seems sturdy and I am 1/10 ton. Just can't get things 90 deg. maybe will post a pic tomorrow if I can get the sun don't glare on it.
"1/4 bubble no trouble" dont use a degree finder... just grab a bubble level and do it the easy way.
actually never learned to use a bubble level properly I think it's the crooked eyes every time it seems level, it is never leveled. This one is a digital bubble level 24 inch and 48 inch (discontinued) from sears and a regular Empire 72 inches I think.

Pictures. We need pictures. But to be honest I brace the pole and use one of those cheap post squares. I put 2 on each post so I can pick which ones I like.
Gets horrible reviews but I didnt have any problems with mine.
http://www.homedepot.com/p/Oz-Post-...CH=RV-_-RV_homepage_rr-2-_-NA-_-202400878-_-N
Gets horrible reviews but I didnt have any problems with mine.
http://www.homedepot.com/p/Oz-Post-...CH=RV-_-RV_homepage_rr-2-_-NA-_-202400878-_-N
ok finally finished it. nothing is 90 deg just 89.8 89.9 89.7.....but opens and close smooth so far....
still have rust treatment and painting and some rusted through spots to patch...


JIG.... for the barrel hinges. worked out pretty good.

still have rust treatment and painting and some rusted through spots to patch...
JIG.... for the barrel hinges. worked out pretty good.
Justanoldguy
Well-known member
That top spreader looks about 4" wider than the bottom.. lol
I think the walls are exaggerating the problem. I mean really .03 of a degree will not make those tubes look like wet noodles. Try scribing some plate along the wall to see if that might help.
BTW did you check with the power company before erecting the gate. I know some states require access even though most are digital now.
BTW did you check with the power company before erecting the gate. I know some states require access even though most are digital now.
That top spreader looks about 4" wider than the bottom.. lol
LOL it does, this is what I mean that I can't use a level, got the wonky eyes. Non of the walls are straight. makes it harder to plumb or looked at. the top cross beam is exactly 89.5 inches I cut it and re-measured it. That bottom piece of red color treated wood was the spreader I used when setting the post. I forgot if it was 90 or trimmed to 89.5....... oh sit that solve the mystery if it was not re-cut to 89.5, gotta to recheck that in the morning.
I think the walls are exaggerating the problem. I mean really .03 of a degree will not make those tubes look like wet noodles. Try scribing some plate along the wall to see if that might help.
BTW did you check with the power company before erecting the gate. I know some states require access even though most are digital now.
I checked the top vs bottom, it's 89.5 inch top and 89.75 inches or 90 inches bottom. I think the neighbor's retaining wall is leaning over a bit, plus his fence is leaning the other way that makes the whole gate looked even more wonkier. Easier to look at it if you use hand and block off that chain link fence. Your eye is playing tricks with the mind.
Plus 1/2 of it is painted with a high gloss black the other side was not. But the post is exactly 89.7 deg on one side and 89.9 deg on other side. The patina rust on the gate is to discourage people wanting to climb over that gate
 .
.Power company wise they are ok. actually the picture is taken from inside looking out, they have access now vs no access before, The lock is double keyed, probably why you mistaken it to be front. Either case those meters are remote readings. Paid a bundle to get that moved outside and installed with the new wireless reading meters, no longer needed to access to get reading. Was getting some bullying threats from them for having no access during hours of Monday to Friday 8AM-5PM when ever they drop by.... Who have time to read their mind and waits from them at their leisure to come in and do the readings. But that is another Rant about this poco.
Anyways more of a reason to ask how others done it.
Last edited:
OccupantRJ
Well-known member
Two words. Plumb bob.
Kevin54
MEMBER EMERITUS
Dog.....you aren't one or two degrees off, you are only .2 degrees off. Huge difference. Two tenths of a degree is not much at all, and the digital angle finder that you have probably isn't accurate to that anyways. Some of the better angle finders a few years back were only accurate to about a 1/2 a degree.
Like Occupant said......Use a Plumb Bob. If there is no breeze blowing, you will be EXACTLY plumb when using it. I have a 6' level that I bought, and I don't trust it and it's never been dropped. But me and wood do not get along, so if I set a post, I use a plumb bob to set it. It takes a little longer, but I'm the type that working with machining metal, and working in thousandths, wood just screws me all up because none of it is ever straight.
Like Occupant said......Use a Plumb Bob. If there is no breeze blowing, you will be EXACTLY plumb when using it. I have a 6' level that I bought, and I don't trust it and it's never been dropped. But me and wood do not get along, so if I set a post, I use a plumb bob to set it. It takes a little longer, but I'm the type that working with machining metal, and working in thousandths, wood just screws me all up because none of it is ever straight.
Kevin54
MEMBER EMERITUS
Did put spreaders, just didn't strap them tight with those ropes / straps. the bottom is 1/4 or 1/8 wider than the top. a pisser. after realizing that, no matter what angle I am looking at it, it still looks lob sided now. I am moving the gate 5 feet into the driveway. The gate was already build by some one, 84 1/2 inches wide by 70 inch tall. Just have to weld on the 3/4 barrel hinges and more leveling. I haven't done it yet, another reason see some tips and advices. I just build a simple jig to tack the barrel hinge to the flat stock for filling the 4.5 inch gap. that is 2.25 inch on each side under ideal conditions. I guess the next challenge is to make sure the gate is level / plumb when welding it onto the post.
 Now that would have me all screwed up. The post on the building is tight at the top. The post at the wall, the chain link fence is throwing a curve to it making it look crooked. To me it looks like you have the top spread out a couple of inches more than the base.
Whoever built the building and wall needs their level checked

schor
Well-known member
Two words. Plumb bob.
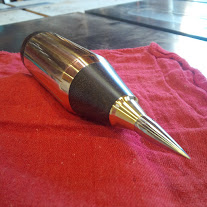
+1 on the plumb bob. You might not need one this big though.
Video of this bob
Last edited:
jeff g
Well-known member
Hi
Your gates & frame are OK.
Your walls are way out, it will never look good.
stop your O.C.D, or bend the frame to the walls.
1/4" on a frame for a gate is OK, if it was spot on, it still would not look good.
Sorry but just live with it.
ps
paint the gate & frame like the walls
Your gates & frame are OK.
Your walls are way out, it will never look good.
stop your O.C.D, or bend the frame to the walls.
1/4" on a frame for a gate is OK, if it was spot on, it still would not look good.
Sorry but just live with it.
ps
paint the gate & frame like the walls
Have no choice, that wall was leaning over, I needed max opening barely fits a small car. The original purpose of the post was to check and see how others level their post so I can learn something from it. I have an good heavy duty plumb bob, but never really know how to properly used it either. that is why I got the digital levels. Now would be something if they got the digital plumb bob. OK thanks for all the tips.
as far as painting it, probably going to be black, I am afraid of the glare makes the gate invisible, some one will ram right into it.
as far as painting it, probably going to be black, I am afraid of the glare makes the gate invisible, some one will ram right into it
.
Last edited:
Justanoldguy
Well-known member
To me it looks like you have the top spread out a couple of inches more than the base.
It sure looks like that to me too, as I said previously.
I'd like to see a photo top and bottom with the tape measure on it ..
Even measuring on this photo makes it miles out.
Kevin54
MEMBER EMERITUS
Have no choice, that wall was leaning over, I needed max opening barely fits a small car. The original purpose of the post was to check and see how others level their post so I can learn something from it. I have an good heavy duty plumb bob, but never really know how to properly used it either. that is why I got the digital levels. Now would be something if they got the digital plumb bob. OK thanks for all the tips.
as far as painting it, probably going to be black, I am afraid of the glare makes the gate invisible, some one will ram right into it
DOG.....Not much to learn when it comes to a plumb bob. Hang it from the top at a given distance away from the post, then when everything is done moving measure the same distance from the point of the plumb bob to match the given distance away at the top. You will never get any more accurate than using a good plumb bob.
On a sort of funny note. I have a plumb bob hanging from my cabinets, just to know where it is at if I need it. A buddy asked me one time why I had a plumb bob hanging off of my cabinets. I told him that I use it to determine earthquakes. Not too long after I told him that, the plumb bob moved. I had to laugh
I thought it was just a breeze in the garage. Sure enough, I heard on the news the next morning that Ohio had felt an earthquake that originated in Virginia, or West Virginia. Nothing major but we had the aftershocks.  The odd thing, the next day at work, he asked me where I got my plumb bob at. The timing couldn't have been any better
OccupantRJ
Well-known member
You don't even need an actual plumb bob as long as you do not need to mark a particular spot on the floor. A wrench tied to the end of a string as a weight will plumb things.
DOG.....Not much to learn when it comes to a plumb bob. Hang it from the top at a given distance away from the post, then when everything is done moving measure the same distance from the point of the plumb bob to match the given distance away at the top. You will never get any more accurate than using a good plumb bob.....
Some how either I am impatience or earth quake all day long here cause the darn plumb bob never stop moving for a long time....every time I move the beam to adjust it. I have to wait a for it to stop moving. that sort of things.
It sure looks like that to me too, as I said previously.
I'd like to see a photo top and bottom with the tape measure on it ..
Even measuring on this photo makes it miles out.
I am pretty sure it's the wall that plays mind trick on your brain. or maybe you have the googly eyes like mine. There are total of 3 spreaders I used like those red lumber ones I am sure 2 of them are 89.5, for top middle and bottom. they still fits without too much exaggerations. That is one of the reason I am asking how did you guys do it to make it look good and to confirm that I don't have the googly wonky eyes.
Sure when it stops raining outside, weather report it will rain all week till Sunday in my area
Justanoldguy
Well-known member
Sure when it stops raining outside, weather report it will rain all week till Sunday in my area
Haha
C'mon, the tape measure won't know if it's raining or not.
schor
Well-known member
Some how either I am impatience or earth quake all day long here cause the darn plumb bob never stop moving for a long time....every time I move the beam to adjust it. I have to wait a for it to stop moving. that sort of things.
Get a pot of oil, that will act as a dampener for the bob and make it settle faster.
Justanoldguy
Well-known member
Get get all modern and use a vertical laser.
Great things them lasers.
Great things them lasers.
nonhog
Well-known member
I suppose you could tell your neighbor you are fixing his post. That would help. As for the wall, how about some ornate scroll work to soften the edge
and take your eyes off that curvy wall.You know something creative, artsy fartsy. Then your eyes would focus on the gate. Which looks really nice.
and take your eyes off that curvy wall.You know something creative, artsy fartsy. Then your eyes would focus on the gate. Which looks really nice.
fixing is a very particular thing, I can't guarantee to fix it professionally just 1 post and make it look good to their liking, when the whole fence and wall is leaning. To properly fix that requires 22 cubic of concrete to replace the retaining wall walls. which is way beyond my one man power or $$$ can afford.
The scrolls are good idea. Might just browse the kingmetals catalog and see what I can get and see if I can get some inspiration out of it.
The scrolls are good idea. Might just browse the kingmetals catalog and see what I can get and see if I can get some inspiration out of it.
ok this is the final posts not sure what I did now they seems come closer again....
Bottom spreader.

fitted between the two post.

measured about 89.625"....

middle spreader.

measured looks like 89.625" it's actually 89.5 the tape was slanted a little. WTH.....I think I needed to go see a eye doctor one of these days......

Bottom spreader.
fitted between the two post.
measured about 89.625"....
middle spreader.
measured looks like 89.625" it's actually 89.5 the tape was slanted a little. WTH.....I think I needed to go see a eye doctor one of these days......
Justanoldguy
Well-known member
It's the top one that look much wider.
1/8" won't matter at all, but it looks like it's inches bigger.
1/8" won't matter at all, but it looks like it's inches bigger.
spotco2
Well-known member
Your question was how everyone else gets posts plumb. The only way I know to do it is with a plumb bob or two.
I have several of these and they work very well. They have a magnetic base and also a pin you can drive into a wooden post as well as a hook that you can hang it with.

The string is 2" away from the post at the reel and you just measure down the post to make sure it's 2" everywhere else.
They actually do make laser plumb bobs. We have a few of those also. Basically just a fancy laser pointer with a base. At the base it's 2" and just hold your tape up and the red dot should hit at 2" on the tape. Here's one version

I have several of these and they work very well. They have a magnetic base and also a pin you can drive into a wooden post as well as a hook that you can hang it with.
The string is 2" away from the post at the reel and you just measure down the post to make sure it's 2" everywhere else.
They actually do make laser plumb bobs. We have a few of those also. Basically just a fancy laser pointer with a base. At the base it's 2" and just hold your tape up and the red dot should hit at 2" on the tape. Here's one version