To avoid these ads, REGISTER NOW!

Wilton 4 inch Vise Repair

orchidlane

Well-known member
Joined
Jan 9, 2014
Messages
126
Location
Chandler AZ
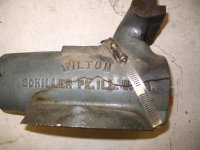
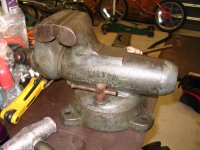
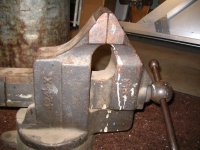
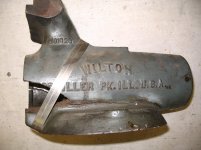
Hello All, I have a Wilton 4 in vise that had a cracked body, I found just the body on Ebay that was the same model and casting numbers, I removed all the rear end parts from my cracked housing and installed everything in the brand used housing / main body, question I have is the end cap that has the 2 dowl pins hole do not line up to the body holes so I cant install the pins, Does anyone know what to do for this problem, It looks like they match drill the end housing to the body or am I wrong, thanks all.
 

Attachments

  • Picture 2640.jpg
    Picture 2640.jpg
    141 KB · Views: 80
  • Picture 2641.jpg
    Picture 2641.jpg
    139.2 KB · Views: 71
  • Picture 2636.jpg
    Picture 2636.jpg
    141.8 KB · Views: 71
  • Picture 2637.jpg
    Picture 2637.jpg
    93.3 KB · Views: 71
  • Picture 2639.jpg
    Picture 2639.jpg
    143.8 KB · Views: 73
  • Picture 2642.jpg
    Picture 2642.jpg
    143.9 KB · Views: 73
To avoid these ads, REGISTER NOW!
OP
O

orchidlane

Well-known member
Joined
Jan 9, 2014
Messages
126
Location
Chandler AZ
Thanks for the thought, the back cap can only fit on one way, the center is offset for the center threaded part.
 

bigcaddy

Well-known member
Joined
Jan 17, 2012
Messages
2,418
Location
Orange County/ San Fernando Valley
Thanks for the thought, the back cap can only fit on one way, the center is offset for the center threaded part.

The rear caps were installed then drilled/pinned but not every one was done the same. You could always fill with weld then drill. It would take some work but that would fix the problem without risking you enlarging the holes and the cap not being tight.
 

drivesitfar

Well-known member
Joined
Oct 23, 2013
Messages
36,174
Location
Pacific Northwest
Orchid: RayH just pulled the pins on his Wilton bullet and drilled holes a bit bigger and tapped them for a threaded pin.

it's post #258 on the Vise Repair 101 thread if you need details and look at a few posts earlier where Carla gives Ray the method to do the job.

http://www.garagejournal.com/forum/showthread.php?t=252830&page=2

good luck.

by the way some guys save silver others save Wilton Bullets and rare old vises. your problem is just that you don't have enough of them yet. they look awesome.
 

rayh

Well-known member
Joined
Apr 23, 2014
Messages
45
How or what would you have to do to break a vise like that???
 

Fretters

Well-known member
Joined
Jan 25, 2014
Messages
4,217
Location
South Yorkshire, England
If that were mine, I'd just drill fresh holes through both the body and cap, (if you drilled them top and bottom, it'd scratch the OCD itch before it started :D), and then tap the original body holes and pop a couple of brass grubscrews in, then peen them in place.
 
Last edited:
To avoid these ads, REGISTER NOW!

Carla

MEMBER EMERITUS
Joined
Nov 27, 2010
Messages
672
If that were mine, I'd just drill fresh holes through both the body and cap, (if you drilled them top and bottom, it'd scratch the OCD itch before it started :D), and then tap the original body holes and pop a couple of brass grubscrews in, then peen them in place.

I'd concur, thats a simple repair which would work well, and restore the vise to serviceablity.

However........

If one wanted the finished job to to be 'very nearly correctly original', tho, it could be done.......don't ask me to do it, but if it was mine, and I wanted to be 'meticulous', here's a way.......

I'd first set the end cap up in the vertical mill, with one of the drilled holes aligned with the spindle, using a gage pin in a drill chuck.

Then, I'd drill and tap the end cap 1/8" NPT, and put in a cast-iron pipe plug, just a little past 'snug' with some red Loctite, after which I'd do the same for the drilled hole on the other side.

(cast-iron 1/8" pipe plugs were once common, and should be available, somewhere, with a bit of looking, even today......this might be an 'ask on machine hobbyists' boards on the internet item'....someone should have a couple of those in their old parts collection)

After the Loctite had set up, I'd cut off the protruding length of the pipe plugs, and file them flush with the curvature of the end cap, checking that the cap fit the back jaw casting easily.

Then, I'd counter-sink the drilled holes in the nut, and braze them up, using little carbon plugs to keep the braze up out of the threads. I'd file the brazed area flush with the curvature of the nut casting. Care must be taken to protect the existing threads in the nut whilst all this is done.

At this point, the 'end cap' and 'nut' parts are effectively as they were, at the stage in production before the holes for the pins were drilled.

I'd re-assemble the vise, with a suitable size of distance-piece (block of any scrap material) in the jaws, just enough to have the screw clear of the holes to be drilled, and tighten the screw, to be sure the nut was tensioned in place.

Drilling through the cast-iron plugs in the end cap, and the nut, is then obvious, with the drill guided by the existing holes in the back jaw casting.

At this point, one has the choice of refitting the original style of pin, or drilling the back jaw casting and the end-cap together, with the nut removed, to 'letter F' drill size, and tapping 5/16-18, to use the modified Allen set-screw (grub-screw) as mentioned earlier.

Too much work/trouble?.......yes, I rather suspected that you might read all that detail, 'glaze over' and lose interest......hard lines, theres 'no free lunch' in restoration work......... : )

cheers

Carla
 
Last edited:
OP
O

orchidlane

Well-known member
Joined
Jan 9, 2014
Messages
126
Location
Chandler AZ
I'd concur, thats a simple repair which would work well, and restore the vise to serviceablity.

However........

If one wanted the finished job to to be 'very nearly correctly original', tho, it could be done.......don't ask me to do it, but if it was mine, and I wanted to be 'meticulous', here's a way.......

I'd first set the end cap up in the vertical mill, with one of the drilled holes aligned with the spindle, using a gage pin in a drill chuck.

Then, I'd drill and tap the end cap 1/8" NPT, and put in a cast-iron pipe plug, just a little past 'snug' with some red Loctite, after which I'd do the same for the drilled hole on the other side.

(cast-iron 1/8" pipe plugs were once common, and should be available, somewhere, with a bit of looking, even today......this might be an 'ask on machine hobbyists' boards on the internet item'....someone should have a couple of those in their old parts collection)

After the Loctite had set up, I'd cut off the protruding length of the pipe plugs, and file them flush with the curvature of the end cap, checking that the cap fit the back jaw casting easily.

Then, I'd counter-sink the drilled holes in the nut, and braze them up, using little carbon plugs to keep the braze up out of the threads. I'd file the brazed area flush with the curvature of the nut casting. Care must be taken to protect the existing threads in the nut whilst all this is done.

At this point, the 'end cap' and 'nut' parts are effectively as they were, at the stage in production before the holes for the pins were drilled.

I'd re-assemble the vise, with a suitable size of distance-piece (block of any scrap material) in the jaws, just enough to have the screw clear of the holes to be drilled, and tighten the screw, to be sure the nut was tensioned in place.

Drilling through the cast-iron plugs in the end cap, and the nut, is then obvious, with the drill guided by the existing holes in the back jaw casting.

At this point, one has the choice of refitting the original style of pin, or drilling the back jaw casting and the end-cap together, with the nut removed, to 'letter F' drill size, and tapping 5/16-18, to use the modified Allen set-screw (grub-screw) as mentioned earlier.

Too much work/trouble?.......yes, I rather suspected that you might read all that detail, 'glaze over' and lose interest......hard lines, theres 'no free lunch' in restoration work......... : )

cheers

Carla

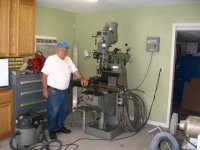
Thanks for the posting, I forgot about the cast iron plugs, I used them way back in the days when I did valve jobs and had to repair cracked heads, so sounds like a plan, lucky me I have a mill also.. Thats my late father in the picture.. thanks.
 

Attachments

  • Copy of Picture 109.jpg
    Copy of Picture 109.jpg
    100.5 KB · Views: 31

autopts

Well-known member
Joined
Jul 4, 2009
Messages
2,268
I'd concur, thats a simple repair which would work well, and restore the vise to serviceablity.

However........

If one wanted the finished job to to be 'very nearly correctly original', tho, it could be done.......don't ask me to do it, but if it was mine, and I wanted to be 'meticulous', here's a way.......

I'd first set the end cap up in the vertical mill, with one of the drilled holes aligned with the spindle, using a gage pin in a drill chuck.

Then, I'd drill and tap the end cap 1/8" NPT, and put in a cast-iron pipe plug, just a little past 'snug' with some red Loctite, after which I'd do the same for the drilled hole on the other side.

(cast-iron 1/8" pipe plugs were once common, and should be available, somewhere, with a bit of looking, even today......this might be an 'ask on machine hobbyists' boards on the internet item'....someone should have a couple of those in their old parts collection)

After the Loctite had set up, I'd cut off the protruding length of the pipe plugs, and file them flush with the curvature of the end cap, checking that the cap fit the back jaw casting easily.

Then, I'd counter-sink the drilled holes in the nut, and braze them up, using little carbon plugs to keep the braze up out of the threads. I'd file the brazed area flush with the curvature of the nut casting. Care must be taken to protect the existing threads in the nut whilst all this is done.

At this point, the 'end cap' and 'nut' parts are effectively as they were, at the stage in production before the holes for the pins were drilled.

I'd re-assemble the vise, with a suitable size of distance-piece (block of any scrap material) in the jaws, just enough to have the screw clear of the holes to be drilled, and tighten the screw, to be sure the nut was tensioned in place.

Drilling through the cast-iron plugs in the end cap, and the nut, is then obvious, with the drill guided by the existing holes in the back jaw casting.

At this point, one has the choice of refitting the original style of pin, or drilling the back jaw casting and the end-cap together, with the nut removed, to 'letter F' drill size, and tapping 5/16-18, to use the modified Allen set-screw (grub-screw) as mentioned earlier.

Too much work/trouble?.......yes, I rather suspected that you might read all that detail, 'glaze over' and lose interest......hard lines, theres 'no free lunch' in restoration work......... : )

cheers

Carla
eh? Wha?
 

Fretters

Well-known member
Joined
Jan 25, 2014
Messages
4,217
Location
South Yorkshire, England

Condensed version. Drill and tap the existing holes, fit cast plugs, braze in place, (thereby effectively making the parts complete and lacking any holes, as close to undrilled new condition as possible), shape the plug protrusions to match the surrounding surfaces and then drill through for the new fixing holes. Least that's how I took it, in meaning.
 
Last edited:

Carla

MEMBER EMERITUS
Joined
Nov 27, 2010
Messages
672
Condensed version. Drill and tap the existing holes, fit cast plugs, braze in place, (thereby effectively making the parts complete and lacking any holes, as close to undrilled new condition as possible), shape the plug protrusions to match the surrounding surfaces and then drill through for the new fixing holes. Least that's how I took it, in meaning.

Hello, Mr Fretters,

Yes, thats a good 'condensed version', save that I'd "v' out the holes in the 'nut' part, and braze it solid, as the Wilton nut casting is a fairly thin section where those holes are drilled.

As it turns out, Mr Orchid is already familiar with the technique, so had I known that, I'd have simply said, 'just plug the end cap with Well-tite pins, braze up the nut, and re-drill'.....one simple sentence.

You're probably familiar with the technique, as well, but for those readers who haven't had occasion to be doing engine valve work, I'll explain.

Some old engines, especially the old side-valve engines, would, sometimes, develop cracks which radiated from a valve seat.

One repair method, which generally worked well, was to drill the crack, and tap with a special taper tap, with a very slight taper, similar to that of a taper-pin, and fit special cast-iron taper pins. 'Well-tite' was one supplier of the pins and taps.

One had to drill/tap, drive the pin, grind it flush, and then drill/tap the next pin so that it over-lapped the first, and so on until one had pinned well beyond the crack, 'chain of pins', so to speak.

Then, one had to counter-bore the block for a 'hard seat ring'. The 'Sioux' and 'Kwik-Way' firms made special tooling for this purpose, which centred on the guide bore.

It was prudent to warm the block, and shrink the seat ring in CO2 snow, and drive the ring carefully, as it was too easy to get the ring out of alignment when driving. After driving the ring, one would 'peen' the cast-iron of the block into a chamfer at the top of the ring, for further assurance that the ring would 'stay put' in service.

With the ring placed, one would grind the seat to suit the valve.

(purely as digression, the seat rings weren't only a crack repair. I commonly had to fit new seat rings to the 'XK' Jaguar heads, as some mechanics would re-grind the original seats so deep that one couldn't get correct tappet-clearance with an 'A' pad. I'd have to grind the new ring for seat depth til I had the correct .006 or .008 with an 'S' pad, a rather tedious task)

cheers

Carla
 

Fretters

Well-known member
Joined
Jan 25, 2014
Messages
4,217
Location
South Yorkshire, England
That's not a technique you tend to see much of these days. I was considering using stitching on that cast hacksaw bed I had a little moment with the other month, but thought better of it once I'd plated it. I'd have been at that for ages judging by how awkward the rear of the bed was to drill for affixing the plate. :D
 
OP
O

orchidlane

Well-known member
Joined
Jan 9, 2014
Messages
126
Location
Chandler AZ
Hello, Mr Fretters,

Yes, thats a good 'condensed version', save that I'd "v' out the holes in the 'nut' part, and braze it solid, as the Wilton nut casting is a fairly thin section where those holes are drilled.

As it turns out, Mr Orchid is already familiar with the technique, so had I known that, I'd have simply said, 'just plug the end cap with Well-tite pins, braze up the nut, and re-drill'.....one simple sentence.

You're probably familiar with the technique, as well, but for those readers who haven't had occasion to be doing engine valve work, I'll explain.

Some old engines, especially the old side-valve engines, would, sometimes, develop cracks which radiated from a valve seat.

One repair method, which generally worked well, was to drill the crack, and tap with a special taper tap, with a very slight taper, similar to that of a taper-pin, and fit special cast-iron taper pins. 'Well-tite' was one supplier of the pins and taps.

One had to drill/tap, drive the pin, grind it flush, and then drill/tap the next pin so that it over-lapped the first, and so on until one had pinned well beyond the crack, 'chain of pins', so to speak.

Then, one had to counter-bore the block for a 'hard seat ring'. The 'Sioux' and 'Kwik-Way' firms made special tooling for this purpose, which centred on the guide bore.

It was prudent to warm the block, and shrink the seat ring in CO2 snow, and drive the ring carefully, as it was too easy to get the ring out of alignment when driving. After driving the ring, one would 'peen' the cast-iron of the block into a chamfer at the top of the ring, for further assurance that the ring would 'stay put' in service.

With the ring placed, one would grind the seat to suit the valve.

(purely as digression, the seat rings weren't only a crack repair. I commonly had to fit new seat rings to the 'XK' Jaguar heads, as some mechanics would re-grind the original seats so deep that one couldn't get correct tappet-clearance with an 'A' pad. I'd have to grind the new ring for seat depth til I had the correct .006 or .008 with an 'S' pad, a rather tedious task)

cheers

Carla

WOW what you wrote about all the cylinder head work brought back soo many memories, boy that was some dirty work and how many people didnt know how to grind seat and valves right. but I sure learned alot and I was only 15 years old when I started on engines. now 51 years old and still playing out in the shop ..
 

Attachments

  • Picture 160.jpg
    Picture 160.jpg
    24 KB · Views: 31

jpickar

Well-known member
Joined
May 21, 2010
Messages
964
WOW what you wrote about all the cylinder head work brought back soo many memories, boy that was some dirty work and how many people didnt know how to grind seat and valves right. but I sure learned alot and I was only 15 years old when I started on engines. now 51 years old and still playing out in the shop ..

Hey orchidlane,

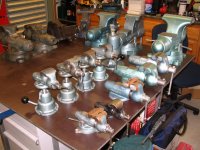
Nice collection of vises there but I hink you have too many baby wiltons there. Your collection looks out of balance, sell me a baby bullet one and that balance will come back to your collection!!:beer:

John
 
OP
O

orchidlane

Well-known member
Joined
Jan 9, 2014
Messages
126
Location
Chandler AZ
Hey orchidlane,

Nice collection of vises there but I hink you have too many baby wiltons there. Your collection looks out of balance, sell me a baby bullet one and that balance will come back to your collection!!:beer:

John

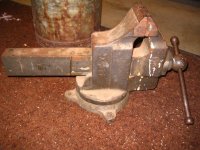
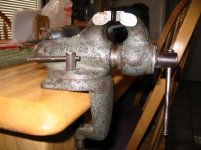
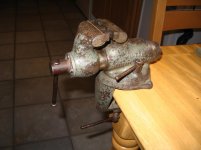
there like kids, how do you sell them, they all have a story this is my newest baby. it clamps where ever you go :thumbup:
 

Attachments

  • Picture 1921.jpg
    Picture 1921.jpg
    138.8 KB · Views: 15
  • Picture 1922.jpg
    Picture 1922.jpg
    136.6 KB · Views: 11
To avoid these ads, REGISTER NOW!
Top Bottom