To avoid these ads, REGISTER NOW!

Wilton C1 vise advise needed.

Voi

Well-known member
Joined
Oct 10, 2010
Messages
5,147
Location
Western South Dakota
I picked up C1 vise that I thought I'd sell for parts several years ago. I guess with social distancing and playing at home teacher I finally decided to tear into it.

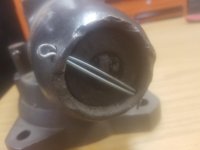
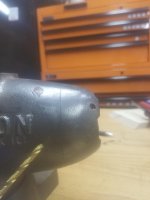
I assume this vise took a fall at some point as the back where the end cap would attach is damaged and some tech screwed holes to add a cotter pin.

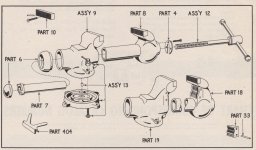
It appears this cotter pin wasn't holding anything in or what it was holding in is now lost. I didn't find a date on the keyway so I'm not sure I'm finding accurate parts diagrams out there. But the diagrams I am finding don't seem to show anything that would be held in by the pin. Am I correct in this?

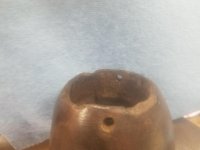
What I'd really like to hear is advice on how repair this area? If you look at the picture with the blue shop towel as a back drop you can see just a bit of what appears to be factory edge in the back right of the picture.

I'm not looking for a pristine shop queen nor am I looking to flip this vise. It's in better shape than I ever expected so I'd like to make a user out of it instead of selling it for parts. But I would like to make this area look better before painting it.

Open to suggestions.

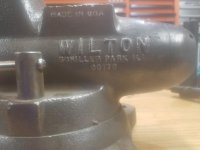
Lastly, the main body says Schiller Park and the number below that appears to be 80178. One or both of the eights could possibly be sixes.

Can anyone direct me to an accurate parts diagram for this era of C1 or is that not enough information to determine its age?
 

Attachments

  • C1 Vise 1.jpg
    C1 Vise 1.jpg
    55.2 KB · Views: 49
  • C1 Vise 3.jpg
    C1 Vise 3.jpg
    60 KB · Views: 43
To avoid these ads, REGISTER NOW!

Fierljeppen

Well-known member
Joined
Jan 26, 2018
Messages
1,159
Voi...Use the -2- diagrams below to better understand what the OEM setup was. You're missing the original pins (rivets), see part #7.

There is actually a lot of good information, including videos out there if you do a search about Wilton vise pin removal. The C1 is an awesome vise in my opinion. The pipe jaws are way better than the Tradesman model. Good luck!

attachment.php

attachment.php
 

Attachments

  • 1950_wilton_cat-101E_pg.06.jpg
    1950_wilton_cat-101E_pg.06.jpg
    129 KB · Views: 134
  • 1953_wilton_cat-109_pg.25.jpg
    1953_wilton_cat-109_pg.25.jpg
    132.4 KB · Views: 130
Last edited:
OP
V

Voi

Well-known member
Joined
Oct 10, 2010
Messages
5,147
Location
Western South Dakota
Voi...Use the -2- diagrams below to better understand what the OEM setup was. You're missing the original pins (rivets), see part #7.

So the rivets go through the holes where the cotter pin is in my pictures?

I probably shouldn't have tackled this project today. Boys are home schooling during quarantine and computer time is at a premium. I'll watch YouTube videos later.

Thank you for the diagrams. Very helpful.

Is part #6 easily removable? I haven't cleaned the main body yet but it does appear there are two pins holding it on. Just use a punch to drive them out?

I'm not sure I really need to remove it but if I can buy a replacement that might be best. But I need to get the rest of the vise taken apart before I decide what to spend money on. Have some parts soaking in Evapo-Rust since my PB Blaster is at the cabin.
 

Fierljeppen

Well-known member
Joined
Jan 26, 2018
Messages
1,159
So the rivets go through the holes where the cotter pin is in my pictures?

Is part #6 easily removable? I haven't cleaned the main body yet but it does appear there are two pins holding it on. Just use a punch to drive them out?

A photo from the side would be helpful. I'm not exactly sure if those holes are the original ones at this point.

Part #6 isn't necessarily easy to get out. With a good video, the right tools and of course a little time, it can be done for sure!
 
OP
V

Voi

Well-known member
Joined
Oct 10, 2010
Messages
5,147
Location
Western South Dakota
I assumed they weren't the original holes because they didn't appear centered. But I'll take a picture.

My inclination this morning was to leave part #6 on the main body. I will leave it be for now.
 
OP
V

Voi

Well-known member
Joined
Oct 10, 2010
Messages
5,147
Location
Western South Dakota
More pictures. Put a drill bit through both holes to show how off center they are.
 

Attachments

  • 20200326_134940.jpg
    20200326_134940.jpg
    80.1 KB · Views: 31
  • 20200326_134852.jpg
    20200326_134852.jpg
    62.6 KB · Views: 26
  • 20200326_134749.jpg
    20200326_134749.jpg
    100.1 KB · Views: 26
  • 20200326_134730.jpg
    20200326_134730.jpg
    46.9 KB · Views: 26
  • 20200326_134701.jpg
    20200326_134701.jpg
    50.5 KB · Views: 32
OP
V

Voi

Well-known member
Joined
Oct 10, 2010
Messages
5,147
Location
Western South Dakota
In the fourth picture I'm using the drill bit to show the pin further back from the holes the cotter pin was in.

I assume this is what you mean by pin removal. I'm talking about the holes closer to back of the vise.

Could this cotter pin have been doing anything important other than hold things in place until the main screw was threaded in?

I'll try to get more parts cleaned up & removed & post more pictures.
 

FJ 432

Well-known member
Joined
Aug 2, 2010
Messages
3,734
Location
Littleton Colorado
The pins center part #7 in place so that part #12 can be threaded in the center.

I believe my C1 has off centered pins as well.
 

drivesitfar

Well-known member
Joined
Oct 23, 2013
Messages
36,034
Location
Pacific Northwest
Voi: didn't you exchange the pins on another wilton bullet vise with screws a couple years ago and document it on the VISE REPAIR 101 THREAD?

or are these holes not lining up with the vise nut to hold it in place?

best of luck with the QUARANTINE for you and your family. :thumbup:
 
To avoid these ads, REGISTER NOW!
OP
V

Voi

Well-known member
Joined
Oct 10, 2010
Messages
5,147
Location
Western South Dakota
The pins center part #7 in place so that part #12 can be threaded in the center.

I believe my C1 has off centered pins as well.

Makes sense. Thanks.

What about the cotter pin in the original post? Could this possibly have been doing anything?
 
OP
V

Voi

Well-known member
Joined
Oct 10, 2010
Messages
5,147
Location
Western South Dakota
Voi: didn't you exchange the pins on another wilton bullet vise with screws a couple years ago and document it on the VISE REPAIR 101 THREAD?

or are these holes not lining up with the vise nut to hold it in place?

best of luck with the QUARANTINE for you and your family. :thumbup:

No. Not me. I bought this vise at a service station auction many years ago & put it in my future projects storage area. I've never used it or attempted to take it apart until today.

Starting to think I should have picked another one from the stash. This one is fighting me.
 

FJ 432

Well-known member
Joined
Aug 2, 2010
Messages
3,734
Location
Littleton Colorado
The cotter pin may have been used as a make shift solution to hold the end cap.

Now that I look at your photos more closely the pin/rivets are not as far back as your holes. I think if you were to take paint off around the end (part number 6) and the assembly you would see the pins/rivets placed by Wilton.

I see them now, just behind the W in Wilton.
 
OP
V

Voi

Well-known member
Joined
Oct 10, 2010
Messages
5,147
Location
Western South Dakota
The cotter pin may have been used as a make shift solution to hold the end cap.

Now that I look at your photos more closely the pin/rivets are not as far back as your holes. I think if you were to take paint off around the end (part number 6) and the assembly you would see the pins/rivets placed by Wilton.

I see them now, just behind the W in Wilton.

Yes. And behind the N in the picture of the opposite side. That's the one I'm pointing to with the drill bit.

So if I were to turn this vise into a user I don't need to worry about what the cotter pin was doing? I took it out first this morning and it didn't appear to be doing anything.

Any idea on how to do a lipstick repair to the damaged end of part #6?

If I were to find a freeze cap that fit could I build up around it with some sort of filler? Maybe fiber filled Bondo or JB Weld or something?

Maybe it won't bother me once I find a makeshift end cap but for now it's the aesthetic weak point of this vise.
 

drivesitfar

Well-known member
Joined
Oct 23, 2013
Messages
36,034
Location
Pacific Northwest
Voi: sorry i was sure it was you that did the pin to screw fix on a Wilton bullet and documented it on the Vise Repair 101 thread. if not I apologize and still think that is a great upgrade for all bullets and A E Neuman documented one along with a few others so you might want to move your pictures and questions to that thread for help if you need some.

did you already take the pins out of the vise nut to remove it or was it already apart?

I think your method of finding a freeze plug or making a dust cap and filling the voids of the damaged end of your C1 with JB Weld or Devcon or some other epoxy or maybe welding it should make it look better.

I can't see that cotter pin doing anything that far back after looking at your pictures a bit closer cause the pins holding the vise nut in should not be so close to the end of that part.

good luck
 
OP
V

Voi

Well-known member
Joined
Oct 10, 2010
Messages
5,147
Location
Western South Dakota
Voi: sorry i was sure it was you that did the pin to screw fix on a Wilton bullet and documented it on the Vise Repair 101 thread. if not I apologize and still think that is a great upgrade for all bullets and A E Neuman documented one along with a few others so you might want to move your pictures and questions to that thread for help if you need some.

did you already take the pins out of the vise nut to remove it or was it already apart?

I think your method of finding a freeze plug or making a dust cap and filling the voids of the damaged end of your C1 with JB Weld or Devcon or some other epoxy or maybe welding it should make it look better.

I can't see that cotter pin doing anything that far back after looking at your pictures a bit closer cause the pins holding the vise nut in should not be so close to the end of that part.

good luck

No need to apologize. This is the only Wilton vise I've owned so it could not have been me. I'll move my questions to that thread. Thanks.

As far as removing the main nut, it pulled out the back after I backed the main screw out. Was this not supposed to come out without removing those pins?

Appreciate any input. Sounds like I need some YouTube time.
 
OP
V

Voi

Well-known member
Joined
Oct 10, 2010
Messages
5,147
Location
Western South Dakota
As far as removing the main nut, it pulled out the back after I backed the main screw out. Was this not supposed to come out without removing those pins?

Answering my own question. Watched a couple of YouTube videos and went back down to my garage and cleaned up the main nut and poked around where pin holes should be.

Sure enough there were two holes where the pins were supposed to go.

Started cleaning up part #6 and found some evidence that somebody had done some welding to build up the damaged area.

I felt around the inside of the main body where the pins should be protruding into the main body and felt nothing. Might just be too much grease.

Tried to punch out what was left of the pins and I suspect they are also welds. I will drill them out tomorrow.

Drives I have your Vise Repair thread bookmarked and I'll look up that screw/pin replacement. Right now I'm still in the rusty parts removal stage and am torn between making this into a user vs selling it as parts as originally planned.

Fortunately I got this thing for next to nothing.
 
Last edited:

drivesitfar

Well-known member
Joined
Oct 23, 2013
Messages
36,034
Location
Pacific Northwest
Voi: here's the link for you and others for the vise repair 101 thread and i posted up my thoughts over there about your vise too already.

leave the old holes plugged and maybe turn the cap 180 degrees and drill two new holes for the new pins which should solve your issue. THEN maybe improve and upgrade the pins by putting in screws and i'll refer to the posts in the 101 thread on how to do that if you need help.

good luck and the Wilton C series bullet vises are their top of the line so saving it and making it work again should be worth your time.
 
To avoid these ads, REGISTER NOW!
Top Bottom