To avoid these ads, REGISTER NOW!

Wilton No. 4 Pat Pend - Siezed

mgmlvks

Well-known member
Joined
Jul 28, 2017
Messages
200
Location
Leavenworth, KS
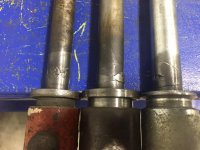
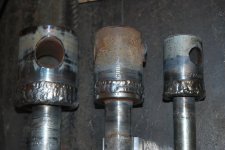
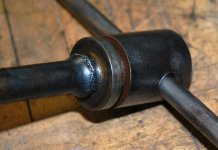
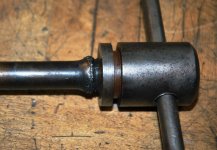
WooHoo - been on a roll with vintage vises lately, and this was the best one yet. From a roadside thrift store in NE Oklahoma - used, not greatly abused. I see no cracks, welds, giant hammer marks, etc. So finally signed up for GJ to get my brain in the game.

It is seized, but then I did not try to hard to deal with it as I am visiting out of town. Insight and advice appreciated.

1. I have read (the entire) thread on Wilton History. lack of PB pics makes that a challange
2. I will report date code when disassembled
3. I will try to determine original color

Questions -
1. Is there a guide to disassembly of this Model/Style?
2. Advice on how to unseize

Pics below:
36062117422_6dcf03381f_z.jpg


35394210454_b251ebd13d_z.jpg


35422056053_67b4db1705_z.jpg


35394209034_1687beaab0_z.jpg
 
Last edited:
To avoid these ads, REGISTER NOW!

1982fxr

Well-known member
Joined
Jan 7, 2012
Messages
10,003
Location
Phoenix
If trying harder doesn't get it, Most will say to give it a soak.

I like diesel/atf.
 

G-ManBart

Well-known member
Joined
Jan 24, 2015
Messages
2,059
Location
Michigan
Don't "try harder" using the handle. All that will do is mess up the horseshoe collar holding the spindle in place or strip the screws holding it.

Remove the three screws holding the collar in place. Unscrew the spindle all the way. Use a dowel or metal bar through the nut to tap the dust cap out of the tail cap assembly. Determine if you have one pin holding the tail cap assembly in place (and the nut) or one pin from each side.

If you scroll down a way I detail how to take apart a Wilton with two pins in this article:
http://mivise.com/vise-restoration-process/

If you have only one pin, it's a bit easier...carefully drive it out from one side until it's out. Then push the nut out the back of the vise and tap out the tail cap assembly. That will let you access the back of the slide.

Bolt the vise down to a bench...if you don't bolt it down, you're probably going to waste a bunch of time. Find a socket that barely fits inside the body of the vise and hit it with a hammer a few times. If the slide doesn't come loose, it's time for a slower process.

Get some Evapo-Rust and a bucket or tote big enough to submerge the vise so that all of the slide is covered. Let it sit for a couple of days (it won't hurt the metal). Remove the vise, mount it to the bench and try a few hits with the socket and hammer again. It's probably going to be free at that point, but if not, give it another 2-3 days and try again. If that doesn't work, report back and we'll give you more ideas.

I just unstuck a seriously stuck Wilton 600 using this method. If it'll work on a rusty, stuck 135lb vise, it should work on yours....this thing was rusty!

This is after I took it out of the Evapo-Rust. In the disassembled pic you can see the corrosion on the slide. Luckily it didn't get to the point it will be pitted. The key on the bottom of the slide was pitted a bit, and so was the keyway....probably what had it seized more than anything else.
 

Attachments

  • IMG_4511.jpg
    IMG_4511.jpg
    141.9 KB · Views: 151
  • IMG_4512.jpg
    IMG_4512.jpg
    131.5 KB · Views: 153
Last edited:

Fretters

Well-known member
Joined
Jan 25, 2014
Messages
4,217
Location
South Yorkshire, England
He's better off using a lump of wood rather than a socket if he's whacking it from the rear. You always want to use something softer than the material you're working on, if possible.
 

Shiftless

Well-known member
Joined
Mar 9, 2014
Messages
14,524
Location
East Bay SFO
I had a seized 4 inch bullet myself. Bought it for $60. I fashioned a puller with some 3/4 inch all thread and a stack of washers so I could use gradual force pulling against the back of the slide. Needless to say, I removed the swivel base before proceeding.

That is a 24 inch breaker bar in the pic.

Details on the vise repair thread.
 

Attachments

  • image.jpg
    image.jpg
    78.8 KB · Views: 114
Last edited:

G-ManBart

Well-known member
Joined
Jan 24, 2015
Messages
2,059
Location
Michigan
He's better off using a lump of wood rather than a socket if he's whacking it from the rear. You always want to use something softer than the material you're working on, if possible.

I've tried that several times on stuck vises and it almost never works (one time it did). The wood simply deforms too easily. I'm not talking about taking big swings with a sledge, just solid hits. If it doesn't move with a few solid hits, it's time for a longer soak.

I haven't had any damage to the slide using a socket, but I was careful to size them correctly so they were making contact all the way around the slide.
 
OP
M

mgmlvks

Well-known member
Joined
Jul 28, 2017
Messages
200
Location
Leavenworth, KS
Well - made it home - will be a bit before i get to the vise - currently held vertically and being liberally applied with PB Blaster. Can get about 1/2 rotation on the screw. Also - screws in the horseshoe seem to be hex-head - I had not seen that in my research - any thoughts?

36109336872_01d0f30f50_z.jpg


35472109863_2599ffa7c7_z.jpg
 

JimNC

Well-known member
Joined
Jul 9, 2017
Messages
580
Location
NC
That you can turn the handle shows that the screw and nut are not rusted together, that 1/2 turn is the amount of backlash. If you apply more force you'll break something.

I can't tell from the angle of your pic if they are hex headed or just stripped Phillips head screws.

Keep adding oil!
 

Shiftless

Well-known member
Joined
Mar 9, 2014
Messages
14,524
Location
East Bay SFO
Looks kinda like stripped Phillips head screws. Try scraping out the paint from the holes with dental tools or something similar.
If it was mine, I would try to remove those 3 screws. You'll have to do that sooner or later anyway. With those screws removed, you can slip off the horseshoe collar and crank the main screw out of the vise. If the vise is stuck, you can't just crank it open with extreme force. Those 3 screws will break and then you'll have a worse problem.
 
OP
M

mgmlvks

Well-known member
Joined
Jul 28, 2017
Messages
200
Location
Leavenworth, KS
Looks kinda like stripped Phillips head screws. Try scraping out the paint from the holes with dental tools or something similar.
If it was mine, I would try to remove those 3 screws. You'll have to do that sooner or later anyway. With those screws removed, you can slip off the horseshoe collar and crank the main screw out of the vise. If the vise is stuck, you can't just crank it open with extreme force. Those 3 screws will break and then you'll have a worse problem.

Thanks - I have pretty much come to the conclusion that they are stripped Phillips screws too. I have not picked or cleaned them yet - but nothing I've seen "out there" with this much old paint and wear and tear has anything but screws on the horseshoe collar.

I keep feeding it PB Blaster. Will try the gentle method on these screws, and if nothing moves - will add some heat to them. If still stuck, try to grind a slot or some flat sides on them to get a better grip with the vise-grips.

Might be a couple of days to get there from here.
 

jimgood

Well-known member
Joined
Aug 4, 2014
Messages
2,394
Location
Marshall, VA
Before you destroy the screws any more, it might be better to weld a nut on top of them. You have to replace them any way so might as well give yourself the best chance at removal.
 

thehorse13

Well-known member
Joined
Mar 15, 2015
Messages
3,477
Location
Jefferson County, WV
Before you really start wrestling with this vise, I would consider taking it out of those vise jaws. The sight of the way it's gripped in there is giving me the shakes. lol.

Seriously though, you can easily mar up that nice bullet with one wrong move. Vise jaws are not a friendly place to be.

Welding a nut on is a good way to go. Prep the surface of the stripped screws the best you can. Your idea of grinding in flat head recesses might work too but if those screws are really in there you may not have enough bite before they give out.
 

rlitman

Well-known member
Joined
Oct 18, 2010
Messages
24,591
Location
Long Island
Don't "try harder" using the handle. All that will do is mess up the horseshoe collar holding the spindle in place or strip the screws holding it...

Only if he tries to open it with the handle. But his jaws are frozen with a gap between them, and that's a big help here.

If it were mine, before doing anything else, I'd use a wire wheel to clean up the cylinder of the dynamic jaw, so that if you do manage to close it, you won't make it tighter.

Then, I would give it a good soaking in penetrating oil.

When it's good and ready, I'd try to CLOSE it a little. NOT all the way, but just enough to crack the corrosion loose and free up the dynamic jaw. A little movement here should give the penetrating oil new paths to soak into. Keep doing this until it feels safe to try to open it.
 

G-ManBart

Well-known member
Joined
Jan 24, 2015
Messages
2,059
Location
Michigan
I wouldn't suggest welding anything to the screws retaining the collar...really no need.

The screws are soft, and if you carefully drill with a couple of increasing size bits, you'll be able to slip the collar off, unscrew the spindle, and get at the remainder of the screws with a pair of vise grips. The heads are small, so you can't really torque them down too hard in the first place, so every single one I've had like this has turned out without even adding heat.

Trying to add heat to those little screws with the collar in place won't do much, and the mass of the vise will soak up a lot of that heat to start with.

The first thing I try is a Speed Out...that gets 90% of them. The rest I drill out carefully and turn with vise grips.

These are incredibly handy...work really well on jaw bolts too.


https://www.amazon.com/dp/B00IRL3WP4/?tag=atomicindus08-20
 

Mark in Indiana

Well-known member
Joined
Aug 11, 2010
Messages
3,057
Location
Southern Indiana
For me, it would be as exciting as Christmas Eve to a 7 year old to get that Bullet open.
I think I would fill a 5 gal. bucket with 50/50 ATF/acetone and let it soak for a month.
Good luck.
 

G-ManBart

Well-known member
Joined
Jan 24, 2015
Messages
2,059
Location
Michigan
I've often wondered if those SpeedOut bits worked. Maybe I will grab a set next time I place an Amazon order.

They are shockingly good. I bought a set because I saw them and figured "why not?"...man am I glad I did! The drill bit part on mine are starting to dull after many uses. I'm not sure if the drill doctor we have at work will sharpen them or not, but I'll probably just order another set since they're cheap.
 
To avoid these ads, REGISTER NOW!

G-ManBart

Well-known member
Joined
Jan 24, 2015
Messages
2,059
Location
Michigan
As others have said, I would get that bullet out of the other vise. I just looked at the picture again, and the dynamic jaw is on a part of the casting that's only about 1/4" thick and you could very easily crack it.
 
OP
M

mgmlvks

Well-known member
Joined
Jul 28, 2017
Messages
200
Location
Leavenworth, KS
Small WooHoo! I started opening the Christmas Present. First - removed from the vise, thanks for the urgings to do so. Studied the screws on the horseshoe collar - holes did not appear wobbled, saw some knurlings, and Yes - against all expectations - they were hex hex-head screws - WOW! Came right out, so did the main screw.

Observations -
1. There were a LOT of metal filings in the open end of the horseshoe
2. A lot of wear on the horseshoe, it has remnants of green paint on the outer edge. Is that honest wear, or does this need to be replaced?
3. Having a hard time looking for the pins - surprised by that!
4. Main screw has some welding - is that a repair or as it was built?

Comments and Insight appreciated

35494742523_e7a0af92df_z.jpg


36167387801_64700f577d_z.jpg


36300683455_47d77f50fe_z.jpg


36167420461_0431434b22_z.jpg
 

G-ManBart

Well-known member
Joined
Jan 24, 2015
Messages
2,059
Location
Michigan
Small WooHoo! I started opening the Christmas Present. First - removed from the vise, thanks for the urgings to do so. Studied the screws on the horseshoe collar - holes did not appear wobbled, saw some knurlings, and Yes - against all expectations - they were hex hex-head screws - WOW! Came right out, so did the main screw.

Observations -
1. There were a LOT of metal filings in the open end of the horseshoe
2. A lot of wear on the horseshoe, it has remnants of green paint on the outer edge. Is that honest wear, or does this need to be replaced?
3. Having a hard time looking for the pins - surprised by that!
4. Main screw has some welding - is that a repair or as it was built?

Comments and Insight appreciated

Nice!

I would replace the collar....once they show wear it's time to get a new one.

You may have to run a wire wheel over the back of the vise to find the pins, but if you run a dowel through the nut and tap out the dust cap it will make things easier. If you see the pins holes in the nut (from the inside), you know it's the kind with two pins...one on each side. If you don't, it's the kind with one long pin down low.

Spindles often look just like that in the same place...rough and crude...very common and nothing to worry about.
 

Shiftless

Well-known member
Joined
Mar 9, 2014
Messages
14,524
Location
East Bay SFO
Gman has good advice. I agree with everything he says. Experience counts!
One addendum though...it's a good idea to round off the end of the dowel used to punch out the rear cap. It is made of thin sheet metal and will be deformed by the sharp edges of a square cut wooden dowel.
Select a dowel size to just barely pass through the big nut. A couple of light taps and that black cover should pop right off. Unless there is too much paint, which it appears might be the case. :)
Try to approximate the curvature of the back cap by sanding a similar curve onto the end of your dowel.
 
Last edited:

thehorse13

Well-known member
Joined
Mar 15, 2015
Messages
3,477
Location
Jefferson County, WV
If you damage the end cap, don't worry too much. KMScott makes beautiful replacements that are far better than the originals. You could hit one of his end caps with a sledge hammer and it would laugh at you.

I would look for a new main screw. That thing will never be as strong as an unbroken one. The collar has seen enough action too. The good news is that you can easily find those parts for a Wilton.

As for the pins, they will magically appear once you strip the paint off the vise body. They will be on one or both sides of the vise body a few inches back from the nose. Again, they are almost impossible to see unless the paint is removed from the vise.

Merry Christmas.
 

G-ManBart

Well-known member
Joined
Jan 24, 2015
Messages
2,059
Location
Michigan
If you damage the end cap, don't worry too much. KMScott makes beautiful replacements that are far better than the originals. You could hit one of his end caps with a sledge hammer and it would laugh at you.

I would look for a new main screw. That thing will never be as strong as an unbroken one. The collar has seen enough action too. The good news is that you can easily find those parts for a Wilton.

As for the pins, they will magically appear once you strip the paint off the vise body. They will be on one or both sides of the vise body a few inches back from the nose. Again, they are almost impossible to see unless the paint is removed from the vise.

Merry Christmas.

That spindle was never broken...they frequently look that way from the factory. I've had to smooth off sharp edges that were like a razor on one and the next one, same model, same vintage, was smooth as can be....no idea why.
 
OP
M

mgmlvks

Well-known member
Joined
Jul 28, 2017
Messages
200
Location
Leavenworth, KS
That spindle was never broken...they frequently look that way from the factory.
Thanks - I am pretty sure that these were welded at the factory. I looked at pictures here and on "that auction site" and saw quite a variation in finishes, but in essentially all cases that there was a good picture - appears that "something" happened at this location on the spindles.

Am guessing that the reason is it conserves a ton of material since the main part of the handle is so much larger in diameter than the threaded portion, and this excess diameter would have been wasted in a production environment if made from a single piece of steel.
 

thehorse13

Well-known member
Joined
Mar 15, 2015
Messages
3,477
Location
Jefferson County, WV
That spindle was never broken...they frequently look that way from the factory. I've had to smooth off sharp edges that were like a razor on one and the next one, same model, same vintage, was smooth as can be....no idea why.

That's an interesting data point.

I've torn down three 4 inch Wiltons and just recently my little 3 inch bullet. They range from late 40s to mid 60s vintage. All of them had silky smooth metal on the main screw with no sign of heat discoloration.

4 vises is hardly a good sample set but the question now rattles in my mind as to how/why some are perfect in that area while others look like they've been snot welded.
 

G-ManBart

Well-known member
Joined
Jan 24, 2015
Messages
2,059
Location
Michigan
Thanks - I am pretty sure that these were welded at the factory. I looked at pictures here and on "that auction site" and saw quite a variation in finishes, but in essentially all cases that there was a good picture - appears that "something" happened at this location on the spindles.

Am guessing that the reason is it conserves a ton of material since the main part of the handle is so much larger in diameter than the threaded portion, and this excess diameter would have been wasted in a production environment if made from a single piece of steel.

I've certainly noted the same thing, but I do have one spindle that shows no evidence of anything happening there...odd. It came from a 1970s C1. I'll post pictures in a minute.
 

G-ManBart

Well-known member
Joined
Jan 24, 2015
Messages
2,059
Location
Michigan
That's an interesting data point.

I've torn down three 4 inch Wiltons and just recently my little 3 inch bullet. They range from late 40s to mid 60s vintage. All of them had silky smooth metal on the main screw with no sign of heat discoloration.

4 vises is hardly a good sample set but the question now rattles in my mind as to how/why some are perfect in that area while others look like they've been snot welded.

I had to go count, and I'm over 60 Wiltons that I've either worked or restored. I've noted a pretty broad spectrum of what spindles look like it that area. I grabbed every spindle not in a vise and took a couple of pictures. The first picture is just a lineup. As you can see, even the spindles that are smooth in that area often show a bright area that's been machined smooth. Many of those when you look closely you can see they aren't exactly flush with one another, but are blended so they're smooth.

Only one shows no evidence of that happening.....second from the last on the right. As best I can tell that one was machined as one piece...it also has slightly different (sharper) lines in a few spots as well. It came from an early 1970s C1.

The worst three are the red one (1945 or earlier 935), the middle one (1946 4" HD) and a mid-1980s 450S. They've got lots of junk left visible....why I took the second picture. I've seen a few that were actually worse, but those are long gone.
 

Attachments

  • IMG_4547.jpg
    IMG_4547.jpg
    143.5 KB · Views: 74
  • IMG_4548.jpg
    IMG_4548.jpg
    143.2 KB · Views: 70
Last edited:

Bellaireroad

Well-known member
Joined
Mar 22, 2013
Messages
636
Location
Fort Worth
I had to go count, and I'm over 60 Wiltons that I've either worked or restored. I've noted a pretty broad spectrum of what spindles look like it that area. I grabbed every spindle not in a vise and took a couple of pictures. The first picture is just a lineup. As you can see, even the spindles that are smooth in that area often show a bright area that's been machined smooth. Many of those when you look closely you can see they aren't exactly flush with one another, but are blended so they're smooth.

Only one shows no evidence of that happening.....second from the last on the right. As best I can tell that one was machined as one piece...it also has slightly different (sharper) lines in a few spots as well. It came from an early 1970s C1.

The worst three are the red one (1945 or earlier 935), the middle one (1946 4" HD) and a mid-1980s 450S. They've got lots of junk left visible....why I took the second picture. I've seen a few that were actually worse, but those are long gone.


Interesting ... what's your theory of how they were manufactured ?


Sent from my iPhone using Tapatalk Pro
 

KMScott

Well-known member
Joined
Feb 14, 2012
Messages
4,640
Location
Daufuskie Island, South Carolina
They friction weld about 80% of all spindles on most of the vises, Just to much material to cut, American Scale pins their handle support but most friction weld their spindles. The acme and square threads are cut with a die head, all in one shot. You need a pretty heavy duty machine. I hear some mention making their own spindles but I would never spend time trying. Just to much tool pressure.

I have welded up a few and re set the groove placement and width. Wilton did not think their washer through since chips and crud can get in the groove and act like sand paper. Always a good idea to pull your washer, clean and grease. I might have gotten of track so excuse me if I did.
 

Attachments

  • Wilton Groove Repair (7).jpg
    Wilton Groove Repair (7).jpg
    139.3 KB · Views: 57
  • Wilton Groove Repair (1).jpg
    Wilton Groove Repair (1).jpg
    133.3 KB · Views: 59
  • Spindle repair (2).jpg
    Spindle repair (2).jpg
    141 KB · Views: 59
  • Friction Welding-union Parker (2).jpg
    Friction Welding-union Parker (2).jpg
    74.8 KB · Views: 55
  • Friction Welding-union Parker (1).jpg
    Friction Welding-union Parker (1).jpg
    140.5 KB · Views: 61
  • Friction_welding01.JPG
    Friction_welding01.JPG
    74.4 KB · Views: 72

Shiftless

Well-known member
Joined
Mar 9, 2014
Messages
14,524
Location
East Bay SFO
Kevin:
Thanks for posting that page on friction welding. Educational! I'm probably not the only one previously in the dark about how it is done.
 
OP
M

mgmlvks

Well-known member
Joined
Jul 28, 2017
Messages
200
Location
Leavenworth, KS
OK - as for "The Pins" - this being an early "Pat Pen" vise - think "The" pins may be "A" pin rather than "2" pins. Pic below shows where I think the pin is. Vise is upside down as I hit the swivel locks with PBB in an effort to loosen up - but this sure looks like it is way lower than the more common two pin later version.

I know I need to wire brush the other side to see what is there - but time is at a premium for me at this moment - and am plotting ahead.

If a single pin - any insight as to how to remove - the angle is pretty steep -

Suspect I will give up on disassembly and get a five gallon bucket of ATF/Acetone (or maybe the molasses option) and wait a week or three and see what happens.

36207450251_302de2394b_z.jpg


35535390923_c904c0a4f6_z.jpg
 
Last edited:

G-ManBart

Well-known member
Joined
Jan 24, 2015
Messages
2,059
Location
Michigan
OK - as for "The Pins" - this being an early "Pat Pen" vise - think "The" pins may be "A" pin rather than "2" pins. Pic below shows where I think the pin is. Vise is upside down as I hit the swivel locks with PBB in an effort to loosen up - but this sure looks like it is way lower than the more common two pin later version.

I know I need to wire brush the other side to see what is there - but time is at a premium for me at this moment - and am plotting ahead.

If a single pin - any insight as to how to remove - the angle is pretty steep -

Suspect I will give up on disassembly and get a five gallon bucket of ATF/Acetone (or maybe the molasses option) and wait a week or three and see what happens.

35535390923_c904c0a4f6_z.jpg

The pin isn't in the circled area...it's just above it in the photo, which is slightly lower on the vise. You can see your black marker line just barely touches it. Hit that area for a second with a wire wheel and it will be obvious.

I don't know what 5gal of ATF/acetone would cost, but I would't be surprised if Evapo-Rust was cheaper (you can get it delivered from Amazon)....non-toxic, biodegradable, and doesn't stink.
 

thehorse13

Well-known member
Joined
Mar 15, 2015
Messages
3,477
Location
Jefferson County, WV
OK - as for "The Pins" - this being an early "Pat Pen" vise - think "The" pins may be "A" pin rather than "2" pins. Pic below shows where I think the pin is. Vise is upside down as I hit the swivel locks with PBB in an effort to loosen up - but this sure looks like it is way lower than the more common two pin later version.

I know I need to wire brush the other side to see what is there - but time is at a premium for me at this moment - and am plotting ahead.

If a single pin - any insight as to how to remove - the angle is pretty steep -

Suspect I will give up on disassembly and get a five gallon bucket of ATF/Acetone (or maybe the molasses option) and wait a week or three and see what happens.

This is how I remove Wilton pins. There may be other ways but this worked for me every time.

Wilton Pin Removal Video
 
OP
M

mgmlvks

Well-known member
Joined
Jul 28, 2017
Messages
200
Location
Leavenworth, KS
WooHoo! Single Pin. Pin broke coming out (actually it had been broken a LONG time in the nut). Nut Removed. Jaws Still Seized. Swivel Base Removal Next

36316958906_47fcb53cf7_z.jpg


35552873853_6df2d368c1_z.jpg
 
Last edited:
To avoid these ads, REGISTER NOW!
Top Bottom