To avoid these ads, REGISTER NOW!

Wilton No3 end cap cracked

SnowB0und

Member
Joined
Mar 19, 2016
Messages
18
Found this vise when we bought our house, was rusted so much it wouldn't screw in more than 1/3 the way. Long story short got it cleaned up and working but it appears I broke the "end cap" where one of the roll pins goes through. Should I epoxy it in find a new end cap? I'm super bummed it happened because I really like the vise.

EDIT: Does anyone know the specs for the roll pins I need to order one.
 

Attachments

  • IMG_1100.jpg
    IMG_1100.jpg
    137.6 KB · Views: 105
  • IMG_1101.jpg
    IMG_1101.jpg
    150.1 KB · Views: 125
Last edited:
To avoid these ads, REGISTER NOW!
OP
S

SnowB0und

Member
Joined
Mar 19, 2016
Messages
18
Sorry the pictures are upside down apparently they flipped around when they got resized.
 

G-ManBart

Well-known member
Joined
Jan 24, 2015
Messages
2,059
Location
Michigan
I'm a bit confused since the hole visible in the photos is where the pin goes through, not where the housing is cracked.

Yours should have one long pin, probably 3/16" diameter that goes from one side to the other. Newer vises have two pins that are placed higher.

Generally speaking, new tail cap assemblies simply aren't available. Wilton hasn't made them for decades. I just bought a junk vise just to get the tail cap assembly and nut from it to fix another basket case vise. You can keep your eye on eBay, but if one comes available, it will likely sell in minutes unless the price is ridiculous.

For some reason this forum software only works with photos taken on a phone held sideways. If you take the picture with the phone vertical, it displays them sideways. Some sites have a plugin to correct for that, but not here evidently.
 
OP
S

SnowB0und

Member
Joined
Mar 19, 2016
Messages
18
Thats what I figured, Mine had 2 separate pins, or maybe one pin that got switched to two. The part that is cracked is inside on that tail cap where the pin goes through. I just assembled it to see if it would work at all. Which it seems to work just fine, it just bothers me its cracked in there. I'll keep an eye out on eBay.
 

G-ManBart

Well-known member
Joined
Jan 24, 2015
Messages
2,059
Location
Michigan
Thats what I figured, Mine had 2 separate pins, or maybe one pin that got switched to two. The part that is cracked is inside on that tail cap where the pin goes through. I just assembled it to see if it would work at all. Which it seems to work just fine, it just bothers me its cracked in there. I'll keep an eye out on eBay.

Sorry, the perspective of the one pic threw me off...I thought that was a chunk out of the body of the vise rather than a broken piece off the tail cap.

If you can, post a picture of the tail cap off the body. I have a way to repair cracked pin supports, but it depends upon how/where the crack is.

If your vise had only one pin the holes in the side of the body would have been very low, and not gone through the center of the nut. I don't see an easy way to go from one pin to two...the parts are different.

I check eBay every day and have never seen a tail cap assembly by itself, but it doesn't hurt to look. Normally you'll find vises with broken tail caps, not good tail caps with broken vises...just the way it seems to work out.
 
Last edited:

eddieK

Well-known member
Joined
Mar 2, 2017
Messages
695
Location
Nampa Idaho
Sorry, the perspective of the one pic threw me off...I thought that was a chunk out of the body of the vise rather than a broken piece off the tail cap.

If you can, post a picture of the tail cap off the body. I have a way to repair cracked pin supports, but it depends upon how/where the crack is.

If your vise had only one pin the holes in the side of the body would have been very low, and not gone through the center of the nut. I don't see an easy way to go from one pin to two...the parts are different.

I check eBay every day and have never seen a tail cap assembly by itself, but it doesn't hurt to look. Normally you'll find vises with broken tail caps, not good tail caps with broken vises...just the way it seems to work out.

Is there some reason you could not seal the old hole (that is cracked inside) with epoxy and drill a new one and insert a new pin?
 
To avoid these ads, REGISTER NOW!

Carla

MEMBER EMERITUS
Joined
Nov 27, 2010
Messages
672
That end cap can be easily repaired by brazing. If you don't do brazing yourself, find someone local to you who does, its a simple job which should be relatively inexpensive.

Note that the repaired area is only under load, and a very light load, to be sure, when the movable jaw is run out, so a braze is more than adequately strong for the purpose.

After brazing, and filing to fit as may be needed, re-drill the pin holes. The best technique is to drill the holes through, either #7 drill or letter F, to tap 1/4-20 or 5/16-18, as that size of vise may need, and use Allen set-screws, turned or ground down on the end, in place of driven pins. (using set-screws allows for easily taking the vise down for cleaning/oiling in future)
 
OP
S

SnowB0und

Member
Joined
Mar 19, 2016
Messages
18
I'll pull it back apart this weekend, I didn't even think of brazing. I saved the chunk that broke off. It's in one of the pictures above. What kind of epoxy? JB weld? Blaze is probably stronger though?

Great idea on using set screws. It's definitely a 2 pin model, a single pin would intersect the threaded rod.

Thanks again for all of the replies!
 
Last edited:

G-ManBart

Well-known member
Joined
Jan 24, 2015
Messages
2,059
Location
Michigan
Brazing the broken piece back in place isn't likely going to work either.

I think what Carla was suggesting is brazing the hole closed, and building up braze to replace the broken part, then drilling a new hole for the pin. That will work, but it's not really the best way to do it...at least in my opinion after fixing several just like this.

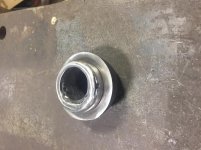
Grind the end cap down so that you remove material just to the level of the pin hole. Get an appropriately sized washer that fits the outer diameter of the tail cap assembly by the pins. Open up the inside diameter of the washer to roughly that of the inside of the tail cap assembly. Braze, or better yet, TIG weld the washer in place.

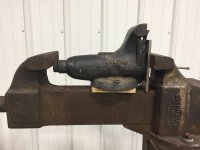
Take the repaired tail cap assembly, put it in the body of the vise, insert the nut, and find something like a socket around the size of the nut, and mount the whole thing in a large vise or clamp (anything will work). That will have the body of the vise, the tail cap assembly, and the nut all lined up.

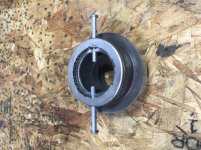
Drill the pin holes one size larger (stock was .250" for this size, so go up to 5/16") and make new pins using dowel pins cut to size.

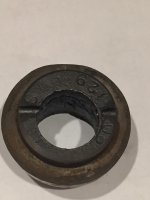
Sorry...the pictures are somewhat out of order and actually from two different repairs. I also never took one after grinding down to the level of the pin holes, but without the washer. Still, you can get the idea. If you don't grind down to the level of the pin holes, there will be slop between the pins and the washer. I actually grind down a bit more than the pin holes because when you drill the new holes it will remove just enough material off the washer to keep things snug. This fix is literally stronger than new when you weld it, and more than strong enough when brazed.
 

Attachments

  • IMG_4086.jpg
    IMG_4086.jpg
    113.6 KB · Views: 21
  • IMG_4111.jpg
    IMG_4111.jpg
    142.9 KB · Views: 21
  • IMG_4199.jpg
    IMG_4199.jpg
    128.6 KB · Views: 26
  • IMG_2715.jpg
    IMG_2715.jpg
    149.7 KB · Views: 22
  • IMG_2711.jpg
    IMG_2711.jpg
    150.9 KB · Views: 21
Last edited:
OP
S

SnowB0und

Member
Joined
Mar 19, 2016
Messages
18
Cool thanks for the pictures. I only have a MIG I'll have to bring it to my friends place and give it a shot. Only one side of mine broke, but it looks just like that.
 
To avoid these ads, REGISTER NOW!
Top Bottom