To avoid these ads, REGISTER NOW!

Window trim gap issue

branimal

Well-known member
Joined
May 31, 2016
Messages
1,938
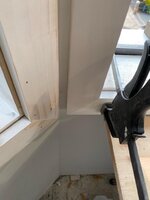
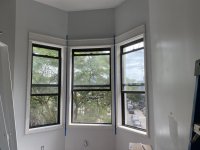
My trim isn’t pulling tight to the jamb extension on the center window pictured below. I clamped it up to see how tight I could get it to fit.

It’s not nailed in yet.

The problem is left vertical trim leg isn’t getting tight to the drywall. My taper used a reinforced paper tape in that 135 degree corner. The right leg is giving me a nice fit. It’s also possible I cut the jamb extension a bit shy of the rock.

I could cut back the drywall along that left leg but I’m afraid it’s gonna make a mess. And fixing that corner will be impossible given there’s minimal space between the windows.

Any other options? I was thinking about easing the back face of the trim with a sander / planer.

1a452fafda56eacabfb2672ca874c04b.jpgf33dc0a774f99abc663f1df071732c9e.jpg0e8f671ff7d84306e16c5d4d628e8484.jpg9e629381f51188fed351bb4400ff9ee3.jpg
 

Attachments

  • 0e8f671ff7d84306e16c5d4d628e8484.jpg
    0e8f671ff7d84306e16c5d4d628e8484.jpg
    81.2 KB · Views: 2
  • f33dc0a774f99abc663f1df071732c9e.jpg
    f33dc0a774f99abc663f1df071732c9e.jpg
    79.1 KB · Views: 1
  • 1a452fafda56eacabfb2672ca874c04b.jpg
    1a452fafda56eacabfb2672ca874c04b.jpg
    54.4 KB · Views: 1
  • 9e629381f51188fed351bb4400ff9ee3.jpg
    9e629381f51188fed351bb4400ff9ee3.jpg
    98 KB · Views: 1
To avoid these ads, REGISTER NOW!
OP
B

branimal

Well-known member
Joined
May 31, 2016
Messages
1,938
Checked the sheetrock and jamb extension with a square and there is indeed a gap.

cde3720c43daa7280aeb4906d0e63940.jpg
 

Attachments

  • cde3720c43daa7280aeb4906d0e63940.jpg
    cde3720c43daa7280aeb4906d0e63940.jpg
    79.2 KB · Views: 3

iced98lx

ALLIANCE MEMBER
Joined
Oct 28, 2013
Messages
1,061
Location
South Eastern SD
You've got a couple options traditionally based on my experience:

attach the trim to the jamb before you put it in, caulk the jam to the window

attach as you are about to, caulk (my preference here..)

pull the jambs, build new ones, scribe them to the wall (I've personally never understood the upsides to this I have never gotten things to work properly..)

If you're painting (appears so) the "Alex" line of caulks from DAP is my favorite but I'm far from a finish trim carpenter.
 

wrenchguy

Well-known member
Joined
Sep 22, 2011
Messages
4,697
Location
NW Indiana
That wide trim is planing off the drywall further away from the edge of the opening where the wall seems thicker. Your not really able to roll it to jamb with a slight bevel mitre cut. Let it into the drywall or add to the extension. It should been noted when making extensions have them out beyond plane at edge of opening a bit. When using wide trim and assembled on table make your extensions using a long top to bottom stick of trim to set the correct projection. Your issue is common to mechanics not knowledgeable using wider trim and extension jamb fabrication. BTW, I would have assembled the trim parts together on the bench like you did.
 

CraigStu

Well-known member
Joined
May 22, 2014
Messages
4,014
Location
Blacksburg, Va
**** google really fails once in a while so I didn't find a pic. I'd attach that as it and get small trim. 1/8-3/16 thick, 1/2 in wide, w/ one edge rounded over. **** the squared edge to the 1x6 (?) and have the rounded over edge on inside surface of your trim board.
 

1MtnGoat

Well-known member
Joined
Aug 18, 2013
Messages
92
Location
Cleveland, TN
No more then the gap is use a good quality minimal shrinking flexible caulk to fill the gap. Caulk and run your finger over it to smooth and make the caulk adhere to the trim. Use a good quality paintable caulk. Cheap stuff will shrink/crack over time. In a year you'll have forgotten about it. Or you can recut the extension. Cut it just proud of the sheetrock. Do not cut into the sheetrock. You will not be happy.
 

Jayman17

Well-known member
Joined
Feb 6, 2017
Messages
3,795
Location
Seattle, Wa
Am I interpreting the photos wrong because it looks like the jamb extension is sticking out past the drywall causing the trim to lay on the jamb cocked, creating the gap. Is the jamb extension MDF or real wood? Easiest way might be to power plane the extension until it is flush with the drywall and then caulk any minor gap. If you have a power plane.
Good luck!

Jay
 
To avoid these ads, REGISTER NOW!

yeldogt

Well-known member
Joined
Jan 2, 2012
Messages
18,184
Things are always off on an old house.


To close the gap you trim the drywall edge when the extension jam has a gap -- you can also trim the back side of the trim -- or both.

I try and keep the extension jams equal -- but sometimes you have to add another angled extension to the jam ...

IMO -- caulk is never the answer. I may use a thin line of phenoseal places -- but I wipe most of it back off w/ a damp rag.
 
OP
B

branimal

Well-known member
Joined
May 31, 2016
Messages
1,938
wrenchguy; said:
That wide trim is planing off the drywall further away from the edge of the opening where the wall seems thicker. Your not really able to roll it to jamb with a slight bevel mitre cut. Let it into the drywall or add to the extension. It should been noted when making extensions have them out beyond plane at edge of opening a bit.

This is where I went wrong. Long story short, I had to do 7 windows this size. In the beginning I was using a combination square to get my measurements for the jamb extensions. After building the jamb extensions this way I noticed they were all coming out a little proud of the drywall. I would then scribe & plane the extension to get a better fit, but I wasn't trying to get an exact fit. I had almost no trim gap issues on the windows I measured out this way.

I got tired of planing, so then I started using a tape in all 4 corners of the windows to measure out the jamb extension. The fits were great..... so i thought. The subject matter window issue was caused by this inaccurate measurement technique.

I ended up planing and sanding the back of the problematic trim piece. Giving it a beveled edge where it was pushing off the drywall. That allowed it to fit closer to the drywall. That along with a 24" Bessey bar clamp (1100lbs of clamping force) pulled everything in tight enough for me. The bessey clamp was really the difference maker. Thanks @Thunderpigeon for the great video you posted above.

I used a brad nailer to nail the trim to the jamb extension and a 15ga nailer to nail the trim to the stud. I did some cross nailing (firing at different angles) with the 15ga nailer to make sure the trim doesn't pull off easily.

I made my future life really hard when I was removing the old windows and re-framing the new ones. I wanted to get the windows as large as possible. And the cheap windows installed here were very narrow. Lots of filler material between the jack stud and window.

Anyway with the larger windows there was barely any room for trim b/w the windows. I ended up using 1x3 for the vertical legs with exception of the window on the right. There I had to use 1x2. It doesn't look terrible until you see the bottom of the window trim. It's 1" higher than the trim on the center window. I might rip a 1" strip and attemp glue and nail it in place. Maybe some wood bondo to hide the gap.
 

Attachments

  • IMG_8649.jpg
    IMG_8649.jpg
    65.1 KB · Views: 45
  • IMG_8648.jpg
    IMG_8648.jpg
    63.2 KB · Views: 50
  • IMG_8647.jpg
    IMG_8647.jpg
    131.6 KB · Views: 46
  • IMG_8651.jpg
    IMG_8651.jpg
    107.5 KB · Views: 50
Last edited:

mille755

Active member
Joined
Jun 14, 2018
Messages
39
Location
Northwest Indiana
Caulk, 2 coats if you need to. Then have a beer and enjoy the day you saved trying to make it perfect. Seriously thought if you use a good tool to smooth it or even just a damp sponge, a good caulk job is more than good enough for paint grade. I'm serious about the 2 coats, it does shrink. All trim needs to be caulked anyway for a proper job. Really makes a house look good, without it things look unfinished. And even if it's perfect today, **** moves and now you have a huge gap. Even on stain grade work I like to see a tight spongewiped bead of clear caulk lto the walls, especially at the baseboards. Because of the shifting and gapping reason.
 

benjamintmiller

Well-known member
Joined
Feb 8, 2011
Messages
284
Location
IA
Most trim carpenters I've seen deal with this by scoring the outside edge with a utility knife, then smashing the drywall in with a hammer so the casing sits flat. It seems excessively brutal, but looks nice and is fast.
 

66cj225

Well-known member
Joined
Nov 4, 2011
Messages
332
Location
NH
Who ever did the 4 3/8 jamb casing should have made it 4 9/16". As the steam valve on the floor suggests, it's not going to be perfect.
 

wrenchguy

Well-known member
Joined
Sep 22, 2011
Messages
4,697
Location
NW Indiana
This is where I went wrong. Long story short, I had to do 7 windows this size. In the beginning I was using a combination square to get my measurements for the jamb extensions. After building the jamb extensions this way I noticed they were all coming out a little proud of the drywall. I would then scribe & plane the extension to get a better fit, but I wasn't trying to get an exact fit. I had almost no trim gap issues on the windows I measured out this way.

I got tired of planing, so then I started using a tape in all 4 corners of the windows to measure out the jamb extension. The fits were great..... so i thought. The subject matter window issue was caused by this inaccurate measurement technique.

I ended up planing and sanding the back of the problematic trim piece. Giving it a beveled edge where it was pushing off the drywall. That allowed it to fit closer to the drywall. That along with a 24" Bessey bar clamp (1100lbs of clamping force) pulled everything in tight enough for me. The bessey clamp was really the difference maker. Thanks @Thunderpigeon for the great video you posted above.

I used a brad nailer to nail the trim to the jamb extension and a 15ga nailer to nail the trim to the stud. I did some cross nailing (firing at different angles) with the 15ga nailer to make sure the trim doesn't pull off easily.

I made my future life really hard when I was removing the old windows and re-framing the new ones. I wanted to get the windows as large as possible. And the cheap windows installed here were very narrow. Lots of filler material between the jack stud and window.

Anyway with the larger windows there was barely any room for trim b/w the windows. I ended up using 1x3 for the vertical legs with exception of the window on the right. There I had to use 1x2. It doesn't look terrible until you see the bottom of the window trim. It's 1" higher than the trim on the center window. I might rip a 1" strip and attemp glue and nail it in place. Maybe some wood bondo to hide the gap.

Look at "all hands on" you got for your next rehab!
We'll prolly not hear from the "experenced 1" next time around!:(
 
To avoid these ads, REGISTER NOW!
Top Bottom