Hi All,
I’m new to the forum, but have been reading quite a lot and decided to finally dig into my garage renovation project. After seeing many of the threads here and looking for something different and "high-end," I've decided to breach the world of tiling. This is my first attempt at laying tile.
Background
I live in a townhome w/ a two car attached garage in northern California. I've been here for 4 years, and I don't have any intentions to move in the foreseeable future, but this also isn't going to be a "forever/dream" home either. I'm a young guy, single at the moment which is probably why I can get away with doing projects like this . I spend a lot of time in the garage, working on motorcycles/cars, and wanted to do a nice, but still cost effective upgrade to it all around. This is all designed to be within reason, someday I'll build my "dream" garage, although I expect this one to be quite a nice step toward that.
Most of my work will be on the weekends simply due to work schedule and requirements. I'll try to do what I can during the weekday evenings, but don't expect to be making a ton of progress outside of the weekends.
I'm open to comments/suggestions/ideas. While I've done a lot of research, I'm adapting as I go. I've already changed my original pattern simply because of the complexity, number of additional required cuts, and my inexperience at laying tile.
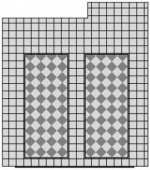
Original Floorplan:

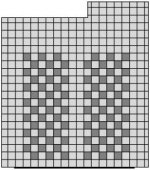
Updated Floorplan:

Techniques Used:
Burn in - Scraping a thin layer of thin set back and forth on the concrete to help adhesion. Then adding additional thin set and using the notched side of the trowel. (I may be calling this technique by the wrong name…)
Back buttering - Applying thin set on the back of each tile to ensure close to 100% adhesion.
Dampen concrete - Use a wet sponge to moisten the concrete as recommended by a couple members to prevent the concrete from sucking the moisture out of the thin set too quickly and allowing a slower curing/stronger bond.
1/2 x 1/2" notched trowel - Not sure if this is necessary for 12" tile, but that’s what seemed to be recommended most often on the board.
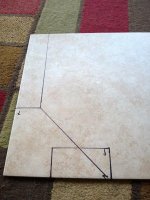
Point all tile arrows the same direction - Each tile has an arrow, make sure they're all pointing the same direction. I probably never would have noticed the arrows if it wasn't for a couple tiling videos I watched.
Mix and match - Mix tiles from various boxes to account for any minor color discrepancies. Better to have a slight color difference accounted for throughout the entire floor instead of all one box together in a single section where it'd stand out like a store thumb. My tile seems to be pretty consistent, but it's cheap insurance.
Lessons learned
Stay with the same brand tile - The accent tiles are a different brand than my primary tile, and just slightly larger. I knew this, but did it anyway. Not the worst decision, but you have to compensate for the size differences with grout lines. I'm using 1/8" grout lines, so there isn't a ton of room to compensate with.
Level the floor! - My floor isn’t perfectly level, but I was hoping to just “fill in” the low spots with a little extra thinset during the tile application. I understand this is not a great approach, but I did it anyway. I was limited to weather conditions last week, and with holidays around the corner/family in and out of town, work, etc… I was trying to get as much done as possible and skipped this step. Wasn’t the worst decision since my floor was mostly flat anyway, but there will be a few spots where it isn't perfect. Should be close, but I have a couple tiles with a little more lipping than I'd like, but I chalk that up to inexperience more than anything at this point. I did a test run with my automotive creeper and it rolls around just fine on the tile, which is the most important part for me.
Keep your batteries charged! - My drill batteries are getting older, and I was burning through them right and left while mixing the thinset. They had been sitting for a while and I had forgotten to "freshen" the charge until after I started mixing water and thinset.
I'm exhausted! - My first batch of tile was put down last Sunday and left me feeling like I got hit by a truck. I have blisters on my hands (worse than crossfit!), bruises on my knees, my back aches, etc… (I'm only 28, I shouldn't feel this old yet!)
Adhesion - The videos I watched for laying tile recommended pulling up a tile every once in a while to ensure 90-100% coverage. When I'm laying tile, there is so much suction, that you'd practically have to break the tile to pull it back up. I've pulled a couple back up by rotating and sliding them off the applied mortar. In practice, I'm only pulling tiles back up if I've really done a poor job aligning it with the other tiles. So far, that's just two tiles. The first one I tried to do this on broke.
Thin set goes faster than expected - Each bag of thin set says it's good for 100 sq. ft. Not sure if I'm using too much, or if it's because of the back buttering, but I seem to be getting about 30 sq. ft. per bag.
FAQ/General Comments I have Received
"You're not going to add any value to the house with that…" - Personally, I'd be pretty excited if I was looking for a new house and someone had decked out the garage! Bottom line, it's not costing me all that much and I'm doing it for ME! If it adds value to the house, then great, a little added bonus.
"Ya know, you should epoxy your garage floor instead…" - (This was LITERALLY said as I was laying my first 3 tiles by a neighbor, with 30+ boxes of tile and many bags of thinset sitting in the garage behind me.)
○ What I wanted to say…"Hey, great idea, would you like to return all of this for me?!" I didn't though, I was nice
○ Epoxy is great, just not the route I chose. After reading a lot on the forums, I personally liked the tile look better and it seems to be more than durable enough. I'm happy with my choice so far, and it's pretty cost effective when you compare it to other flooring options.
"Won't they crack/break?!" - Nope, and if they do, I should have plenty of extras. As proven by a number of members, tile properly applied will be as strong/stronger than the cement under it.
Cost/Materials
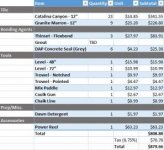
**Cost as of 2013.12.19**
These costs will definitely go up, especially as I buy more thin set. I also received a little bit of a discount on the tile itself that isn't reflected in the total figure. I had some of the necessary tools and/or borrowed them; this just reflects what I've purchased for the project in general.

Progress
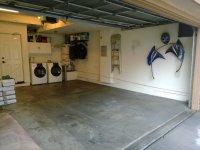
Cleaned out the garage and scrubbed it with hot water and dish soap and thoroughly washed it out.

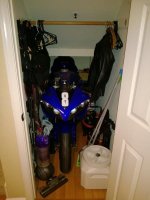
Sometimes you have to get creative with where to put your "stuff" while remodeling the garage Who ever said a hallway closet wouldn't make a good bike garage?

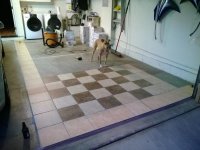
Dry run on laying tiles out and updating my pattern. My helper was making sure all the lines were straight.

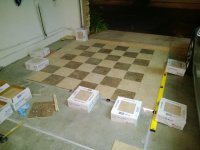
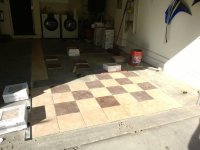
31 tiles laid (1 broken) and about 3-4 hours of work... Definitely experienced the learning curve in the beginning but I'm getting better.

I’m new to the forum, but have been reading quite a lot and decided to finally dig into my garage renovation project. After seeing many of the threads here and looking for something different and "high-end," I've decided to breach the world of tiling. This is my first attempt at laying tile.
Background
I live in a townhome w/ a two car attached garage in northern California. I've been here for 4 years, and I don't have any intentions to move in the foreseeable future, but this also isn't going to be a "forever/dream" home either. I'm a young guy, single at the moment which is probably why I can get away with doing projects like this
. I spend a lot of time in the garage, working on motorcycles/cars, and wanted to do a nice, but still cost effective upgrade to it all around. This is all designed to be within reason, someday I'll build my "dream" garage, although I expect this one to be quite a nice step toward that.Most of my work will be on the weekends simply due to work schedule and requirements. I'll try to do what I can during the weekday evenings, but don't expect to be making a ton of progress outside of the weekends.
I'm open to comments/suggestions/ideas. While I've done a lot of research, I'm adapting as I go. I've already changed my original pattern simply because of the complexity, number of additional required cuts, and my inexperience at laying tile.
Original Floorplan:
Updated Floorplan:
Techniques Used:
Burn in - Scraping a thin layer of thin set back and forth on the concrete to help adhesion. Then adding additional thin set and using the notched side of the trowel. (I may be calling this technique by the wrong name…)
Back buttering - Applying thin set on the back of each tile to ensure close to 100% adhesion.
Dampen concrete - Use a wet sponge to moisten the concrete as recommended by a couple members to prevent the concrete from sucking the moisture out of the thin set too quickly and allowing a slower curing/stronger bond.
1/2 x 1/2" notched trowel - Not sure if this is necessary for 12" tile, but that’s what seemed to be recommended most often on the board.
Point all tile arrows the same direction - Each tile has an arrow, make sure they're all pointing the same direction. I probably never would have noticed the arrows if it wasn't for a couple tiling videos I watched.
Mix and match - Mix tiles from various boxes to account for any minor color discrepancies. Better to have a slight color difference accounted for throughout the entire floor instead of all one box together in a single section where it'd stand out like a store thumb. My tile seems to be pretty consistent, but it's cheap insurance.
Lessons learned
Stay with the same brand tile - The accent tiles are a different brand than my primary tile, and just slightly larger. I knew this, but did it anyway. Not the worst decision, but you have to compensate for the size differences with grout lines. I'm using 1/8" grout lines, so there isn't a ton of room to compensate with.
Level the floor! - My floor isn’t perfectly level, but I was hoping to just “fill in” the low spots with a little extra thinset during the tile application. I understand this is not a great approach, but I did it anyway. I was limited to weather conditions last week, and with holidays around the corner/family in and out of town, work, etc… I was trying to get as much done as possible and skipped this step. Wasn’t the worst decision since my floor was mostly flat anyway, but there will be a few spots where it isn't perfect. Should be close, but I have a couple tiles with a little more lipping than I'd like, but I chalk that up to inexperience more than anything at this point. I did a test run with my automotive creeper and it rolls around just fine on the tile, which is the most important part for me.
Keep your batteries charged! - My drill batteries are getting older, and I was burning through them right and left while mixing the thinset. They had been sitting for a while and I had forgotten to "freshen" the charge until after I started mixing water and thinset.
I'm exhausted! - My first batch of tile was put down last Sunday and left me feeling like I got hit by a truck. I have blisters on my hands (worse than crossfit!), bruises on my knees, my back aches, etc… (I'm only 28, I shouldn't feel this old yet!)
Adhesion - The videos I watched for laying tile recommended pulling up a tile every once in a while to ensure 90-100% coverage. When I'm laying tile, there is so much suction, that you'd practically have to break the tile to pull it back up. I've pulled a couple back up by rotating and sliding them off the applied mortar. In practice, I'm only pulling tiles back up if I've really done a poor job aligning it with the other tiles. So far, that's just two tiles. The first one I tried to do this on broke.
Thin set goes faster than expected - Each bag of thin set says it's good for 100 sq. ft. Not sure if I'm using too much, or if it's because of the back buttering, but I seem to be getting about 30 sq. ft. per bag.
FAQ/General Comments I have Received
"You're not going to add any value to the house with that…" - Personally, I'd be pretty excited if I was looking for a new house and someone had decked out the garage! Bottom line, it's not costing me all that much and I'm doing it for ME! If it adds value to the house, then great, a little added bonus.
"Ya know, you should epoxy your garage floor instead…" - (This was LITERALLY said as I was laying my first 3 tiles by a neighbor, with 30+ boxes of tile and many bags of thinset sitting in the garage behind me.)
○ What I wanted to say…"Hey, great idea, would you like to return all of this for me?!" I didn't though, I was nice
○ Epoxy is great, just not the route I chose. After reading a lot on the forums, I personally liked the tile look better and it seems to be more than durable enough. I'm happy with my choice so far, and it's pretty cost effective when you compare it to other flooring options.
"Won't they crack/break?!" - Nope, and if they do, I should have plenty of extras. As proven by a number of members, tile properly applied will be as strong/stronger than the cement under it.
Cost/Materials
**Cost as of 2013.12.19**
These costs will definitely go up, especially as I buy more thin set. I also received a little bit of a discount on the tile itself that isn't reflected in the total figure. I had some of the necessary tools and/or borrowed them; this just reflects what I've purchased for the project in general.
Progress
Cleaned out the garage and scrubbed it with hot water and dish soap and thoroughly washed it out.
Sometimes you have to get creative with where to put your "stuff" while remodeling the garage
Who ever said a hallway closet wouldn't make a good bike garage? Dry run on laying tiles out and updating my pattern. My helper was making sure all the lines were straight.
31 tiles laid (1 broken) and about 3-4 hours of work... Definitely experienced the learning curve in the beginning but I'm getting better.
Attachments
Last edited: