To avoid these ads, REGISTER NOW!

Winter project - K5 Blazer

77fixer

Active member
Joined
Jan 18, 2006
Messages
32
Location
Meridian, ID
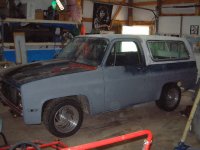
Well, here is my first post and I haven't even done one for the garage, but that will change soon. We close on the 13th, then I'll start the garage thread, but for now, here is my Winter Vehicular Project. I hope it's done before spring. My goal is to make it very capable off road while staying largely street legal. As we are preparing to move I don't have any good overall pics, but here is what I do have.
blazer+037.jpg


It started as an 82 Blazer. I took it to the frame rails and a body and this is where it sits. I've done everything to it myself and every mod other than the cage was salvaged metal. I probably have less than $200 in steel for the shackle flips, crossmembers, rockers, shifters, bumpers and other misc. parts.

While replacing the rockers with 2x6 tube was involved, the fenders are definitely more ambitious. The rear axle moved back 4" so I cut the fender in the center and moved the rear half back 8" while sectioning 3" to raise the lip. I still have to cut sections from other fenders to fill in the gaps. The front axle moved forward so the fender opening will move 2" back and 6" forward plus up 1" to equal the rear. Other body work includes cutting off the half top to replicate the full convertibles of 73-75.
blazer+036.jpg

blazer+rockers+002.jpg

blazer+rockers+019.jpg


While building the crossmember for the double transfer cases, I raised them several inches to provide extra clearance under the belly. This required that I cut a large portion of the floor out. I will form several new panels that can be removed with the cage in place.

Raising the transfer cases plus the available droop of the front axle requires some angularity from my driveshafts. I am going to use axle shafts from a ford F250 and tractor slip joints to build my own shafts. This should allow me over 40* of angle and 6-8" of slip.

The 454 was bought from a fellow wheeler with an Edelbrock Performer intake for $400. The Thorley Tri-Y headers are from a coworker for $70, plus I am planning a VooDoo cam set before I install the front clip. I built the TH400 for a previous rig with a 34 element sprag and Transgo shift kit. The transfer case doubler is from Jed's Machining and the triple stick shifters are my own design. The transmission shifter is going to be a similar design.
shifter+assembly+07.jpg


The suspension is pretty simple. My shackle flip in the rear with 56" springs. In the front I used the 52" springs from the rear and moved the factory mounts forward. Shocks are 14" ProComp ES3000. The shock mounts in the front are from a F250 and the rear shocks will go through the bed and tie into the cage.
shackle+flip+03.jpg

blazer+rockers+024.jpg


Tires are 14/42-16.5 Super Swamper IROKs on Hummer H1 wheels. Rather than recenter the wheels, I am using dually hubs on the front Dana 60 and fabbing my own 4.5" wheel spacers for the 14B rear.
wheel+spacers+006.jpg
 
To avoid these ads, REGISTER NOW!
OP
7

77fixer

Active member
Joined
Jan 18, 2006
Messages
32
Location
Meridian, ID
I love the old K5's! It's what got me started in 4 Wheel'n. More pics and details please.

Thanks for the comments, interest.

I have more pics here http://4x4lizard.com/g2/v/77fixer_002/blazer+build/ , but here are a few more.
Engine crossmember
blazer+rockers+008.jpg


More of the rockers
blazer+rockers+005.jpg

blazer+rockers+009.jpg

blazer+rockers+014.jpg


The tierod and draglink. These are from an 80's chevy trucks. After putting the bend in one for a dropped draglink, it has to be shortened and I reinforce the length with 13/16" cold rolled bar. The tierod has to be lengthened with a piece of what was cut from the draglink inserted in the middle, plus the 13/16" bar.
tierod_draglink+02.jpg
 
OP
7

77fixer

Active member
Joined
Jan 18, 2006
Messages
32
Location
Meridian, ID
The doubler provides an extra set of gears. This particular one uses the hi/lo range box from a NP203 and mates it to a NP205. These are all cast iron cases with gear drive and allows me to have High range, Low range and a Low/low range or 1:1, 2:1 and 4:1, plus I have modified the shift rails to allow this in front wheel drive only, if I choose.
 
OP
7

77fixer

Active member
Joined
Jan 18, 2006
Messages
32
Location
Meridian, ID
Ya, I'll try letting the air out of the tires first and if it still doesn't fit, I have some bare wheels. Fortunately the door of the new garage is about a foot taller:)

As far as hydo assist, I've got it covered. This one is an 1 3/4" ram. I used a 2" last time with no problems. This one will be in a lot smaller package though, without the huge clevis ends.

I have ripped a steering box off the frame before, on my last blazer in 2004. 600 miles from home, in Moab, UT. I did not even have crossover at the time, which probably helped cause the damage. We were down there for the week. I found that I couldn't steer as we came off Hell's Revenge. That was Thursday afternoon. Fortunately, one of the guys I was with had wheeled with Stephen from Off Road Design in the past. They red labeled the frame repair kit for Friday and hooked me up with a local to help install it.
So I rode in the passenger seat Friday, got the repair done Friday night, wheeled gently on Saturday and drove home (no trailer) on Sunday.

This pic is from Saturday. I was trying not to steer too forcefully and as the right front jammed up, the rear slid around, pushing me into this position.
Moab+wheelie.jpg
 
OP
7

77fixer

Active member
Joined
Jan 18, 2006
Messages
32
Location
Meridian, ID
I have had good results with this small cylinder.

DSCF0074B.jpg


The smaller shaft gives close to equal assist both directions.

This is on a rockwell with 16R20 tires.


And Disc Brakes:beer: Are those the F700 rotors? Interesting ram mounting also. I just sold a set of steering Rocks. The buggy plan wasn't working out. The cylinder I'm using I picked up used from a buddy, it's from West Texas Offroad.
 

offroader1971

Member
Joined
Mar 16, 2009
Messages
20
Location
West Virgina
I just joined and the way I found you guys is I was looking for info on K5 Blazers and stumbled on these pics .Have you finished the project and do you have more pics?
 
OP
7

77fixer

Active member
Joined
Jan 18, 2006
Messages
32
Location
Meridian, ID
I haven't done much since we moved. We're still getting settled and I'm still planning workbenches and whatnot for the garage.

As far as pics, this is most of what I have. http://4x4lizard.com/g2/v/77fixer_002/blazer+build/ When I first started this project last spring, I set a deadline of mid June 2008, then July 4 weekend, then late July, now I would like to be done mid June of this year, but it's gonna be close.
 
OP
7

77fixer

Active member
Joined
Jan 18, 2006
Messages
32
Location
Meridian, ID
It's 2x6, 3/16" wall. I think 2x8 would protect the body better, but it is what was at the recycler. I think I paid about $20 for 11', plus $8 to cut it in half so it would fit in my civic:lol_hitti 11' was the bare minimum I could use, just got lucky:thumbup:
 

offroader1971

Member
Joined
Mar 16, 2009
Messages
20
Location
West Virgina
This is gonna be a very awesome rig. I hope to see it when its done and maybe see a video of it in action. And I hope you dont mind me borowing a couple ideas for my 1989 jimmy.lol Big differance when I cut my rockers I'll be getting rid of lots and lots of rust.
 
OP
7

77fixer

Active member
Joined
Jan 18, 2006
Messages
32
Location
Meridian, ID
I can't wait to get it done, either, but I have to get the garage in order first.

The new compressor is waiting to be wired and plumbed, and I just picked up everything to put in a sub-panel so I can keep the electric tankless water heater for the wife and still have two 50 amp outlets for the welder and an oven (for powder coating). I'm wiring them that way so I can plug either one in either location, depending on my wants and needs. Then a 20 amp for the compressor (it's not as big as I wanted, but it's all I could get at the time and I'm wiring for the true 5 hp) plus four 20 amp outlet circuits, two for garage outlets, one circuit for the lights and another for outdoor outlets.

Then I have to get started on a bench and welding table, but I might be able to get along without them until after the K5 is done, since I really want it running by June.
 

TOOLOW4I75

Active member
Joined
Aug 3, 2005
Messages
38
Location
michigan
Ya, I'll try letting the air out of the tires first and if it still doesn't fit, I have some bare wheels. Fortunately the door of the new garage is about a foot taller:)

As far as hydo assist, I've got it covered. This one is an 1 3/4" ram. I used a 2" last time with no problems. This one will be in a lot smaller package though, without the huge clevis ends.

I have ripped a steering box off the frame before, on my last blazer in 2004. 600 miles from home, in Moab, UT. I did not even have crossover at the time, which probably helped cause the damage. We were down there for the week. I found that I couldn't steer as we came off Hell's Revenge. That was Thursday afternoon. Fortunately, one of the guys I was with had wheeled with Stephen from Off Road Design in the past. They red labeled the frame repair kit for Friday and hooked me up with a local to help install it.
So I rode in the passenger seat Friday, got the repair done Friday night, wheeled gently on Saturday and drove home (no trailer) on Sunday.

This pic is from Saturday. I was trying not to steer too forcefully and as the right front jammed up, the rear slid around, pushing me into this position.
Moab+wheelie.jpg

Where is your ROLLBAR?
 
To avoid these ads, REGISTER NOW!

offroader1971

Member
Joined
Mar 16, 2009
Messages
20
Location
West Virgina
I was reading one of your earlier post and you were talking about using 56" rear springs in the rear.I also noticed that you said your wheelbase increased by 4". by looking at the photos it appears that you have not relocated the front spring hanger.What did you do?Install factory Chevy 56"rear springs on backwards?
 

bad5x8

Well-known member
Joined
Jan 22, 2005
Messages
57
Location
Liberty MO
I have 56"s on the back of my 82 K5, but they are not turned around. The longer spring makes for a flexy ride.
 
OP
7

77fixer

Active member
Joined
Jan 18, 2006
Messages
32
Location
Meridian, ID
People use the 56" GM, 57" Ford and 63" GM springs to increase flex. I used the 56 because it is what I had and by flipping them around I gained the extra wheelbase that I wanted. With the 52" swap in the front, I have gained a total of about 6", putting me at 114". Moving the axle back also helped with my departure angle. These sping changes also need longer shocks. The ones I bought have 14" travel.

The biggest issue I've seen so far (the truck doesn't even run yet) is that I only have a few inches of up travel (before the spring flattens out) with the back end loaded for my move. How that will translate into articulation still remains to be seen, but I am pretty sure it will work well as many have done it before me. I should also have a good amount of droop.

Brett
 
OP
7

77fixer

Active member
Joined
Jan 18, 2006
Messages
32
Location
Meridian, ID
Not doing so good on the blazer. I've got to get going on some cabinets. I've got such a mess with boxes, I can't find half my tools and can hardly move around. I have started cutting up the front fenders, but that is about it. Got to get moving if it's going to be trail ready by mid June.
I put in a subpanel with two 50 amp breakers, they will allow me to use the welder at either the front where I plan on having my welding table and also run it out onto the driveway if needed. I can also hook up an oven for powder coating down the road. I put in one 20 amp 220 for the compressor and 4 20 amp breakers, one for the south wall, where my workbench will be, one on the west wall for my stationary tools, one for lights and one for the east wall and some outside outlets (christmas lights). The 50 amp circuits are way more than I need for the welder, but if I put in an oven I want to be set.

Brett
 

Silverback

Member
Joined
Jun 21, 2006
Messages
6
Dont you hate it when life gets in the way of what you want to be doing?
:mad:

Nice K5 build... would love to do something like that but noplace within a few hours drive of me is there someplace that I could really have fun with it. There are a few jeep trails within a few hours of here but my fullsize blazer couldn't fit down a lot of those with nothing but some 33's, forget wider axles or anything as serious as yours.

Waiting for updates...
 
OP
7

77fixer

Active member
Joined
Jan 18, 2006
Messages
32
Location
Meridian, ID
Well, it's still not done. I am getting closer though. I put off any work on the garage to concentrate. Maybe it'll be done after next winter:lol_hitti

I'll have to roll it out for some pics. I've got it started, still no driveshafts. Most of the cage is tacked in place and the seat mounts are tacked also. I've used about 160' of 2" tube, with maybe 20' in small scraps and need another 20-40' to finish. I have the pieces welded in the fenders and my wife is enjoying spreading bondo and sanding it off.:thumbup: She even helped welding in some of the sheet metal. We are trying to figure out what color(s) to paint it. I wanted a bright yellow (Krylon Sun Yellow), but she wants it desert camo like my last one. I am also trying to find a color that is different, but would be easy to apply and touch up.

Here's my old 74
Blazer+pics+002.jpg


Heres a more current pic
July+2009+008.JPG


I didn't take any pics of the finished diff covers, but here are some pictures of them in progress. Still had to cut out for the bolts.
The Dana 60
diff+covers+004.jpg


The 14Bff
diff+covers+005.jpg


And a closeup of one of the wheels.
rock+rings+005.jpg
 
OP
7

77fixer

Active member
Joined
Jan 18, 2006
Messages
32
Location
Meridian, ID
Here are some cage shots, plus the fenders in progress. I'll be adding more bars overhead and behind the seats for the belts

Blazer+cage+015.jpg


Blazer+cage+016.jpg


Blazer+cage+019.jpg
 

bb1970

Well-known member
Joined
Dec 22, 2008
Messages
545
Location
Buckner MO.
I've got a K/5 project of my own. But mine is of the 2wd variety. Don't have any newer pics but it is flat black now.
 

Attachments

  • DSCF0008.JPG
    DSCF0008.JPG
    36.1 KB · Views: 13
OP
7

77fixer

Active member
Joined
Jan 18, 2006
Messages
32
Location
Meridian, ID
Its lookn pretty good. The 73 to 80 marker light is a nice touch.And im with you on color ,but I guess camo is fairly easy to touch up.
Nice catch on the light. Thanks for noticing:)

I've got a K/5 project of my own. But mine is of the 2wd variety. Don't have any newer pics but it is flat black now.


I think a 2wd would be great, full convertible would make it even better. Is it factory or was it converted from 4wd. I think I've only seen, maybe, 3-4 2wd's through the years.

Brett
 

bb1970

Well-known member
Joined
Dec 22, 2008
Messages
545
Location
Buckner MO.
It is factory. They just didn't nearly as many 2wd's. They stopped in 1982 I think. I agree the full conv. would be alot cooler.
 
OP
7

77fixer

Active member
Joined
Jan 18, 2006
Messages
32
Location
Meridian, ID
Well, here it is a week before it's maiden run. It was my spring, summer, fall, winter, maybe next spring, summer, made it this fall, project. Still have a lot to finish but, I am able to use it.
K5+15+nov+02.jpg

The last week I was working on it all day until 10 or 11, and Friday night we took it on the road for the first time to get some gas, it was a pretty wild ride. Went home and aired the tires from 5-10 psi up to 25 and that helped the next run around the block. Back home, I realized I missed tightening the bolts on one side of the front axle. Tightened those up and went to bed at midnight.
Got up at 5am to start putting tools and spare bolts together for the trip. Stopped for more fuel, saw that I forgot one of the front shocks (none on the rear, yet) So back home to install that. Had to remove the shock mount in order to drill out the bolt hole (couldn't fit the drill in there), then made the 40 mile trip to the trailhead.

It wasn't uneventful as I blew a seal out of my steering box, but for something that was down to the framerails and had basically no testing before heading out, I'm pleased.

BTW, the garage still looks like a bomb went off in there:lol_hitti

Brett
 
To avoid these ads, REGISTER NOW!
Top Bottom