

roofster
Well-known member
My winter project was to insulate and sheath the main room of my 30x42 pole barn. The main room is 30x32 with a 9' ceiling. Along the way, I had to move some electrical outlets and air lines. I also had to dodge around the incoming gas line and a water drain stub. One car, and most all the stuff that was in the pole barn remained in place. 2 other cars went outside as necessary. Sometimes it seemed like something was always in the way. I was also pretty good about sweeping up and putting tools away every day.
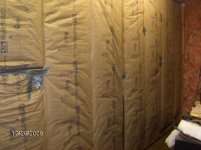
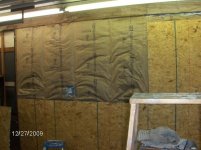
The 32' long walls face east & west. The west wall had existing R13 that I opted to save and patch, except for an 8" section that I tore out and replaced with R19. The whole east wall got covered with R19. Before putting up any insulation, I had to frame in the walls. All that was there were 6x4 posts every 8' and the horizontal boards (girts?) that the steel siding is screwed to. I also went along the perimeter on the floor with pressure treated 2x4's toenailed to the 6x4 posts, so that the 2x6 studs were not on the concrete. Occasionally I had to notch a stud for clearance to the girt, but for the most part they were flush with the 6x4's without any notches. The electrical boxes are connected with EMT and were mounted on 2x2's or 2x4's. Those got relocated onto 2x6's with a slight bend to the EMT. There was also an air drop to contend with as well. The steel siding has corrugations for stiffness, but I at the bottom you could see daylight through those. I cleaned out the junk in them and stuffed steel wool in the corrugations to hopefully discourage mice. That was just at the bottom. Along all the girts, I put insulation between them and the corrugations. I also stuffed the gaps between the siding and 2x6's studs with insulation. Once the studs were up and stuffed, putting up the rolls went pretty fast.
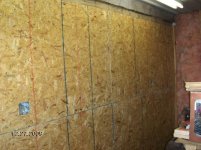
In early December, I had a company blow in the ceiling/attic to R38, the rest of this I did myself except a for an afternoon a friend came by. Also my wife has helped lift some OSB onto the walls. I used 5 rolls of 23" wide R19, 2 rolls of 23" wide R13 and a R19x15" bat. I decided to sheath with 7/16" OSB. The 32' walls used 8 sheets each. The south wall joining the 10' enclosed lean-to wall will use 6 sheets. 3 are up. All OSB is screwed on with 1.25" or 1.62" dry-wall screws. I'm painting it semi-gloss white and have used at least 8 gallons so far, including primers.
If I had to do it again, I would paint the OSB before hanging it. I pre-painted the last six sheets and at about 3 coats per sheet, it's allot easier. I read on the GJ to use 1.25" nap rollers and that's a great tip. I load them up and when they quit sliding and start to roll it's about time for another load of paint. Probably while reading about paint rollers, I read about smooth and rough sides of OSB. I can't believe I didn't know this. I checked it out on my boards and, sure enough, it was true. Mine were all on the walls with rough side out. I had used the stripes for guides to screw it on. I had installed the OSB with the long side parallel to ground. The upper sheets have cutouts for electrical boxes, but the lower ones were plain so I flipped those around to the smooth side before painting. It's not done yet, but I'm going to put a 1x3 over the seam where the boards meet and paint it red. I may also put 1x2's along the top edge. I was off work for the holidays from 12/18 to Jan 4 and spent most days & evenings working on this.
Something else I would have done differently was to put the upper most OSB on first. I started with the bottom boards and spaced them off the ground with 7/16" OSB spacers. Then the top boards went on. That left a small section at the top to fill in. I don't have a table saw so everything is cut with a circular saw or jig saw. I had to cut 3" to 4" wide pieces to fill the gap. If they were too big, then I had to trim them. If I had put the upper boards on first and all the way up, this seam and gap would have been near floor and less visible. Also, since I wanted a gap near the floor, cutting the width correctly wouldn't have been as critical.
A big mistake was priming over the stripes in the OSB. Even with 3 or 4 top coats, I could still see where I had primed over the stripes. Finally, I marked them off and painted between them. Once or twice of this made everything blend back in.
Overall, I'm almost done. I have 3 more sheets of OSB to put up after I get some more electrical boxes wired and installed and that's it. Then I can take a break and put up my "moldings" at my leisure.
For more pictures see http://good-times.webshots.com/album/564022478porWov
I have to get some pictures with it painted.
The 32' long walls face east & west. The west wall had existing R13 that I opted to save and patch, except for an 8" section that I tore out and replaced with R19. The whole east wall got covered with R19. Before putting up any insulation, I had to frame in the walls. All that was there were 6x4 posts every 8' and the horizontal boards (girts?) that the steel siding is screwed to. I also went along the perimeter on the floor with pressure treated 2x4's toenailed to the 6x4 posts, so that the 2x6 studs were not on the concrete. Occasionally I had to notch a stud for clearance to the girt, but for the most part they were flush with the 6x4's without any notches. The electrical boxes are connected with EMT and were mounted on 2x2's or 2x4's. Those got relocated onto 2x6's with a slight bend to the EMT. There was also an air drop to contend with as well. The steel siding has corrugations for stiffness, but I at the bottom you could see daylight through those. I cleaned out the junk in them and stuffed steel wool in the corrugations to hopefully discourage mice. That was just at the bottom. Along all the girts, I put insulation between them and the corrugations. I also stuffed the gaps between the siding and 2x6's studs with insulation. Once the studs were up and stuffed, putting up the rolls went pretty fast.
In early December, I had a company blow in the ceiling/attic to R38, the rest of this I did myself except a for an afternoon a friend came by. Also my wife has helped lift some OSB onto the walls. I used 5 rolls of 23" wide R19, 2 rolls of 23" wide R13 and a R19x15" bat. I decided to sheath with 7/16" OSB. The 32' walls used 8 sheets each. The south wall joining the 10' enclosed lean-to wall will use 6 sheets. 3 are up. All OSB is screwed on with 1.25" or 1.62" dry-wall screws. I'm painting it semi-gloss white and have used at least 8 gallons so far, including primers.
If I had to do it again, I would paint the OSB before hanging it. I pre-painted the last six sheets and at about 3 coats per sheet, it's allot easier. I read on the GJ to use 1.25" nap rollers and that's a great tip. I load them up and when they quit sliding and start to roll it's about time for another load of paint. Probably while reading about paint rollers, I read about smooth and rough sides of OSB. I can't believe I didn't know this. I checked it out on my boards and, sure enough, it was true. Mine were all on the walls with rough side out. I had used the stripes for guides to screw it on. I had installed the OSB with the long side parallel to ground. The upper sheets have cutouts for electrical boxes, but the lower ones were plain so I flipped those around to the smooth side before painting. It's not done yet, but I'm going to put a 1x3 over the seam where the boards meet and paint it red. I may also put 1x2's along the top edge. I was off work for the holidays from 12/18 to Jan 4 and spent most days & evenings working on this.
Something else I would have done differently was to put the upper most OSB on first. I started with the bottom boards and spaced them off the ground with 7/16" OSB spacers. Then the top boards went on. That left a small section at the top to fill in. I don't have a table saw so everything is cut with a circular saw or jig saw. I had to cut 3" to 4" wide pieces to fill the gap. If they were too big, then I had to trim them. If I had put the upper boards on first and all the way up, this seam and gap would have been near floor and less visible. Also, since I wanted a gap near the floor, cutting the width correctly wouldn't have been as critical.
A big mistake was priming over the stripes in the OSB. Even with 3 or 4 top coats, I could still see where I had primed over the stripes. Finally, I marked them off and painted between them. Once or twice of this made everything blend back in.
Overall, I'm almost done. I have 3 more sheets of OSB to put up after I get some more electrical boxes wired and installed and that's it. Then I can take a break and put up my "moldings" at my leisure.
For more pictures see http://good-times.webshots.com/album/564022478porWov
I have to get some pictures with it painted.
Attachments


Last edited: