To avoid these ads, REGISTER NOW!

Wolverine Epoxy Floor Install

blittle000

Member
Joined
Mar 14, 2017
Messages
14
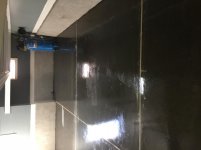
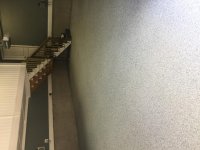
I thought I'd share my experience with installing my garage floor. I've got a 700 Sq Ft. garage floor that had a previous water based epoxy from Lowes installed about 7 years ago. The concrete overall was in good shape, but the floor paint was worn.

I rented a concrete grinder from a local rental company. The first company wouldn't rent one to homeowners as they claimed the diamond grinders always were returned "gummed up". The second store was very helpful and rented me the Edco grinder with the diamond grinder heads.

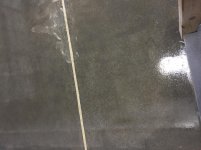
The floor coating was very light and took me about 4-5 hours to get this ground. The amount of dust this thing puts out is crazy. I tried a shop-vac but it didn't seem to reduce the dust by much at all. For whatever reason, installing the vacuum hose, but without the vacuum turned on actually helped a bit to reduce the dust.
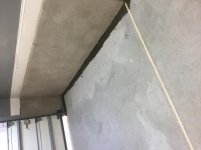
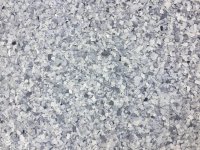
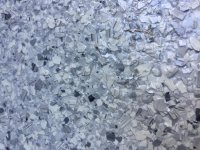
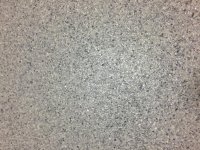
 

Attachments

  • IMG_1271.jpg
    IMG_1271.jpg
    140.1 KB · Views: 116
  • IMG_1272.jpg
    IMG_1272.jpg
    145.6 KB · Views: 111
To avoid these ads, REGISTER NOW!
OP
B

blittle000

Member
Joined
Mar 14, 2017
Messages
14
Next I decided to fill the expansion joints and decided to use Legacy's Xtreme Set 100 Crack/Joint Filler. This mixed with sand was used to fill the joints. It setup rather quickly and installed nicely. I used a grinder with a concrete diamond wheel attachment to get it reasonably smooth. The Edco did the rest.
 

Attachments

  • IMG_1285.jpg
    IMG_1285.jpg
    145.6 KB · Views: 102
OP
B

blittle000

Member
Joined
Mar 14, 2017
Messages
14
When researching which product to use, it seemed I couldn't go wrong with vendors here on the site. I took advantage of Alpha Garage's "spring special" and received a great price on the Wolverine product along with 90 pounds of flake. Bert was very helpful with details of the product and an instruction sheet was provided in advance. I had plenty of time to come up with my game plan. After placing the order, it shipped immediately and arrived within a few days.
 

Attachments

  • IMG_1269.jpg
    IMG_1269.jpg
    141.6 KB · Views: 89
OP
B

blittle000

Member
Joined
Mar 14, 2017
Messages
14
For supplies, I ordered a notched squeegee, and picked up other items at local Lowe's. Alpha Garage provided the spiked shoes. I used Purdy "White Dove" rollers that were lint free, and cheep paint brushes. I also picked up some buckets for mixing smaller batches, the drill attachment for mixing. And I also used a couple paint trays.

First step was the primer coat. I mixed a small portion to start and get the nerves worked out :). I went around the perimeter of the garage and underneath steps and a compressor that I didn't want to move. For the mixing, I used my phone to set a 4 minute time to ensure I mixed it enough. After I finished the border, i went on an mixed the remaining in 2 batches. After mixing, I poured into a paint tray. I had plenty of time for this step and never felt rushed. I rolled it out and was straight forward. it goes down clear. I decided to go ahead and prime/epoxy the small strip that is outside the garage that will be exposed to sunlight. That happened to be the only portion where small bubbles popped up as it was curing. I popped them before the completely cured, and were easily covered the next day when I installed the epoxy.

I did this very quickly on a Friday around lunch time. Temperatures were in the 60's and dipped into the 50's, but was completely cured by Saturday morning.
 

Attachments

  • IMG_1287.jpg
    IMG_1287.jpg
    138.5 KB · Views: 162
  • IMG_1288.jpg
    IMG_1288.jpg
    146.4 KB · Views: 149
  • IMG_1283.jpg
    IMG_1283.jpg
    138.5 KB · Views: 141
  • IMG_1280.jpg
    IMG_1280.jpg
    138.4 KB · Views: 151
OP
B

blittle000

Member
Joined
Mar 14, 2017
Messages
14
I started the epoxy the following day. I decided to mix a small batch of the epoxy to get the borders complete and the same area under my steps and air compressor. I realized immediately this stuff was no joke when I began to mix it. i read where you should a second drill on stand-by "just in case", and I quickly realized why it was recommended. I have a Dewalt electric drill and it was working hard to mix the epoxy. I put in two separate cups and my wife and I got the borders knocked out with ease.

I mixed the next batch using the buckets the epoxy arrived in. I spread it out on the floor in "ribbons" and used the notched squeegee to spread it out quickly. I found the notch seemed to leave too much product on the floor. I used the flat side initially to push the epoxy around, followed by the notched side, then rolled it out. I used the spiked shoes to walk on it while installing. Pay attention to where the "ribbons" of epoxy were poured on the floor to make sure you don't leave excess epoxy (or high spots). I walked around rolling it out to ensure it looked even and covered well. This stuff is very thick. Without a squeegee, i don't see how you'd ever get it rolled out. I got the epoxy rolled out with relative ease and didn't feel pressed for time. Unfortunately I didn't take pictures of just the epoxy on the floor. But, it looked great and covered nicely the previously primered floor (including those small bubbles I mentioned earlier).

I immediately started to put out the flakes. The instructions indicated to get the flakes out immediately while the floor is tacky. Instructions said 2-10 hours depending on temperature, but I was nervous and started immediately. After the fact, I really had plenty of time as the instructions indicated. This was my first slight misstep. I had 90 pounds of flakes that were to broadcast for a very heavy flake. I should have mixed them thoroughly and did not, so some areas have a little more dark gray flake than others. But it's one of those things that probably only i will notice, especially after cars are on it.

I attached a close-up of the floor after heavy flakes thrown over the epoxy floor.
 

Attachments

  • IMG_1293.jpg
    IMG_1293.jpg
    158.1 KB · Views: 133
  • IMG_1294.jpg
    IMG_1294.jpg
    143.2 KB · Views: 130
OP
B

blittle000

Member
Joined
Mar 14, 2017
Messages
14
The next morning, the floor was dry and I began to remove the excess flake. I swept up the majority with a garage broom and used the blower for the rest. I went over the floor multiple times with the stiff broom, but probably should have used a scraper of some sorts. When putting down the urethane clear, I picked up quick a few flakes. More of a nuisance.

For the clear, again I mixed a small batch to get the borders and moved on. I put down 2 thin coats. I used the same rollers as I did for the epoxy and also rolled it from a pan just as I did the primer. My 2.5 gallons just did cover my heavy flaked floor. The flakes will leave a "bumpy" feeling which I like. I debated on using an epoxy as a clear coat so the floor would be level, but opted against that. There's plenty of pro's/con's on this forum on epoxy clear vs. urethane (and others), so I settled on what I thought would work best for me.

Attached a close up of final floor after clear coat, and one that is full floor. You can see in the second picture a little more grey in a few spots, but only in certain light.

Overall, very pleased with the Wolverine epoxy product. I consider myself the average do-it-yourselfer and found this project to be very straight forward. Follow instructions and think through each step in advance to minimize the pucker factor when you're "on the clock" after mixing product.
 

Attachments

  • IMG_1295.jpg
    IMG_1295.jpg
    145.6 KB · Views: 110
  • IMG_1296.jpg
    IMG_1296.jpg
    146.8 KB · Views: 110
To avoid these ads, REGISTER NOW!
OP
B

blittle000

Member
Joined
Mar 14, 2017
Messages
14
Was able to walk on it to get in pictures in better lighting.
 

Attachments

  • IMG_1299.jpg
    IMG_1299.jpg
    154.5 KB · Views: 134
  • IMG_1300.jpg
    IMG_1300.jpg
    148.3 KB · Views: 122

retfr8flyr

Well-known member
Joined
Mar 7, 2013
Messages
756
Location
Providence Forge, VA
You will be very happy with the way the Wolverine holds up over time. I did my floor 4 years ago and I have beaten it up badly. It still looks just as good as when I first put it down. I also did full flakes but I did 2 clear topcoats.
 
OP
B

blittle000

Member
Joined
Mar 14, 2017
Messages
14
I did my research and planned it over a few weeks. It was helpful to see some good videos out here on youtube of installers to see simple things (mixing, rolling, squeegee, approach, etc.) The other part was waiting until the weather was such that temperatures were consistently over 40 degrees, and no rain forecast over a week.
 

bigjon

Well-known member
Joined
Apr 21, 2007
Messages
499
Location
NSW Australia
Smick looking floor! The closeup pics are deceiving as they look nothing like the other pics.

Congrats on a job well done!
 
OP
B

blittle000

Member
Joined
Mar 14, 2017
Messages
14
You will be very happy with the way the Wolverine holds up over time. I did my floor 4 years ago and I have beaten it up badly. It still looks just as good as when I first put it down. I also did full flakes but I did 2 clear topcoats.

Yeah, I'm considering putting another coat of urethane down at some point as well. But it's expensive. If I do, I may decide to try to "fix" the darker gray spotches at the same time. I'm just going to use it for a while and see how I like it. But definitely another coat of urethane would be nice for sure.
 

Jack A.

Member
Joined
Mar 27, 2017
Messages
7
Location
North of Raleigh, NC
I did my research and planned it over a few weeks. It was helpful to see some good videos out here on youtube of installers to see simple things (mixing, rolling, squeegee, approach, etc.) The other part was waiting until the weather was such that temperatures were consistently over 40 degrees, and no rain forecast over a week.

If you could post links to the videos you found most helpful, that would be appreciated. I'm looking into doing the floor in my soon-to-be-completed garage/workshop as soon as the contractors are done. Thanks!
 
OP
B

blittle000

Member
Joined
Mar 14, 2017
Messages
14
If you could post links to the videos you found most helpful, that would be appreciated. I'm looking into doing the floor in my soon-to-be-completed garage/workshop as soon as the contractors are done. Thanks!

Here are a couple good ones. I don't know much about the product they are using, but more for their process.

On this one, note the great way to ensure your flakes are properly mixed. If I would have picked up on this, my results would have been slightly better.

Here's another one:
My epoxy didn't squeegee out so easily as this guys seemed to. His epoxy I'm perhaps was water base and not as thick, just a guess.
I also didn't use a notched squeegee for the urethane coat, just a roller.

Good luck!
 

LegacyIndustrial

ALLIANCE MEMBER
Joined
Jun 7, 2010
Messages
7,994
Location
deerfield, IL
These fellows are applying what looks to be a high solids Polyaspartic or clear epoxy. This is what our install crew uses here in Orlando. Never want to use a squeegee on aliphatic or mcu urethane . You will make a mess of the highest order and I mean mess!

a08f92c311cf9cba0beff082fe404b51.jpg


Sent from my iPhone using Tapatalk
 
Last edited:

FJ4FUN

Well-known member
Joined
Jul 28, 2014
Messages
622
Location
NorCal
blittle000- Nice looking floor and congrats on a job well done!:beer:

My only suggestion for future reference is that we typically recommend that the BondTite 1101 primer coat be applied via mix>dump>roll and not Dip'n Roll out of a pan. Looks like you managed just fine but had the temps been a bit warmer or the user been a bit slower it could be a potential problem allowing the BondTite to sit in the bucket.

In any event you've got a great looking floor and I'm sure it will treat you very well in the years to come.

Thanks for sharing!


.
 
To avoid these ads, REGISTER NOW!
Top Bottom