To avoid these ads, REGISTER NOW!

Wolverine Epoxy Floor

252Imports

New member
Joined
Jul 24, 2014
Messages
4
Location
Glasgow, ky
Hello all. After doing quite a bit of reading on the forum about different flooring options and getting some great info from Fred @ Alpha garage I decided to epoxy my 1500 sq ft shop space. I figured i would contribute the documentation of my project because I've learned so much from reading through other members similar projects so here goes.
Going with wolverine coatings silver gray with 40, 30, 30 blue, white, black flakes. Blue is the %40.
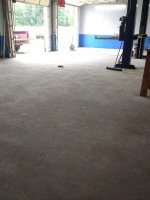
Decided to grind instead of acid etch. Rented a husqvarna pg280 with diamond cutters. The grinder did a great job in my opinion but it took forever to grind the whole slab. 17 hours of grind time to be exact. If I had to do it over again i would have spent more and rented a larger unit but oh well.
The floor will consist of 6 gallons bondtite, 12.75 of liquatile, and 3.75 gallons of endurashield.
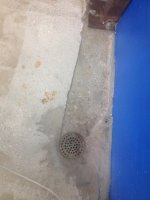
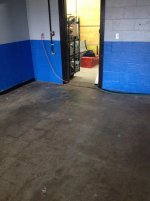
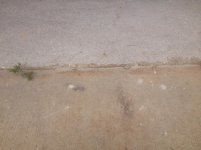
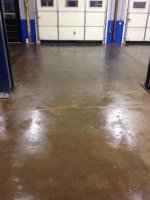
I have the grinding finished except for the edges and various drains and such. I have a few questions about how to apply the coating to various spots on the floor that are not level and how to apply the coating at the bay doors where it will stop at the edge of the slab. Pics to follow, any input or suggestions welcome.
 
To avoid these ads, REGISTER NOW!
OP
2

252Imports

New member
Joined
Jul 24, 2014
Messages
4
Location
Glasgow, ky
I really just met Fred through dealing with him on the floor and am not sure what he has been dealing with. He has been more than helpful though and I hope I haven't been too much of a bother during whatever he is recovering from.
Here are some pics of before and after the grind as well as a few areas i'm not real sure how to deal with. One of the areas is a floor drain that is not level and the other is where i took a block wall out and filled the void, however one slab is highter than the other. This is really no bother as long as it won't cause the epoxy to "run" or create a thin spot.
 

Attachments

  • IMG_9600.jpg
    IMG_9600.jpg
    146.5 KB · Views: 88
  • IMG_9643.jpg
    IMG_9643.jpg
    142 KB · Views: 67
  • IMG_9640.jpg
    IMG_9640.jpg
    145.2 KB · Views: 65
  • IMG_9647.jpg
    IMG_9647.jpg
    148.2 KB · Views: 74
  • IMG_9615.jpg
    IMG_9615.jpg
    145.5 KB · Views: 67
  • IMG_9612.jpg
    IMG_9612.jpg
    142.3 KB · Views: 71
  • IMG_9604.jpg
    IMG_9604.jpg
    146.1 KB · Views: 67
OP
2

252Imports

New member
Joined
Jul 24, 2014
Messages
4
Location
Glasgow, ky
Also, this is a pic of the transition under the bay doors going outside. The unground concrete is outside. The step is about 1". Can't decide whether to grind a groove just back from the edge to stop at, let the epoxy run over the edge, or try and mask or put a 2x4 against the edge to come to with epoxy. any ideas?
 

Attachments

  • IMG_9642.jpg
    IMG_9642.jpg
    148.6 KB · Views: 34
To avoid these ads, REGISTER NOW!

BabaGanoosh

Well-known member
Joined
May 28, 2014
Messages
67
Also, this is a pic of the transition under the bay doors going outside. The unground concrete is outside. The step is about 1". Can't decide whether to grind a groove just back from the edge to stop at, let the epoxy run over the edge, or try and mask or put a 2x4 against the edge to come to with epoxy. any ideas?

I just finished mine and opted to cut a scribe line. It worked great. Others on here said that tape bled. That being said, I would not hesitate to try gorilla tape if the floor was already vacuumed and you were ready to go. In my (very limited) experience, the epoxy is thick enough that any bleeding should be minimal. Good luck! Keep Posting!
 
OP
2

252Imports

New member
Joined
Jul 24, 2014
Messages
4
Location
Glasgow, ky
Ground the edges yesterday and keyed in some areas at doors and stuff. Thoroughly vacuumed the slab and then pressure washed. The angle grinder created an unbelievable amount of dust but I feel I did a top notch prep job. One thing I did learn is that i will never tackle a dusty job without a bag in my shop vac. I went from losing suction and having to clean the filter every 30-50 sq ft to putting a bag in it and not cleaning it since. It might be a no brainer to others but the bag does an excellent job of keeping dust from clogging the filter so quickly. Filled a crack and a few small spots with a bondtite/sand mixture of 1:5 as suggested by Fred at Alpha Garage and called it a night.
This morning the sand and bondtite mix had completely hardened and looked great. Sanded it a little and measured off my sections for the first bondtite coat. With two helpers the bondtite went on pretty well. Used 18" rollers and applied like the instructions said with no problems. It was a little harder than i thought to pour an even ribbon out over a section but i felt we compensated with back-rolling. Had the bondtite on by 11am this morning.
Dropped back by the shop at 8pm with intentions of spreading the liquatile and found the whole floor was tack free and ready to be coated except for the last section which was still a little sticky. Looking over the floor it looks like there is thick and thin spots that are a little troubling. Several small spots even look dry. I'm not sure if the concrete could have soaked up that much bondtite in areas or what exactly caused this but I am sure the areas were coated to start with. With no more bondtite to mix up i was a little perplexed at the least and didn't feel like this was right. I finally decided to drain the last bit of resin and hardener out of my empty buckets and measure it which actually came out to 2:1. It ended up making about 8oz which i brushed on starting with the thinnest looking spots. It ended up covering the "dry" spots with at least a little bondtite. I can only hope this is a good fix and that the floor will be ready for liquatile in the morning. Heres a pic or two.
 

Attachments

  • IMG_9701.jpg
    IMG_9701.jpg
    146.4 KB · Views: 44
  • IMG_9704.jpg
    IMG_9704.jpg
    146.3 KB · Views: 44
  • IMG_9699.jpg
    IMG_9699.jpg
    146.3 KB · Views: 46
  • IMG_9700.jpg
    IMG_9700.jpg
    144.4 KB · Views: 40

Shea

Well-known member
Joined
Sep 19, 2012
Messages
2,865
Location
California
Epoxy primer is supposed to look like that after application. Some parts of the concrete absorbed more than others. It's one of the reasons why applying a primer is recommended. You would have been just fine leaving it as is. The thin or "dry" looking spots would have let the Liquatile bond to it just like the rest of the surface. You are looking good so far!
 
To avoid these ads, REGISTER NOW!
Top Bottom