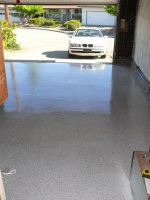
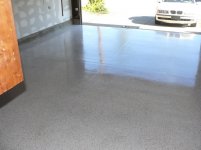
Wolverine floor finally done - updated
Update posted in a later post.
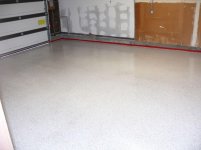
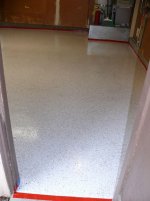
Well, it's been a long time coming, but I'm thrilled with the results.
Like most around here, I did a lot of research on floor products before deciding to go with Wolverine products through Fred at AlphaGarage on my two car, 475 sq ft garage. Here's my material list:
2 BondTite 1101 3 quart kits;
1 IntegraFlex 1921 1 gallon kit;
1 LiquiTile 1184 3 gallon kit (silver gray);
1 LiquiTile 1184 3 quart kit;
1 EnduraShield 2254 1.25 gallong kit;
25 pounds DecoFLakes (Moody Granite);
2 pounds Decoflakes (Tiger Orange).
Orange is my favorite color, so I had to have a hint of it in my floor!
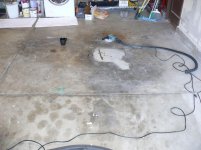
My floor is about 47 years old and while being in pretty good physical shape, it was an aesthetic mess. I think a lot of leaky cars had resided in this garage over the years, and I had a bear of a time degreasing the sea of spots, and two spots in particular. I used ZEP Purple commercial, Simple Green Pro, Easy Off, OxyClean spot remover (the stuff for your clothes), mineral spirits, and half a dozen other things to attack the primary spots. ZEP commercial did a good job on the bulk floor. In the end, the bad spots no longer failed the water test, but they were somewhat more resistant than the rest of the floor, which immediately wicked the water right in. I made sure to hand brush in the BondTite on these sections to ensure excellent coverage and penetration -- that seemed to work great.
In each case, I'd add the degreaser, undiluted, and then scrub with a hard bristled brush for several minutes. I'd let the mix rest for several minutes, then agitate again. I would then rinse with water from a hose, squeegee, then power wash.
The mineral spirits pulled oil out of the concrete quickly, and the oil moved with the solvent front. I had the best results by having paper towels waiting on the floor in a ring around the treated area. After pouring the spirits, it migrated outward toward the towels. Once it reached the towels, it and the oil were wicked up. When I concentrated on the area onto which I actually poured the spirits, I missed the oil since it was already traveling outward away from the pour spot.
The grinding was dismal. I used the diamond cup wheel recommended all over this and other forums, as well as a perfectly powerful enough Makita grinder. The problem is, no matter how much time I spent on a spot, even doing a near 190 pound handstand on the grinder, I never was able to get a 80-100 grit sandpaper profile. To make things more frustrating, after spending at least 15 hours grinding only half the floor, I achieved a very significantly rougher profile by using muriatic acid (scrubbed vigorously, neutralized with bleach and washed with copious amounts of water -- then power washed). 1/10 the time and better results... My concrete seemed harder than any I have ever worked with in the past, and that may have something to do with it.
My expansion joints were quite large, so I filled them with 1/2" backer rod, followed by BondTite with a chip brush. The single crack I had in the floor, previously chased out with the grinder, and primed with BondTite (24 oz for crack and expansion joints). This was on a Friday morning. By Friday evening the BondTite was no longer tacky, so I proceeded with the IntegraFlex (two separate batches). It wasn't easy to work with, per se, but it was easier than I was expecting. I used disposable plastic trowels to spread the IntegraFlex. The crack and the front-to-back expansion joint are essentially invisible. The side-to-side expansion joint is somewhat visible -- I didn't have enough product to give that joint another layer.
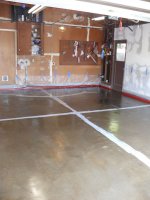
By Saturday morning, the IntegraFlex was no longer tacky, so I proceeded to BondTite the entire floor. The weather went from a forecast 100 degrees and sunny to sprinkling and high 60s (!), so I did the entire floor in one batch, pouring out a ribbon and following with an 18" wide 1/4" nap Wooster EpoxyGlide roller. I nearly ran short, and were I to guess, I'd guess I used a bit too much on the perimeter (32 oz; the perimeter edge was quite fat though). My wife was laughing at me since I was apparently reacquainting myself with my cussing vocabulary, every other word no less. It ended up fine, but I had to scramble.
By Saturday night, everything was tack-free, so I proceeded with the LiquiTile. I did the perimeter (32 oz), then the entire floor in a single step. I felt I was comfortable with the process and the pot life to do it in one step. It was fine but for nearly running short again. I used a notched squeegee, followed by another EpoxyGlide roller. Do yourself a favor and go with 18" rollers. They were a terrific help.
Broadcasting the chips went pretty smoothly. I had tape on the wall that visually divided the room into four quadrants. I had previously divided the 27 pounds of DecoFlakes into 4 6-3/4 lb batches, so one bucket per quadrant. The throwing up-and-out technique worked the best, but be careful around the perimeter as lots of chips can impact the walls and fall on the edge of your floor on a clump. Pretty obvious, I know, but that didn't stop me from doing it!
Sunday morning I scraped the chips twice (once front-to-back, once side-to-side) and swept, swept, swept and swept, followed by sweeping. I used compressed air to chase out any stubborn chips that remained resistant to the broom. Last was the EnduraShield. With its extended pot life, I had no problems with application in a single batch. I brushed the garage door border of the floor (the part that gets the most sun in my garage) and each corner and rolled the rest. This was the easiest part of the entire process.
In all, I'm thrilled with the floor. The EnduraShield really made the floor pop -- I only wish I had purchased two kits so I could have had another coat. I plan to wait until Wednesday or Thursday to start moving the washer/dryer and some other stuff into the garage, and probably the weekend before I move my tool box back in.
Additional advice:
1. Buy more product than called for. I about had a coronary from nearly running short at every step, from the BondTite through the EnduraShield. Well, I had ****just**** enough at each step, even though I should have had a decent amount of leeway. If you go for a boxed product, do yourself a favor and buy an extra box as well.
2. Premix, premix, premix. And then mix, mix, mix. After reading some of the stories where inadequate mixing led to uncured (or very slowly curing) floors, I was a mixing fool. Every single step led to fast curing, even the dregs in the mixing buckets. Scraping that stuff out (like you're not supposed to do on your floor) and letting it cure on cardboard revealed complete curing in the same amount of time as the bulk product on the floor. Frankly this saved me on the whole-floor BondTite step, as I had to take the dregs to finish the floor!
3. Get something like a Wooster Sky Scraper. It's a scraper that attached to the end of a painter's extension pole. By extending the pole out (I did it about 8'), you can scrape the floor rapidly at a very shallow angle (hang your arm at your side, holding the pole handle, and move your hand front to back, front to back with the scraper edge flat on the floor 8 feet in front of you), which will prevent gouging of the floor. It was WAY faster than working on my knees with a plastic scraper.
4. Ribbons: I had a tendency to pour too heavy when I started pouring our epoxy ribbons, be it in the body of the floor or along the borders. It's better to start your ribbons too thin and have extra at the end (you can then add to the first section) than to be scrambling to "pull" the extra epoxy from the beginning of the pour to the end.
Edit: larger pictures added.
Update posted in a later post.
Well, it's been a long time coming, but I'm thrilled with the results.
Like most around here, I did a lot of research on floor products before deciding to go with Wolverine products through Fred at AlphaGarage on my two car, 475 sq ft garage. Here's my material list:
2 BondTite 1101 3 quart kits;
1 IntegraFlex 1921 1 gallon kit;
1 LiquiTile 1184 3 gallon kit (silver gray);
1 LiquiTile 1184 3 quart kit;
1 EnduraShield 2254 1.25 gallong kit;
25 pounds DecoFLakes (Moody Granite);
2 pounds Decoflakes (Tiger Orange).
Orange is my favorite color, so I had to have a hint of it in my floor!
My floor is about 47 years old and while being in pretty good physical shape, it was an aesthetic mess. I think a lot of leaky cars had resided in this garage over the years, and I had a bear of a time degreasing the sea of spots, and two spots in particular. I used ZEP Purple commercial, Simple Green Pro, Easy Off, OxyClean spot remover (the stuff for your clothes), mineral spirits, and half a dozen other things to attack the primary spots. ZEP commercial did a good job on the bulk floor. In the end, the bad spots no longer failed the water test, but they were somewhat more resistant than the rest of the floor, which immediately wicked the water right in. I made sure to hand brush in the BondTite on these sections to ensure excellent coverage and penetration -- that seemed to work great.
In each case, I'd add the degreaser, undiluted, and then scrub with a hard bristled brush for several minutes. I'd let the mix rest for several minutes, then agitate again. I would then rinse with water from a hose, squeegee, then power wash.
The mineral spirits pulled oil out of the concrete quickly, and the oil moved with the solvent front. I had the best results by having paper towels waiting on the floor in a ring around the treated area. After pouring the spirits, it migrated outward toward the towels. Once it reached the towels, it and the oil were wicked up. When I concentrated on the area onto which I actually poured the spirits, I missed the oil since it was already traveling outward away from the pour spot.
The grinding was dismal. I used the diamond cup wheel recommended all over this and other forums, as well as a perfectly powerful enough Makita grinder. The problem is, no matter how much time I spent on a spot, even doing a near 190 pound handstand on the grinder, I never was able to get a 80-100 grit sandpaper profile. To make things more frustrating, after spending at least 15 hours grinding only half the floor, I achieved a very significantly rougher profile by using muriatic acid (scrubbed vigorously, neutralized with bleach and washed with copious amounts of water -- then power washed). 1/10 the time and better results... My concrete seemed harder than any I have ever worked with in the past, and that may have something to do with it.
My expansion joints were quite large, so I filled them with 1/2" backer rod, followed by BondTite with a chip brush. The single crack I had in the floor, previously chased out with the grinder, and primed with BondTite (24 oz for crack and expansion joints). This was on a Friday morning. By Friday evening the BondTite was no longer tacky, so I proceeded with the IntegraFlex (two separate batches). It wasn't easy to work with, per se, but it was easier than I was expecting. I used disposable plastic trowels to spread the IntegraFlex. The crack and the front-to-back expansion joint are essentially invisible. The side-to-side expansion joint is somewhat visible -- I didn't have enough product to give that joint another layer.
By Saturday morning, the IntegraFlex was no longer tacky, so I proceeded to BondTite the entire floor. The weather went from a forecast 100 degrees and sunny to sprinkling and high 60s (!), so I did the entire floor in one batch, pouring out a ribbon and following with an 18" wide 1/4" nap Wooster EpoxyGlide roller. I nearly ran short, and were I to guess, I'd guess I used a bit too much on the perimeter (32 oz; the perimeter edge was quite fat though). My wife was laughing at me since I was apparently reacquainting myself with my cussing vocabulary, every other word no less. It ended up fine, but I had to scramble.
By Saturday night, everything was tack-free, so I proceeded with the LiquiTile. I did the perimeter (32 oz), then the entire floor in a single step. I felt I was comfortable with the process and the pot life to do it in one step. It was fine but for nearly running short again. I used a notched squeegee, followed by another EpoxyGlide roller. Do yourself a favor and go with 18" rollers. They were a terrific help.
Broadcasting the chips went pretty smoothly. I had tape on the wall that visually divided the room into four quadrants. I had previously divided the 27 pounds of DecoFlakes into 4 6-3/4 lb batches, so one bucket per quadrant. The throwing up-and-out technique worked the best, but be careful around the perimeter as lots of chips can impact the walls and fall on the edge of your floor on a clump. Pretty obvious, I know, but that didn't stop me from doing it!
Sunday morning I scraped the chips twice (once front-to-back, once side-to-side) and swept, swept, swept and swept, followed by sweeping. I used compressed air to chase out any stubborn chips that remained resistant to the broom. Last was the EnduraShield. With its extended pot life, I had no problems with application in a single batch. I brushed the garage door border of the floor (the part that gets the most sun in my garage) and each corner and rolled the rest. This was the easiest part of the entire process.
In all, I'm thrilled with the floor. The EnduraShield really made the floor pop -- I only wish I had purchased two kits so I could have had another coat. I plan to wait until Wednesday or Thursday to start moving the washer/dryer and some other stuff into the garage, and probably the weekend before I move my tool box back in.
Additional advice:
1. Buy more product than called for. I about had a coronary from nearly running short at every step, from the BondTite through the EnduraShield. Well, I had ****just**** enough at each step, even though I should have had a decent amount of leeway. If you go for a boxed product, do yourself a favor and buy an extra box as well.
2. Premix, premix, premix. And then mix, mix, mix. After reading some of the stories where inadequate mixing led to uncured (or very slowly curing) floors, I was a mixing fool. Every single step led to fast curing, even the dregs in the mixing buckets. Scraping that stuff out (like you're not supposed to do on your floor) and letting it cure on cardboard revealed complete curing in the same amount of time as the bulk product on the floor. Frankly this saved me on the whole-floor BondTite step, as I had to take the dregs to finish the floor!
3. Get something like a Wooster Sky Scraper. It's a scraper that attached to the end of a painter's extension pole. By extending the pole out (I did it about 8'), you can scrape the floor rapidly at a very shallow angle (hang your arm at your side, holding the pole handle, and move your hand front to back, front to back with the scraper edge flat on the floor 8 feet in front of you), which will prevent gouging of the floor. It was WAY faster than working on my knees with a plastic scraper.
4. Ribbons: I had a tendency to pour too heavy when I started pouring our epoxy ribbons, be it in the body of the floor or along the borders. It's better to start your ribbons too thin and have extra at the end (you can then add to the first section) than to be scrambling to "pull" the extra epoxy from the beginning of the pour to the end.
Edit: larger pictures added.
Attachments
-
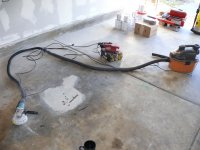 Grinding setup (large).jpg143.7 KB · Views: 237
 -
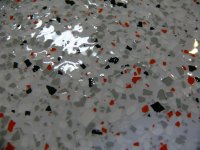 Macro (large).jpg130.3 KB · Views: 297
 -
 Macro (mid range, large).jpg148.9 KB · Views: 292
 -
 Complete - from side door 2.jpg128.1 KB · Views: 286
 -
 Complete - from side door 1.jpg142.9 KB · Views: 283
 -
 BondTite Floor (large).jpg135.7 KB · Views: 244
 -
 Stains (large).jpg132.3 KB · Views: 212
Last edited: