Wood coffee table top varnish is worn off help

To avoid these ads, REGISTER NOW!

PCustoms

Well-known member
Joined
Jul 23, 2011
Messages
23,513
Location
VT
SMH

Pictures?

What kind off wood?

What kind of existing finish?

Provide some information so that people can help...
 
OP
J

Jacko264

Well-known member
Joined
Mar 27, 2016
Messages
947
Location
Kingston upon Hull uk
I believe it’s oak as it came from oak furniture land shop
G
 

Attachments

  • IMG_0630.jpeg
    IMG_0630.jpeg
    662.2 KB · Views: 70
  • IMG_0631.jpeg
    IMG_0631.jpeg
    565.9 KB · Views: 69
  • IMG_0629.jpeg
    IMG_0629.jpeg
    667.6 KB · Views: 65

MoonRise

Well-known member
Joined
Nov 5, 2010
Messages
4,031
Location
NJ
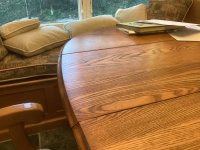
That doesn't look like 'renew the finish', that looks like the finish is GONE in that section.

Which means pretty much strip and sand down to clean bare wood, and then refinish at least the top.

IMNSHO

🍺

Doesn't look like red oak either. White oak maybe, ash maybe, some other wood possible but it does NOT look like red oak (wrong grain pattern from what I can see from two pictures and one of focus picture).
 

Jgaz

Well-known member
Joined
Dec 16, 2016
Messages
1,711
Location
AZ
To the OP.
If you are going remove the original finish down to bare wood, do yourself a favor and get yourself a couple of card scrapers and learn to sharpen them.
IMG_1983_Original.jpeg
This is a picture of an in process color change on an oak sofa table top I made back in the early 2000’s.
Scraping was loads faster to remove the bulk of the ugly *** orange stain before refinishing the top
 
OP
J

Jacko264

Well-known member
Joined
Mar 27, 2016
Messages
947
Location
Kingston upon Hull uk
Thank you for the info so far .
what would you put on the table top to re- varnish to put it another way
what do I do after removing the old finish ?
stain / varnish / wax ? I have never done anything like a table
Graham
 
To avoid these ads, REGISTER NOW!

ALinCarolina

Well-known member
Joined
Dec 29, 2014
Messages
760
Location
NC Piedmont
It does look like a bare spot so it would need to have all the finish removed. Your biggest decision is what stain if any you need to match the legs. Or just strip them too and start from scratch. You may be able to sand the bottom and test a few stains. The choice of top coat is easier, there are many good options. I have been particularly impressed with this Minwax finish. It lays down nicely.
 

gahrajmahal

Well-known member
Joined
Dec 12, 2008
Messages
2,545
Location
Cincinnati, Ohio
I refinished our 100 yr old kitchen table twice before. I always used Minwax or other polyurethane to cover it. We put hot coffee cups, milk in cereal bowls and hot plates with our meals and like this photo it’s usually covered with books, flower vases and used for craft work too. It didn’t take long for the finish to look poor. This last time I belt sanded it, then oscillated sanded it down to 220 grit. Use a wood stain pre conditioner PRIOR to staining. No matter how good you think you sanded it you might get blotches.

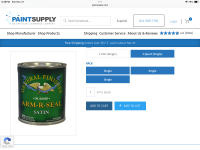
Stain it whatever color you want, then top coat it with General Finishes oil based Arm-R-Shield clear finish. I don’t know what that finish has but it is bulletproof! We have used this table for many years now and it still looks like new. You can continue to put your bare, or sock feet on the table and it will still look great!

IMG_1662.jpeg

IMG_1661.png

IMG_1659.jpeg

IMG_1660.jpeg
 

gahrajmahal

Well-known member
Joined
Dec 12, 2008
Messages
2,545
Location
Cincinnati, Ohio
I think I did it over two years ago. General Finishes is the product to use, and don’t forget the pre-stain conditioner. I use that now on all my furniture refinishing projects, even on new wood.
 

engineer2

Well-known member
Joined
Dec 13, 2009
Messages
11,827
Location
Chicago burbs
Step 1: Orbital sander to remove the old finish. Use sandpaper coarse to fine. 120 grit, 240 grit, 320 grit, 400 grit.
Step 2: Use a plastering tool to coat the tabletop with jointing compound. Sand it off with 400 grit. Do it twice if the tabletop is rough. The compound will fill defects and grain to make a smoother finish. Not to worry, the stain and varnish will penetrate it and make it invisible. Don't listen to GJ members who claim "You can't do this because it's never been done before!"
Step 3: Stain per manufacturers recommendations.
Step 4: Varnish per manufacturers recommendations. Usually 2 or 3 coats brushed VERY thinly. You may lightly sand with 400 grit between coats.

IMG_6468.jpg

IMG_6476.jpg
 
To avoid these ads, REGISTER NOW!
Top Bottom