To avoid these ads, REGISTER NOW!

Wood top for tool box?

AEAdam

Well-known member
Joined
May 27, 2023
Messages
2,819
Location
SE PA
On my way to get some scrap butcher block to use as tops for my miscellaneous collection of Kennedy chests and I have a couple questions. Some will be light duty work surfaces, some will support surfaces plates, and others still may just get upper chests on them. I think I have 4 or 5 of these units.

Question 1: How much if any overhang should I make in the front. Don’t want inches, but I think flush with the front may not look right. Do you have wood tops? How are yours?

Question 2: What should I finish these with? These aren’t kitchen countertops so I think I want something more than just mineral oil. Should I do shellac, or polyurethane, or maybe buy some spray lacquer?

Question 3: Any pro tips for anything under the wood? Should I put something like toolbox drawer liner there or something?

I’ll post pictures later.
 
To avoid these ads, REGISTER NOW!

KnurledNut

Well-known member
Joined
Jan 28, 2011
Messages
8,217
Location
n/a
Question 1: How much if any overhang should I make in the front. Don’t want inches, but I think flush with the front may not look right. Do you have wood tops? How are yours?
I wouldnt over hang them. They will limit access to the top drawer just enough to be annoying.
 

MovingAlong

Well-known member
Joined
Aug 17, 2013
Messages
1,268
On my way to get some scrap butcher block to use as tops for my miscellaneous collection of Kennedy chests and I have a couple questions. Some will be light duty work surfaces, some will support surfaces plates, and others still may just get upper chests on them. I think I have 4 or 5 of these units.

Question 1: How much if any overhang should I make in the front. Don’t want inches, but I think flush with the front may not look right. Do you have wood tops? How are yours?

I'd be looking to overhang them same as any countertop, with a relief cut creating a drip edge in front of the drawers.

Question 2: What should I finish these with? These aren’t kitchen countertops so I think I want something more than just mineral oil. Should I do shellac, or polyurethane, or maybe buy some spray lacquer?

Osmo, expensive but it delivers full value...

Question 3: Any pro tips for anything under the wood? Should I put something like toolbox drawer liner there or something?

I’ll post pictures later.

I wouldn't. Another layer is another place for grit, moisture, etc... but if the top is slipping around on the toolbox, might use the grip mats they put under rugs.
 

lardy1

Well-known member
Joined
Mar 17, 2019
Messages
3,419
Location
Michigan
Oils are way easier to repair than clear coats like polyurethane or lacquer. Oil will also provide at least some protection to the underside of the wood which may be exposed to condensation from the sheet metal, depending on conditions.

Several applications of boiled linseed oil would be the cat's ***.
 

bonneyman

Well-known member
Joined
Apr 22, 2010
Messages
8,857
Location
Desert SW
I've thought about a similar project! Take a butcher block and make it fit a roll-away so I could have it in the garage when working on the cars. That way I'm not making endless trips to the shop for another needed tool. And I have a workplace at the perfect height right next to the car.

I thought about cutting a groove in the top at a slant form front to back with a bottle hanging on the back with a hole in the top. that way, a small amount of spilled liquid (like motor oil) would be channeled around and collected rather than run all over the floor.
 
OP
A

AEAdam

Well-known member
Joined
May 27, 2023
Messages
2,819
Location
SE PA
Oils are way easier to repair than clear coats like polyurethane or lacquer. Oil will also provide at least some protection to the underside of the wood which may be exposed to condensation from the sheet metal, depending on conditions.

Several applications of boiled linseed oil would be the cat's ***.
I could do that with a couple thin coats of shellac over it. You can shellac over oil.
 

desertdog256

Well-known member
Joined
Nov 22, 2015
Messages
103
I am not knocking the oil finish, but I have been very happy with a plywood work surface that I coated with spar urethane. It dried glossy and it’s tough as nails.
 
OP
A

AEAdam

Well-known member
Joined
May 27, 2023
Messages
2,819
Location
SE PA
I've thought about a similar project! Take a butcher block and make it fit a roll-away so I could have it in the garage when working on the cars. That way I'm not making endless trips to the shop for another needed tool. And I have a workplace at the perfect height right next to the car.

I thought about cutting a groove in the top at a slant form front to back with a bottle hanging on the back with a hole in the top. that way, a small amount of spilled liquid (like motor oil) would be channeled around and collected rather than run all over the floor.
That gives me an idea. I could rout a groove on the underside in back so I have overhang in the back. That way I could push these against a wall and not have much gap.
 
OP
A

AEAdam

Well-known member
Joined
May 27, 2023
Messages
2,819
Location
SE PA
I am not knocking the oil finish, but I have been very happy with a plywood work surface that I coated with spar urethane. It dried glossy and it’s tough as nails.
What’s nice about that is chemical and stain resistance. I know these aren’t furniture. But I could see hosing something down with WD-40 and wanting to just wipe the surface off.

BTW, these are for my machine/wood shop, not my garage. I have a stainless top on my garage box.
 
OP
A

AEAdam

Well-known member
Joined
May 27, 2023
Messages
2,819
Location
SE PA
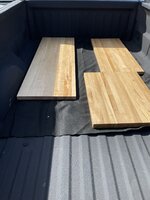
Think I got what I need. Some or all pieces are already finished.
IMG_7948.jpeg
I paid $13/sqft, which wasn’t as cheap as I would have liked, but cheaper than retail. Paid $250 for these pieces-about 11 linear feet. Still thinking about how best to install them
 
To avoid these ads, REGISTER NOW!
OP
A

AEAdam

Well-known member
Joined
May 27, 2023
Messages
2,819
Location
SE PA
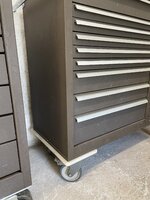
Tried something I thought some of you should think about. The weak point on so many tools boxes is the way the casters attach.

IMG_7949.jpeg
This is an older Kennedy 275. I'm not sure they still add these stiffening beads. This is one reason why some of the older USA made stuff is nicer than new.

Engineering Alert:
So the weight of the drawers, and anything you place on the top, gets reacted by the side skins. That load travels down to the bottom of the box, then bends the sheet metal bottom, until it gets to the casters, because the contact patch of the wheels is offset from the the sides.

The result is a moment pushing the inner edge of the caster in (up) against the thin sheet metal, and a prying action, trying to pull the outboard bolts through the sheet metal bottom. The best thing to do is add a "boiler plate" of some metal. Thicker the better. And many old salts do exactly that. I have also added aluminum angle irons inside to spread the prying load across the bottom of the tool box, and get it closer to the sides. Imagine an extruded angle, running front to back, picking up the outboard caster fasteners. Best, is really a nice big boiler plate (often 3/8" aluminum). I think 3/4" plywood would also be worthwhile. I could do the math to determine how thick the plywood would have to be to be the equivalent stiffness as 3/8" thick aluminum.

Edit: Good quality 3/4" plywood is about the same stiffness as 3/8" aluminum plate. Remember, for this the height is cubed.
 
Last edited:
OP
A

AEAdam

Well-known member
Joined
May 27, 2023
Messages
2,819
Location
SE PA
The problem I had this this particular box is that I wanted to use it to hold a 18X24 granite surface plate. I haven't treated the bottom of the box yet, but I tried something at the top.

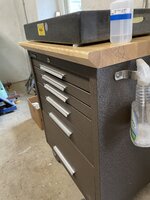
Instead of cutting the butcher block to fit within the upstanding seams at the top, I routed grooves in the underside of the butcher block to rest directly on the seams, the stiffest part of the tool box. It actually doesn't touch the top sheetmetal of the box.

IMG_7952.jpeg

Another thing I tried (not sure about) is I chamfered the underside of the front so I could create a little over hang, without interfering with the lock.

IMG_7955.jpeg
I wanted as much space as I could get around my surface plate. Just a place for a ruler, calipers, reading glasses, anything. That's a squeeze bottle of acetone I was using to get spotting dye off my plate.

IMG_7956.jpeg

I slid the plate on to the butcher block using some UHMW scraps I had laying around. I will eventually (soon) fab up some sort of airy points. Since these are so far in under the plate (1/4-1/5 of the length and width), I could conceivably have it overhanging the tool box, side or back to free up more space. Also thinking about adding a little side fence on one side so stuff doesn't slip off the edge.

This scrap of butcher block cost me about $50. It's 1-3/4" PA white ash. There's a blight happening to our Ash and I was wondering if the price of Ash lumber was going down because we are cutting so much of it. It may do the opposite.
 
Last edited:

RTM

Well-known member
Joined
May 13, 2019
Messages
13,269
Location
SF Bay Area
Looking good. I do like the Chamfer on the front. I was worried about putting the block inside the rails, **** builds up in the gap. The groove underneath should work great. The overhangs will also give you places to clamp stuff, like lights, when needed.
 
OP
A

AEAdam

Well-known member
Joined
May 27, 2023
Messages
2,819
Location
SE PA
Looking good. I do like the Chamfer on the front. I was worried about putting the block inside the rails, **** builds up in the gap. The groove underneath should work great. The overhangs will also give you places to clamp stuff, like lights, when needed.
Good point. Didn't think about lights. Magnifying lens might be nice.
 

WisJim

Well-known member
Joined
Dec 20, 2010
Messages
2,310
Location
Menomonie, WI
I'm thinking of putting some butcher block that I have on hand, on top of a tool chest also, and I like the idea of routing a groove so it overlaps the top of the tool chest.
 
OP
A

AEAdam

Well-known member
Joined
May 27, 2023
Messages
2,819
Location
SE PA
No bevel on this one. I only had 18” of width. Still did the grooves on the sides, but butting against the back. This isn’t a work bench and will never hold a surface plate, so maybe that’s okay.
IMG_7957.jpeg
This is a 315XB.

I tried putting old cutting boards under the casters as I discussed earlier. This box also has the angles inside. I made the cutting boards proud to serve as bumpers. I also replaced the original 5X2 casters with these soft tire Albion hospital casters. HATE THEM. Tho they lock, all swivel isn’t great. These wobble around. Based on my earlier post, I think I’ll put the originals back on under a good piece of 3/4” plywood.

IMG_7959.jpeg

On the left you can kinda see my Kennedy 297, maybe my favorite Kennedy roller. Built stout, 20” deep, 29” long. Even tho I’d had friction slides, it’s very nice. I wouldn’t pass another one up.

This one has the 3/8” aluminum plate, you can see above the caster. If money were no object, I’d do that again. I’ll be sure to check my local scrap yard before I pull the trigger on plywood. Good plywood is also not cheap. I don’t think the stuff at the homecenters is good enough. I’d want birch plywood or the equivalent. The numbers I used earlier for the ply was a modulus of 1.5X10^6 psi. 3/4” of that is equivalent to 3/8” of aluminum at 10x10^6 psi.
 

tool_scrounge

Well-known member
Joined
Jul 20, 2010
Messages
4,212
Location
Southern California
I upgraded my Kennedy tool boxes to 5“ Colson hard casters and it was a huge improvement over the stock 4” casters. The other huge improvement was to lubricate the drawer slide components with paraffin wax rubbed on. Just completely clean off the old grease before applying the wax. Much smoother and reduced of pull force.
 
OP
A

AEAdam

Well-known member
Joined
May 27, 2023
Messages
2,819
Location
SE PA
I upgraded my Kennedy tool boxes to 5“ Colson hard casters and it was a huge improvement over the stock 4” casters. The other huge improvement was to lubricate the drawer slide components with paraffin wax rubbed on. Just completely clean off the old grease before applying the wax. Much smoother and reduced of pull force.
Tell me more. Did you just rub a candle on the slides? In the drawer grooves or did you remove the slides entirely? I squirted some WD-40 in there when I had it on its back and put a few drops of way oil (vactra) on the weird top drawer locking mechanism. Weird as it is, works fine.

Just in case anyone gets any bright ideas, no way I’d have these boxes in my garage for auto repair. In a machine shop they are absolutely good enough. I do t hustle in my machine shop like I do in my garage.
 
Last edited:

tool_scrounge

Well-known member
Joined
Jul 20, 2010
Messages
4,212
Location
Southern California
Tell me more. Did you just rub a candle on the slides? In the drawer grooves or did you remove the slides entirely? I squirted some WD-40 in there when I had it on its back and put a few drops of way oil (vactra) on the weird top drawer locking mechanism. Weird as it is, works fine.

Just in case anyone gets any bright ideas, no way I’d have these boxes in my garage for auto repair. In a machine shop they are absolutely good enough. I do t hustle in my machine shop like I do in my garage.
I remove all drawers and slides. I clean off all the residual oils and grease from the slides and rails with a solvent. I then take a brick of paraffin canning wax and rub all rails and slides mating surfaces. I find candle wax does not work as well. I then assemble the top drawer and slides, slide it in and out vigorously to knock off any excess wax that then drops to the bottom of the tool box. Repeat until you get to the last drawer. Then clean up the wax and the bottom of the tool box and then put in the last drawer.
 

seber

Well-known member
Joined
May 31, 2016
Messages
4,208
Location
Deep East Tx.
For chest over the top, match the chest dimension. All others make it an exact fit. It won't move around on you. The only finish I would consider for a working surface is danish oil. It won't flake off over time and scratches are not important.
 

bpwoodworking

Well-known member
Joined
Jul 6, 2023
Messages
254
Nice work, Adam! Really cool.

Good to know these details on the casters and plates. Some of them I’ve removed the casters and set them on blocks (they’re behind a built in). I got tired of the wobbly aspect of them.
 
To avoid these ads, REGISTER NOW!
Top Bottom