
Teenager with old tools
Well-known member
There's a forum about wood working where a few others and I have asked wood turning questions so I figured I'd start this thread. Please contribute projects you all make and how to do it and ask any questions. As I learn I'll add lessons on what I learn and if y'all post up tutorials too that would be great.
Safety first. No rings or watches keep long hair back. Wear a face shield. No long sleeves. No gloves. No necklace or ties. I am not liable for any injury.
So I'll start it with making a chisel handle. My ten year old brother is the one turning this. So to start you need a lathe and some turning tools and a piece of wood. I have the harbor freight 8x12 I would only recommend if that's absolutely all you can afford. I warrantied it once and it works great can even spin my 7 inch bowl blank full speed but my bench isn't stable enough. For turning tools I personally have the cheap harbor freight set it works fine though I did pick up a 3/4 craftsman carbide tipped skew.
For this tutorial his chisels are being used. vintage craftsman carbide tipped set I found for his birthday. There's a 3/4 skew a 1/2 round scraper a parting tool and a 1/2 gouge. He also has this 1 inch gouge used to turn the square blank round.
  for the wood I find that the 1.5 by 1.5 poplar from Home Depot turns decently. First we cut the blank about an inch and a half longer than we needed. Then we drilled the hole in the top for the tang. Measure 3/4 the way up the tang and make the hole that size.
  draw two lines from corner to corner and drill it. Much easier to have a centered hole if you drill it before. Draw two lines for center on bottom too. We cut it long because when the wood is tightened in the lathe the live center which is tapered slightly enlarges the hole so we cut that off.
  put is between centers with the points centered lock down the tailstock and turn the handle so the wood is tight. Next position the tool test 1/4 inch from farthest point of the wood. Rotate wood by hand to make sure it won't hit tool rest. Then turn it on position the gouge on the tool rest and touch it to the wood bevel first until the tip starts to cut. Every gouge is different so how you tilt it angle it and turn it is different. We have found this position to be most effective for this gouge.
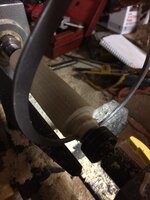
  with it spinning, I tend to turn speed up until it shakes or vibrates and then go down a little until it stops. Move the chisel down the rest touching the wood. My brother is left handed. When you go down the rest you can adjust the chisel and go back cutting or move it to start and go again. Adjust chisel positioning until you find the best cutting. Pressure applied to the wood just go by feel I know that's a bad way to teach but that's the truth. Make sure the tool is sharp. You should be able to tell as it cuts less and less. If not check every once in a while. As the wood starts to round out it will look like this.
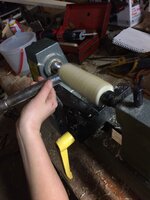
  and then more like this.
  we like to use a round nose scraper to make it as even and not tapered as possible. Touch the bevel to the wood and slowly move toward edge of tool and when it barely starts to cut hold it at that angle and go back and forth.
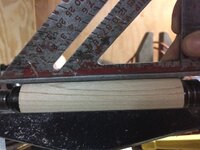
  we got it pretty square. No real reason to do this except it helps train steady hands and gives you an idea of the size you start with. Next we use spread dividers I think they're called for the size of the handle where the ferrule goes. We are replacing a handle so we are reusing the old ferrule. Or you can use copper pipe is my personal favorite.
  I adjust to slightly over size to allow for sanding. Then use the parting tool to cut a Tennon (I think is the word please correct me) to the size. Touch bevel to wood and move edge towards it to cut and cut deeper by moving it down towards centerline of the wood slowly and check sizing every once in a while.

 with it sized right you can now go on to shape the handle. My next tutorial will be in depth on doing the skew work we did on the handle but I don't have the pictures for that yet. Use the scraper or gouge to turn down to desired diameter and shape.
  the skew was used for the sphere like parts.
When it's turned to the shape you can sand it now. I like to use wet dry paper wet. Start at 120 grit and work up until you like the finish. hold the sand paper lightly with two fingers under the piece of wood with the tool rest out of the way. (Edited out pic of doing it improperly) And here it is finished position the tang to handle after sawing off excess length. Push tang in it should go 3/4 the way. Then tap the **** of the chisel to completely set the tang in. Make sure ferrule is on before putting tang in.
Sent from my iPhone using Tapatalk
Safety first. No rings or watches keep long hair back. Wear a face shield. No long sleeves. No gloves. No necklace or ties. I am not liable for any injury.
So I'll start it with making a chisel handle. My ten year old brother is the one turning this. So to start you need a lathe and some turning tools and a piece of wood. I have the harbor freight 8x12 I would only recommend if that's absolutely all you can afford. I warrantied it once and it works great can even spin my 7 inch bowl blank full speed but my bench isn't stable enough. For turning tools I personally have the cheap harbor freight set it works fine though I did pick up a 3/4 craftsman carbide tipped skew.
For this tutorial his chisels are being used.
vintage craftsman carbide tipped set I found for his birthday. There's a 3/4 skew a 1/2 round scraper a parting tool and a 1/2 gouge. He also has this 1 inch gouge used to turn the square blank round. for the wood I find that the 1.5 by 1.5 poplar from Home Depot turns decently. First we cut the blank about an inch and a half longer than we needed. Then we drilled the hole in the top for the tang. Measure 3/4 the way up the tang and make the hole that size. draw two lines from corner to corner and drill it. Much easier to have a centered hole if you drill it before. Draw two lines for center on bottom too. We cut it long because when the wood is tightened in the lathe the live center which is tapered slightly enlarges the hole so we cut that off. put is between centers with the points centered lock down the tailstock and turn the handle so the wood is tight. Next position the tool test 1/4 inch from farthest point of the wood. Rotate wood by hand to make sure it won't hit tool rest. Then turn it on position the gouge on the tool rest and touch it to the wood bevel first until the tip starts to cut. Every gouge is different so how you tilt it angle it and turn it is different. We have found this position to be most effective for this gouge. with it spinning, I tend to turn speed up until it shakes or vibrates and then go down a little until it stops. Move the chisel down the rest touching the wood. My brother is left handed. When you go down the rest you can adjust the chisel and go back cutting or move it to start and go again. Adjust chisel positioning until you find the best cutting. Pressure applied to the wood just go by feel I know that's a bad way to teach but that's the truth. Make sure the tool is sharp. You should be able to tell as it cuts less and less. If not check every once in a while. As the wood starts to round out it will look like this. and then more like this. we like to use a round nose scraper to make it as even and not tapered as possible. Touch the bevel to the wood and slowly move toward edge of tool and when it barely starts to cut hold it at that angle and go back and forth. we got it pretty square. No real reason to do this except it helps train steady hands and gives you an idea of the size you start with. Next we use spread dividers I think they're called for the size of the handle where the ferrule goes. We are replacing a handle so we are reusing the old ferrule. Or you can use copper pipe is my personal favorite. I adjust to slightly over size to allow for sanding. Then use the parting tool to cut a Tennon (I think is the word please correct me) to the size. Touch bevel to wood and move edge towards it to cut and cut deeper by moving it down towards centerline of the wood slowly and check sizing every once in a while. with it sized right you can now go on to shape the handle. My next tutorial will be in depth on doing the skew work we did on the handle but I don't have the pictures for that yet. Use the scraper or gouge to turn down to desired diameter and shape. the skew was used for the sphere like parts. When it's turned to the shape you can sand it now. I like to use wet dry paper wet. Start at 120 grit and work up until you like the finish. hold the sand paper lightly with two fingers under the piece of wood with the tool rest out of the way. (Edited out pic of doing it improperly) And here it is finished
position the tang to handle after sawing off excess length. Push tang in it should go 3/4 the way. Then tap the **** of the chisel to completely set the tang in. Make sure ferrule is on before putting tang in.Sent from my iPhone using Tapatalk
Attachments
-
 a408856c95a044a147be941799766821.jpg578.2 KB · Views: 0
 -
 183b6f2821916670d5ba3d7b63dbba30.jpg463.5 KB · Views: 0
 -
 5c53081c4f2cd8de499ee87dccf55b71.jpg512.6 KB · Views: 0
 -
 5f1b0587c9b290eb7a934fae0695662c.jpg433.6 KB · Views: 0
 -
 70359801a3ffd890a12d1722765cd51d.jpg413.7 KB · Views: 0
 -
 80ff270c9ddf4f8d5c59fc35c31e99d8.jpg413.2 KB · Views: 0
 -
 91224c0c8b7e24108962701b9627ff6f.jpg634.7 KB · Views: 0
 -
 9449eb071723597e96f457e43e6e242a.jpg463 KB · Views: 0
 -
 3bb2d95f70ffe74fce7dd7a10a1f9ba7.jpg403 KB · Views: 0
 -
 ef77ea6dc14be8011d4d2bfcba31c7c7.jpg432.2 KB · Views: 0
 -
 f522a9155fa1fc35a4740cea975c28ab.jpg537.5 KB · Views: 0
 -
 b23e1b6d216e562c1b15c43d8ea35e90.jpg460.4 KB · Views: 0
 -
 c3e4fb70cd3bbe6479d7cf733f10a176.jpg475.6 KB · Views: 0
 -
 5119e83d369e825f2ddeb2a4d4bb72f3.jpg522.1 KB · Views: 0
Last edited:


 Keep em coming!! Great Job.